


一、说明
本文内容提取自Welcome to Flask — Flask Documentation (2.2.x) (palletsprojects.com),在Tutorial章节的基础上进行展开详细撰写
环境准备
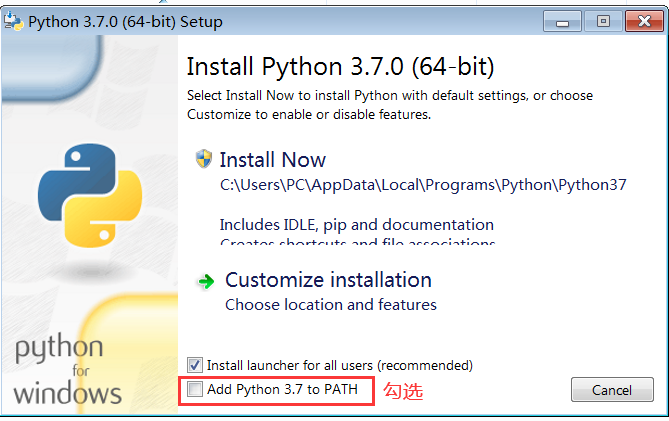
先安装python 3.7 + PyCharm,安装完python 3.7记得在Path中添加Python的环境变量,或者在安装第一步时就勾选
二、新建工程模板并运行
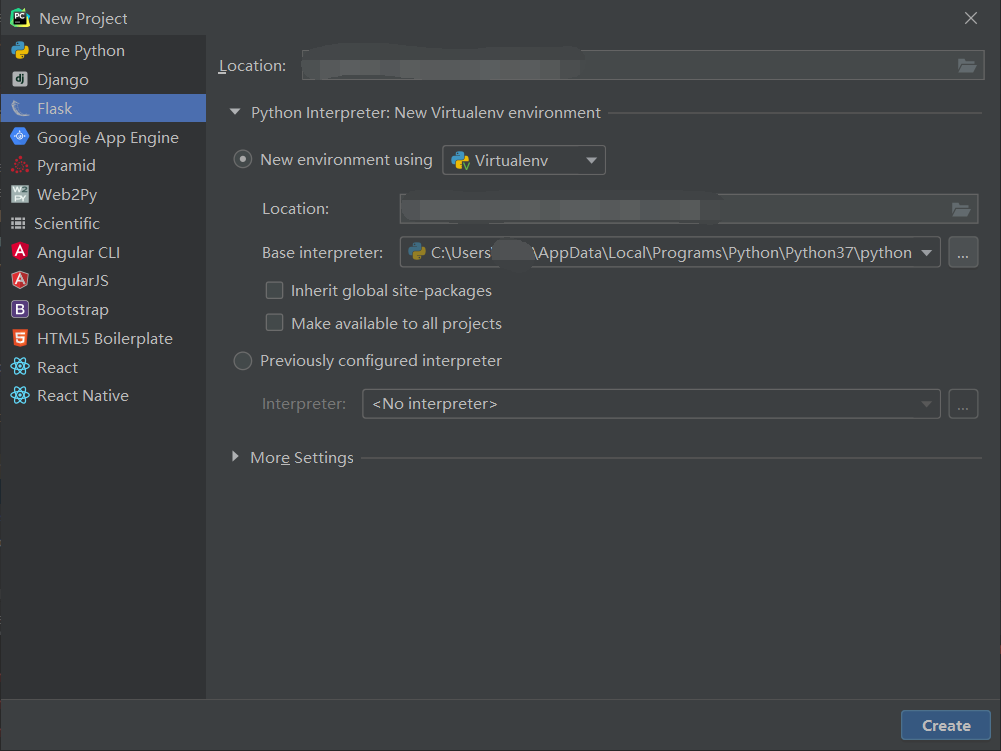
打开PyCharm,点击File->New Project...->flask,在Location一栏的末尾填写工程名,其他保持默认即可,最后点击Create
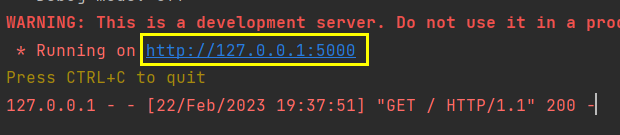
等待片刻,点击绿色三角即可运行服务
在下方点击此处,会使用默认浏览器打开并显示hello world,但127.0.0.1只局限于本机浏览器访问
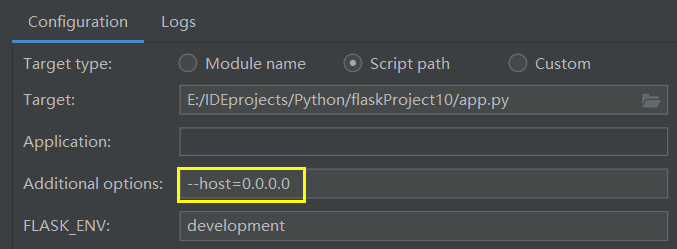
如果想要同一局域网下的所有设备都可以访问,需要在右上方展开此处
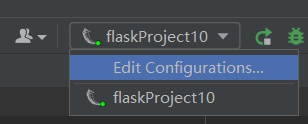
选择Edit Configurations...,在标记处填写--host=0.0.0.0,填写完成后确定,然后点击红色方块停止服务,再点绿色三角重启,此时可能会弹出Windows防火墙提示,直接允许即可
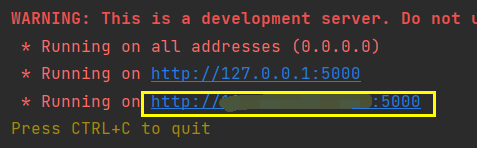
这样局域网内所有设备都可以通过下面第二个IP地址访问
完成以上步骤就完成了模板工程的搭建,可以到工程目录下复制一份出来备份,后续误操作可以直接重新恢复到模板而无需重新配置。
三、正式开始博客系统开发
工程布局
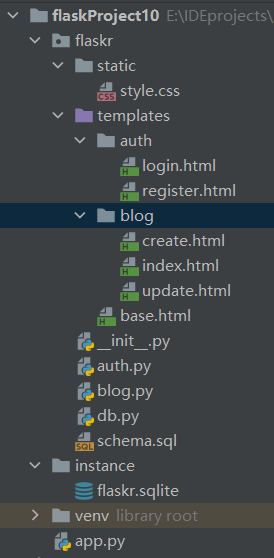
flask-tutorial
├── flaskr/
│ ├── __init__.py
│ ├── db.py
│ ├── schema.sql
│ ├── auth.py
│ ├── blog.py
│ ├── templates/
│ │ ├── base.html
│ │ ├── auth/
│ │ │ ├── login.html
│ │ │ └── register.html
│ │ └── blog/
│ │ ├── create.html
│ │ ├── index.html
│ │ └── update.html
│ └── static/
│ └── style.css
├── venv/
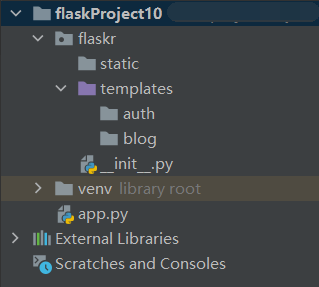
├── app.py按照如上目录树新建目录结构,右击PyCharm左侧项目名称新建
其中flaskr新建为Python Package
其余均新建为Directory,将原有的static目录和Template目录删除,新建到flaskr下

全部完成后目录结构应该是下面这样,其中__init__.py文件是上一步新建完Python Package自动生成的
2. 应用工厂
应用程序工厂告诉 Python 应将目录即flaskr视为包
打开__init__.py,输入以下内容
import os

from flask import Flask


def create_app(test_config=None):
    # create and configure the app
    app = Flask(__name__, instance_relative_config=True)
    app.config.from_mapping(
        SECRET_KEY='dev',
        DATABASE=os.path.join(app.instance_path, 'flaskr.sqlite'),
    )

    if test_config is None:
        # load the instance config, if it exists, when not testing
        app.config.from_pyfile('config.py', silent=True)
    else:
        # load the test config if passed in
        app.config.from_mapping(test_config)

    # ensure the instance folder exists
    try:
        os.makedirs(app.instance_path)
    except OSError:
        pass

    # a simple page that says hello
    @app.route('/hello/')
    def hello():
        return 'Hello, World!'

    return app
注:原文作者中28行是/hello而不是/hello/,经过测试/hello会在后面步骤中报404错误,后面不加/会被视为hello文件,找不到就会报错,所以应该改为/hello/
在app.py中输入如下内容
from flaskr import create_app

app = create_app()

if __name__ == '__main__':
    app.run()
如果上述步骤均正确,重启服务,使用127.0.0.1:5000/hello/,浏览器应该还是会弹出hello world,记住文件有改动时都要重新运行,否则不会有变化
3. 定义和连接数据库
在flaskr目录下新建db.py文件,注意不要建错路径,db.py和static、templates文件夹处于同一级,该文件包括连接数据库、关闭数据库连接,此处数据库使用的是SQLite 3,直接导入包即可,具体功能描述见一、说明中的原文链接
flaskr/db.py
import sqlite3

import click
from flask import current_app
from flask import g


def get_db():
    """Connect to the application's configured database. The connection
    is unique for each request and will be reused if this is called
    again.
    """
    if "db" not in g:
        g.db = sqlite3.connect(
            current_app.config["DATABASE"], detect_types=sqlite3.PARSE_DECLTYPES
        )
        g.db.row_factory = sqlite3.Row

    return g.db


def close_db(e=None):
    """If this request connected to the database, close the
    connection.
    """
    db = g.pop("db", None)

    if db is not None:
        db.close()


def init_db():
    """Clear existing data and create new tables."""
    db = get_db()

    with current_app.open_resource("schema.sql") as f:
        db.executescript(f.read().decode("utf8"))


@click.command("init-db")
def init_db_command():
    """Clear existing data and create new tables."""
    init_db()
    click.echo("Initialized the database.")


def init_app(app):
    """Register database functions with the Flask app. This is called by
    the application factory.
    """
    app.teardown_appcontext(close_db)
    app.cli.add_command(init_db_command)
在flaskr目录下新建schema.sql文件用于SQLite数据库创建,PyCharm在此处貌似没有直接新建SQL文件的选项,我们就直接选择新建file,输入带后缀名的schema.sql就可以
flaskr/schema.sql
DROP TABLE IF EXISTS user;
DROP TABLE IF EXISTS post;

CREATE TABLE user
(
    id       INTEGER PRIMARY KEY AUTOINCREMENT,
    username TEXT UNIQUE NOT NULL,
    password TEXT        NOT NULL
);

CREATE TABLE post
(
    id        INTEGER PRIMARY KEY AUTOINCREMENT,
    author_id INTEGER   NOT NULL,
    created   TIMESTAMP NOT NULL DEFAULT CURRENT_TIMESTAMP,
    title     TEXT      NOT NULL,
    body      TEXT      NOT NULL,
    FOREIGN KEY (author_id) REFERENCES user (id)
);
此时顶部会弹出提示,先点击Use SQLite,再点击Configure data source,在下拉框中选择SQLite,然后点击OK

最后更改__init__.py,添加如下内容(5、6行)
def create_app():
    app = ...
    # existing code omitted

    from . import db
    db.init_app(app)

    return app
添加后的__init__.py如下
flaskr/__init__.py
import os

from flask import Flask


def create_app(test_config=None):
    # create and configure the app
    app = Flask(__name__, instance_relative_config=True)
    app.config.from_mapping(
        SECRET_KEY='dev',
        DATABASE=os.path.join(app.instance_path, 'flaskr.sqlite'),
    )

    if test_config is None:
        # load the instance config, if it exists, when not testing
        app.config.from_pyfile('config.py', silent=True)
    else:
        # load the test config if passed in
        app.config.from_mapping(test_config)

    # ensure the instance folder exists
    try:
        os.makedirs(app.instance_path)
    except OSError:
        pass

    # a simple page that says hello
    @app.route('/hello/')
    def hello():
        return 'Hello, World!'

    from . import db
    db.init_app(app)

    return app
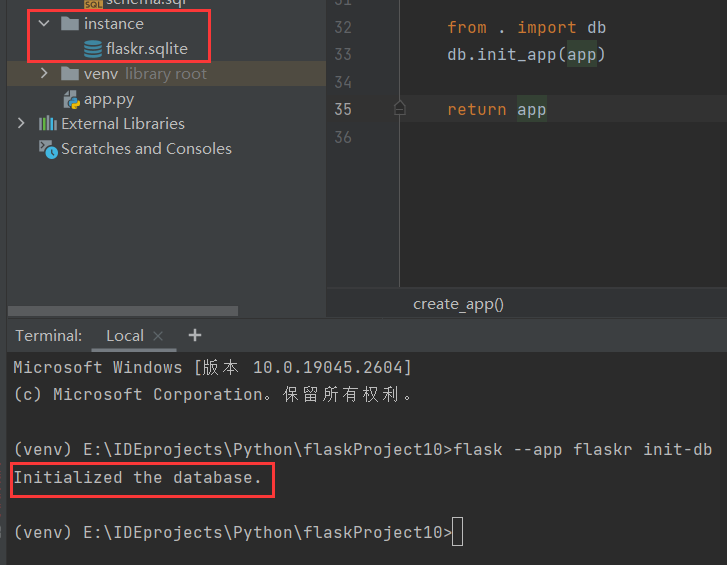
现在停止并重新启动项目,下方切换到Terminal
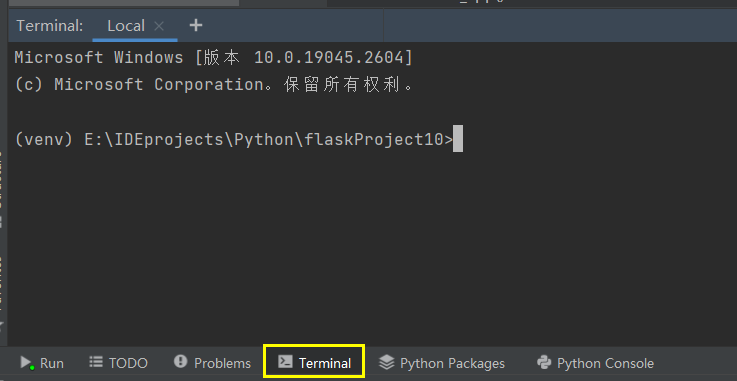
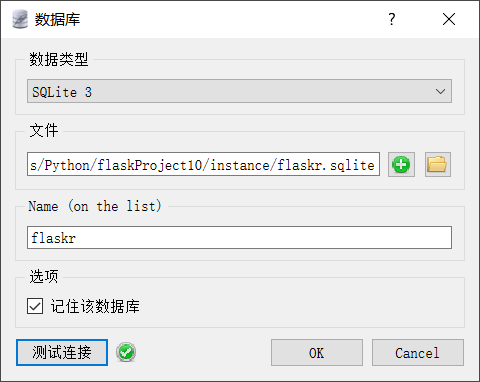
输入命令flask --app flaskr init-db并回车,正确情况下会提示Initialized the database.表明数据库创建成功,且在上方的instance目录下可以看到一个新文件,该文件可以使用SLQLiteStudio查看,编辑,下载地址如下SQLiteStudio,下载完成后直接打开,找到flaskr.sqlite文件所在的目录,拖动文件到SQLiteStudio,可以先点击测试连接,然后点击OK,双击左侧数据库即可查看,后面进行详细说明。
4. 创建用户蓝图
蓝图起到组织视图和其他代码的功能
新建auth.py,该文件同样创建于flaskr目录下,包含了注册、登录、注销等逻辑功能
flaskr/auth.py
import functools

from flask import Blueprint
from flask import flash
from flask import g
from flask import redirect
from flask import render_template
from flask import request
from flask import session
from flask import url_for
from werkzeug.security import check_password_hash
from werkzeug.security import generate_password_hash

from flaskr.db import get_db

bp = Blueprint("auth", __name__, url_prefix="/auth")


def login_required(view):
    """View decorator that redirects anonymous users to the login page."""

    @functools.wraps(view)
    def wrapped_view(**kwargs):
        if g.user is None:
            return redirect(url_for("auth.login"))

        return view(**kwargs)

    return wrapped_view


@bp.before_app_request
def load_logged_in_user():
    """If a user id is stored in the session, load the user object from
    the database into ``g.user``."""
    user_id = session.get("user_id")

    if user_id is None:
        g.user = None
    else:
        g.user = (
            get_db().execute("SELECT * FROM user WHERE id = ?", (user_id,)).fetchone()
        )


@bp.route("/register", methods=("GET", "POST"))
def register():
    """Register a new user.

    Validates that the username is not already taken. Hashes the
    password for security.
    """
    if request.method == "POST":
        username = request.form["username"]
        password = request.form["password"]
        db = get_db()
        error = None

        if not username:
            error = "Username is required."
        elif not password:
            error = "Password is required."

        if error is None:
            try:
                db.execute(
                    "INSERT INTO user (username, password) VALUES (?, ?)",
                    (username, generate_password_hash(password)),  # 把密码用hash256加密,如果不想要可以直接写成password明文存储
                )
                db.commit()
            except db.IntegrityError:
                # The username was already taken, which caused the
                # commit to fail. Show a validation error.
                error = f"用户名 {username} 已被注册。"
            else:
                # Success, go to the login page.
                return redirect(url_for("auth.login"))

        flash(error)

    return render_template("auth/register.html")


@bp.route("/login", methods=("GET", "POST"))
def login():
    """Log in a registered user by adding the user id to the session."""
    if request.method == "POST":
        username = request.form["username"]
        password = request.form["password"]
        db = get_db()
        error = None
        user = db.execute(
            "SELECT * FROM user WHERE username = ?", (username,)
        ).fetchone()

        if user is None:
            error = "用户名错误!"
        elif not check_password_hash(user["password"], password):
            error = "密码错误!"

        if error is None:
            # store the user id in a new session and return to the index
            session.clear()
            session["user_id"] = user["id"]
            return redirect(url_for("index"))

        flash(error)

    return render_template("auth/login.html")


@bp.route("/logout")
def logout():
    """Clear the current session, including the stored user id."""
    session.clear()
    return redirect(url_for("index"))
在flaskr下的__init__.py下添加如下代码
flaskr/__init__.py
def create_app():
    app = ...
    # existing code omitted

    from . import auth
    app.register_blueprint(auth.bp)

    return app
添加完成后的__init__.py
flaskr/__init__.py
import os

from flask import Flask


def create_app(test_config=None):
    """Create and configure an instance of the Flask application."""
    app = Flask(__name__, instance_relative_config=True)
    app.config.from_mapping(
        # a default secret that should be overridden by instance config
        SECRET_KEY="dev",
        # store the database in the instance folder
        DATABASE=os.path.join(app.instance_path, "flaskr.sqlite"),
    )

    if test_config is None:
        # load the instance config, if it exists, when not testing
        app.config.from_pyfile("config.py", silent=True)
    else:
        # load the test config if passed in
        app.config.update(test_config)

    # ensure the instance folder exists
    try:
        os.makedirs(app.instance_path)
    except OSError:
        pass

    @app.route("/hello/")
    def hello():
        return "Hello, World!"

    # register the database commands
    from flaskr import db

    db.init_app(app)

    # apply the blueprints to the app
    from flaskr import auth

    app.register_blueprint(auth.bp)

    return app
5. 用户模板和CSS文件
Jinja的外观和行为大多像Python。使用特殊分隔符将 Jinja 语法与模板中的静态数据区分开来。新建如下文件
主页
flaskr/templates/base.html
<!doctype html>
<title>{% block title %}{% endblock %} - Flaskr</title>
<link rel="stylesheet" href="{{ url_for('static', filename='style.css') }}">
<nav>
    <h1><a href="{{ url_for('index') }}">Flaskr</a></h1>
    <ul>
        {% if g.user %}
            <li><span>{{ g.user['username'] }}</span>
            <li><a href="{{ url_for('auth.logout') }}">注销</a>
                {% else %}
            <li><a href="{{ url_for('auth.register') }}">注册</a>
            <li><a href="{{ url_for('auth.login') }}">登录</a>
        {% endif %}
    </ul>
</nav>
<section class="content">
    <header>
        {% block header %}{% endblock %}
    </header>
    {% for message in get_flashed_messages() %}
        <div class="flash">{{ message }}</div>
    {% endfor %}
    {% block content %}{% endblock %}
</section>
注册页面
flaskr/templates/auth/register.html
{% extends 'base.html' %}

{% block header %}
    <h1>{% block title %}注册{% endblock %}</h1>
{% endblock %}

{% block content %}
    <form method="post">
        <label for="username">用户名</label>
        <input name="username" id="username" required>
        <label for="password">密码</label>
        <input type="password" name="password" id="password" required>
        <input type="submit" value="注册">
    </form>
{% endblock %}
登录页面
flaskr/templates/auth/login.html
{% extends 'base.html' %}

{% block header %}
    <h1>{% block title %}登录{% endblock %}</h1>
{% endblock %}

{% block content %}
    <form method="post">
        <label for="username">用户名</label>
        <input name="username" id="username" required>
        <label for="password">密码</label>
        <input type="password" name="password" id="password" required>
        <input type="submit" value="登录">
    </form>
{% endblock %}
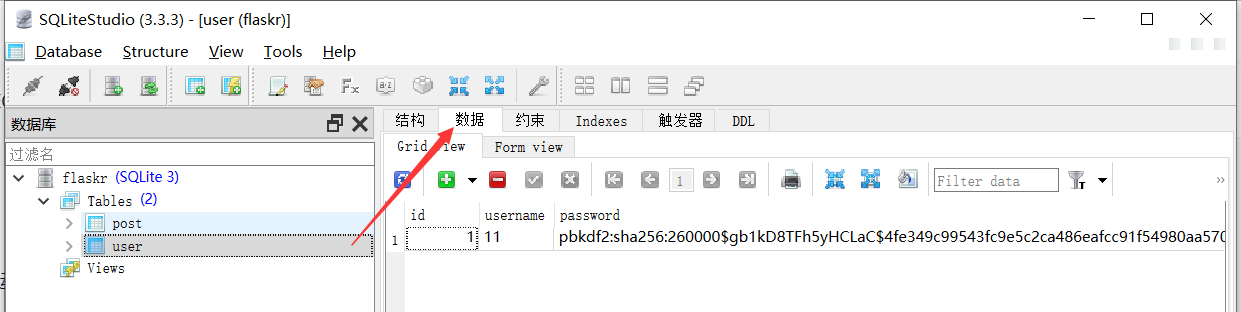
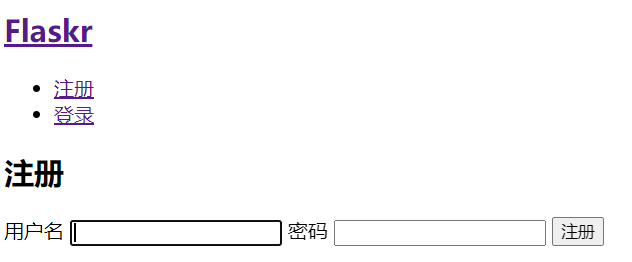
此时访问http://127.0.0.1:5000/auth/register可以看到可以进行用户注册,注册后可以直接登录,已经存储到SQLite中了,在SQLiteStudio中连接数据库(连接方法已经在三、3中说明),连接后双击user表,选择数据标签,即可看到刚刚注册的用户数据,其中密码经过了加密处理,如果不想要加密处理直接存储明文,把flaskr/auth.py中68行的“generate_password_hash(password)“改为“password“即可,但注意,这样处理后之前注册的就登陆不上了,会提示密码错误
效果如下
此时还没有CSS文件,显示较为单一,新建flaskr/static/style.css即可,style.css的代码如下
html {
    font-family: sans-serif;
    background: #eee;
    padding: 1rem;
}

body {
    max-width: 960px;
    margin: 0 auto;
    background: white;
}

h1, h2, h3, h4, h5, h6 {
    font-family: serif;
    color: #377ba8;
    margin: 1rem 0;
}

a {
    color: #377ba8;
}

hr {
    border: none;
    border-top: 1px solid lightgray;
}

nav {
    background: lightgray;
    display: flex;
    align-items: center;
    padding: 0 0.5rem;
}

nav h1 {
    flex: auto;
    margin: 0;
}

nav h1 a {
    text-decoration: none;
    padding: 0.25rem 0.5rem;
}

nav ul {
    display: flex;
    list-style: none;
    margin: 0;
    padding: 0;
}

nav ul li a, nav ul li span, header .action {
    display: block;
    padding: 0.5rem;
}

.content {
    padding: 0 1rem 1rem;
}

.content > header {
    border-bottom: 1px solid lightgray;
    display: flex;
    align-items: flex-end;
}

.content > header h1 {
    flex: auto;
    margin: 1rem 0 0.25rem 0;
}

.flash {
    margin: 1em 0;
    padding: 1em;
    background: #cae6f6;
    border: 1px solid #377ba8;
}

.post > header {
    display: flex;
    align-items: flex-end;
    font-size: 0.85em;
}

.post > header > div:first-of-type {
    flex: auto;
}

.post > header h1 {
    font-size: 1.5em;
    margin-bottom: 0;
}

.post .about {
    color: slategray;
    font-style: italic;
}

.post .body {
    white-space: pre-line;
}

.content:last-child {
    margin-bottom: 0;
}

.content form {
    margin: 1em 0;
    display: flex;
    flex-direction: column;
}

.content label {
    font-weight: bold;
    margin-bottom: 0.5em;
}

.content input, .content textarea {
    margin-bottom: 1em;
}

.content textarea {
    min-height: 12em;
    resize: vertical;
}

input.danger {
    color: #cc2f2e;
}

input[type=submit] {
    align-self: start;
    min-width: 10em;
}
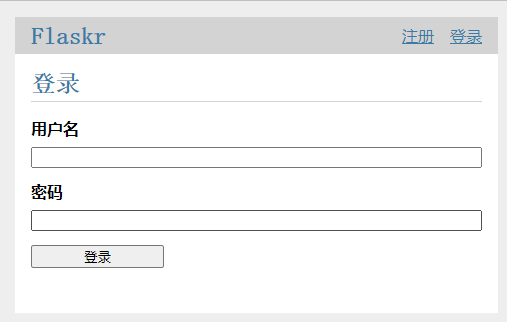
添加完成后重新启动项目,进入http://127.0.0.1:5000/auth/login即可看到效果
6. 创建博客蓝图
创建flaskr/blog.py文件,包括博客首页索引,新建博客,修改博客,删除博客
blog.py文件如下
from flask import Blueprint
from flask import flash
from flask import g
from flask import redirect
from flask import render_template
from flask import request
from flask import url_for
from werkzeug.exceptions import abort

from flaskr.auth import login_required
from flaskr.db import get_db

bp = Blueprint("blog", __name__)


@bp.route("/")
def index():
    """Show all the posts, most recent first."""
    db = get_db()
    posts = db.execute(
        "SELECT p.id, title, body, created, author_id, username"
        " FROM post p JOIN user u ON p.author_id = u.id"
        " ORDER BY created DESC"
    ).fetchall()
    return render_template("blog/index.html", posts=posts)


def get_post(id, check_author=True):
    """Get a post and its author by id.

    Checks that the id exists and optionally that the current user is
    the author.

    :param id: id of post to get
    :param check_author: require the current user to be the author
    :return: the post with author information
    :raise 404: if a post with the given id doesn't exist
    :raise 403: if the current user isn't the author
    """
    post = (
        get_db()
            .execute(
            "SELECT p.id, title, body, created, author_id, username"
            " FROM post p JOIN user u ON p.author_id = u.id"
            " WHERE p.id = ?",
            (id,),
        )
            .fetchone()
    )

    if post is None:
        abort(404, f"Post id {id} doesn't exist.")

    if check_author and post["author_id"] != g.user["id"]:
        abort(403)

    return post


@bp.route("/create", methods=("GET", "POST"))
@login_required
def create():
    """Create a new post for the current user."""
    if request.method == "POST":
        title = request.form["title"]
        body = request.form["body"]
        error = None

        if not title:
            error = "Title is required."

        if error is not None:
            flash(error)
        else:
            db = get_db()
            db.execute(
                "INSERT INTO post (title, body, author_id) VALUES (?, ?, ?)",
                (title, body, g.user["id"]),
            )
            db.commit()
            return redirect(url_for("blog.index"))

    return render_template("blog/create.html")


@bp.route("/<int:id>/update", methods=("GET", "POST"))
@login_required
def update(id):
    """Update a post if the current user is the author."""
    post = get_post(id)

    if request.method == "POST":
        title = request.form["title"]
        body = request.form["body"]
        error = None

        if not title:
            error = "Title is required."

        if error is not None:
            flash(error)
        else:
            db = get_db()
            db.execute(
                "UPDATE post SET title = ?, body = ? WHERE id = ?", (title, body, id)
            )
            db.commit()
            return redirect(url_for("blog.index"))

    return render_template("blog/update.html", post=post)


@bp.route("/<int:id>/delete", methods=("POST",))
@login_required
def delete(id):
    """Delete a post.

    Ensures that the post exists and that the logged in user is the
    author of the post.
    """
    get_post(id)
    db = get_db()
    db.execute("DELETE FROM post WHERE id = ?", (id,))
    db.commit()
    return redirect(url_for("blog.index"))
在flaskr下的__init__.py下添加如下代码
flaskr/__init__.py
def create_app():
    app = ...
    # existing code omitted

    from . import blog
    app.register_blueprint(blog.bp)
    app.add_url_rule('/', endpoint='index')

    return app
添加完成后的__init__.py
flaskr/__init__.py
import os

from flask import Flask


def create_app(test_config=None):
    """Create and configure an instance of the Flask application."""
    app = Flask(__name__, instance_relative_config=True)
    app.config.from_mapping(
        # a default secret that should be overridden by instance config
        SECRET_KEY="dev",
        # store the database in the instance folder
        DATABASE=os.path.join(app.instance_path, "flaskr.sqlite"),
    )

    if test_config is None:
        # load the instance config, if it exists, when not testing
        app.config.from_pyfile("config.py", silent=True)
    else:
        # load the test config if passed in
        app.config.update(test_config)

    # ensure the instance folder exists
    try:
        os.makedirs(app.instance_path)
    except OSError:
        pass

    @app.route("/hello/")
    def hello():
        return "Hello, World!"

    # register the database commands
    from flaskr import db

    db.init_app(app)

    # apply the blueprints to the app
    from flaskr import auth, blog

    app.register_blueprint(auth.bp)
    app.register_blueprint(blog.bp)

    app.add_url_rule("/", endpoint="index")

    return app
7. 博客模板
flaskr/templates/blog/index.html
index.html代码如下
{% extends 'base.html' %}

{% block header %}
    <h1>{% block title %}所有博客{% endblock %}</h1>
    {% if g.user %}
        <a class="action" href="{{ url_for('blog.create') }}">写博客</a>
    {% endif %}
{% endblock %}

{% block content %}
    {% for post in posts %}
        <article class="post">
            <header>
                <div>
                    <h1>{{ post['title'] }}</h1>
                    <div class="about">by {{ post['username'] }} on {{ post['created'].strftime('%Y-%m-%d') }}</div>
                </div>
                {% if g.user['id'] == post['author_id'] %}
                    <a class="action" href="{{ url_for('blog.update', id=post['id']) }}">编辑</a>
                {% endif %}
            </header>
            <p class="body">{{ post['body'] }}</p>
        </article>
        {% if not loop.last %}
            <hr>
        {% endif %}
    {% endfor %}
{% endblock %}
flaskr/templates/blog/create.html
create.html代码如下
{% extends 'base.html' %}

{% block header %}
    <h1>{% block title %}新博客{% endblock %}</h1>
{% endblock %}

{% block content %}
    <form method="post">
        <label for="title">标题</label>
        <input name="title" id="title" value="{{ request.form['title'] }}" required>
        <label for="body">内容</label>
        <textarea name="body" id="body">{{ request.form['body'] }}</textarea>
        <input type="submit" value="保存">
    </form>
{% endblock %}
flaskr/templates/blog/update.html
update.html代码如下
{% extends 'base.html' %}

{% block header %}
    <h1>{% block title %}编辑 "{{ post['title'] }}"{% endblock %}</h1>
{% endblock %}

{% block content %}
    <form method="post">
        <label for="title">标题</label>
        <input name="title" id="title" value="{{ request.form['title'] or post['title'] }}" required>
        <label for="body">内容</label>
        <textarea name="body" id="body">{{ request.form['body'] or post['body'] }}</textarea>
        <input type="submit" value="保存">
    </form>
    <hr>
    <form action="{{ url_for('blog.delete', id=post['id']) }}" method="post">
        <input class="danger" type="submit" value="删除" onclick="return confirm('确定删除?');">
    </form>
{% endblock %}
至此,所有文件创建完毕,完整文件应该如下
重新运行项目,进入http://127.0.0.1:5000即可进入博客首页,进行相关操作,包括注册、登录,写博客、修改博客(仅登录用户可修改自己博客)、删除博客(仅登录用户可删除自己博客),浏览所有博客,下一章介绍如何将项目部署到阿里云ECS服务器,随时随地访问,不受局域网限制。
四、阿里云ECS部署
购买阿里云ECS服务、更换操作系统、远程连接
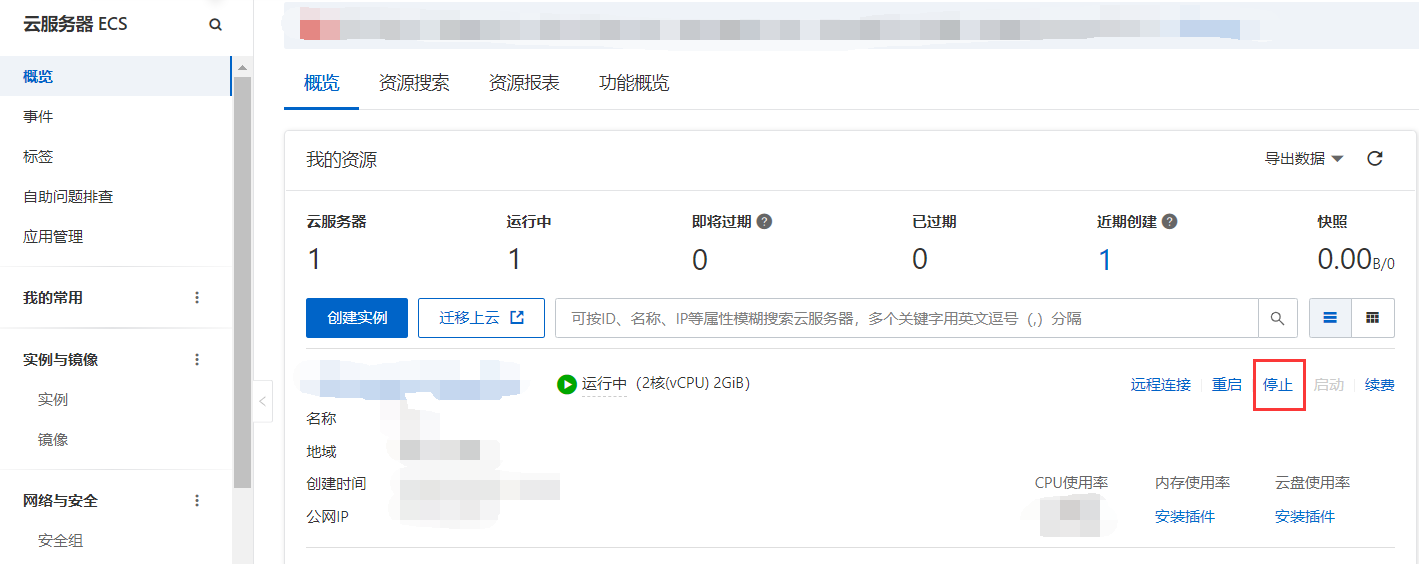
购买成功后进入云服务器管理控制台 (aliyun.com)
此处以更换系统为Windows Server 2008为例,先停止原有操作系统的实例
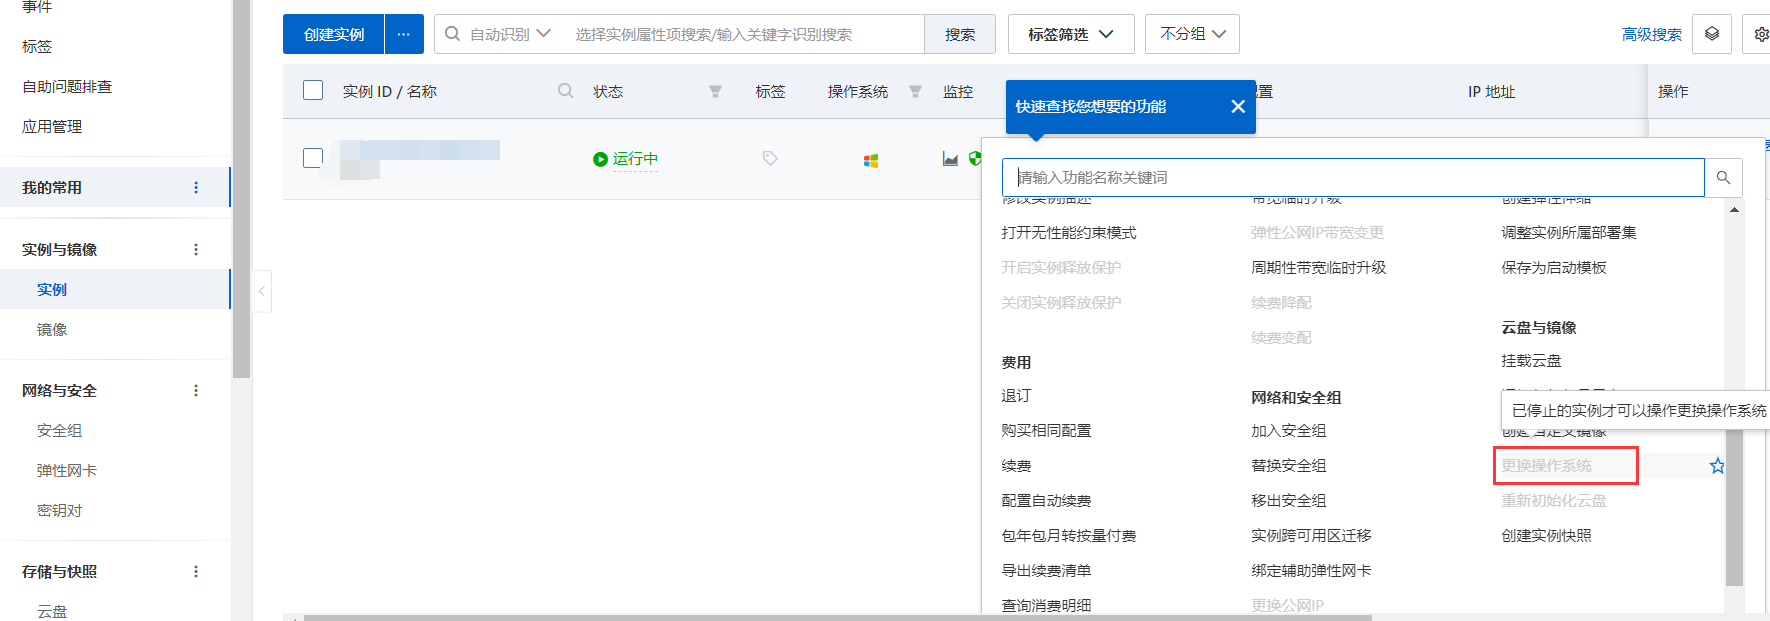
然后左侧选择‘实例’更换操作系统,在对应实例的操作一栏点击三点,选择更换操作系统
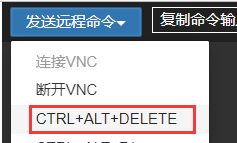
稍等片刻后更换成功会自动启动更换后的操作系统,此时便可使用VNC连接,进入后发送CTRL+ALT+DELETE命令登录(此处不要直接按键盘上的快捷键,否则会打开主机的任务管理器)
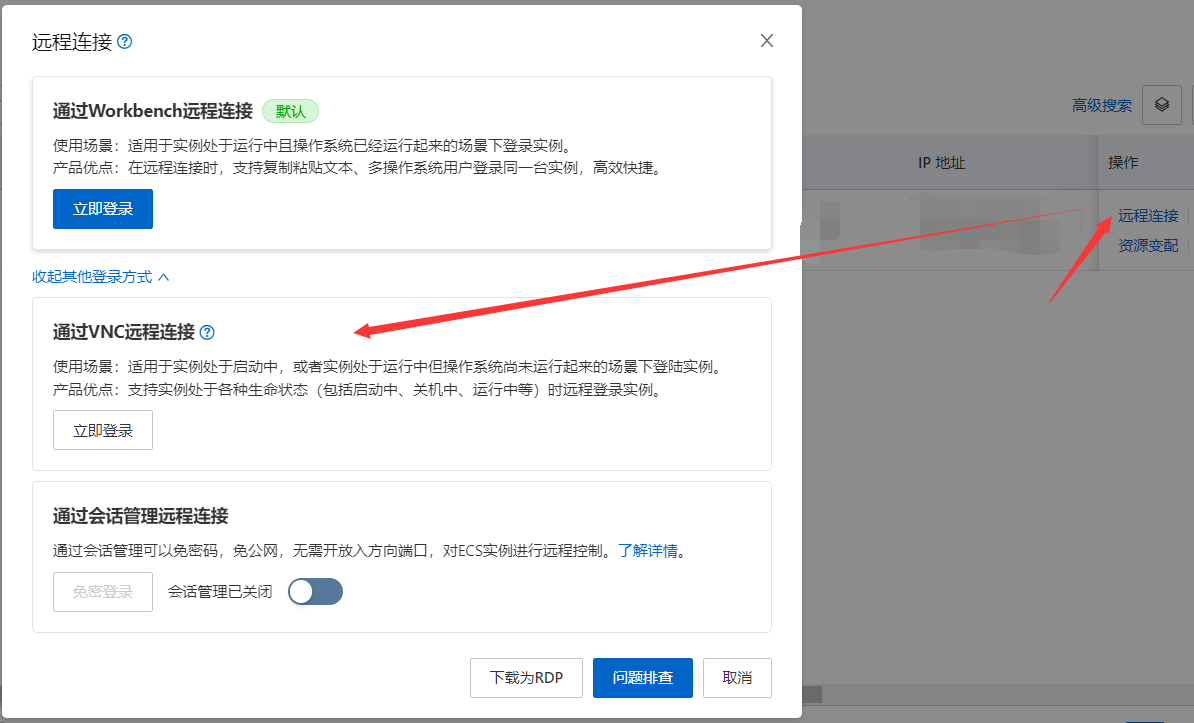
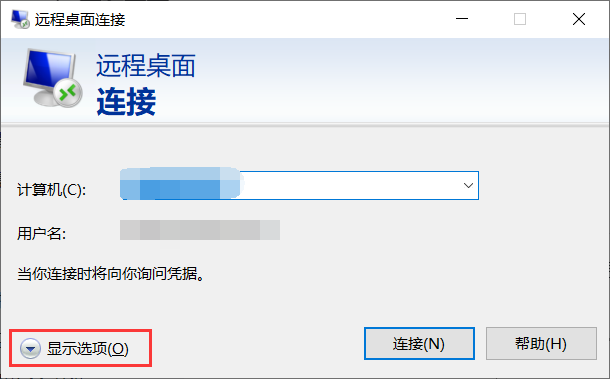
除了使用VNC远程连接,也可以使用Windows自带的远程连接,直接搜索“远程桌面连接“即可打开,输入实例的公网IP地址(可在控制台查看),然后输入实例的用户名(默认为Administrator)和密码即可远程连接到Windows Server 2008
2. 在服务器端配置Python环境
与主机安装Python 3.7的步骤相同,如果后续不想自己配置环境变量记得在第一步勾选”Add Python 3.7 to PATH“
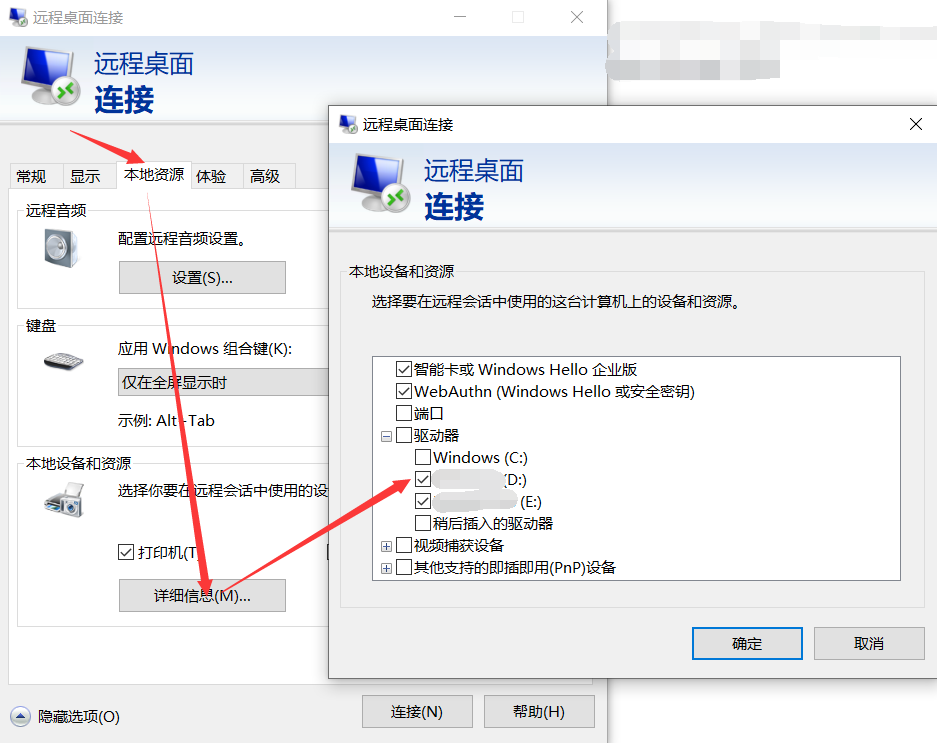
如果想要远程桌面和主机共享文件,比如Python安装包,需要在连接时进行相关配置,连接时展开”显示选项“
进行如下操作即可和远程桌面共享文件
3. 在服务器端新建项目并运行
新建之前先按照此处教程更换下载源,Python中的pip如何换源-百度经验 (baidu.com),否则下载会很慢
%APPDATA%/pip/pip.ini
[global]

timeout = 60

index-url = http://pypi.douban.com/simple

trusted-host = pypi.douban.com
在服务器端C盘新建文件夹flask_template(工程名)
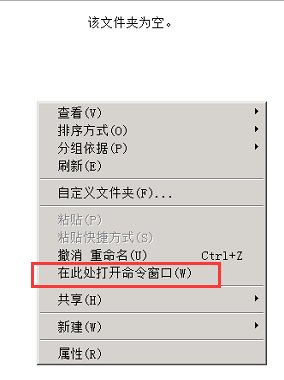
然后双击进入C:\flask_template,按住Shift键不动,在该文件夹下右击,选择”在此处打开命令窗口“
在弹出的命令行界面输入
py -3 -m venv venv稍等片刻,即可看到目录下产生了vnev文件夹,继续输入如下命令激活虚拟环境
venv\Scripts\activate然后在虚拟环境下安装Flask
pip install Flask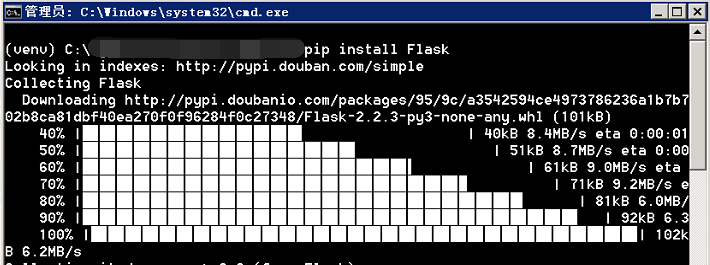
然后在工程目录下新建app.py(记得显示文件后缀名并更改),然后使用记事本打开,输入如下内容并保存
from flask import Flask

app = Flask(__name__)


@app.route('/')
def hello_world():
    return 'Hello World!'


if __name__ == '__main__':
    app.run()
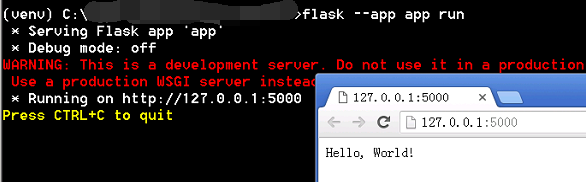
然后继续在(venv)前缀的命令行(虚拟环境)输入如下命令启动
run前面的app是刚刚新建的app.py文件名,如果是其他名字,则更改为对应的文件名
flask --app app run此处提示说明工程运行成功,打开服务器端的浏览器并输入127.0.0.1:5000即可看到hello world
但自带的IE浏览器貌似打不开,可以使用四、2中介绍的文件共享安装一个旧版的chrome浏览器,体积较小

按下CTRL+C停止运行
如果想要远程访问,则需要配置相关规则
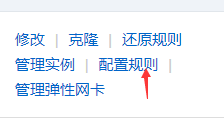
进入云服务器管理控制台 (aliyun.com),选择左侧的安全组,在实例的操作一栏选择配置规则
在入方向和出方向配置授权对象0.0.0.0,端口输入5000,其余保持默认并保存

回到远程桌面,重新使用如下命令运行,如下图所示
flask --app app run --host=0.0.0.0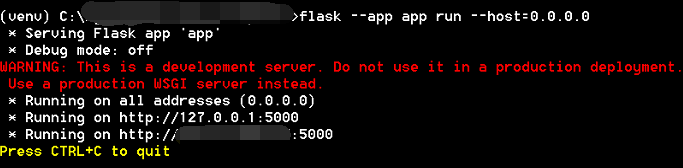
此时便可以任意设备任意网络访问,使用(服务器公网ip)xx.xxx.xxx.xx:5000,都可以看到hello world

4. 移植博客系统到服务器端
这里只介绍一种简便的方法,那就是直接复制三、的整个目录到服务器,当然正确做法应该是打包.whl文件并安装部署,这个自行阅读官方文档了解
复制整个工程文件夹后与四、3类似按住Shift打开命令行,直接激活虚拟环境(因为已经有venv)
venv\Scripts\activate然后执行
pip install Flask安装完成后,直接运行(运行之前确认四、3中的服务已经关闭)
flask --app app run --host=0.0.0.0此时移植完毕,直接在任意设备任意网络使用(服务器公网ip)xx.xxx.xxx.xx:5000即可看到博客系统,如果需要查看数据库内容,则共享SQLiteStudio安装包到服务器,安装完成后打开博客系统工程下的instance文件夹下的flaskr.sqlite文件
连接、打开、查看数据库方法见三、3
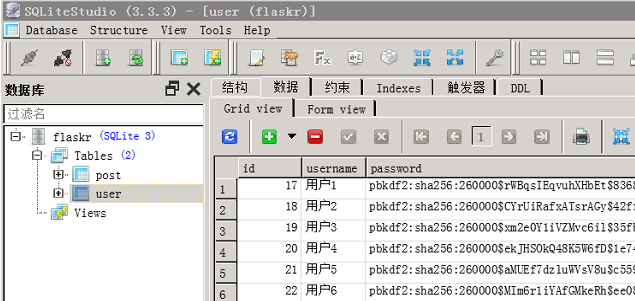
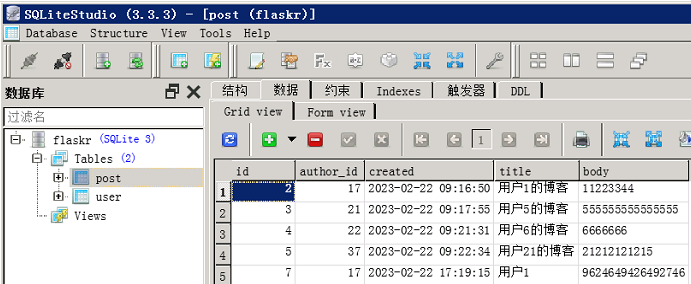
可以在手机端注册几个用户并登录、写博客,服务器端SQLiteStudio查看数据,在数据页面按F5刷新
用户表:
博客表
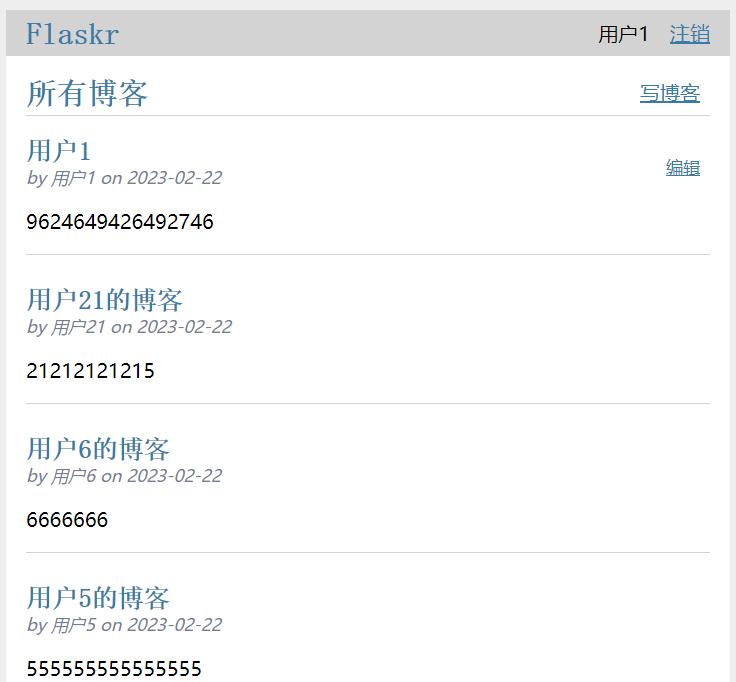
网页效果
五、小结
至此,一个基于Flask和阿里云ECS构建的简单博客系统就完成,原官方文档后面还有许多内容,在运行完成后还要认真阅读代码,理解实现的方法。


 1583
1583

 被折叠的 条评论
为什么被折叠?
被折叠的 条评论
为什么被折叠?
 到【灌水乐园】发言


