


SpringBoot启动流程
springboot版本2.6.3
- 启动类入口main方法
@SpringBootApplication
public class TestApplication {
    public static void main(String[] args) {
        SpringApplication.run(TestApplication.class, args);
    }
}
- 静态SpringApplication.run方法中初始化SpringApplication,并执行run方法
	public static ConfigurableApplicationContext run(Class<?> primarySource, String... args) {
        return run(new Class[]{primarySource}, args);
    }

	public static ConfigurableApplicationContext run(Class<?>[] primarySources, String[] args) {
        return (new SpringApplication(primarySources)).run(args);
    }
- 初始化SpringApplication
	public SpringApplication(Class<?>... primarySources) {
        this((ResourceLoader)null, primarySources);
    }

    public SpringApplication(ResourceLoader resourceLoader, Class<?>... primarySources) {
    	//初始化各种参数
        this.sources = new LinkedHashSet();
        this.bannerMode = Mode.CONSOLE;
        this.logStartupInfo = true;
        this.addCommandLineProperties = true;
        this.addConversionService = true;
        this.headless = true;
        this.registerShutdownHook = true;
        this.additionalProfiles = Collections.emptySet();
        this.isCustomEnvironment = false;
        this.lazyInitialization = false;
        this.applicationContextFactory = ApplicationContextFactory.DEFAULT;
        this.applicationStartup = ApplicationStartup.DEFAULT;
        this.resourceLoader = resourceLoader;
        Assert.notNull(primarySources, "PrimarySources must not be null");
        this.primarySources = new LinkedHashSet(Arrays.asList(primarySources));
        //deduceFromClasspath()方法从类路径推断出Web应用程序类型(REACTIVE\SERVLET\NONE)
        this.webApplicationType = WebApplicationType.deduceFromClasspath();
        //getSpringFactoriesInstances方法从META-INF/spring.factories加载和实例化给定类型接口的实现类
        /**
        BootstrapRegistryInitializer是在使用BootstrapRegistry之前对其进行初始化的回调接口。
	    BootstrapRegistry是一个简单的对象注册表,在启动和Environment后处理期间可用,直到ApplicationContext准备好为止
	    由于应用依赖的JAR包中没有包含key是org.springframework.boot.BootstrapRegistryInitializer的spring.factories文件,所以bootstrapRegistryInitializers的size为0。
	    **/
        this.bootstrapRegistryInitializers = new ArrayList(this.getSpringFactoriesInstances(BootstrapRegistryInitializer.class));
        /**
        ApplicationContextInitializer(org.springframework.context.ApplicationContextInitializer)是用于在刷新之前初始化Spring ConfigurableApplicationContext的回调接口。
        (通常在需要对应用程序上下文进行一些编程初始化的Web应用程序中使用。例如,针对上下文环境注册属性源或激活配置文件。)
        **/
        this.setInitializers(this.getSpringFactoriesInstances(ApplicationContextInitializer.class));
        /**
        ApplicationListener(org.springframework.context.ApplicationListener)是由应用程序事件监听器实现的接口,也是基于观察者设计模式的标准java.util.EventListener接口。
        从Spring 3.0开始, ApplicationListener可以一般性地声明它感兴趣的事件类型。当使用Spring ApplicationContext注册时,事件将被相应地过滤,只有匹配事件对象才会调用监听器。
		**/
        this.setListeners(this.getSpringFactoriesInstances(ApplicationListener.class));
        //该方法用于推断并返回主应用类
        this.mainApplicationClass = this.deduceMainApplicationClass();
    }
参考博文:深入SpringBoot源码(一)从SpringApplication的构造方法入门源码
ApplicationContextInitializer
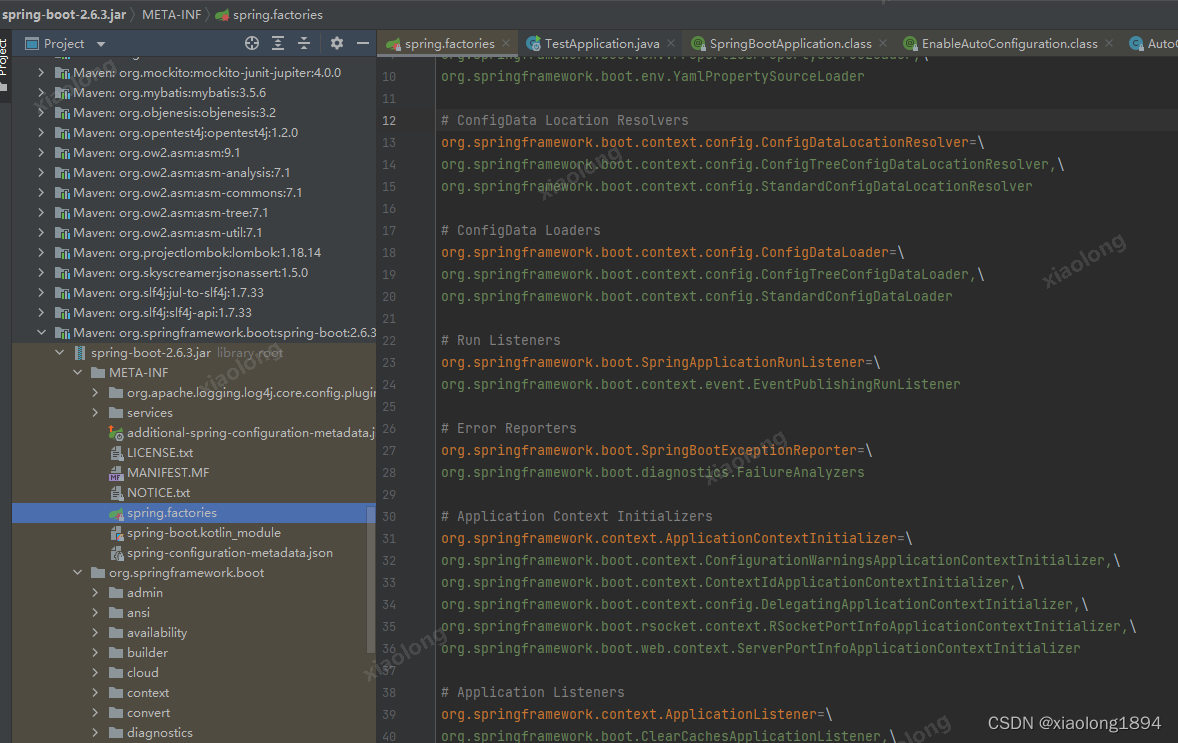
# Application Context Initializers
org.springframework.context.ApplicationContextInitializer=\
org.springframework.boot.context.ConfigurationWarningsApplicationContextInitializer,\
org.springframework.boot.context.ContextIdApplicationContextInitializer,\
org.springframework.boot.context.config.DelegatingApplicationContextInitializer,\
org.springframework.boot.rsocket.context.RSocketPortInfoApplicationContextInitializer,\
org.springframework.boot.web.context.ServerPortInfoApplicationContextInitializer
Springboot 内置ApplicationContextInitializer
ApplicationListener
org.springframework.context.ApplicationListener=\
#应用上下文加载完成后对缓存做清除工作
org.springframework.boot.ClearCachesApplicationListener,\
#监听双亲应用上下文的关闭事件并往自己的孩子应用上下文中传播
org.springframework.boot.builder.ParentContextCloserApplicationListener,\
#如果系统文件编码和环境变量中指定的不同则终止应用启动
org.springframework.boot.context.FileEncodingApplicationListener,\
#根据spring.output.ansi.enabled参数配置AnsiOutput
org.springframework.boot.context.config.AnsiOutputApplicationListener,\
#监听到事件后转发给环境变量context.listener.classes指定的那些事件监听器
org.springframework.boot.context.config.DelegatingApplicationListener,\
#配置LoggingSystem。使用logging.config环境变量指定的配置或者缺省配置
org.springframework.boot.context.logging.LoggingApplicationListener,\
org.springframework.boot.env.EnvironmentPostProcessorApplicationListener
Springboot内置ApplicationListener
- run方法(SpringBoot启动核心流程)
	public ConfigurableApplicationContext run(String... args) {
		//计时
        long startTime = System.nanoTime();
        DefaultBootstrapContext bootstrapContext = this.createBootstrapContext();
        ConfigurableApplicationContext context = null;
        //调⽤configureHeadlessProperty设置系统属性java.awt.headless,这⾥设置为true,表示运⾏在服务器端,在没有显示器和⿏标键盘的模式下⼯作,模拟输⼊输出设备功能
        this.configureHeadlessProperty();
        /**
        获取事件监听器SpringApplicationRunListener类型,用来在整个启动流程中接收不同执行点事件通知的监听者,
        SpringApplicationRunListener接口规定了SpringBoot的生命周期,在各个生命周期广播相应的事件,调用实际的ApplicationListener类。
        **/
        SpringApplicationRunListeners listeners = this.getRunListeners(args);
        //调用listeners.starting,里面做了什么后续再看 TODO
        listeners.starting(bootstrapContext, this.mainApplicationClass);

        try {
        	//创建⼀个DefaultApplicationArguments对象,它持有着args参数
            ApplicationArguments applicationArguments = new DefaultApplicationArguments(args);
            //******创建并配置当前 Spring Boot 应用将要使用的 Environment
            ConfigurableEnvironment environment = this.prepareEnvironment(listeners, bootstrapContext, applicationArguments);
            this.configureIgnoreBeanInfo(environment);
            //打印banner
            Banner printedBanner = this.printBanner(environment);
            //创建上下文
            context = this.createApplicationContext();
            context.setApplicationStartup(this.applicationStartup);
            //准备上下文
            this.prepareContext(bootstrapContext, context, environment, listeners, applicationArguments, printedBanner);
            //Spring IOC核心代码,包括Spring容器初始化、Bean加载等过程
            this.refreshContext(context);
            this.afterRefresh(context, applicationArguments);
            Duration timeTakenToStartup = Duration.ofNanos(System.nanoTime() - startTime);
            if (this.logStartupInfo) {
                (new StartupInfoLogger(this.mainApplicationClass)).logStarted(this.getApplicationLog(), timeTakenToStartup);
            }

            listeners.started(context, timeTakenToStartup);
            this.callRunners(context, applicationArguments);
        } catch (Throwable var12) {
            this.handleRunFailure(context, var12, listeners);
            throw new IllegalStateException(var12);
        }

        try {
            Duration timeTakenToReady = Duration.ofNanos(System.nanoTime() - startTime);
            listeners.ready(context, timeTakenToReady);
            return context;
        } catch (Throwable var11) {
            this.handleRunFailure(context, var11, (SpringApplicationRunListeners)null);
            throw new IllegalStateException(var11);
        }
    }
SpringApplicationRunListeners
public interface SpringApplicationRunListener {
    //Srping应用刚启动
    void starting();
    //环境准备完毕( 在prepareEnvironment方法内部调用。)
    void environmentPrepared(ConfigurableEnvironment environment);
    //上下文准备完毕(在prepareContext的开始阶段被调用。)
    void contextPrepared(ConfigurableApplicationContext context);
    //上下文加载完毕(在prepareContext的最后一步被调用。)
    void contextLoaded(ConfigurableApplicationContext context);
    //启动完成( 在所有执行完成,ApplicationRunner和CommandLineRunner回调之前。)
    void started(ConfigurableApplicationContext context);
    //运行中(在run方法最后单独使用try catch执行,只要上面没有异常,项目已经启动完成。那么running回调异常也不能影响正常流程。)
    void running(ConfigurableApplicationContext context);
    //失败( 在handleRunFailure异常处理中被调用。)
    void failed(ConfigurableApplicationContext context, Throwable exception);
}
# Run Listeners
org.springframework.boot.SpringApplicationRunListener=\
org.springframework.boot.context.event.EventPublishingRunListener
EventPublishingRunListener是Springboot中SpringApplicationRunListener的唯一实现类,在构造器中将SpringApplication已关联的ApplicationListener实例列表动态的添加到SimpleApplicationEventMulticaster中;其充当Spring Boot事件发布者的角色,比如SpringApplicationRunListener#starting()方法运行后,EventPublishingRunListener会委托内置的SimpleApplicationEventMulticaster广播ApplicationStartingEvent事件,
SpringBoot自动装配原理
SPI机制
SPI是Service Provider Interface 的简称,即服务提供者接口的意思。SPI说白了就是一种扩展机制,我们在相应配置文件中定义好某个接口的实现类,然后再根据这个接口去这个配置文件中加载这个实例类并实例化。有了SPI机制,那么就为一些框架的灵活扩展提供了可能,而不必将框架的一些实现类写死在代码里面。
@SpringBootApplication
@SpringBootApplication
public class TestApplication {

    public static void main(String[] args) {
        SpringApplication.run(TestApplication.class, args);
    }

}
@SpringBootConfiguration 继承自Configuration,支持JavaConfig的方式进行配置
@EnableAutoConfiguration 用于开启自动配置
@ComponentScan 自动扫描组件,默认扫描该类所在包及其子包下所有带有指定注解的类,将它们自动装配到bean容器中
@Target({ElementType.TYPE})
@Retention(RetentionPolicy.RUNTIME)
@Documented
@Inherited
@SpringBootConfiguration
@EnableAutoConfiguration
@ComponentScan(
    excludeFilters = {@Filter(
    type = FilterType.CUSTOM,
    classes = {TypeExcludeFilter.class}
), @Filter(
    type = FilterType.CUSTOM,
    classes = {AutoConfigurationExcludeFilter.class}
)}
)
public @interface SpringBootApplication {
...
@Import({AutoConfigurationImportSelector.class})
@Target({ElementType.TYPE})
@Retention(RetentionPolicy.RUNTIME)
@Documented
@Inherited
@AutoConfigurationPackage
@Import({AutoConfigurationImportSelector.class})
public @interface EnableAutoConfiguration {
    String ENABLED_OVERRIDE_PROPERTY = "spring.boot.enableautoconfiguration";

    Class<?>[] exclude() default {};

    String[] excludeName() default {};
}
AutoConfigurationImportSelector.class
	public String[] selectImports(AnnotationMetadata annotationMetadata) {
        if (!this.isEnabled(annotationMetadata)) {
            return NO_IMPORTS;
        } else {
            AutoConfigurationImportSelector.AutoConfigurationEntry autoConfigurationEntry = this.getAutoConfigurationEntry(annotationMetadata);
            return StringUtils.toStringArray(autoConfigurationEntry.getConfigurations());
        }
    }

	protected AutoConfigurationImportSelector.AutoConfigurationEntry getAutoConfigurationEntry(AnnotationMetadata annotationMetadata) {
        if (!this.isEnabled(annotationMetadata)) {
            return EMPTY_ENTRY;
        } else {
            AnnotationAttributes attributes = this.getAttributes(annotationMetadata);
            //获取候选配置类
            List<String> configurations = this.getCandidateConfigurations(annotationMetadata, attributes);
            //去掉重复的配置类
            configurations = this.removeDuplicates(configurations);
            //获得注解中被exclude和excludeName排除的类的集合
            Set<String> exclusions = this.getExclusions(annotationMetadata, attributes);
            //检查被排除类是否可实例化、是否被自动注册配置所使用,不符合条件则抛出异常
            this.checkExcludedClasses(configurations, exclusions);
            //从候选配置类中去除掉被排除的类
            configurations.removeAll(exclusions);
            //过滤
            configurations = this.getConfigurationClassFilter().filter(configurations);
            //将配置类和排除类通过事件传入到监听器中
            this.fireAutoConfigurationImportEvents(configurations, exclusions);
            //最终返回符合条件的自动配置类的全限定名数组
            return new AutoConfigurationImportSelector.AutoConfigurationEntry(configurations, exclusions);
        }
    }
点进getCandidateConfigurations 查看获取配置类的代码
	protected List<String> getCandidateConfigurations(AnnotationMetadata metadata, AnnotationAttributes attributes) {
        List<String> configurations = SpringFactoriesLoader.loadFactoryNames(this.getSpringFactoriesLoaderFactoryClass(), this.getBeanClassLoader());
        Assert.notEmpty(configurations, "No auto configuration classes found in META-INF/spring.factories. If you are using a custom packaging, make sure that file is correct.");
        return configurations;
    }
通过loadFactoryNames方法传递过来的class名称作为Key从Map中获得该类的配置列表
SpringFactoriesLoader.loadFactoryNames(type, classLoader)
看到最终是加载META-INF/spring.factories文件中的配置,解析并存在Map中。
	private static Map<String, List<String>> loadSpringFactories(ClassLoader classLoader) {
        Map<String, List<String>> result = (Map)cache.get(classLoader);
        if (result != null) {
            return result;
        } else {
            HashMap result = new HashMap();

            try {
            	//获取到每个配置类的url
                Enumeration urls = classLoader.getResources("META-INF/spring.factories");

                while(urls.hasMoreElements()) {
                    URL url = (URL)urls.nextElement();
                    UrlResource resource = new UrlResource(url);
                    //封装成Properties对象
                    Properties properties = PropertiesLoaderUtils.loadProperties(resource);
                    Iterator var6 = properties.entrySet().iterator();

                    while(var6.hasNext()) {
                        Entry<?, ?> entry = (Entry)var6.next();
                        String factoryTypeName = ((String)entry.getKey()).trim();
                        String[] factoryImplementationNames = StringUtils.commaDelimitedListToStringArray((String)entry.getValue());
                        String[] var10 = factoryImplementationNames;
                        int var11 = factoryImplementationNames.length;

                        for(int var12 = 0; var12 < var11; ++var12) {
                            String factoryImplementationName = var10[var12];
                            ((List)result.computeIfAbsent(factoryTypeName, (key) -> {
                                return new ArrayList();
                            })).add(factoryImplementationName.trim());
                        }
                    }
                }

                result.replaceAll((factoryType, implementations) -> {
                    return (List)implementations.stream().distinct().collect(Collectors.collectingAndThen(Collectors.toList(), Collections::unmodifiableList));
                });
                //内容存于Map<String,List<String>>中
                cache.put(classLoader, result);
                return result;
            } catch (IOException var14) {
                throw new IllegalArgumentException("Unable to load factories from location [META-INF/spring.factories]", var14);
            }
        }
    }
spring.factories文件
@Condition
在上面的步骤中我们得到了一个动配置类的全限定名数组,这些配置类需要在满足@Condition后才能真正的被注册到Spring容器之中。
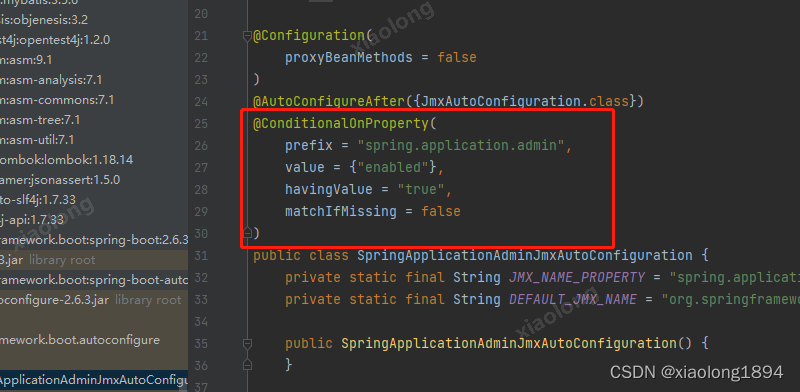
| @ConditionOnBean | 在容器中有指定Bean的条件下。 |
| @ConditionalOnMissingBean | 在容器中没有指定Bean的条件下。 |
| @ConditionOnClass | 在classpath类路径下有指定类的条件下。 |
| @ConditionalOnMissingClass | 在classpath类路径下没有指定类的条件下。 |
| @ConditionalOnResource | 类路径是否有指定的值。 |
| @ConditionalOnWebApplication | 在项目是一个Web项目的条件下。 |
| @ConditionOnProperty | 在指定的属性有指定的值条件下。 |
Spring容器初始化过程
- 第一步:Resource定位
在SpringBoot中,我们都知道他的包扫描是从主类所在的包开始扫描的,prepareContext()方法中,会先将主类解析成BeanDefinition,然后在refresh()方法的invokeBeanFactoryPostProcessors()方法中解析主类的BeanDefinition获取basePackage的路径。这样就完成了定位的过程。其次SpringBoot的各种starter是通过SPI扩展机制实现的自动装配,SpringBoot的自动装配同样也是在invokeBeanFactoryPostProcessors()方法中实现的。还有一种情况,在SpringBoot中有很多的@EnableXXX注解,细心点进去看的应该就知道其底层是@Import注解,在invokeBeanFactoryPostProcessors()方法中也实现了对该注解指定的配置类的定位加载。
常规的在SpringBoot中有三种实现定位,第一个是主类所在包的,第二个是SPI扩展机制实现的自动装配(比如各种starter),第三种就是@Import注解指定的类。(对于非常规的不说了)
- 第二步:BeanDefinition的载入
在第一步中说了三种Resource的定位情况,定位后紧接着就是BeanDefinition的分别载入。所谓的载入就是通过上面的定位得到的basePackage,SpringBoot会将该路径拼接成:classpath*:org/springframework/boot/demo/**/*.class这样的形式,然后一个叫做PathMatchingResourcePatternResolver的类会将该路径下所有的.class文件都加载进来,然后遍历判断是不是有@Component注解,如果有的话,就是我们要装载的BeanDefinition。大致过程就是这样的了。
- 第三个过程:注册BeanDefinition
这个过程通过调用上文提到的BeanDefinitionRegister接口的实现来完成。这个注册过程把载入过程中解析得到的BeanDefinition向IoC容器进行注册。通过上文的分析,我们可以看到,在IoC容器中将BeanDefinition注入到一个ConcurrentHashMap中,IoC容器就是通过这个HashMap来持有这些BeanDefinition数据的。比如DefaultListableBeanFactory 中的beanDefinitionMap属性。
前面SpringBoot启动流程源码中看到refreshContext()方法,点进去可以看到refresh()方法
	public void refresh() throws BeansException, IllegalStateException {
        synchronized(this.startupShutdownMonitor) {
            StartupStep contextRefresh = this.applicationStartup.start("spring.context.refresh");
            //进行一些刷新前的准备信息,如设置active=true,校验必须的参数等
            this.prepareRefresh();
            //创建BeanFactory: 默认实现的是ConfigurableListableBeanFactory
            ConfigurableListableBeanFactory beanFactory = this.obtainFreshBeanFactory();
            //BeanFactory预备工作,设置一些初始化的Bean实例信息
            this.prepareBeanFactory(beanFactory);

            try {
            	// BeanFactory准备⼯作完成后进⾏的后置处理⼯作
                this.postProcessBeanFactory(beanFactory);
                StartupStep beanPostProcess = this.applicationStartup.start("spring.context.beans.post-process");
                // 实例化并调⽤实现了BeanFactoryPostProcessor接⼝的Bean
                this.invokeBeanFactoryPostProcessors(beanFactory);
                //注册 BeanPostProcessor 的实现类(Bean的后置处理器),在创建bean的前后等执行
                this.registerBeanPostProcessors(beanFactory);
                beanPostProcess.end();
                //初始化MessageSource组件(做国际化功能;消息绑定,消息解析);
                this.initMessageSource();
                // 初始化ApplicationEventMulticaster,事件派发器
                this.initApplicationEventMulticaster();
                // 创建webServer等
                this.onRefresh();
                // 注册监听器。就是注册实现了ApplicationListener接⼝的监听器Bean
                this.registerListeners();
                // 初始化所有⾮懒加载的 (non-lazy-init) 单例Bean.
                this.finishBeanFactoryInitialization(beanFactory);
                // 发布刷新完成事件,清除资源换成,启动web容器
                this.finishRefresh();
            } catch (BeansException var10) {
                if (this.logger.isWarnEnabled()) {
                    this.logger.warn("Exception encountered during context initialization - cancelling refresh attempt: " + var10);
                }

                this.destroyBeans();
                this.cancelRefresh(var10);
                throw var10;
            } finally {
                this.resetCommonCaches();
                contextRefresh.end();
            }

        }
    }
onRefresh()方法
作用是创建内置Servlet容器
	//AbstractApplicationContext中的方法
	protected void onRefresh() throws BeansException {
    }

    //子类ServletWebServerApplicationContext的重写方法
	protected void onRefresh() {
        super.onRefresh();

        try {
            this.createWebServer();
        } catch (Throwable var2) {
            throw new ApplicationContextException("Unable to start web server", var2);
        }
    }
createWebServer()
	private void createWebServer() {
        WebServer webServer = this.webServer;
        ServletContext servletContext = this.getServletContext();
        if (webServer == null && servletContext == null) {
            StartupStep createWebServer = this.getApplicationStartup().start("spring.boot.webserver.create");
            ServletWebServerFactory factory = this.getWebServerFactory();
            createWebServer.tag("factory", factory.getClass().toString());
            this.webServer = factory.getWebServer(new ServletContextInitializer[]{this.getSelfInitializer()});
            createWebServer.end();
            this.getBeanFactory().registerSingleton("webServerGracefulShutdown", new WebServerGracefulShutdownLifecycle(this.webServer));
            this.getBeanFactory().registerSingleton("webServerStartStop", new WebServerStartStopLifecycle(this, this.webServer));
        } else if (servletContext != null) {
            try {
                this.getSelfInitializer().onStartup(servletContext);
            } catch (ServletException var5) {
                throw new ApplicationContextException("Cannot initialize servlet context", var5);
            }
        }

        this.initPropertySources();
    }
点进factory.getWebServer()
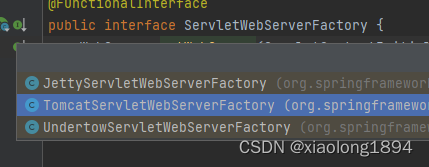
可以看到这里加载了Servlet容器tomcat
	public WebServer getWebServer(ServletContextInitializer... initializers) {
        if (this.disableMBeanRegistry) {
            Registry.disableRegistry();
        }

        Tomcat tomcat = new Tomcat();
        File baseDir = this.baseDirectory != null ? this.baseDirectory : this.createTempDir("tomcat");
        tomcat.setBaseDir(baseDir.getAbsolutePath());
        Iterator var4 = this.serverLifecycleListeners.iterator();

        while(var4.hasNext()) {
            LifecycleListener listener = (LifecycleListener)var4.next();
            tomcat.getServer().addLifecycleListener(listener);
        }

        Connector connector = new Connector(this.protocol);
        connector.setThrowOnFailure(true);
        tomcat.getService().addConnector(connector);
        this.customizeConnector(connector);
        tomcat.setConnector(connector);
        tomcat.getHost().setAutoDeploy(false);
        this.configureEngine(tomcat.getEngine());
        Iterator var8 = this.additionalTomcatConnectors.iterator();

        while(var8.hasNext()) {
            Connector additionalConnector = (Connector)var8.next();
            tomcat.getService().addConnector(additionalConnector);
        }

        this.prepareContext(tomcat.getHost(), initializers);
        return this.getTomcatWebServer(tomcat);
    }
SpringBoot启动流程分析(四):IoC容器的初始化过程
SpringBoot启动流程分析六 refreshContext()
Spring Bean的作用域
- singleton 单例:唯一 bean 实例,Spring 中的 bean 默认都是单例的。
- prototype 原型:每次请求都会创建一个新的 bean 实例。
- request 请求: 每一次 HTTP 请求都会产生一个新的 bean,该 bean 仅在当前 HTTP request 内有效。
- session 会话:每一次 HTTP 请求都会产生一个新的 bean,该 bean 仅在当前 HTTP session 内有效。
- global-session:全局 session 作用域,仅仅在基于 Portlet 的 web 应用中才有意义,Spring5 已经没有了。Portlet 是能够生成语义代码(例如:HTML)片段的小型 Java Web 插件。它们基于 portlet 容器,可以像 servlet 一样处理 HTTP 请求。但是,与 servlet 不同,每个 portlet 都有不同的会话。
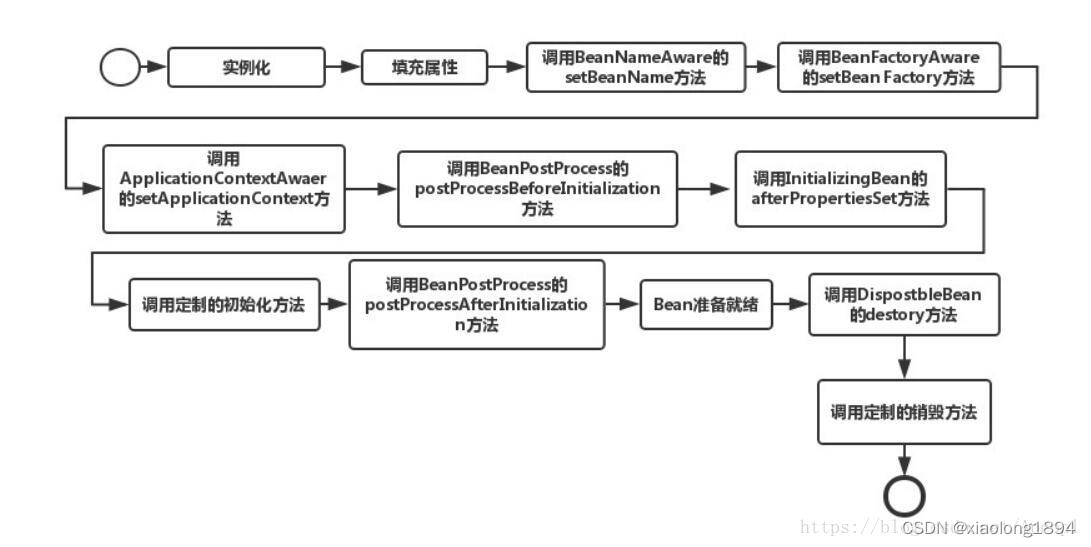
Spring Bean的生命周期
Spring Bean 的生命周期主要指的是 singleton bean,对于 prototype 的 bean ,Spring 在创建好交给使用者之后则不会再管理后续的生命周期。
Spring Bean的生命周期分为四个阶段和多个扩展点。扩展点又可以分为影响多个Bean和影响单个Bean,如BeanPostProcessor、BeanFactoryProcessor、BeanNameAware等。
- 实例化 Instantiation
- 属性复制 Populate
- 初始化 Initialization
- 销毁 Destruction
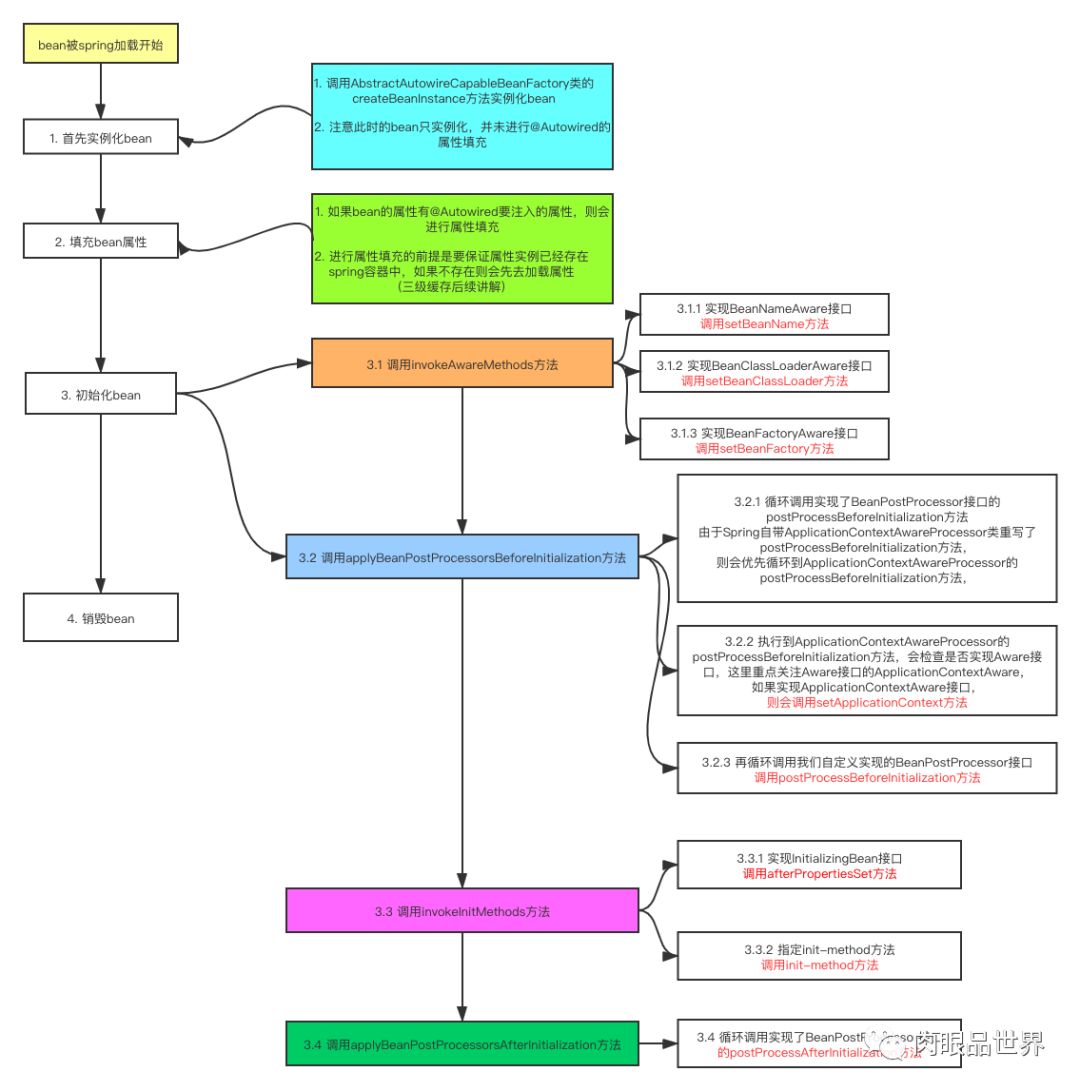
详细参考博客:一文读懂 Spring Bean 的生命周期
Spring中的bean线程安全吗
前面列出了Bean的作用域,原型的Bean是每个线程复制一个,所以是线程安全的,单例的Bean是共享的,没有做线程安全处理。单例Bean又分为有状态和无状态。
- 有状态的bean:就是有实例变量的对象,可以保存数据,是非线程安全的。
- 无状态的bean:就是没有实例变量的对象,不能保存数据,是线程安全的。
在Spring框架中,并没有提供bean的线程安全策略,所以Spring容器中的bean并不具备线程安全的特性,可以改为原型或者用ThreadLocal。
Spring如何解决循环依赖问题?为什么是三层缓存?
从上面我们可以知道,对象属性的注入在对象实例化之后。
- 单例模式下的setter循环依赖:通过“三级缓存”处理循环依赖。
- 构造器的循环依赖:这种依赖spring是处理不了的,直 接抛出BeanCurrentlylnCreationException异常。
- 非单例循环依赖:无法处理。
- singletonObjects:一级缓存,也叫单例池存放已经经历了完整生命周期的Bean对象。
- earlySingletonObjects:二级缓存,存放早期暴露出来的Bean对象,Bean的生命周期未结束(属性还未填充完整)。
- singletonFactories:三级缓存,Map<String, ObiectFactory<?>> 存放可以生成Bean的工厂。
为什么需要三级缓存
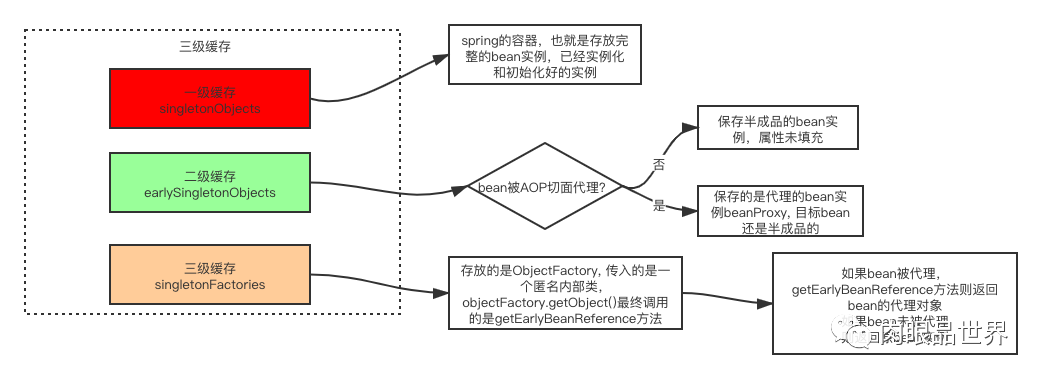
一级缓存存放成品,出现循环依赖需要引入二级缓存存放半成品,有AOP的情况需要第三级缓存存放对象工厂。
如果A的原始对象注入给B的属性之后,A的原始对象进行了AOP(按照bean的生命周期,AOP是在初始化后在后置处理器中处理的),此时会产生另外一个对象-代理对象,这个对象最终会被存放到单例池singletonObjects中,也就是说,对于A而言,它最终的bean对象实际上应该是AOP之后的代理对象而不是原来那个原始对象,但B拿的是原始对象,这就产生冲突:B依赖的A和最终的A不是同一个对象。
FactoryBean和BeanFactory,ApplicationContext区别
BeanFactory:BeanFactory是个bean 工厂,是一个工厂类(接口), 它负责生产和管理bean的一个工厂
是ioc 容器最底层的接口,是个ioc容器,是spring用来管理和装配普通bean的ioc容器(这些bean成为普通bean)。
ApplicationContext:ApplicationContext是BeanFactory 的子接口,包含BeanFactory的所有功能,同时还进行更多的扩展。
FactoryBean:FactoryBean是个bean,在IOC容器的基础上给Bean的实现加上了一个简单工厂模式和装饰模式,是一个可以生产对象和装饰对象的工厂bean,由spring管理后,生产的对象是由getObject()方法决定的(从容器中获取到的对象不是
“ FactoryBeanTest ” 对象)。
FactoryBean和BeanFactory及ApplicationContext
Spring中的拓展点有哪些
BeanFactoryPostProcessor
BeanPostProcessor
ApplicationListener
……
Spring的扩展点都有哪些
Spring 框架中都用到了哪些设计模式
- 单例模式:Spring Bean的单例作用域
- 原型模式:Spring Bean的原型作用域
- 模板方法模式:Spring中的JdbcTemplate就是这样的实现
定义一个操作中的算法骨架,而将算法的一些步骤延迟到子类中,使得子类可以不改变该算法结构的情况下重定义该算法的某些特定步骤。它是一种类行为型模式。
- 观察者模式:使用比较场景是在监听器中而spring中Observer模式常用的地方也是listener的实现。如ApplicationListener
- 工厂方法模式:Bean的生产
- 适配器模式:在Spring中在AOP实现中的Advice和interceptor之间的转换就是通过适配器模式实现的。
- 装饰者模式: 具体的使用在Spring session框架中的SessionRepositoryRequestWrapper使用包装模式对原生的request的功能进行增强,可以将session中的数据和分布式数据库进行同步,这样即使当前tomcat崩溃,session中的数据也不会丢失。
- 代理模式:Spring AOP。
- 策略模式:Spring中在实例化对象的时候用到Strategy模式。XmlBeanDefinitionReader,PropertiesBeanDefinitionReader
- 责任链默认:AOP中的拦截器链
- 委托者模式 :DelegatingFilterProxy,整合Shiro,SpringSecurity的时候都有用到。
Spring事务
声明式事务@Transactional,基于AOP。
TransactionInterceptor拦截器
PlatformTransactionManager事务管理器
public interface PlatformTransactionManager extends TransactionManager {
    TransactionStatus getTransaction(@Nullable TransactionDefinition definition) throws TransactionException;

    void commit(TransactionStatus status) throws TransactionException;

    void rollback(TransactionStatus status) throws TransactionException;
}
DataSourceTransactionManager支持Mybatis的事务管理器实现类
源码其实是对Connection对象的调用
protected void doCommit(DefaultTransactionStatus status) {
        DataSourceTransactionManager.DataSourceTransactionObject txObject = (DataSourceTransactionManager.DataSourceTransactionObject)status.getTransaction();
        Connection con = txObject.getConnectionHolder().getConnection();
        if (status.isDebug()) {
            this.logger.debug("Committing JDBC transaction on Connection [" + con + "]");
        }

        try {
            con.commit();
        } catch (SQLException var5) {
            throw this.translateException("JDBC commit", var5);
        }
    }
事务的隔离级别
- 读未提交
- 读已提交
- 可重复读
- 串行化
事务的传播行为
PROPAGATION_REQUIRED:如果当前有事务,则加入该事务中。如果没有,则新建事务。
PROPAGATION_SUPPORTS:如果当前有事务,则加入该事务中。如果没有,则以非事务状态运行。
PROPAGATION_MANDATORY:如果当前有事务,则加入该事务中。如果没有,则抛出无事务异常
PROPAGATION_REQUIRES_NEW:新建事务。如果当前存在事务,则挂起该事务。
PROPAGATION_NOT_SUPPORTED:非事务状态运行。如果当前存在事务,则挂起该事务。
PROPAGATION_NEVER:非事务状态运行。如果当前存在事务,则抛出异常。
PROPAGATION_NESTED:如果当前有事务,则嵌套事务(父子事务)执行。如果没有,类似PROPAGATION_REQUIRED处理。
Spring MVC工作原理
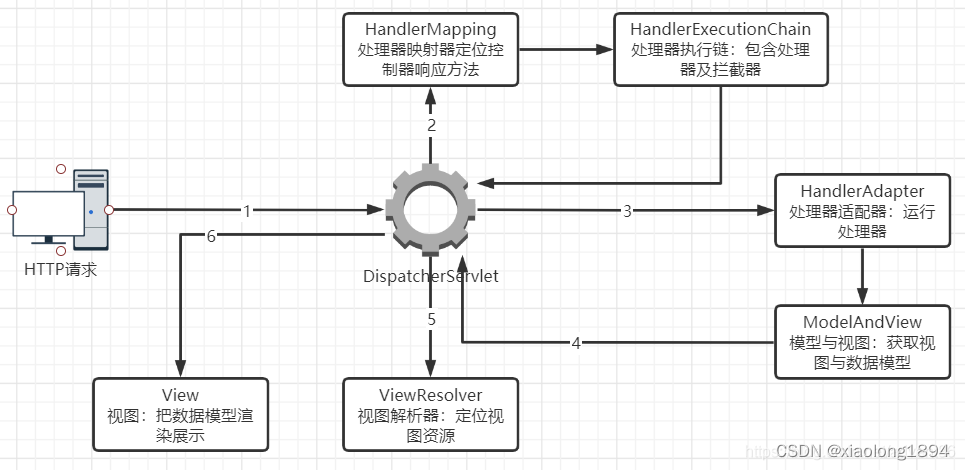
DispatcherServlet 前端控制器
HandlerMapping 处理器映射器
HandlerAdapter 处理器适配器
Controller 处理器
ViewResolver 视图解析器
Spring的内容博大精深,以上只做了初步总结,后续再逐步详细完善。


 1332
1332


 被折叠的 条评论
为什么被折叠?
被折叠的 条评论
为什么被折叠?
 到【灌水乐园】发言


