ESP32入门Arduino开发(四)--WiFi network connection

22 篇文章 94 订阅
20 篇文章 20 订阅

注:对于ESP32开源技术感兴趣的可以加群,我们一起探索交流学习,群号:782473783。群名:ESP32开源技术交流群。


这篇文章的目的是解释如何使用Arduino IDEESP32连接到WiFi网络。

介绍

这篇文章的目的是解释如何使用Arduino IDEESP32连接到WiFi网络。幸运的是,对于我们之前拥有ESP8266 Arduino IDE库经验的人来说,这个过程非常相似。

如果您尚未安装ESP32 Arduino IDE支持,请在此处查看如何操作。

代码

由于这个简单的例子我们将连接到一个WiFi网络,我们将在设置功能中完成所有编码。

首先,我们需要包含WiFi.h库,这将允许我们连接到网络。你可以在这里查看这个库的实现。有趣的是,开发人员选择了更通用的库名称,而ESP8266则是ESP8266WiFi.h  

不过,正如我们将看到的那样,这个功能还被称为WiFi的外部变量,在这个类的WiFiClass

#include <WiFi.h>

为了让我们的代码易于编辑,我们将声明两个全局变量,用于保存我们想要连接到的WiFi网络的名称及其密码。请使用您的网络的凭据。

const char* ssid ="yourNetworkName";

const char* password = "yourNetworkPass";

设置功能,我们将实际连接到WiFi网络。但首先,我们将打开一个串口连接,以便输出程序的结果。

然后,我们在WiFi对象上调用begin方法,并将指定的SSID(网络名称)和密码变量作为参数提前指定。这将开始连接到网络。

Serial.begin(115200);

WiFi.begin(ssid, password);

之后,我们会做一段时间循环,直到连接有效建立。为此,我们可以调用WiFi对象的状态方法,并等待结果匹配WL_CONNECTED枚举。在每次迭代之间,我们引入一个小的延迟,以避免不断的轮询。

while (WiFi.status()!= WL_CONNECTED)

{

  delay(500);

  Serial.println("Connectingto WiFi..");

}

循环后,ESP32应该成功连接到WiFi网络。

完整的源代码在下面。

#include<WiFi.h>
const char* ssid ="yourNetworkName";
const char*password =  "yourNetworkPass";
void setup()
{
  Serial.begin(115200);
  WiFi.begin(ssid,password);
  while (WiFi.status()!= WL_CONNECTED) {
    delay(500);
    Serial.println("Connectingto WiFi..");
  }
  Serial.println("Connectedto the WiFi network");
}
void loop() {
}


测试代码


要测试代码,只需将其上传到电路板并打开串口助手即可。你应该得到类似于图1的结果。
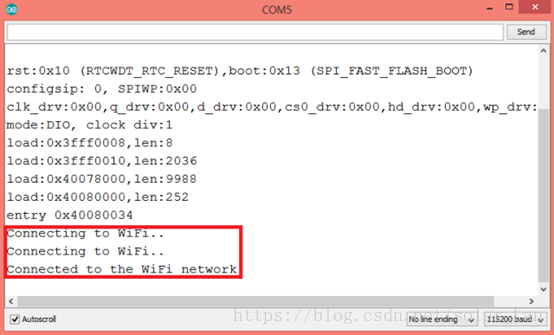
1 -ESP32连接到WiFi网络。

  • 10
    点赞
  • 45
    收藏
    觉得还不错? 一键收藏
  • 打赏
    打赏
  • 0
    评论
WLAN是英文WirelessLAN的缩写,就是无线局域网的意思。无线以太网技术是一种基于无线传输的局域网技术,与有线网络技术相比,具有灵活、建网迅速、个人化等特点。将这一技术应用于电信网的接入网领域,能够方便、灵活地为用户提供网络接入,适合于用户流动性较大、有数据业务需求的公共场所、高端的企业及家庭用户、需要临时建网的场合以及难以采用有线接入方式的环境等 作为全球公认的局域网权威,IEEE802工作组建立的标准在过去二十年内在局域网领域独领风骚。这些协议包括了802.3Ethernet协议、802.5TokenRing协议、802.3z100BASE-T快速以太网协议。在1997年,经过了7年的工作以后,IEEE发布了802.11协议,这也是在无线局域网领域内的第一个国际上被认可的协议。  在1999年9月,他们又提出了802.11b"HighRate"协议,用来对802.11协议进行补充,802.11b在802.11的1Mbps和2Mbps速率下又增加了5.5Mbps和11Mbps两个新的网络吞吐速率。利用802.11b,移动用户能够获得同Ethernet一样的性能、网络吞吐率、可用性。这个基于标准的技术使得管理员可以根据环境选择合适的局域网技术来构造自己的网络,满足他们的商业用户和其他用户的需求。802.11协议主要工作在ISO协议的最低两层上,并在物理层上进行了一些改动,加入了高速数字传输的特性和连接的稳定性。
ESP32 Arduino MQTT is a way to connect an ESP32 microcontroller to an MQTT broker using the Arduino programming language. MQTT stands for Message Queuing Telemetry Transport, which is a lightweight messaging protocol designed for IoT devices. This protocol allows devices to publish and subscribe to topics, enabling communication between them. To use ESP32 Arduino MQTT, you need to first set up your ESP32 microcontroller with the Arduino IDE. Once you have done that, you can install the MQTT library for Arduino and start coding. Here are the basic steps: 1. Install the PubSubClient library in the Arduino IDE. 2. Connect your ESP32 to a Wi-Fi network using the Wi-Fi library. 3. Connect to an MQTT broker using the MQTT library and the PubSubClient library. 4. Publish messages to a topic using the MQTT library and the PubSubClient library. 5. Subscribe to topics and receive messages using the MQTT library and the PubSubClient library. Here is an example code for setting up an ESP32 Arduino MQTT connection: ``` #include <WiFi.h> #include <PubSubClient.h> // Wi-Fi credentials const char* ssid = "your_SSID"; const char* password = "your_PASSWORD"; // MQTT broker details const char* mqtt_server = "your_MQTT_broker_IP_address"; const int mqtt_port = 1883; const char* mqtt_username = "your_MQTT_username"; const char* mqtt_password = "your_MQTT_password"; // MQTT client WiFiClient espClient; PubSubClient client(espClient); void setup() { // Connect to Wi-Fi network WiFi.begin(ssid, password); while (WiFi.status() != WL_CONNECTED) { delay(1000); } // Connect to MQTT broker client.setServer(mqtt_server, mqtt_port); client.setCallback(callback); while (!client.connected()) { if (client.connect("ESP32_client", mqtt_username, mqtt_password)) { client.subscribe("test/topic"); } else { delay(1000); } } } void loop() { // Publish message to MQTT broker client.publish("test/topic", "Hello, world!"); // Check for incoming messages client.loop(); } void callback(char* topic, byte* payload, unsigned int length) { // Handle incoming messages Serial.print("Message received on topic: "); Serial.println(topic); Serial.print("Message: "); for (int i = 0; i < length; i++) { Serial.print((char)payload[i]); } Serial.println(); } ``` This code connects to a Wi-Fi network and an MQTT broker, subscribes to a topic, publishes a message to that topic, and receives incoming messages. You can modify the code to fit your specific use case.

“相关推荐”对你有帮助么?

  • 非常没帮助
  • 没帮助
  • 一般
  • 有帮助
  • 非常有帮助
提交
评论
添加红包

请填写红包祝福语或标题

红包个数最小为10个

红包金额最低5元

当前余额3.43前往充值 >
需支付:10.00
成就一亿技术人!
领取后你会自动成为博主和红包主的粉丝 规则
hope_wisdom
发出的红包

打赏作者

Mr.Lanson

你的鼓励将是我创作的最大动力

¥1 ¥2 ¥4 ¥6 ¥10 ¥20
扫码支付:¥1
获取中
扫码支付

您的余额不足,请更换扫码支付或充值

打赏作者

实付
使用余额支付
点击重新获取
扫码支付
钱包余额 0

抵扣说明:

1.余额是钱包充值的虚拟货币,按照1:1的比例进行支付金额的抵扣。
2.余额无法直接购买下载,可以购买VIP、付费专栏及课程。

余额充值