


Service我觉的跟Activity差不多,就是没有界面。它是在后台运行的。服务有自己的生命周期。接下来就学习以下内容:
想仔细了解的可以去官网学习
https://developer.android.com/guide/components/services.html
- 开启服务生命周期和绑定服务生命周期
- 调用本地服务方法和远程服务方法
开启服务生命周期
布局文件activity_main.xml
<?xml version="1.0" encoding="utf-8"?>
<LinearLayout xmlns:android="http://schemas.android.com/apk/res/android"
    xmlns:tools="http://schemas.android.com/tools"
    android:id="@+id/activity_main"
    android:layout_width="match_parent"
    android:layout_height="match_parent"
    android:orientation="vertical"
    tools:context="com.example.edu.androidforservicesimple.MainActivity">


    <Button
        android:onClick="start"
        android:layout_width="match_parent"
        android:layout_height="wrap_content"
        android:text="开启服务"
        />
    <Button
        android:onClick="stop"
        android:layout_width="match_parent"
        android:layout_height="wrap_content"
        android:text="关闭服务"
        />
</LinearLayout>
就两个按钮,很简单
MyService.java代码如下:
import android.app.Service;
import android.content.Intent;
import android.os.IBinder;
import android.util.Log;

public class MyService extends Service {
    private static final String TAG="TAG";
    public MyService() {
    }

    @Override
    public IBinder onBind(Intent intent) {
        // TODO: Return the communication channel to the service.
        throw new UnsupportedOperationException("Not yet implemented");
    }

    @Override
    public void onCreate() {
        Log.i(TAG, "onCreate: ........");
        super.onCreate();
    }

    @Override
    public int onStartCommand(Intent intent, int flags, int startId) {
        Log.i(TAG, "onStartCommand: ...........");
        return super.onStartCommand(intent, flags, startId);
    }

    /**
     * 已过时的方法
     * @param intent
     * @param startId
     */
    @Override
    public void onStart(Intent intent, int startId) {
        Log.i(TAG, "onStart: .........");
        super.onStart(intent, startId);
    }


    @Override
    public void onDestroy() {
        Log.i(TAG, "onDestroy: ..............");
        super.onDestroy();
    }
}
MainActivity.java代码如下:
import android.content.Intent;
import android.support.v7.app.AppCompatActivity;
import android.os.Bundle;
import android.view.View;

public class MainActivity extends AppCompatActivity {

    private Intent intent;

    @Override
    protected void onCreate(Bundle savedInstanceState) {
        super.onCreate(savedInstanceState);
        setContentView(R.layout.activity_main);
        intent = new Intent(MainActivity.this, MyService.class);
    }

    public void start(View view) {

        startService(intent);
    }

    public void stop(View view) {
        stopService(intent);
    }
}
运行结果分析:
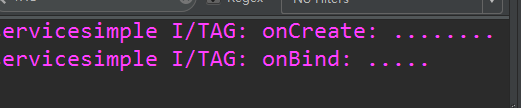
点击开启按钮:执行的方法是:

点击关闭按钮:执行的方法是:

如果是点击返回键时 ,不会关闭,它会一直运行在后台
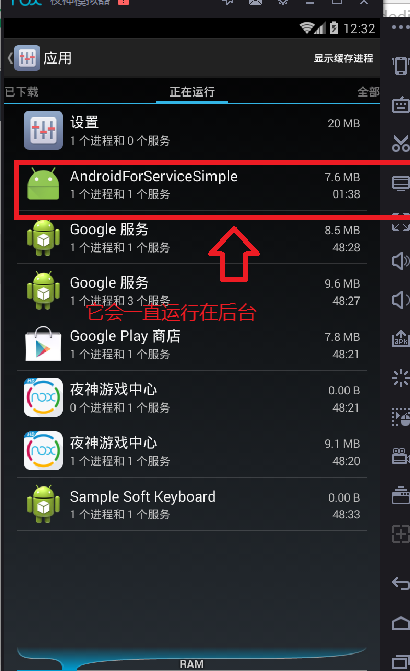
直到有调用 stopService(Intent i )方法,服务才会关闭。还要补充的是:当又一次开启服务时。onCreate()不会执行,它只会执行一次。只会执行onStartCommand()方法,
绑定服务生命周期
首先在MyService服务中添加两个生命周期方法:
onUnbind()和onRebind()
然后改写MainActivity.java 代码如下:
import android.content.ComponentName;
import android.content.Intent;
import android.content.ServiceConnection;
import android.os.IBinder;
import android.support.v7.app.AppCompatActivity;
import android.os.Bundle;
import android.util.Log;
import android.view.View;

public class MainActivity extends AppCompatActivity {

    private static final String TAG = "TAG";
    private Intent intent;


    ServiceConnection myConn = new ServiceConnection() {
        //当服务被绑定时调用
        @Override
        public void onServiceConnected(ComponentName name, IBinder service) {
            Log.i(TAG, "onServiceConnected:.... ");
        }

        //当服务被解绑是调用
        @Override
        public void onServiceDisconnected(ComponentName name) {
            Log.i(TAG, "onServiceDisconnected: ...........");
        }
    };

    @Override
    protected void onCreate(Bundle savedInstanceState) {
        super.onCreate(savedInstanceState);
        setContentView(R.layout.activity_main);
        intent = new Intent(MainActivity.this, MyService.class);
    }

    public void start(View view) {
        bindService(intent, myConn, BIND_AUTO_CREATE);
    }

    public void stop(View view) {
        unbindService(myConn);

    }
}
运行结果分析:
点击开启服务按钮: 执行的方法是
再点击开启按钮时: 不执行任何方法
当点击关闭服务按钮时 : 执行的方法是

如果点击关闭服务按钮后,再点击开启按钮时又会执行onCreate和onBind这两种方法。当按下返回键时,也会执行onUnbind和onDestroy方法。这个可以说明绑定服务时,它的生命周期跟启动它服务的Activity活动的生命周期一样。
我们先看下官网介绍这两种方式的区别:
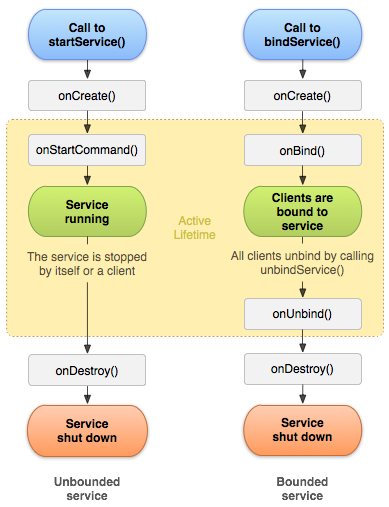
这张图已经说明的很明显了。讲完这两种方式的生命周期,我们该学习怎么样调用服务里的方法。一种时是调用本地的,还一种是远程调用的
调用本地服务的方法
activity_main.xml代码如下:
<?xml version="1.0" encoding="utf-8"?>
<LinearLayout xmlns:android="http://schemas.android.com/apk/res/android"
    xmlns:tools="http://schemas.android.com/tools"
    android:id="@+id/activity_main"
    android:layout_width="match_parent"
    android:layout_height="match_parent"
    android:orientation="vertical"
    tools:context="com.example.edu.androidforinvokeservicemethod.MainActivity">

    <Button
        android:text="绑定服务"
        android:layout_width="match_parent"
        android:layout_height="wrap_content"
        android:onClick="bind"
        />

    <Button
        android:layout_width="match_parent"
        android:layout_height="wrap_content"
        android:onClick="unbind"
        android:text="解除绑定"
        />

    <Button
        android:layout_width="match_parent"
        android:layout_height="wrap_content"
        android:onClick="invoke"
        android:text="调用服务中的方法"
        />
</LinearLayout>
MyService代码如下 :
import android.app.Service;
import android.content.Intent;
import android.os.Binder;
import android.os.IBinder;
import android.util.Log;

public class MyService extends Service {
    public MyService() {
    }

    public class MyBinder extends Binder {
        public void getName() {
            getMethodInService();
        }
    }

    public void getMethodInService() {
        Log.i("TAG", "我是来自服务中的方法");
    }

    @Override
    public IBinder onBind(Intent intent) {

        return new MyBinder();
    }
}
MainActivity.java代码如下:
import android.content.ComponentName;
import android.content.Intent;
import android.content.ServiceConnection;
import android.os.IBinder;
import android.support.v7.app.AppCompatActivity;
import android.os.Bundle;
import android.view.View;

public class MainActivity extends AppCompatActivity {

    private Intent intent;
    private MyService.MyBinder myBinder;

    @Override
    protected void onCreate(Bundle savedInstanceState) {
        super.onCreate(savedInstanceState);
        setContentView(R.layout.activity_main);
        intent = new Intent(MainActivity.this, MyService.class);
    }

    ServiceConnection myConn = new ServiceConnection() {
        //绑定服务时调用
        @Override
        public void onServiceConnected(ComponentName name, IBinder service) {
            myBinder = (MyService.MyBinder) service;
        }

        //解除绑定时调用
        @Override
        public void onServiceDisconnected(ComponentName name) {

        }
    };

    /**
     * 绑定服务
     *
     * @param view
     */
    public void bind(View view) {
        bindService(intent, myConn, BIND_AUTO_CREATE);
    }

    /**
     * 解绑服务
     *
     * @param view
     */
    public void unbind(View view) {
        unbindService(myConn);
    }

    /**
     * 调用服务中的方法
     *
     * @param view
     */
    public void invoke(View view) {

        myBinder.getName();
    }
}
先点击绑定按钮,再点击调用按钮
运行结果:

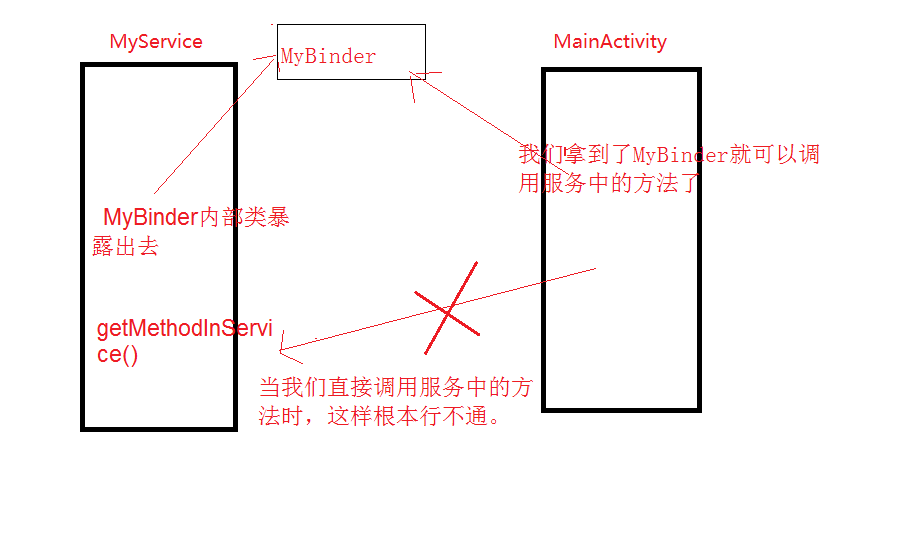
最后提一下,估计有人想new 一个服务实例来调用服务中的方法,其实这根本不行。因为这是系统为我们创建的。
接下来就重点学习怎么调用远程服务中的方法
首先创建个远程服务端
创建个adil文件 在main目录下:
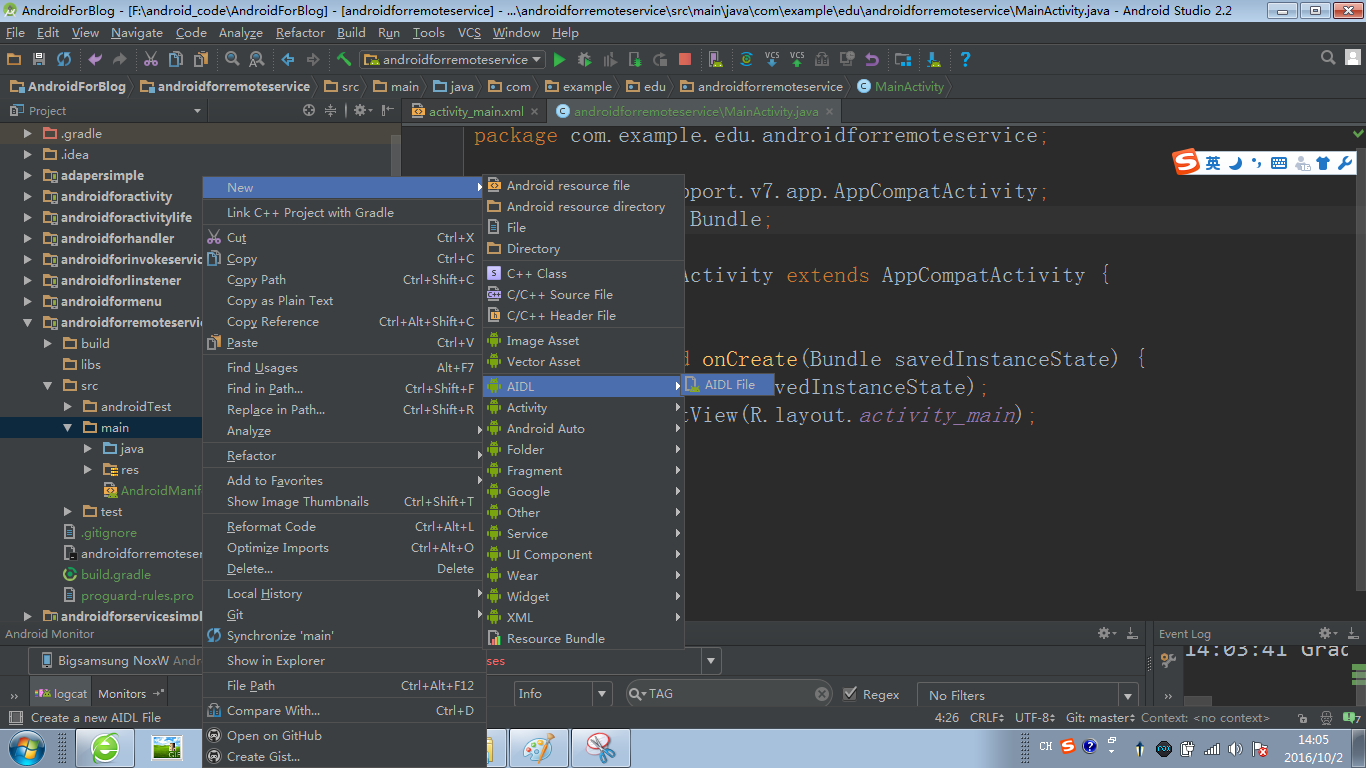
代码如下:
interface Person {
    void getName();
}
就是声明了一个方法,补充下,该方法不能有修饰符
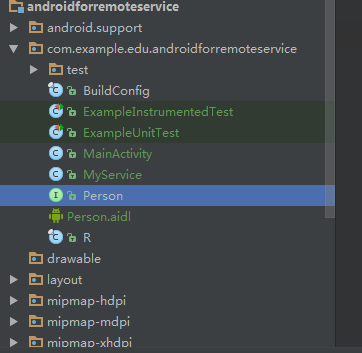
在rebuild下该项目,会出现person接口
接下来就编写MyService.java 代码如下:
import android.app.Service;
import android.content.Intent;
import android.os.IBinder;
import android.os.RemoteException;
import android.util.Log;

public class MyService extends Service {
    public MyService() {
    }

    public class MyBinder extends Person.Stub {

        @Override
        public void getName() throws RemoteException {
            getMethodInService();
        }
    }

    public void getMethodInService(){

        Log.i("TAG", " 我是来自远程服务中的方法。。。。 ");

    }
    @Override
    public IBinder onBind(Intent intent) {

        return new MyBinder();
    }
}
接下来我们再创建个Moudle,创建之前我们先把远程服务的清单文件改下,设置下动作。因为我们要通过这个来开启远程服务
 <service
            android:name=".MyService"
            android:enabled="true"
            android:exported="true">
            <intent-filter>
                <action android:name="edu.jju.remote"></action>
            </intent-filter>
        </service>
创建好了新的Moudle 就把远程服务下定义的adil文件直接复制过来,带包一起复制。然后复制到新创建的Moudle Main目录下
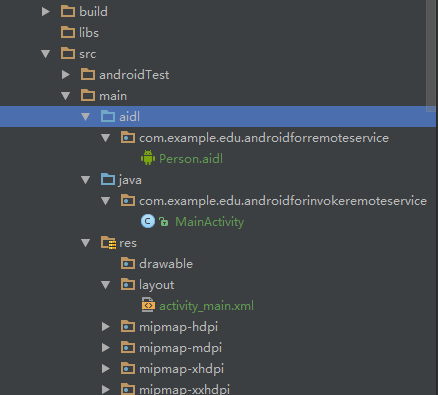
复制完然后就rebuild下
activity_main.xml代码如下:
<?xml version="1.0" encoding="utf-8"?>
<LinearLayout xmlns:android="http://schemas.android.com/apk/res/android"
    xmlns:tools="http://schemas.android.com/tools"
    android:id="@+id/activity_main"
    android:layout_width="match_parent"
    android:layout_height="match_parent"
    android:orientation="vertical"
    tools:context="com.example.edu.androidforinvokeremoteservice.MainActivity">


    <Button
        android:onClick="bind"
        android:layout_width="match_parent"
        android:layout_height="wrap_content"
        android:text="绑定远程服务"
        />
    <Button
        android:onClick="invoke"
        android:layout_width="match_parent"
        android:layout_height="wrap_content"
        android:text="调用远程服务中的方法"
        />
</LinearLayout>
就是两个按钮,简单。哈哈
MainActivity.java代码如下:
import android.content.ComponentName;
import android.content.Intent;
import android.content.ServiceConnection;
import android.os.IBinder;
import android.os.RemoteException;
import android.support.v7.app.AppCompatActivity;
import android.os.Bundle;
import android.view.View;

import com.example.edu.androidforremoteservice.Person;

public class MainActivity extends AppCompatActivity {
    private Intent intent;
    private Person person;

    @Override
    protected void onCreate(Bundle savedInstanceState) {
        super.onCreate(savedInstanceState);
        setContentView(R.layout.activity_main);
        intent = new Intent();
        intent.setAction("edu.jju.remote");//该动作是远程服务当中的
    }

    ServiceConnection myConn = new ServiceConnection() {
        @Override
        public void onServiceConnected(ComponentName name, IBinder service) {
            person = Person.Stub.asInterface(service);//这个跟调用本地服务方法有些区别
        }

        @Override
        public void onServiceDisconnected(ComponentName name) {

        }
    };

    /**
     * 绑定远程服务
     * @param view
     */
    public void bind(View view) {
        bindService(intent, myConn, BIND_AUTO_CREATE);
    }

    /**
     * 调用远程服务中的方法
     * @param view
     * @throws RemoteException
     */
    public void invoke(View view) throws RemoteException {
        person.getName();
    }
}
然后就是怎么测试了。应该先运行远程服务后,再执行这个调用远程服务的项目
点击绑定远程服务按钮,然后点击调用远程服务方法按钮。
运行结果:

我居然一次就运行成功了,没出问题。太佩服自己了。。哈哈
我已经把service服务讲的差不多了,如果更详细的了解服务的话可以去官网看。你也可以把我上面写的跟着做一遍也差不多了解服务的基本知识了。基本上代码全部在上面。
总结:
服务的启动方式有两种,一种是启动另一种是绑定。绑定这种的生命周期跟绑定它的Activity生命周期一样。再接下来我们就学习怎么调用服务中的方法,也是两种情况,1 调用本地服务中的方法,2 调用远程服务中的方法。它们核心思想也是向外暴露接口,我感觉差不多。哈哈。。


 1152
1152

 被折叠的 条评论
为什么被折叠?
被折叠的 条评论
为什么被折叠?
 到【灌水乐园】发言


