


作为目前架构设计主推的微服务模式,springboot无疑是java程序员的福音,下面就开始springboot的实战之旅。
(目前已有深入应用以及与其他各大技术框架集成,本地实践笔记40余篇,后续持续连载)
通过spring4的了解,spring4加入了更多的注解,从而减少xml文件的编写。从最初的纯粹xml配置、到注解+xml结合、到现在的java配置,进行了很大的一个调整。
本次案例将通过最简单的helloworld来实践常用的几个注解和服务的启动测试以及打包。
1、首先新建maven项目,这个就不在重复,比较基础;
2、在POM文件中加入
<parent>
<groupId>org.springframework.boot</groupId>
<artifactId>spring-boot-starter-parent</artifactId>
<version>1.4.0.RELEASE</version>
</parent>
<dependencies>
<dependency>
<groupId>org.springframework.boot</groupId>
<artifactId>spring-boot-starter-web</artifactId>
</dependency>
</dependencies>
使用spring-boot-starter-parent作为当前项目的parent可以享受到spring boot应用相关的一系列依赖(dependency), 插件(plugins)等装备, 而添加spring-boot-starter-web这个依赖,则纯粹是我们希望构建一个独立运行的web应用而已(注意, 没有version元素定义,因为spring-boot-starter-parent已经提供了相应的dependencyManagement)。
3、
3.1、编写对应的启动类:
package com.shf.SpringBoot1;
import org.springframework.boot.SpringApplication;
import org.springframework.boot.autoconfigure.SpringBootApplication;
@SpringBootApplication
public class App {
public static void main(String[] args) throws Exception {
SpringApplication.run(App.class, args);
}
}
3.2、控制类
package com.shf.SpringBoot1;
import org.springframework.beans.factory.annotation.Autowired;
import org.springframework.web.bind.annotation.RequestMapping;
import org.springframework.web.bind.annotation.RestController;
import com.shf.springboot.controller.ServerConfig2;
@RestController
public class HelloWorldController {
@RequestMapping("/")
public String helloWorld() {
return "Hello World!";
}
}
3.3、启动服务:
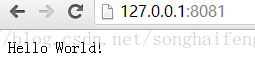
默认已经通过tomcat,且为8080端口。通过浏览器访问:

成功完成初级的尝试,那么我们未来可以通过springboot来进行webapi的服务开发了。下面开始尝试更多的配置。
特别关注:@SpringBootApplication 其实是@Configuraiton + @EnableAutoConfiguration + @ComponentScan的组合使用。那么具体这3个配置的使用又是如何的呢,也将在后续使用尝试。
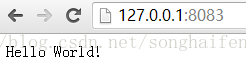
4、如果我需要能够修改tomcat端口如何尝试,通过阅读官方,发现其实非常简答,直接在recourse目录下添加application.properties文件,配置:

# Server settings (ServerProperties)
server.port=8081
查看启动服务效果:

访问效果:
5、所有的配置都有维护在application.properties中,springboot会自动读取,但是这不是我喜欢的风格,如何能够很好的将自定义的自己的properties文件,从而更新tomcat端口呢,发现有一个接口EmbeddedServletContainerCustomizer,通过在启动类实现此接口,并重写对应的方法即可。同时也需要考虑如何读取我们的自定义文件呢,下面来看过程实现:
5.1、首先配置server.properties文件:
# Server settings (ServerProperties)
server.port=8083
server.address=127.0.0.1
server.sessionTimeout=30
server.contextPath=/
5.2、编写对应资源文件读取的配置类:
package com.shf.SpringBoot1;
import org.springframework.boot.context.properties.ConfigurationProperties;
@ConfigurationProperties(prefix = "server",locations = {"classpath:config/server.properties"})
public class ServerConfig {
private String port;
private String address;
private String sessionTimeout;
private String contextPath;
public String getPort() {
return port;
}
public void setPort(String port) {
this.port = port;
}
public String getAddress() {
return address;
}
public void setAddress(String address) {
this.address = address;
}
public String getSessionTimeout() {
return sessionTimeout;
}
public void setSessionTimeout(String sessionTimeout) {
this.sessionTimeout = sessionTimeout;
}
public String getContextPath() {
return contextPath;
}
public void setContextPath(String contextPath) {
this.contextPath = contextPath;
}
}
5.3、调整启动类:
package com.shf.SpringBoot1;
import org.springframework.beans.factory.annotation.Autowired;
import org.springframework.boot.SpringApplication;
import org.springframework.boot.autoconfigure.SpringBootApplication;
import org.springframework.boot.context.embedded.ConfigurableEmbeddedServletContainer;
import org.springframework.boot.context.embedded.EmbeddedServletContainerCustomizer;
import org.springframework.boot.context.properties.EnableConfigurationProperties;
@SpringBootApplication
@EnableConfigurationProperties({ServerConfig.class})
public class App
implements EmbeddedServletContainerCustomizer
{
@Autowired
ServerConfig serverConfig;
public static void main(String[] args) throws Exception {
SpringApplication.run(App.class, args);
}
/**
* 自定义tomcat相关属性
*/
@Override
public void customize(ConfigurableEmbeddedServletContainer container) {
container.setPort(Integer.valueOf(serverConfig.getPort()).intValue());
}
}
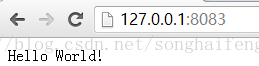
5.4、我们重新启动服务:

特别关注:@ConfigurationProperties:通过配置资源文件的路径以及前缀,配置资源,从而在其他类中能够注入。
@EnableConfigurationProperties:需要在启动类中添加该注解,并配置对应的java配置类,从而启用@ConfigurationProperties注解。
@Autowired :直接注入对应的资源配置类的bean对象实例,方便此类中直接使用。
@EnableAutoConfiguration:此时如果不采用@SpringBootApplication注解,采用@EnableAutoConfiguration同样正常启动服务,那么之前@SpringBootApplication不是等效于3个注解么,下面先来看看@ComponentScan的作用。
本案例中采用的其实是
TomcatEmbeddedServletContainerFactory容器对象
6、@ComponentScan对应xml时代的<context:component-scan>, 用来扫描classpath下标注了相应Annotation的bean定义,然后加载到Spring容器之中。一般配合@Configuration来使用, 你可以将@Configuraiton做的事情是纯手工定义bean然后添加到Spring容器, 而@ComponentScan则是自动收集bean定义并添加到Spring容器。
根据之前的实践,目前将controller类和app类放置在了一个包下,下面我们再加入一个不同包下的控制类呢:
package
com.shf.springboot.controller;
import org.springframework.web.bind.annotation.RequestMapping;
import org.springframework.web.bind.annotation.RestController;
import com.shf.SpringBoot1.ServerConfig;
@RestController
public class HelloWorldController2 {
@RequestMapping("/helloworld")
public String helloWorld() {
return "Hello World!";
}
}
6.1、此时我们采用@EnableAutoConfiguration注解:
启动测试,发现均失败,没有对应的地址:


下面来调整我们的启动类,在类级别配置
@ComponentScan(basePackages={"com.shf.SpringBoot1","com.shf.springboot.*"})
再次启动测试:
成功验证。

6.2、既然@SpringBootApplication 包含有3个注解的组合,那么我们采用@SpringBootApplication呢,同时先注释掉@ComponentScan我们验证下结果:
启动测试:


看来
@SpringBootApplication能够自动扫描相同包路径下的bean配置,那么取消@ComponentScan注释,查看结果:


再次均成功,看来使用@SpringBootApplication的情况下,我们还是需要@ComponentScan配合使用,避免无法扫描其他包下的bean。
7、既然可以正常的读取properties文件了,那么我们在不同的包下均添加一个资源文件,在com.shf.springboot.controller加一个ServerConfig2配置类,读取application.properties文件:
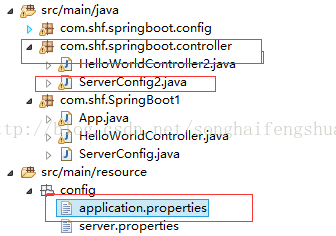
7.1、配置内容:
# Server settings (ServerProperties)
server.port=8082
7.2、此时注意我们的名称为application,其实这个名称是spring默认配置文件的名称,编写对应的配置类:
package com.shf.springboot.controller;
import org.springframework.boot.context.properties.ConfigurationProperties;
@ConfigurationProperties(prefix = "server")
public class ServerConfig2 {
private String port;
public String getPort() {
return port;
}
public void setPort(String port) {
this.port = port;
}
}
由于是默认的配置文件,所有我们无需配置其locations属性。
7.3、我们在两个控制类中均注入配置类的bean对象,打印对应的信息:
第一个控制类HelloWorldController:
package com.shf.SpringBoot1;
import org.springframework.beans.factory.annotation.Autowired;
import org.springframework.web.bind.annotation.RequestMapping;
import org.springframework.web.bind.annotation.RestController;
import com.shf.springboot.controller.ServerConfig2;
@RestController
public class HelloWorldController {
@Autowired
ServerConfig serverConfig;
@Autowired
ServerConfig2 serverConfig2;
@RequestMapping("/")
public String helloWorld() {
System.out.println("server.properties服务器端口:"+serverConfig.getPort());
System.out.println("application.properties服务器端口:"+serverConfig2.getPort());
return "Hello World!";
}
}
第二个控制类HelloWorldController2:
package com.shf.springboot.controller;
import org.springframework.beans.factory.annotation.Autowired;
import org.springframework.web.bind.annotation.RequestMapping;
import org.springframework.web.bind.annotation.RestController;
import com.shf.SpringBoot1.ServerConfig;
@RestController
public class HelloWorldController2 {
@Autowired
ServerConfig serverConfig;
@Autowired
ServerConfig2 serverConfig2;
@RequestMapping("/helloworld")
public String helloWorld() {
System.out.println("server.properties服务器端口:"+serverConfig.getPort());
System.out.println("application.properties服务器端口:"+serverConfig2.getPort());
return "Hello World!";
}
}
7.4、此时关注我们启动的端口号,应该是server中的8083

7.5、下面我们对两个请求地址发起请求查看打印读取的信息:


是我预期的结果,通过bean注入正确的读取了资源文件内容。
8、再次猜想,如果不配置对应的端口修改程序,注释掉设置代码:
@Override
public void customize(ConfigurableEmbeddedServletContainer container) {
// container.setPort(Integer.valueOf(serverConfig.getPort()).intValue());
}
此时既然有application.properties文件,即时不是在resource根目录也同样作为默认访问,验证结果:

9、目前设置端口是在启动类中实现EmbeddedServletContainerCustomizer接口并实现其方法进行设置,那么我们是否可以尝试编写一个配置类,将此设置独立在启动类以外,进行更多独立配置的分离管理。实现代码如下:
9.1、首先删除启动类中EmbeddedServletContainerCustomizer的继承以及实现;
9.2、添加配置类:
package
com.shf.springboot.config;
import org.springframework.beans.factory.annotation.Autowired;
import org.springframework.boot.context.embedded.ConfigurableEmbeddedServletContainer;
import org.springframework.boot.context.embedded.EmbeddedServletContainerCustomizer;
import org.springframework.context.annotation.Bean;
import org.springframework.context.annotation.Configuration;
import com.shf.SpringBoot1.ServerConfig;
@Configuration
public class WebConfiguration {
@Autowired
ServerConfig serverConfig;
@Bean
public EmbeddedServletContainerCustomizer embeddedServletContainerCustomizer() {
return new EmbeddedServletContainerCustomizer() {
@Override
public void customize(ConfigurableEmbeddedServletContainer container) {
container.setPort(Integer.valueOf(serverConfig.getPort()).intValue());
}
};
}
}
可以发现此处又多使用了两个注解:
@Configuration:注解当前类为配置类,可以在其中注解bean对象,类似于applicationContext.xml文件作用;
@Bean:注解标示当前方法为bean对象,在项目工程中可以直接注入使用;默认为单例模式bean对象;
9.3、我们在启动了设置了@ComponentScan(basePackages={"com.shf.SpringBoot1","
com.shf.springboot.*"})故能够启动后加载配置类,构建bean对象。
9.4、查看实验的效果:

是期望值,设置成功。
10、在实际项目工程中,研发环境和生产环境可能配置不同的端口,如果能够动态的加载呢,根据不同的环境使用不同的端口,实验代码如下:
10.1、package com.shf.springboot.config;
import org.springframework.beans.factory.annotation.Autowired;
import org.springframework.boot.context.embedded.ConfigurableEmbeddedServletContainer;
import org.springframework.boot.context.embedded.EmbeddedServletContainerCustomizer;
import org.springframework.context.annotation.Bean;
import org.springframework.context.annotation.Configuration;
import org.springframework.context.annotation.Profile;
import com.shf.SpringBoot1.ServerConfig;
@Configuration
@Profile(value="production")
public class WebConfiguration {
@Autowired
ServerConfig serverConfig;
@Bean
public EmbeddedServletContainerCustomizer embeddedServletContainerCustomizer() {
return new EmbeddedServletContainerCustomizer() {
@Override
public void customize(ConfigurableEmbeddedServletContainer container) {
container.setPort(Integer.valueOf(serverConfig.getPort()).intValue());
}
};
}
}
在application.properties中设置:
# Server settings (ServerProperties)
server.port=8082
spring.profiles.active=production
此处我们发现又使用了一个新的注解:
@Profile:设置当前配置环境。
对应资源文件中的生产环境设置,与配置类WebConfiguration呼应,此时能够读取serverConfig中的port值,上述维护为8083,查看验证结果:

10.2、此时如果我们把配置类修改为dev呢,研发环境,启动服务:
package com.shf.springboot.config;
import org.springframework.beans.factory.annotation.Autowired;
import org.springframework.boot.context.embedded.ConfigurableEmbeddedServletContainer;
import org.springframework.boot.context.embedded.EmbeddedServletContainerCustomizer;
import org.springframework.context.annotation.Bean;
import org.springframework.context.annotation.Configuration;
import org.springframework.context.annotation.Profile;
import com.shf.SpringBoot1.ServerConfig;
@Configuration
@Profile(value="dev")
public class WebConfiguration {
@Autowired
ServerConfig serverConfig;
@Bean
public EmbeddedServletContainerCustomizer embeddedServletContainerCustomizer() {
return new EmbeddedServletContainerCustomizer() {
@Override
public void customize(ConfigurableEmbeddedServletContainer container) {
container.setPort(Integer.valueOf(serverConfig.getPort()).intValue());
}
};
}
}

此时直接采用了application.properties文件中设置的port8082,不加载WebConfiguration配置类中的bean。
10.3、如果我们在配置类中有两个bean,一个采用设置为生产环境个,一个开发环境,取消类级别的设置。
首先修改application.properties中环境设置:
# Server settings (ServerProperties)
server.port=8082
spring.profiles.active=dev
其次修改配置类
package com.shf.springboot.config;
import org.springframework.beans.factory.annotation.Autowired;
import org.springframework.boot.context.embedded.ConfigurableEmbeddedServletContainer;
import org.springframework.boot.context.embedded.EmbeddedServletContainerCustomizer;
import org.springframework.context.annotation.Bean;
import org.springframework.context.annotation.Configuration;
import org.springframework.context.annotation.Profile;
import com.shf.SpringBoot1.ServerConfig;
@Configuration
public class WebConfiguration {
@Autowired
ServerConfig serverConfig;
@Bean
@Profile(value="dev")
public EmbeddedServletContainerCustomizer devEmbeddedServletContainerCustomizer() {
return new EmbeddedServletContainerCustomizer() {
@Override
public void customize(ConfigurableEmbeddedServletContainer container) {
container.setPort(Integer.valueOf(serverConfig.getPort()).intValue());
}
};
}
@Bean
@Profile(value="production")
public EmbeddedServletContainerCustomizer proEmbeddedServletContainerCustomizer() {
return new EmbeddedServletContainerCustomizer() {
@Override
public void customize(ConfigurableEmbeddedServletContainer container) {
// container.setPort(Integer.valueOf(serverConfig.getPort()).intValue());
}
};
}
}
启动服务验证,读取server.properties文件设置的8083,是否正确呢:

特别注意:如果在类级别设置了@Profile(value="production"),但如果active.profile为dev,则无论内部是否设置dev环境下的bean,均不会被实例化。说明类级别的优先级高于方法级别。
11、那么如果我们需要部署了怎么办呢,首先在POM文件中添加如下编译插件:
<build>
<plugins>
<plugin>
<groupId>org.springframework.boot</groupId>
<artifactId>spring-boot-maven-plugin</artifactId>
</plugin>
</plugins>
</build>
通过

进行打包,生成jar文件

在cmd下通过java -jar **.jar 启动服务.


12、对于在研发过程中我们没有打包的编译库,我们启动服务除了传统通过Eclipse中的run还可以在cmd下启动,正式由于
<plugin>
<groupId>org.springframework.boot</groupId>
<artifactId>spring-boot-maven-plugin</artifactId>
<configuration>
<source>1.7</source>
<target>1.7</target>
</configuration>
</plugin>
的插件配置,cmd启动后找到项目根目录通过mvn spring-boot:run命令即可启动内置tomcat服务:
F:\SWorkspace\SpringBoot1>mvn spring-boot:run
[INFO] Scanning for projects...
[INFO]
[INFO] ------------------------------------------------------------------------
[INFO] Building SpringBoot1 0.0.1-SNAPSHOT
[INFO] ------------------------------------------------------------------------
[INFO]
[INFO] >>> spring-boot-maven-plugin:1.4.0.RELEASE:run (default-cli) > test-compile @ SpringBoot1 >>>
[WARNING] The POM for com.google.guava:guava:jar:15.0 is invalid, transitive dependencies (if any) will not be available, enable debug logging for more details
[INFO]
[INFO] --- maven-resources-plugin:2.6:resources (default-resources) @ SpringBoot1 ---
[INFO] Using 'UTF-8' encoding to copy filtered resources.
[INFO] skip non existing resourceDirectory F:\SWorkspace\SpringBoot1\src\main\resources
[INFO] skip non existing resourceDirectory F:\SWorkspace\SpringBoot1\src\main\resources
[INFO]
[INFO] --- maven-compiler-plugin:3.1:compile (default-compile) @ SpringBoot1 ---
[INFO] Nothing to compile - all classes are up to date
[INFO]
[INFO] --- maven-resources-plugin:2.6:testResources (default-testResources) @ SpringBoot1 ---
[INFO] Using 'UTF-8' encoding to copy filtered resources.
[INFO] skip non existing resourceDirectory F:\SWorkspace\SpringBoot1\src\test\resources
[INFO]
[INFO] --- maven-compiler-plugin:3.1:testCompile (default-testCompile) @ SpringBoot1 ---
[INFO] Nothing to compile - all classes are up to date
[INFO]
[INFO] <<< spring-boot-maven-plugin:1.4.0.RELEASE:run (default-cli) < test-compile @ SpringBoot1 <<<
[INFO]
[INFO] --- spring-boot-maven-plugin:1.4.0.RELEASE:run (default-cli) @ SpringBoot1 ---
[INFO] Attaching agents: []
. ____ _ __ _ _
/\\ / ___'_ __ _ _(_)_ __ __ _ \ \ \ \
( ( )\___ | '_ | '_| | '_ \/ _` | \ \ \ \
\\/ ___)| |_)| | | | | || (_| | ) ) ) )
' |____| .__|_| |_|_| |_\__, | / / / /
=========|_|==============|___/=/_/_/_/
:: Spring Boot :: (v1.4.0.RELEASE)
最后通过CTRL+C按键即可停止该tomcat服务,顺利关闭tomcat应用进程:

持续连载,如有错误之处望留言协助斧正,感谢。


 399
399

 被折叠的 条评论
为什么被折叠?
被折叠的 条评论
为什么被折叠?
 到【灌水乐园】发言


