


一、回顾grpc
我们先简单看下如何构建一个grpc服务的,梳理出里面的主要关键点。
1、准备工作
需要使用grpc,我们得先安装把proto文件能转为代码的工具,即protoc,去官网下载zip包解压得到protoc.exe。
因为要使用的go语言,需要安装protoc执行时的插件,支持把proto转为go语言代码。为了使用grpc,还要安装protoc工具关于grpc的插件。两个插件都可以通过go get的方式安装。
go install google.golang.org/protobuf/cmd/protoc-gen-go@latest
go install google.golang.org/grpc/cmd/protoc-gen-go-grpc@v1.2
最后我们就可以通过如下两个命令,把一个proto文件转为两个go代码文件。
protoc --go_out=. *.proto
protoc --go-grpc_out=. *.proto
得到的文件名格式
- xxxx.pb.go
- xxxx_grpc.pb.go
2、如何实现server
以我们定义的article.proto为例,执行完protoc命令后,得到如下文件
- article.pb.go
- article_grpc.pb.go
在article_grpc.pb.go中实现了接口ArticleServer
// ArticleServer is the server API for Article service.
// All implementations must embed UnimplementedArticleServer
// for forward compatibility
type ArticleServer interface {
	ArticleAdd(context.Context, *AddRequest) (*AddResponse, error)
	mustEmbedUnimplementedArticleServer()
}
在article_grpc.pb.go中还提供好了把ArticleServer接口实现注册到grpc服务注册器中的方法
func RegisterArticleServer(s grpc.ServiceRegistrar, srv ArticleServer) {
	s.RegisterService(&Article_ServiceDesc, srv)
}
对于业务开发人员,我们要做的工作就是如下几步:
- 创建一个结构体并实现proto中的ArticleServer接口,如上,只要实现ArticleAdd这个方法即可。方法中的代码逻辑就是我们具体的业务处理。
- 创建tcp监听,通过google.golang.org/grpc包提供的 grpc.NewServer()方法创建出服务(含注册功能),即提供了RisterService()来注册我们实现的服务。
- 调用proto中提供好的方法,把我们的ArticleServer接口实现注册到grpc服务中。
- 调用grpc服务的Server()启动监听。
func main() {
    // tpc监听
	lis, err := net.Listen("tcp", "0.0.0.0:1001")
	if err != nil {
		log.Fatalln("failed to listen")
	}
	// 创建grpc服务
	grpcServer := grpc.NewServer()
    // 注册我们实现的服务
	proto.RegisterArticleServer(grpcServer, new(ArticleServer))
    // 启动服务
	grpcServer.Serve(lis)
}
二、如何集成到go-kit
从基础概念推导
1.、必须实现proto中的Server接口
要提供grpc服务,我们离不开google.golang.org/grpc包提供的基础能力。要创建grpc服务grpcServer := grpc.NewServer(), grpcServer服务提供了方法func (s *Server) RegisterService(sd *ServiceDesc, ss interface{})来注入具体的service,这个service都是业务开发人员按照服务接口定义实现的具体struct。从这个角度看,这些都是最底层的方式,无法避开的。
比如我们的article.proto构建出article_grpc.pb.go之后,里面有个接口如下,我们必须实现它,它既是我们业务的处理逻辑。
type ArticleServer interface {
	ArticleAdd(context.Context, *AddRequest) (*AddResponse, error)
	mustEmbedUnimplementedArticleServer()
}
2、必须有go-kit的service
go-kit的思想是想在transport层处理各类协议并把负责数据的encode和decode即代码中定义的业务数据与协议提供的数据转换。那么对于grpc协议,go-kit需要提供能从grpc协议中拿到数据并把业务数据返回grpc通信的能力。transport会把真正的处理交给endpoint接口去处理,只要提供给它context.Context和数据 interface{}即可。endpoint会把处理能力最终交给go-kit的service层,go-kit的service层不在乎协议,它就是最朴实的业务处理,有自己的请求响应,有自己的业务逻辑代码,如果一个服务既提供http也提供grpc,对于service层的方法都是一个。
基于上面go-kit思路,很显然,我们先得实现go-kit所定义的service层的业务代码,这个可不是xxxx_grpc.pb.go中定义的接口实现,而是纯粹的业务处理,不关乎协议的。等实现好service,就得考虑怎么提供给endpoint层。 方式是一样的,就是endpoint层都是函数类型的实现,通过闭包方式把service传进去。要把service层业务代码提供给endpoint层,之前做http的服务时,是对于一个service的方法(一个业务处理)转为一个endpoint,是利用闭包把service注入到其中,让调用这个endpoint时,实际还得调用里面service的具体业务处理。这里我们仍然是要这么实现,这些endpoint闭包也是不关心协议的,他们就是如下的函数类型:
func(ctx context.Context, request interface{}) (response interface{}, err error)
3、 endpoint层提供给transport层
transport要把协议中要处理的方法,用go-kit提供的方式处理,而且处理方法里面套上三个核心元素,即endpoint、decode、encode。
比如go-kit集成http,net/http提供了一个路由和一个handler的映射,handler接口定义如下:
type Handler interface {
	ServeHTTP(ResponseWriter, *Request)
}
go-kit就提供了自己的handler,它会包装把三个元素包装成一个handler然后处理一个路由:
// 使用kit创建handler
	handler := httpTransport.NewServer(
		endpointArticleAdd,
		my_tansport.DecodeArticleAddRequest,
		my_tansport.EncodeArticleAddResponse,
	)
参照这个思路,grpc也是一样,grpc用的handler是什么,go-kit也需要提供能把三个元素包装成这个handler的方法。
但是对于grpc,我们上面说明,得有个实现grpc Server的接口实现,比如ArticleServer接口实现,实现里面的方法ArticleAdd(context.Context, *AddRequest) (*AddResponse, error)。grpc协议过来,也是先要交给ArticleServer接口实现来处理的,它好比是http路由处理必须提供的handler,这里是grpc,必须提供grpc Server接口实现。
那么go-kit就要提供方式,来重写这个handler,即重写我们实现的grpc Server接口的结构体中的每个方法。
我们需要三个元素:
- endpoint,它跟其他协议比如http的endpoint都是一样的,都是
func(ctx context.Context, request interface{}) (response interface{}, err error) - decode, 它是从配合ArticleServer这种grpc Server接口实现的,它拿到数据是proto中定义的比如*AddRequest,然解析为go-kit service层需要的数据。
- encode,它也是配合ArticleServer这种grpc Server接口实现的,它从endpoint拿到数据,转为proto中要响应的数据格式,比如*AddResponse。
这里就发现,如何把endpoint转为 Server实现才是核心问题。
Server接口实现,, 我们比如叫 articleServer 里面就是proto中ArticleServer接口定义的,需要实现里面的一个个方法。这些方法实现不是自己直接写业务逻辑了,而要要交给go-kit的transport层定义的handler,这样它才能继续交给endpoint,这样就协议解耦了。
那么articleServer中的方法怎么由transport层接管呢?go-kit提供了包github.com/go-kit/kit/transport/grpc提供了这个能力。grpc包提供的如下方法
grpc.NewServer(
			endpoint,
			DecodeArticleAddRequest,
			EncodeArticleAddResponse,
)它可以把endpoint闭包和encode、decode方法转为一个Handler接口实现。我们看下github.com/go-kit/kit/transport/grpc包Handler接口定义,它用于处理grpc协议的通用方式。
// Handler which should be called from the gRPC binding of the service
// implementation. The incoming request parameter, and returned response
// parameter, are both gRPC types, not user-domain.
type Handler interface {
	ServeGRPC(ctx context.Context, request interface{}) (context.Context, interface{}, error)
}
比如我们一个微服务中定义了多个proto,我们得到多个xxxx_grpc.pb.go文件,对应的就有多个XXXXServer接口。我们要实现这些XXXXServer接口,就会有多个xxxxServer实现。这些实现要注入到grpc服务中,最终就能基于tcp连接提供服务。
每一个xxxxServer中每个业务处理方法,都不再是自己填入业务处理,而是要使用一个Handler接口实现,Handler实现服务从协议中encode、decode数据然后交给endpoint处理。一个xxxxServer比如有十几个业务方法,对应的就得有十几个Handler实现,每个Handler实现绑定一个endpoint、一个decode、一个encode。
三、一个demo来说明
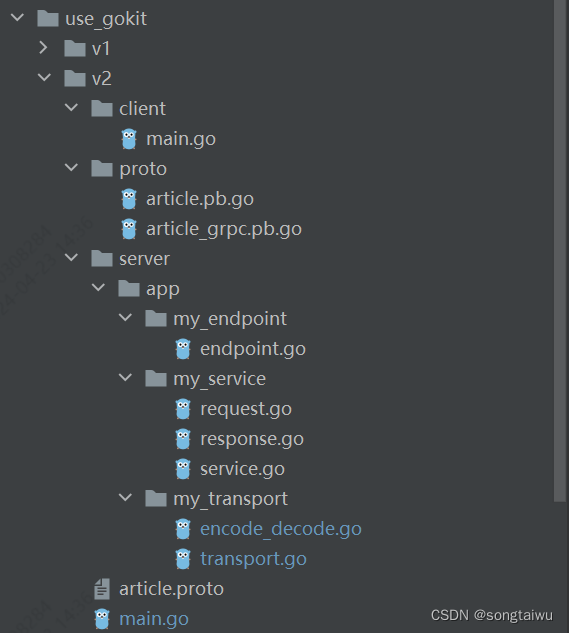
1、 构建proto
在article.proto中定义好一个grpc服务
//proto3标准
syntax = "proto3";

option go_package = "./proto";

package Article;

// 定义rpc接口
service Article {
  rpc ArticleAdd (AddRequest) returns (AddResponse) {}
}

//AddRequest协议内容
message AddResponse {
  string data = 1;
}

//AddRequest协议内容
message AddRequest {
  string name = 1;
  string content = 2;
}
然后用工具生成 article.pb.go 、 article_grpc.pb.go
2、构建service
service层定义了业务处理的具体逻辑, 定义了业务的请求和响应体。
request.go
package my_service

type ArticleAddRequest struct {
	Name    string `json:"name"`
	Content string `json:"content"`
}
response.go
package my_service

type ArticleAddResponse struct {
	Data string `json:"data"`
}
service.go
package my_service

import (
	"context"
)

// IService 用于定义业务方法的接口
type IService interface {
	ArticleAdd(ctx context.Context, param ArticleAddRequest) ArticleAddResponse
}

// baseService 用于实现上面定义的接口
type baseService struct {
	// 根据业务需求填充结构体...
}

func (b baseService) ArticleAdd(ctx context.Context, param ArticleAddRequest) ArticleAddResponse {
	return ArticleAddResponse{
		Data: param.Name + param.Content,
	}
}

func NewService() IService {
	return &baseService{}
}
3、构建endpoint
my_endpoint/endpoint.go
package my_endpoint

import (
	"context"
	"github.com/go-kit/kit/endpoint"
	"swwgo/use_gokit/v2/server/app/my_service"
)

// MakeEndPointArticleAdd 创建关于业务的构造函数
// 传入service层定义的相关业务接口
// 返回 endpoint.Endpoint, 实际就是一个函数签名
func MakeEndPointArticleAdd(svc my_service.IService) endpoint.Endpoint {
	// 这里使用闭包,可以在这里做一些业务的处理
	return func(ctx context.Context, request interface{}) (response interface{}, err error) {
		// request是对应请求过来时传入的参数,实际上是Transport中一个decode函数处理得到的
		// 需要进行下断言
		req := request.(my_service.ArticleAddRequest)

		// 这里就是调用service层定义的业务逻辑
		// 把拿到的数据作为参数
		res := svc.ArticleAdd(ctx, req)

		// 返回值可以是任意的,不过根据规范要返回我们刚才定义好的返回对象
		return res, nil
	}
}
4、构建transport
首先实现一组decode和encode方法,用于把grpc协议的数据转为我们grpc定义时的结构体。
my_transport/encode_decode.go
package my_tansport

import (
	"context"
	"swwgo/use_gokit/v2/proto"
	"swwgo/use_gokit/v2/server/app/my_service"
)

// Transport 负责HTTP、gRPC、thrift等相关协议的请求逻辑

// 对每一个请求都要实现一对参数解码和返回值编码的函数签名。
// DecodeRequest & EncodeResponse 函数签名是固定的。
// func DecodeRequest(c context.Context, request *http.Request) (interface{}, error)
// func EncodeResponse(c context.Context, w http.ResponseWriter, response interface{}) error

// DecodeRequest解码,请求参数封装为Endpoint中定义的Request格式
func DecodeArticleAddRequest(_ context.Context, r interface{}) (interface{}, error) {
	req := r.(*proto.AddRequest)
	return my_service.ArticleAddRequest{
		Content: req.Content,
		Name: req.Name,
	}, nil
}

// EncodeResponse编码,把业务的响应封装成想要的结构
func EncodeArticleAddResponse(ctx context.Context, resp interface{}) (interface{}, error) {
	res := resp.(my_service.ArticleAddResponse)
	// 这里将Response返回成有效的json格式给http
	// 设置请求头
	//w.Header().Set("Content-Type", "application/json; charset=utf-8")
	// 使用内置json包转换
	return &proto.AddResponse{
		Data: res.Data,
	}, nil
}
my_transport/transport.go
proto生成的文件有ArticleServer接口, 我们这里定义一个grpcServer结构体,它实现ArticleServer接口。这里要注意,如果一个项目中有多个proto,那就有多个XXXServer接口要实现,这里就都由grpcServer来实现。
实现的方式就是grpcServer包含了这些XXXServer的方法,不过它们都是用grpcServer中的一个个kitgrpc.Handler实现的, 这个handler就类似http的handler,由endpoint、decode、encode三部分组成。
package my_tansport

import (
	"context"
	"github.com/go-kit/kit/endpoint"
	kitgrpc "github.com/go-kit/kit/transport/grpc"
	"swwgo/use_gokit/v2/proto"
)

type grpcServer struct {
	addArticle kitgrpc.Handler
	proto.UnimplementedArticleServer
}

func (g grpcServer) ArticleAdd(ctx context.Context, request *proto.AddRequest) (*proto.AddResponse, error) {
	_, resp, err := g.addArticle.ServeGRPC(ctx, request)
	if err != nil {
		return nil, err
	}
	return resp.(*proto.AddResponse), nil
}

func NewArticleServer(ctx context.Context, endpoint endpoint.Endpoint) proto.ArticleServer {
	return &grpcServer{
		addArticle: kitgrpc.NewServer(
			endpoint,
			DecodeArticleAddRequest,
			EncodeArticleAddResponse,
			),
	}
}
5、服务的main.go
综合上面的内容,
我们已经有了一个endpoint,然后用endppint构建handler,这些handler构成的grpcServer就是实现了我们定义的服务接口。
package main

import (
	"context"
	"google.golang.org/grpc"
	"log"
	"net"
	"swwgo/use_gokit/v2/proto"
	"swwgo/use_gokit/v2/server/app/my_endpoint"
	"swwgo/use_gokit/v2/server/app/my_service"
	"swwgo/use_gokit/v2/server/app/my_transport"
)

func main() {
	// 1.先创建定义的业务处理接口实现, service
	svc := my_service.NewService()

	// 2.再创建业务服务的函数签名,endpoint
	endpointArticleAdd := my_endpoint.MakeEndPointArticleAdd(svc)

	ctx := context.Background()
	handler := my_tansport.NewArticleServer(ctx, endpointArticleAdd)

	lis, err := net.Listen("tcp", "0.0.0.0:1001")
	if err != nil {
		log.Fatalln("failed to listen")
	}

	grpcServer := grpc.NewServer()
	proto.RegisterArticleServer(grpcServer, handler)
	grpcServer.Serve(lis)
}


 395
395


 被折叠的 条评论
为什么被折叠?
被折叠的 条评论
为什么被折叠?
 到【灌水乐园】发言


