


SpringBoot源码解析(1.3.1)-自动装配原理(创建应用上下文AnnotationConfigServletWebServerApplicationContext)
承接上文:https://blog.csdn.net/sql2008help/article/details/123311657
关键代码 :
ConfigurableApplicationContext context = null;
context = this.createApplicationContext();
ApplicationContextFactory
SpringApplication createApplicationContext 方法:
protected ConfigurableApplicationContext createApplicationContext() {
    return this.applicationContextFactory.create(this.webApplicationType);
}
其中 applicationContextFactory是 SpringApplication 成员 ,类型为 ApplicationContextFactory ,默认值为 ApplicationContextFactory.DEFAULT,如下:
@FunctionalInterface
public interface ApplicationContextFactory {
    // 实现 create 方法,根据不同的应用类型创建应用上下文
    ApplicationContextFactory DEFAULT = (webApplicationType) -> {
        try {
            switch(webApplicationType) {
            case SERVLET:
                return new AnnotationConfigServletWebServerApplicationContext();
            case REACTIVE:
                return new AnnotationConfigReactiveWebServerApplicationContext();
            default:
                return new AnnotationConfigApplicationContext();
            }
        } catch (Exception var2) {
            throw new IllegalStateException("Unable create a default ApplicationContext instance, you may need a custom ApplicationContextFactory", var2);
        }
    };

    ConfigurableApplicationContext create(WebApplicationType webApplicationType);
}
因为在此例中我们引入了web相关依赖,所以当前应用类型为:WebApplicationType.SERVLET,具体判断应用类型的逻辑可以查看 WebApplicationType.deduceFromClasspath 方法,https://blog.csdn.net/sql2008help/article/details/123253292
<dependency>
    <groupId>org.springframework.boot</groupId>
    <artifactId>spring-boot-starter-web</artifactId>
</dependency>
所以此时我们实例化出的应用上下文对象为 AnnotationConfigServletWebServerApplicationContext。
AnnotationConfigServletWebServerApplicationContext
AnnotationConfigServletWebServerApplicationContext 类图如下:
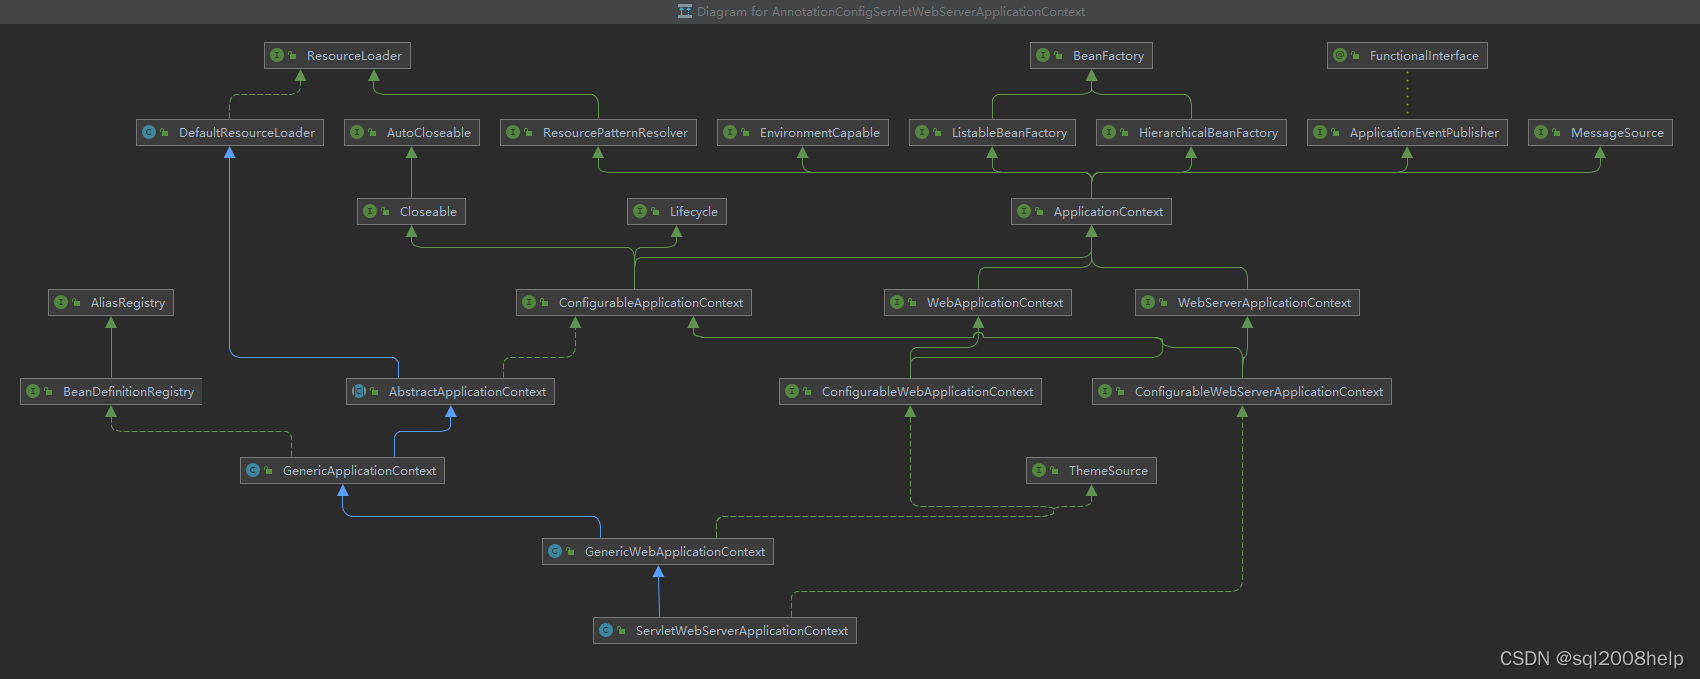
AnnotationConfigServletWebServerApplicationContext:
package:org.springframework.boot.web.servlet.context
构造方法:
public AnnotationConfigServletWebServerApplicationContext() {
    this.annotatedClasses = new LinkedHashSet();
    // 初始化通过注解定义的bean阅读器
    this.reader = new AnnotatedBeanDefinitionReader(this);
    this.scanner = new ClassPathBeanDefinitionScanner(this);
}
AnnotatedBeanDefinitionReader 实例化:
public AnnotatedBeanDefinitionReader(BeanDefinitionRegistry registry) {
   this(registry, getOrCreateEnvironment(registry));
}

public AnnotatedBeanDefinitionReader(BeanDefinitionRegistry registry, Environment environment) {
    this.beanNameGenerator = AnnotationBeanNameGenerator.INSTANCE;
    this.scopeMetadataResolver = new AnnotationScopeMetadataResolver();
    Assert.notNull(registry, "BeanDefinitionRegistry must not be null");
    Assert.notNull(environment, "Environment must not be null");
    this.registry = registry;
    this.conditionEvaluator = new ConditionEvaluator(registry, environment, (ResourceLoader)null);
    // 注册一些 后置处理器
    AnnotationConfigUtils.registerAnnotationConfigProcessors(this.registry);
}
AnnotationConfigUtils.registerAnnotationConfigProcessors(this.registry) 方法:
public static Set<BeanDefinitionHolder> registerAnnotationConfigProcessors(BeanDefinitionRegistry registry, @Nullable Object source) {
       。。。省略。。。
        RootBeanDefinition def;
        if (!registry.containsBeanDefinition("org.springframework.context.annotation.internalConfigurationAnnotationProcessor")) {
            def = new RootBeanDefinition(ConfigurationClassPostProcessor.class);
            def.setSource(source);
            // 往 DefaultListableBeanFactory 注册一个 key 为 org.springframework.context.annotation.internalConfigurationAnnotationProcessor,BeanDefinition 为 ConfigurationClassPostProcessor 的后置处理器
            beanDefs.add(registerPostProcessor(registry, def, "org.springframework.context.annotation.internalConfigurationAnnotationProcessor"));
        }

      (registerPostProcessor(registry, def, "org.springframework.context.annotation.internalAutowiredAnnotationProcessor"));
        }

        if (jsr250Present && !registry.containsBeanDefinition("org.springframework.context.annotation.internalCommonAnnotationProcessor")) {
            def = new RootBeanDefinition(CommonAnnotationBeanPostProcessor.class);
            def.setSource(source);
            beanDefs.add(registerPostProcessor(registry, def, "org.springframework.context.annotation.internalCommonAnnotationProcessor"));
        }

        if (jpaPresent && !registry.containsBeanDefinition("org.springframework.context.annotation.internalPersistenceAnnotationProcessor")) {
            def = new RootBeanDefinition();

            try {
                def.setBeanClass(ClassUtils.forName("org.springframework.orm.jpa.support.PersistenceAnnotationBeanPostProcessor", AnnotationConfigUtils.class.getClassLoader()));
            } catch (ClassNotFoundException var6) {
                throw new IllegalStateException("Cannot load optional framework class: org.springframework.orm.jpa.support.PersistenceAnnotationBeanPostProcessor", var6);
            }

            def.setSource(source);
            beanDefs.add(registerPostProcessor(registry, def, "org.springframework.context.annotation.internalPersistenceAnnotationProcessor"));
        }

        if (!registry.containsBeanDefinition("org.springframework.context.event.internalEventListenerProcessor")) {
            def = new RootBeanDefinition(EventListenerMethodProcessor.class);
            def.setSource(source);
            beanDefs.add(registerPostProcessor(registry, def, "org.springframework.context.event.internalEventListenerProcessor"));
        }

        if (!registry.containsBeanDefinition("org.springframework.context.event.internalEventListenerFactory")) {
            def = new RootBeanDefinition(DefaultEventListenerFactory.class);
            def.setSource(source);
            beanDefs.add(registerPostProcessor(registry, def, "org.springframework.context.event.internalEventListenerFactory"));
        }

        return beanDefs;
    }
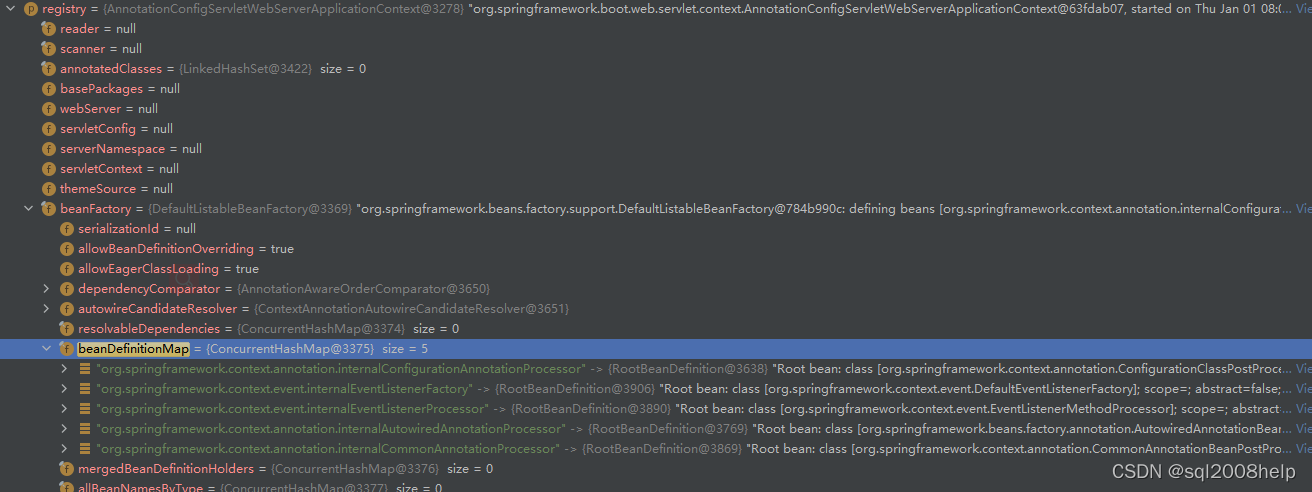
以上步骤做完之后 DefaultListableBeanFactory 中bean定义键值对 beanDefinitionMap 值如下:
这个点比较重要,后面步骤中会用到
ServletWebServerApplicationContext:
package:org.springframework.boot.web.servlet.context
GenericWebApplicationContext:
package:org.springframework.web.context.support
GenericApplicationContext:
package:org.springframework.context.support
这个类包含bean实例化工厂 DefaultListableBeanFactory 属性
AbstractApplicationContext:
package:org.springframework.context.support
关键属性:
bean 工厂后置处理器集合,通过实现BeanFactoryPostProcessor接口,可以让spring在bean实例化之前修改bean定义,比如修改bean属性的默认值
private final List<BeanFactoryPostProcessor> beanFactoryPostProcessors;
BeanFactoryPostProcessor 接口定义:
package org.springframework.beans.factory.config;

import org.springframework.beans.BeansException;

@FunctionalInterface
public interface BeanFactoryPostProcessor {
    void postProcessBeanFactory(ConfigurableListableBeanFactory var1) throws BeansException;
}
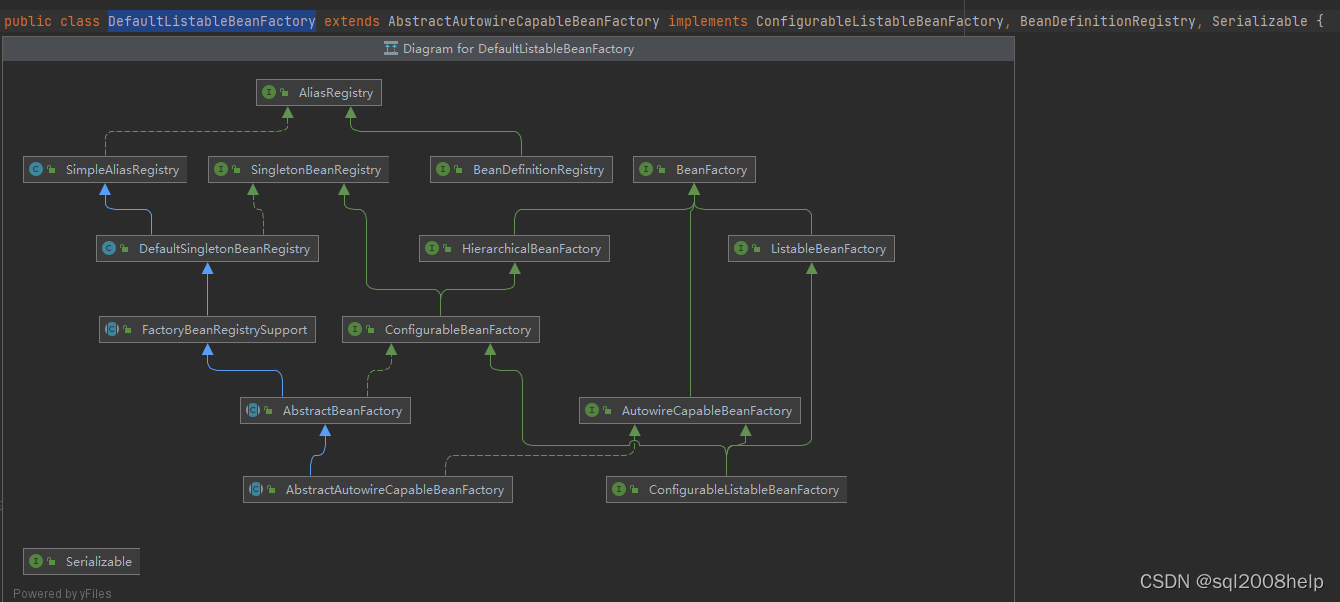
DefaultListableBeanFactory
bean实例化工厂,类图如下:
关键属性:
// BeanDefinition 为bean定义类,beanDefinitionMap 为bean定义的键值对集合
private final Map<String, BeanDefinition> beanDefinitionMap;
AbstractBeanFactory :
package:org.springframework.beans.factory.support
关键属性:
// bean 后置处理器,在 spring 加载完 bean 定义文件,并且实例化bean后,执行接口实现的方法
private final List<BeanPostProcessor> beanPostProcessors = new AbstractBeanFactory.BeanPostProcessorCacheAwareList();
BeanPostProcessor 接口:
BeanPostProcessor,可以在spring容器实例化bean之后,在执行bean的初始化方法前后,添加一些自己的处理逻辑,初始化方法,指的是下面两种:
1)bean实现了InitializingBean接口,对应的方法为afterPropertiesSet
2)在bean定义的时候,通过init-method设置的方法
BeanPostProcessor接口方法在BeanFactoryPostProcessor 接口方法之后执行
package org.springframework.beans.factory.config;

import org.springframework.beans.BeansException;
import org.springframework.lang.Nullable;

public interface BeanPostProcessor {
    @Nullable
    default Object postProcessBeforeInitialization(Object bean, String beanName) throws BeansException {
        return bean;
    }

    @Nullable
    default Object postProcessAfterInitialization(Object bean, String beanName) throws BeansException {
        return bean;
    }
}


 被折叠的 条评论
为什么被折叠?
被折叠的 条评论
为什么被折叠?
 到【灌水乐园】发言


