


如何写一个转发日志的fluentd插件?
上篇介绍了logging-operator依赖于自定义的fluentd插件,实现了根据指定的namespaces和labels转发日志,本篇将从以下几个方面介绍如何编写一个具有该功能集成的fluentd插件:
确定要扩展的插件类型
相关语法词法介绍
学习如何编写一个
fluentd插件
确定要扩展的插件类型
根据我们的需求, 需要按照namespaces和labels来完成日志的转发,这依赖于kubernetes元数据。kubernetes元数据的获取并不在fluentd阶段配置,而是在转发给fluentd之前,依赖于fluent-bit的配置。
https://docs.fluentbit.io/manual/pipeline/filters/kubernetes#workflow-of-tail-kubernetes-filter
$ kubectl get secrets defaultlogging-fluentbit  -o json | jq '.data."fluent-bit.conf"' | xargs echo | base64 --decode
[SERVICE]
    Flush        1
    Grace        5
    Daemon       Off
    Log_Level    info
    Parsers_File parsers.conf
    Coro_Stack_Size    24576
    storage.path  /buffers

[INPUT]
    Name         tail
    DB  /tail-db/tail-containers-state.db
    Mem_Buf_Limit  5MB
    Parser  docker
    Path  /var/log/containers/*.log
    Refresh_Interval  5
    Skip_Long_Lines  On
    Tag  kubernetes.*
[FILTER]
    Name        kubernetes
    Buffer_Size  0
    Kube_CA_File  /var/run/secrets/kubernetes.io/serviceaccount/ca.crt
    Kube_Tag_Prefix  kubernetes.var.log.containers
    Kube_Token_File  /var/run/secrets/kubernetes.io/serviceaccount/token
    Kube_URL  https://kubernetes.default.svc:443
    Match  kubernetes.*
Merge_Log On在确定好该配置后激活后,我们来到fluentd这一层,需要编写一个output插件来完成过滤、转发功能。
相关语法词法介绍
详细样例参考:https://docs.fluentd.org/plugin-development/api-plugin-output
上面链接中搬运过来就是这样的:
require 'fluent/plugin/output'

module Fluent::Plugin
  class SomeOutput < Output
    # First, register the plugin. 'NAME' is the name of this plugin
    # and identifies the plugin in the configuration file.
    Fluent::Plugin.register_output('NAME', self)

    # Enable threads if you are writing an async buffered plugin.
    helpers :thread

    # Define parameters for your plugin.
    config_param :path, :string

    #### Non-Buffered Output #############################
    # Implement `process()` if your plugin is non-buffered.
    # Read "Non-Buffered output" for details.
    ######################################################
    def process(tag, es)
      es.each do |time, record|
        # output events to ...
      end
    end

    #### Sync Buffered Output ##############################
    # Implement `write()` if your plugin uses normal buffer.
    # Read "Sync Buffered Output" for details.
    ########################################################
    def write(chunk)
      real_path = extract_placeholders(@path, chunk)

      log.debug 'writing data to file', chunk_id: dump_unique_id_hex(chunk.unique_id)

      # For standard chunk format (without `#format()` method)
      chunk.each do |time, record|
        # output events to ...
      end

      # For custom format (when `#format()` implemented)
      # File.open(real_path, 'w+')

      # or `#write_to(io)` is available
      # File.open(real_path, 'w+') do |file|
      #   chunk.write_to(file)
      # end
    end

    #### Async Buffered Output #############################
    # Implement `try_write()` if you want to defer committing
    # chunks. Read "Async Buffered Output" for details.
    ########################################################
    def try_write(chunk)
      real_path = extract_placeholders(@path, chunk)

      log.debug 'sending data to server', chunk_id: dump_unique_id_hex(chunk.unique_id)

      send_data_to_server(@host, real_path, chunk.read)

      chunk_id = chunk.unique_id

      # Create a thread for deferred commit.
      thread_create(:check_send_result) do
        while thread_current_running?
          sleep SENDDATA_CHECK_INTERVAL # == 5

          if check_data_on_server(real_path, chunk_id)
            # commit chunk
            # chunk will be deleted and not be retried anymore by this call
            commit_write(chunk_id)
            break
          end
        end
      end
    end

    # Override `#format` if you want to customize how Fluentd stores
    # events. Read the section "How to Customize the Serialization
    # Format for Chunks" for details.
    def format(tag, time, record)
      [tag, time, record].to_json
    end
  end
end
我将一个插件的编写规范整理为两类,一类是骨架定义,一类是子类逻辑实现:
- 骨架定义部分包括
require、module、class definition - 子类逻辑实现又包括插件注册、参数定义、激活配置等前置逻辑和具体接口实现和内置方法调用的逻辑。
require
根据需要编写的插件类型导入依赖:
require 'fluent/plugin/output' # input, filter, output, parser, formatter, storage or buffersubclass
所有的插件都是Fluent::Plugin::Base的子类。
class definition
module Fluent::Plugin
    class SomeOutput < Output
        ...
    end
end
register
注册插件的名称类别,需要根据这个来识别该插件,这里我们注册了一个名为NAME类别的output插件
Fluent::Plugin.register_output('NAME', self)helpers
以下的语法激活了线程helper, 可以调用 thread_create(:check_send_result)和thread_current_running?:
# Load thread helper
helpers :thread
----
 thread_create(:check_send_result) do
   while thread_current_running?
     sleep SENDDATA_CHECK_INTERVAL # == 5
     if check_data_on_server(real_path, chunk_id)
        # commit chunk
        # chunk will be deleted and not be retried anymore by this call
         commit_write(chunk_id)
         break
     end
   end
 end
----
config_param && desc
config_param定义插件的参数, desc定义描述:
desc 'The port number'
# `config_param` Defines a parameter. You can refer the following parameter via @port instance variable.
# Without `:default`, a parameter is required.
config_param :port, :integer
config_section
定义一个可以嵌套的参数结构:
name: 名称.
options:
root: 是否激活为root配置区域,内部使用;param_name: 子区域的名称;final: 激活后子类无法修改,buffer配置区域就是通过这种方法实现。init:激活后,必须要有初始默认值;required: 激活后,整个配置区域会被设为必须配置项, 否则会报错;multi: 激活后可以多次配置该配置区域;alias: Alias for this section.
参考:
config_section :user, param_name: :users, multi: true, required: false do
  desc 'Username for authentication'
  config_param :username, :string
  desc 'Password for authentication'
  config_param :password, :string, secret: true
end
接口实现和内置方法调用
如果output没有使用buffer就需要实现process(tag, es)方法,反之,则需要实现write(同步)和try_write方法(异步)。
#### Non-Buffered Output #############################
# Implement `process()` if your plugin is non-buffered.
# Read "Non-Buffered output" for details.
######################################################
def process(tag, es)

#### Sync Buffered Output ##############################
# Implement `write()` if your plugin uses normal buffer.
# Read "Sync Buffered Output" for details.
########################################################
def write(chunk)

#### Async Buffered Output #############################
# Implement `try_write()` if you want to defer committing
# chunks. Read "Async Buffered Output" for details.
########################################################
def try_write(chunk)

# Override `#format` if you want to customize how Fluentd stores
# events. Read the section "How to Customize the Serialization
# Format for Chunks" for details.
def format(tag, time, record)
更多接口实现和内置方法可以访问上文提到的链接。
补充介绍下configure(conf)方法, conf是Fluent::Config::Element的一个实例,实例变量和可访问的方法需要super调用之后才能可用。
def configure(conf)
  super

  # cache_default_value is created/configured by config_param
  @in_memory_cache = Hash.new(@cache_default_value)
end学习如何编写一个fluentd插件
掌握相关语法后,我们试着分析下上篇文章提到的fluentd插件如何实现根据namespaces和labels转发日志的功能。
require
require "fluent/plugin/output"
require 'prometheus/client'
class定义
按照官方的说法, 这里继承Output即可,如果不是做了巨大的改变,一般不推荐直接继承BareOutput:
class LabelRouterOutput < BareOutputregister
注册了一个名为label_router的type:
Fluent::Plugin.register_output("label_router", self)helpers
激活event_emitter 和record_accessor两个helper api :
helpers :event_emitter, :record_accessor
---
# event_emitter
# 1. emit event
router.emit(tag, time, record)
# 2. emit event stream
router.emit_stream(tag, es)
---
# record_accessor
# 1. Call `record_accessor_create` to create object
 @accessor = record_accessor_create('$.user.name')
# 2. Call `call` method to get value
value = @accessor.call(record) # With `$.user.name`, access to record["user"]["name"]
---
config_param
emit_mode: list类型,可选值为batch或者record;
sticky_tags: bool类型,默认为true, 相同的tag使用相同的方法;
default_route:string类型,默认为空,无法匹配时使用默认标签;
default_tag:string类型,默认为空, 无法匹配时使用默认tag;
metrics: bool类型,默认为false,是否激活监控;
config_section
定义了两层嵌套配置区域。
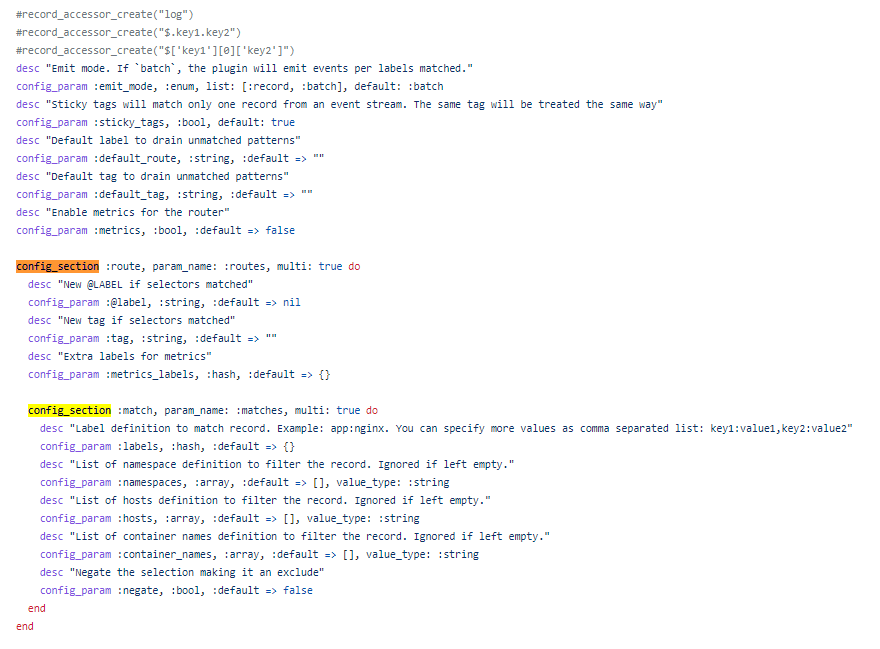
第一层,子嵌套配置区域名称为routes,可以配置多个route,route详细参数如下:
@label: 类型为string,默认为nil,如果子区域的选择器命中匹配到,则会新建一个名为@label值的label给该record;
tag: 类型为string, 如果子区域匹配到,则会新建一个名为tag值的tag给给该record,前提是这个新tag不为空;
metrics_labels: 类型为string, 配置额外的metrics labels;
第二层子嵌套配置区域名称为matches,可以配置多个match,match详细参数如下:
labels : hash 类型, 例如app:nginx
namespaces: array类型,默认是[], 需要过滤的命名空间在这里定义;
hosts:array类型,默认是[], 需要过滤的hosts在这里定义;
container_names: array类型,默认是[], 需要过滤的container_names在这里定义;
negate: bool类型,用来标记为反选,默认为false;
接口实现和内置方法
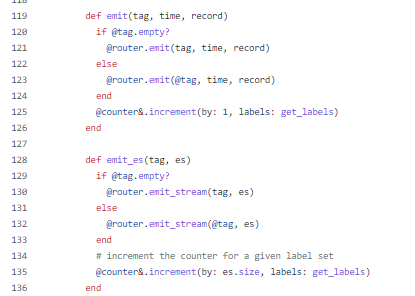
首先,定义了一个Route类共给初始化配置时调用,具体的逻辑可以不用看,只需要注意它实现了两个方法,分别用于逐个处理和批处理,处理完毕后将计数器增加size个计数:
下面直接看configure(conf)部分:
def configure(conf)
    super
    @registry = (::Prometheus::Client.registry if @metrics)
    @route_map = Hash.new { |h, k| h[k] = Set.new }
    @mutex = Mutex.new
    @routers = []
    @default_router = nil
    @routes.each do |rule|
       route_router = event_emitter_router(rule['@label'])
       @routers << Route.new(rule, route_router, @registry)
    end

    if @default_route != '' or @default_tag != ''
       default_rule = { 'matches' => nil, 'tag' => @default_tag, '@label' => @default_route}
       @default_router = Route.new(default_rule, event_emitter_router(@default_route), @registry)
    end

    @access_to_labels = record_accessor_create("$.kubernetes.labels")
    @access_to_namespace = record_accessor_create("$.kubernetes.namespace_name")
    @access_to_host = record_accessor_create("$.kubernetes.host")
    @access_to_container_name = record_accessor_create("$.kubernetes.container_name")

    @batch = @emit_mode == :batch
end这里定义了一些初始化默认值和实例变量,需要注意的是routers这个数组的值,存放的是定义的Route实例, 其中, event_emitter_router是helpers api导入的函数。
 @routes.each do |rule|
    route_router = event_emitter_router(rule['@label'])
    @routers << Route.new(rule, route_router, @registry)
end参考上文,由于没有定义buffer组件,只需要实现process方法即可:

上面这个函数基本上囊括了整个处理逻辑,无非是做一些匹配以及根据参数做一些控制流,来触发router实例中emit和emit_es方法。
整个逻辑很简单的。如果开启了强制匹配tag的模式,会在route_map中寻找该tag,做一次快速处理,否则会拿着组装的input_metadata去做匹配,如果匹配到则触发上面的两个emit方法,没有一个批次全部没匹配到就会判断有没有默认router来触发,最后,会触发一次批量emit_es。
至此,我们探讨了一下如果编写fluentd插件的流程,希望对你有所帮助!
PS: 码字不易,欢迎点赞收藏~
本文由博客一文多发平台 OpenWrite 发布!


 2212
2212


 被折叠的 条评论
为什么被折叠?
被折叠的 条评论
为什么被折叠?
 到【灌水乐园】发言


