


Core Data简单实例
Core Data原理
Core Data是一个模型层的技术。Core Data帮助你建立代表程序状态的模型层。Core Data也是一种持久化技术,它能将模型对象的状态持久化到磁盘,但它最重要的特点是:Core Data不仅是一个加载、保存数据的框架,它还能和内存中的数据很好的共事。
创建属性列表
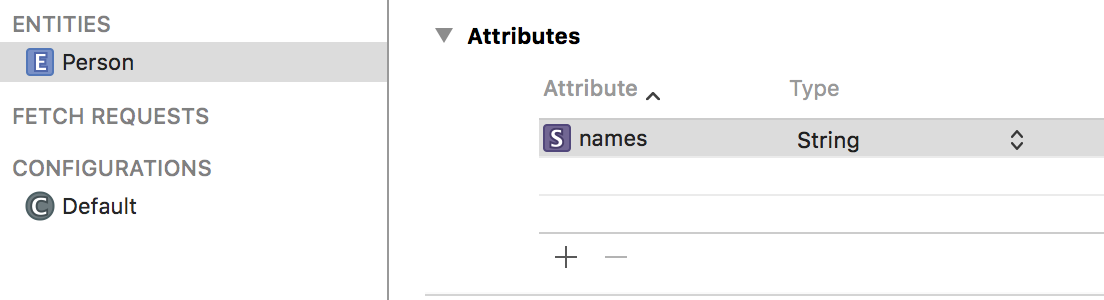
这里需要注意,名字都是键值,在后面的代码中要进行索引。
代码
//
//  TableViewController.swift
//  Hitlist
//
//  Created by 颜泽鑫 on 4/13/16.
//  Copyright © 2016 颜泽鑫. All rights reserved.
//

import UIKit
import CoreData

class TableViewController: UITableViewController {

    override func viewDidLoad() {
        super.viewDidLoad()

        // Uncomment the following line to preserve selection between presentations
        // self.clearsSelectionOnViewWillAppear = false

        // Uncomment the following line to display an Edit button in the navigation bar for this view controller.
        // self.navigationItem.rightBarButtonItem = self.editButtonItem()
    }


    override func viewDidAppear(animated: Bool) {
        // 获取core data 的代理。
        let appDelegate = UIApplication.sharedApplication().delegate as! AppDelegate

        let managerObjectContext = appDelegate.managedObjectContext

        // 2 建立一个获取的请求
        let fetchRequest = NSFetchRequest(entityName: "Person")

        // 3 执行请求
        do {
            let fetchedRequest = try managerObjectContext.executeFetchRequest(fetchRequest)
            let result = fetchedRequest as! [NSManagedObject]
            people = result
            self.tableView.reloadData()
        } catch {
            print("error")
        }
    }

    override func didReceiveMemoryWarning() {
        super.didReceiveMemoryWarning()
        // Dispose of any resources that can be recreated.
    }

    // MARK: - Table view data source

    @IBAction func AddName(sender: AnyObject) {
        let alertController = UIAlertController(title: "Add a names?", message: nil, preferredStyle: UIAlertControllerStyle.Alert)
        let YesAction = UIAlertAction(title: "Yes", style: UIAlertActionStyle.Default) { (action : UIAlertAction) -> Void in
            let textField = alertController.textFields![0] as UITextField
            self.saveName(textField.text!)
            // 重新加载。
            // self.tableView.reloadData()
            let indexPath = NSIndexPath(forItem: self.people.count - 1, inSection: 0)
            self.tableView.insertRowsAtIndexPaths([indexPath], withRowAnimation: UITableViewRowAnimation.Automatic)
        }
        let CancelAction = UIAlertAction(title: "Cancel", style: UIAlertActionStyle.Cancel, handler: nil)
        alertController.addTextFieldWithConfigurationHandler { (UITextField) -> Void in

        }
        alertController.addAction(YesAction)
        alertController.addAction(CancelAction)
        self.presentViewController(alertController, animated: true, completion: nil)
    }
    // core data object
    // shape-shifted!
    // 这里面可以存储一切空间类型。
    var people = [NSManagedObject]()

    func saveName(text : String) {
        // 获取core data 的代理。
        let appDelegate = UIApplication.sharedApplication().delegate as! AppDelegate

        let managerObjectContext = appDelegate.managedObjectContext

        let entity = NSEntityDescription.entityForName("Person", inManagedObjectContext: managerObjectContext)

        let person = NSManagedObject(entity: entity!, insertIntoManagedObjectContext: managerObjectContext)
        person.setValue(text, forKey: "names")
        // var error : NSError?

        do {
            try managerObjectContext.save()
        } catch {
            print("error")
        }
        people.append(person)
    }

    override func numberOfSectionsInTableView(tableView: UITableView) -> Int {
        // #warning Incomplete implementation, return the number of sections
        return 1
    }

    override func tableView(tableView: UITableView, numberOfRowsInSection section: Int) -> Int {
        // #warning Incomplete implementation, return the number of rows
        return people.count
    }

    override func tableView(tableView: UITableView, cellForRowAtIndexPath indexPath: NSIndexPath) -> UITableViewCell {
        let cell = tableView.dequeueReusableCellWithIdentifier("cell", forIndexPath: indexPath)
        let person = people[indexPath.row]
        // find the key of "names".
        cell.textLabel?.text = person.valueForKey("names") as? String

        // Configure the cell...

        return cell
    }


    /*
    // Override to support conditional editing of the table view.
    override func tableView(tableView: UITableView, canEditRowAtIndexPath indexPath: NSIndexPath) -> Bool {
        // Return false if you do not want the specified item to be editable.
        return true
    }
    */

    /*
    // Override to support editing the table view.
    override func tableView(tableView: UITableView, commitEditingStyle editingStyle: UITableViewCellEditingStyle, forRowAtIndexPath indexPath: NSIndexPath) {
        if editingStyle == .Delete {
            // Delete the row from the data source
            tableView.deleteRowsAtIndexPaths([indexPath], withRowAnimation: .Fade)
        } else if editingStyle == .Insert {
            // Create a new instance of the appropriate class, insert it into the array, and add a new row to the table view
        }
    }
    */

    /*
    // Override to support rearranging the table view.
    override func tableView(tableView: UITableView, moveRowAtIndexPath fromIndexPath: NSIndexPath, toIndexPath: NSIndexPath) {

    }
    */

    /*
    // Override to support conditional rearranging of the table view.
    override func tableView(tableView: UITableView, canMoveRowAtIndexPath indexPath: NSIndexPath) -> Bool {
        // Return false if you do not want the item to be re-orderable.
        return true
    }
    */

    /*
    // MARK: - Navigation

    // In a storyboard-based application, you will often want to do a little preparation before navigation
    override func prepareForSegue(segue: UIStoryboardSegue, sender: AnyObject?) {
        // Get the new view controller using segue.destinationViewController.
        // Pass the selected object to the new view controller.
    }
    */

}
Demo下载。(适应Xcode7)
提示
这个Demo在模拟机运行时可能会出现一些莫名其妙的bug,此时可以reset一下模拟器。同时,最好使用真机测试,这样不会出bug。


 2723
2723


 被折叠的 条评论
为什么被折叠?
被折叠的 条评论
为什么被折叠?
 到【灌水乐园】发言


