


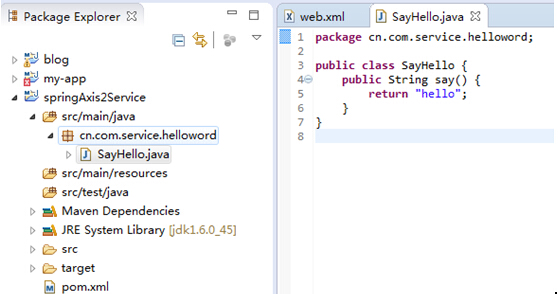
一、 新建一个web项目
二、 修改web.xml
<?xml version="1.0" encoding="UTF-8"?>
<web-app xmlns:xsi="http://www.w3.org/2001/XMLSchema-instance"
xmlns="http://java.sun.com/xml/ns/javaee"
xsi:schemaLocation="http://java.sun.com/xml/ns/javaee http://java.sun.com/xml/ns/javaee/web-app_3_0.xsd"
id="WebApp_ID" version="3.0">
  <display-name>axis2SpringService</display-name>

  <listener>  <listener-class>org.springframework.web.context.ContextLoaderListener</listener-class>
  </listener>

  <context-param>
    <param-name>contextConfigLocation</param-name>
    <param-value>/WEN-INF/applicationContext-*.xml</param-value>
  </context-param>

  <servlet>
    <servlet-name>AxisServlet</servlet-name>
    <servlet-class>
      org.apache.axis2.transport.http.AxisServlet
    </servlet-class>
    <load-on-startup>1</load-on-startup>
  </servlet>

  <servlet-mapping>
    <servlet-name>AxisServlet</servlet-name>
    <url-pattern>/services/*</url-pattern>
  </servlet-mapping>
</web-app>
三、配置Spring Bean
在/webapp/WEB-INF/文件夹下新建文件applicationContext-servlet.xml,内容如下:
<?xml version="1.0" encoding="UTF-8"?>
<beans
    xmlns="http://www.springframework.org/schema/beans"
    xmlns:xsi="http://www.w3.org/2001/XMLSchema-instance"
    xmlns:context="http://www.springframework.org/schema/context"
    xsi:schemaLocation="http://www.springframework.org/schema/beans
    http://www.springframework.org/schema/beans/spring-beans-4.1.xsd">
   <!-- Configure spring to give a hook to axis2 without a ServletContext -->
    <bean id="applicationContext"
class="org.apache.axis2.extensions.spring.receivers.ApplicationContextHolder" />

    <bean id="SayHello" class="cn.com.service.helloword.SayHello"></bean>
</beans>
四、 在WEB-INF\services\axis\META-INF\目录下配置services.xml(不存在则自己创建)
<?xml version="1.0" encoding="UTF-8"?>
<service name="axis2SpringService">
<description>axis2 service</description>
<parameter name="ServiceClass">cn.com.service.helloword.SayHello</parameter>
<parameter name="ServiceObjectSupplier">
org.apache.axis2.extensions.spring.receivers.SpringAppContextAwareObjectSupplier
</parameter>
<parameter name="SpringBeanName">SayHello</parameter>
<messageReceivers>
<messageReceiver mep="http://www.w3.org/2004/08/wsdl/in-only" class="org.apache.axis2.rpc.receivers.RPCInOnlyMessageReceiver" />
<messageReceiver mep="http://www.w3.org/2004/08/wsdl/in-out" class="org.apache.axis2.rpc.receivers.RPCMessageReceiver"/>
</messageReceivers>
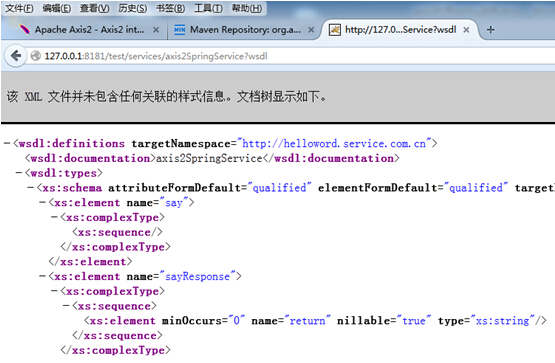
</service>五、访问wsdl
将spring项目发布到tomcat中,访问
http://工程部署路径/services/服务名称?wsdl服务名称就是services.xml中的name值
六、访问webservice方法
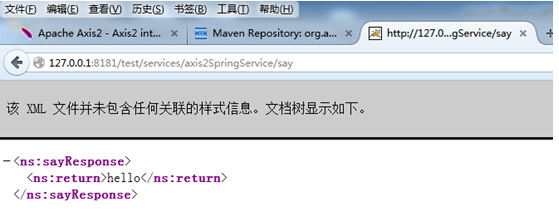
这只是示例,实际开发中要生成webservice客户端代码进行访问。
七、上述测试项目的pom.xml文件
<project xmlns="http://maven.apache.org/POM/4.0.0" xmlns:xsi="http://www.w3.org/2001/XMLSchema-instance"
  xsi:schemaLocation="http://maven.apache.org/POM/4.0.0 http://maven.apache.org/maven-v4_0_0.xsd">
  <modelVersion>4.0.0</modelVersion>
  <groupId>daybreak</groupId>
  <artifactId>springAxis2Service</artifactId>
  <packaging>war</packaging>
  <version>0.0.1-SNAPSHOT</version>
  <name>spring.axis2 Maven Webapp</name>
  <url>http://maven.apache.org</url>
  <dependencies>
    <dependency>
      <groupId>junit</groupId>
      <artifactId>junit</artifactId>
      <version>3.8.1</version>
      <scope>test</scope>
    </dependency>
    <dependency>
        <groupId>javax.servlet</groupId>
        <artifactId>servlet-api</artifactId>
        <version>3.0</version>
    </dependency>
    <dependency>
        <groupId>org.springframework</groupId>
        <artifactId>spring-core</artifactId>
        <version>4.1.4.RELEASE</version>
    </dependency>
    <dependency>
        <groupId>org.springframework</groupId>
        <artifactId>spring-context</artifactId>
        <version>4.1.4.RELEASE</version>
    </dependency>
    <dependency>
        <groupId>org.springframework</groupId>
        <artifactId>spring-web</artifactId>
        <version>4.1.4.RELEASE</version>
    </dependency>
    <dependency>
        <groupId>org.apache.axis2</groupId>
        <artifactId>axis2-adb</artifactId>
        <version>1.6.2</version>
    </dependency>
    <dependency>
        <groupId>org.apache.axis2</groupId>
        <artifactId>axis2-transport-http</artifactId>
        <version>1.6.2</version>
    </dependency>
    <dependency>
        <groupId>org.apache.axis2</groupId>
        <artifactId>axis2-spring</artifactId>
        <version>1.6.2</version>
    </dependency>
  </dependencies>
  <build>
    <finalName>springAxis2Service</finalName>
    <defaultGoal>package</defaultGoal>
    <plugins>
         <!-- 更改maven默认的打包目录 -->
        <plugin>
            <groupId>org.apache.maven.plugins</groupId>
            <artifactId>maven-war-plugin</artifactId>
            <version>2.5</version>
            <configuration>
                <webappDirectory>src/main/webapp</webappDirectory>
                <warSourceDirectory>target</warSourceDirectory>
            </configuration>
        </plugin>
    </plugins>
  </build>
</project>


 626
626

 被折叠的 条评论
为什么被折叠?
被折叠的 条评论
为什么被折叠?
 到【灌水乐园】发言


