


NGINX中单设置一个web前端很容易,改变端口,改变root指向基本就搞定了,那么,假设我们有多个前端项目部署在同一个域名下,该怎么设置呢?
1. 先假设我们有一个应用,http://domain就可以访问了, 现在改版了希望可以访问旧的应用http://domain,同时也可以通过http://domain/new访问新应用,那么首先第一步就是需要对新的前端项目进行一些配置。
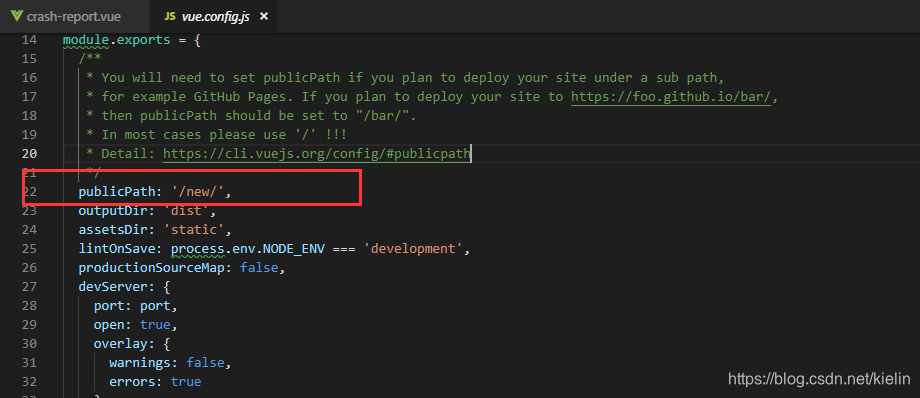
a. 在vue.config.js中设置 publicPath: '/new/',
b. 在路由index.js中设置 base:'/new/',

c. 在index.html中加入<meta base=/new/>

2. 修改NGINX设置,基本就是使location /指向原来的web前端, location /new指向新的web前端
a. 先在NGINX目录下/usr/share/nginx/html 创建新的文件夹new,把新项目的static,index.html放置于new目录,注意不是dist放到new目录

new 目录结构

b. vim /etc/nginx/nginx.conf,修改server 部份
-
#For more information on configuration,
see:
-
# * Official English Documentation: http:
//nginx.org/en/docs/
-
# * Official Russian Documentation: http:
//nginx.org/ru/docs/
-
-
#user nginx;
-
user root;
-
worker_processes auto;
-
error_log /
var/log/nginx/error.log;
-
pid /run/nginx.pid;
-
-
# Load dynamic modules. See /usr/share/nginx/README.dynamic.
-
include /usr/share/nginx/modules
/*.conf;
-
-
events {
-
worker_connections 1024;
-
}
-
-
http {
-
log_format main '$remote_addr - $remote_user [$time_local] "$request" '
-
'$status $body_bytes_sent "$http_referer" '
-
'"$http_user_agent" "$http_x_forwarded_for"';
-
-
access_log /var/log/nginx/access.log main;
-
-
sendfile on;
-
tcp_nopush on;
-
tcp_nodelay on;
-
keepalive_timeout 65;
-
types_hash_max_size 2048;
-
-
include /etc/nginx/mime.types;
-
default_type application/octet-stream;
-
-
# Load modular configuration files from the /etc/nginx/conf.d directory.
-
# See http://nginx.org/en/docs/ngx_core_module.html#include
-
# for more information.
-
#include /etc/nginx/conf.d/*.conf;
-
-
server {
-
listen 8099;
-
server_name localhost;
-
#此为nginx本身index目录
-
#root /usr/share/nginx/html;
-
-
# Load configuration files for the default server block.
-
include /etc/nginx/default.d/*.conf;
-
-
location / {
-
此为旧应用index,static目录
-
root /usr/share/nginx/html/dist;
-
try_files $uri $uri/ @router;
-
index index.html index.htm;
-
-
}
-
-
location /new {
-
#此为新应用index,static目录,同时注意这里是alias,不是root,还有以及new的后面有/结尾
-
alias /usr/share/nginx/html/new/;
-
try_files $uri $uri/ /new/index.html;
-
index index.html index.htm;
-
-
}
-
-
location @router {
-
rewrite ^.*$ /index.html last;
-
}
-
error_page 404 /404.html;
-
location = /40x.html {
-
}
-
-
error_page 500 502 503 504 /50x.html;
-
location = /50x.html {
-
}
-
}
-
# Settings for a TLS enabled server.
-
#
-
# server {
-
# listen 443 ssl http2 default_server;
-
# listen [::]:443 ssl http2 default_server;
-
# server_name _;
-
# root /usr/share/nginx/html;
-
#
-
# ssl_certificate "/etc/pki/nginx/server.crt";
-
# ssl_certificate_key "/etc/pki/nginx/private/server.key";
-
# ssl_session_cache shared:SSL:1m;
-
# ssl_session_timeout 10m;
-
# ssl_ciphers HIGH:!aNULL:!MD5;
-
# ssl_prefer_server_ciphers on;
-
#
-
# # Load configuration files for the default server block.
-
# include /etc/nginx/default.d/*.conf;
-
#
-
# location / {
-
# }
-
#
-
# error_page 404 /404.html;
-
# location = /40x.html {
-
# }
-
#
-
# error_page 500 502 503 504 /50x.html;
-
# location = /50x.html {
-
# }
-
# }
-
-
}
c. /usr/sbin/nginx -t 验证conf文件是否配置正确
d. /usr/sbin/nginx -s reload 重新加载NGINX配置生效
3. 最后通过http://localhost:8099就能访问到旧前端,而通过http://localhost:8099/new就能访问到新前端
网上有其他很多写的NGINX反向代理部署多个前端,其前提应该是这个应用都已经可以正常访问,只不过是在某个域和端口进行转发,使用户访问方便。
在些过程中遇到的一些问题:
1. 一开始只对NGINX进行了设置,在new文件夹下放了一个index.html,这样只能访问到index,而不能访问到新的项目,因为一些编译好的文件路径不对,导致没法加载
2. 404错误,一般来说就是配置和真实的路径不符合
3. 设置多个前端的时候需要把原来默认的全局ROOT 路径注释掉
4. 注意每行设置最后的分号,反正我自己好几次忘了
5. 重启NGINX可能发生的错误:
a. nginx[13499]: nginx: [emerg] bind() to 0.0.0.0:80 failed (98: Address already in use),使用 netstat -ntpl或者ps -ef | grep nginx找到相应进程,然后kill 进程ID
b. nginx start failed,pid找不到, ./nginx -c -/etc/nginx/nginx.conf


 780
780


 被折叠的 条评论
为什么被折叠?
被折叠的 条评论
为什么被折叠?
 到【灌水乐园】发言


