


这个教程将要介绍如何在Direct10里面写vertex和pixel shader,也会介绍Direct 10里面的vertex buffer 和index buffer.在理解和使用渲染3D图形里面这些都是最基本的概念。
Vertex buffers
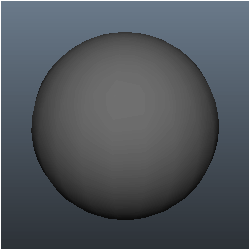
第一个需要理解的概念是vertex buffers.我们用一个3D的球体来阐述这个概念:
这个3D的球体实际上是由上百个三角形组成的:
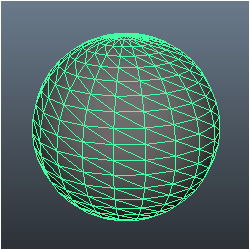
球体的每个三角形有三个点,每个点叫做vertex.当渲染这个球的模型的时候,我们需要把所有的顶点放进一个特殊的数据矩阵即vertex buffer里面,然后我们把vertex buffer送给GPU来渲染这个模型。
Index buffers
index buffers与vertex buffers相关,他们的目的是记录vertex buffer里面每个vertex的位置。GPU用index buffer来很快的找到vertex buffer中指定的vertex.index buffer的概念类似于书的索引,它能帮你以更快的速度找到指定的章节。DirectX SDK指明使用index buffers可以在video内存里面更快的缓存vertex数据,为了提高性能,推荐使用index buffer
vertex shaders
vertex shaders是一些小的程序,用来转换vertex buffer中的vertex转成3D空间,也有一些其他的计算可以在vertex shaders里面完成,例如计算每个vertex的法线。GPU会执行这些vertex shaders程序,用来处理每个需要处理的顶点,例如一个5000多边形的模型每一帧会运行你的vertex shaders 15000次。如果当你锁定60fps,你会执行你的vertex shaders 900000次来画仅仅5000个三角形,所有高效的vertex shaders是很重要的。
pixel shaders
pixel shaders也是一些小的程序,GPU执行它们用来处理每一个将要画在屏幕上的像素。Coloring,texturing,lighting以及很多其他的效果都是由pixel shaders来处理的。GPU需要执行pixel shaders很多次,同样它需要非常的高效。
HLSL
HLSL是DirectX 10的用来编写vertex shader和pixel shaders的语言,它的语法和C语言很相像,也有很多预定义的类型。HLSL编程文件由全局变量,类型定义,vertex shaders,pixel shaders和geometry shaders 组成。因为这是第一个HLSL教程,我们用一些很简单的代码来开始。
升级的框架
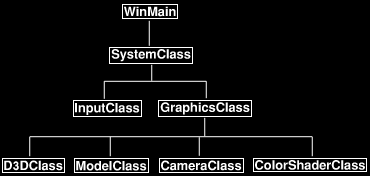
这个教程我们升级了这个框架,在GraphicsClass下面,我们增加了三个新的类,CameraClass, ModelClass, 和 ColorShaderClass。CameraClass负责视图矩阵,它处理世界坐标系中相机的位置,把这个位置传给shader当需要知道我们从哪里来看这个场景的时候。ModeClass负责描述3D模型的几何结构,这个教程里面这个3D模型仅仅是一个简单的三角形。ColorShaderClass负责渲染这个模型到屏幕上面。
我们先来看看HLSL shader程序。
Color.fx
这是我们的第一个shader程序。shader是一些小的程序,负责渲染实际的模型。这个shader的文件名师color.fx,目的是画一个有颜色的三角形,这是第一个HLSL教程,我们保持所有的东西尽可能的简单,下面是shader的代码:
// Filename: color.fx
/
// GLOBALS //
/
matrix worldMatrix;
matrix viewMatrix;
matrix projectionMatrix;
//
// TYPEDEFS //
//
struct VertexInputType
{
    float4 position : POSITION;
    float4 color : COLOR;
};

struct PixelInputType
{
    float4 position : SV_POSITION;
    float4 color : COLOR;
};
当vertex buffers的数据发送给GPU后,GPU执行vertex shader,我们把它取名ColorVertexShader,vertex buffer里面的每个vertex都是执行它。vextex shader的输入数据格式必须和vertex buffer里面的数据格式匹配,vertex shader的输出发送给pixel shader.
记住vertex shader创建了一个输出变量PixelInputType,然后输入的vertex的位置会和world,view,以及projection矩阵相乘,颜色信息直接copy,输出给pixel shader。我们设置输入位置的w分量为1,否则它是没有定义的,因为我们只读入位置XYZ的值。
// Vertex Shader

PixelInputType ColorVertexShader(VertexInputType input)
{
    PixelInputType output;


    // Change the position vector to be 4 units for proper matrix calculations.
    input.position.w = 1.0f;

    // Calculate the position of the vertex against the world, view, and projection matrices.
    output.position = mul(input.position, worldMatrix);
    output.position = mul(output.position, viewMatrix);
    output.position = mul(output.position, projectionMatrix);

    // Store the input color for the pixel shader to use.
    output.color = input.color;

    return output;
}
pixel shader负责画出多边形中渲染到屏幕的每一个像素。pixel shader的输入时PixelInpurType,返回一个float4类型的值作为输出,代表最终像素颜色值。这个pixel shader保持和输入的color值不变。
// Pixel Shader

float4 ColorPixelShader(PixelInputType input) : SV_Target
{
    return input.color;
}
这个technique是实际上的“shader”,你可以把它看成HLSL shader的main()函数,你可以设置它通过很多步执行不同的pixel和vertex shader来实现你想要的效果。这个例子中我们仅仅使用简单的一步,通过调用我们前面定义好的vertex shader和vertex shader。我们不调用geometry shader而且我们目前不需要用到。
注意我们设置vertex shader和pixel shader版本4.0。
// Technique

technique10 ColorTechnique
{
    pass pass0
    {
        SetVertexShader(CompileShader(vs_4_0, ColorVertexShader()));
        SetPixelShader(CompileShader(ps_4_0, ColorPixelShader()));
        SetGeometryShader(NULL);
    }
}
Modelclass.h
ModelClass负责描述3D几何模型,这个例子中我们手动设置一个单一的绿色三角形的数据,为它创建一个vertex buffer和一个index buffer。
// Filename: modelclass.h

#ifndef _MODELCLASS_H_
#define _MODELCLASS_H_


//
// INCLUDES //
//
#include <d3d10.h>
#include <d3dx10math.h>


// Class name: ModelClass

class ModelClass
{
private: struct VertexType
{
D3DXVECTOR3 position;
D3DXVECTOR4 color;
};
public:
ModelClass();
ModelClass(const ModelClass&);
~ModelClass(); bool Initialize(ID3D10Device*);
void Shutdown();
void Render(ID3D10Device*);
int GetIndexCount();
private:
bool InitializeBuffers(ID3D10Device*);
void ShutdownBuffers();
void RenderBuffers(ID3D10Device*);
private:
ID3D10Buffer *m_vertexBuffer, *m_indexBuffer;
int m_vertexCount, m_indexCount;
};
#endifModelclass.cpp
// Filename: modelclass.cpp

#include "modelclass.h"
ModelClass::ModelClass()
{
	m_vertexBuffer = 0;
	m_indexBuffer = 0;
}


ModelClass::ModelClass(const ModelClass& other)
{
}


ModelClass::~ModelClass()
{
}
bool ModelClass::Initialize(ID3D10Device* device)
{
	bool result;


	// Initialize the vertex and index buffer that hold the geometry for the triangle.
	result = InitializeBuffers(device);
	if(!result)
	{
		return false;
	}

	return true;
}
void ModelClass::Shutdown()
{
	// Release the vertex and index buffers.
	ShutdownBuffers();

	return;
}
void ModelClass::Render(ID3D10Device* device)
{
	// Put the vertex and index buffers on the graphics pipeline to prepare them for drawing.
	RenderBuffers(device);

	return;
}
GetIndexCount 返回这个模型的index的数目,color shader需要这个信息来渲染这个模型。
int ModelClass::GetIndexCount()
{
	return m_indexCount;
}

bool ModelClass::InitializeBuffers(ID3D10Device* device)
{
	VertexType* vertices;
	unsigned long* indices;
	D3D10_BUFFER_DESC vertexBufferDesc, indexBufferDesc;
	D3D10_SUBRESOURCE_DATA vertexData, indexData;
	HRESULT result;
	// Set the number of vertices in the vertex array.
	m_vertexCount = 3;

	// Set the number of indices in the index array.
	m_indexCount = 3;

	// Create the vertex array.
	vertices = new VertexType[m_vertexCount];
	if(!vertices)
	{
		return false;
	}

	// Create the index array.
	indices = new unsigned long[m_indexCount];
	if(!indices)
	{
		return false;
	}
	// Load the vertex array with data.
	vertices[0].position = D3DXVECTOR3(-1.0f, -1.0f, 0.0f);  // Bottom left.
	vertices[0].color = D3DXVECTOR4(0.0f, 1.0f, 0.0f, 1.0f);

	vertices[1].position = D3DXVECTOR3(0.0f, 1.0f, 0.0f);  // Top middle.
	vertices[1].color = D3DXVECTOR4(0.0f, 1.0f, 0.0f, 1.0f);

	vertices[2].position = D3DXVECTOR3(1.0f, -1.0f, 0.0f);  // Bottom right.
	vertices[2].color = D3DXVECTOR4(0.0f, 1.0f, 0.0f, 1.0f);

	// Load the index array with data.
	indices[0] = 0;  // Bottom left.
	indices[1] = 1;  // Top middle.
	indices[2] = 2;  // Bottom right.
	// Set up the description of the vertex buffer.
	vertexBufferDesc.Usage = D3D10_USAGE_DEFAULT;
	vertexBufferDesc.ByteWidth = sizeof(VertexType) * m_vertexCount;
	vertexBufferDesc.BindFlags = D3D10_BIND_VERTEX_BUFFER;
	vertexBufferDesc.CPUAccessFlags = 0;
	vertexBufferDesc.MiscFlags = 0;

	// Give the subresource structure a pointer to the vertex data.
	vertexData.pSysMem = vertices;

	// Now finally create the vertex buffer.
	result = device->CreateBuffer(&vertexBufferDesc, &vertexData, &m_vertexBuffer);
	if(FAILED(result))
	{
		return false;
	}

	// Set up the description of the index buffer.
	indexBufferDesc.Usage = D3D10_USAGE_DEFAULT;
	indexBufferDesc.ByteWidth = sizeof(unsigned long) * m_indexCount;
	indexBufferDesc.BindFlags = D3D10_BIND_INDEX_BUFFER;
	indexBufferDesc.CPUAccessFlags = 0;
	indexBufferDesc.MiscFlags = 0;
ShutdownBuffers 函数release vertex buffer 和 index buffer
void ModelClass::ShutdownBuffers()
{
	// Release the index buffer.
	if(m_indexBuffer)
	{
		m_indexBuffer->Release();
		m_indexBuffer = 0;
	}

	// Release the vertex buffer.
	if(m_vertexBuffer)
	{
		m_vertexBuffer->Release();
		m_vertexBuffer = 0;
	}

	return;
}
RenderBuffers由Render函数调用,这个函数的目的是GPU在IA阶段把vertex buffer和index buffer设置成active,一旦GPU有一个active的vertex buffer,就能使用HLSL shader来渲染这个buffer.
void ModelClass::RenderBuffers(ID3D10Device* device)
{
	unsigned int stride;
	unsigned int offset;


	// Set vertex buffer stride and offset.
	stride = sizeof(VertexType);
	offset = 0;

	// Set the vertex buffer to active in the input assembler so it can be rendered.
	device->IASetVertexBuffers(0, 1, &m_vertexBuffer, &stride, &offset);

	// Set the index buffer to active in the input assembler so it can be rendered.
	device->IASetIndexBuffer(m_indexBuffer, DXGI_FORMAT_R32_UINT, 0);

	// Set the type of primitive that should be rendered from this vertex buffer, in this case triangles.
	device->IASetPrimitiveTopology(D3D10_PRIMITIVE_TOPOLOGY_TRIANGLELIST);

	return;
}
Colorshaderclass.h
ColorShaderClass用来触发HLSL shader,在GPU上渲染3D模型
// Filename: colorshaderclass.h

#ifndef _COLORSHADERCLASS_H_
#define _COLORSHADERCLASS_H_


//
// INCLUDES //
//
#include <d3d10.h>
#include <d3dx10math.h>
#include <fstream>
using namespace std;


// Class name: ColorShaderClass

class ColorShaderClass
{
public:
	ColorShaderClass();
	ColorShaderClass(const ColorShaderClass&);
	~ColorShaderClass();
这些函数处理shader的初始化和关闭,render()设置shader参数然后画准备的模型。
	bool Initialize(ID3D10Device*, HWND);
	void Shutdown();
	void Render(ID3D10Device*, int, D3DXMATRIX, D3DXMATRIX, D3DXMATRIX);

private:
	bool InitializeShader(ID3D10Device*, HWND, WCHAR*);
	void ShutdownShader();
	void OutputShaderErrorMessage(ID3D10Blob*, HWND, WCHAR*);

	void SetShaderParameters(D3DXMATRIX, D3DXMATRIX, D3DXMATRIX);
	void RenderShader(ID3D10Device*, int);

private:
	ID3D10Effect* m_effect;
	ID3D10EffectTechnique* m_technique;
	ID3D10InputLayout* m_layout;

	ID3D10EffectMatrixVariable* m_worldMatrixPtr;
	ID3D10EffectMatrixVariable* m_viewMatrixPtr;
	ID3D10EffectMatrixVariable* m_projectionMatrixPtr;
};

#endif


 被折叠的 条评论
为什么被折叠?
被折叠的 条评论
为什么被折叠?
 到【灌水乐园】发言


