


一.LinearLayout:是排列布局,子视图是按照某个方向对齐的(垂直或水平),默认排列方向是水平方向,期待的子视图都是有间距的。
常见属性:
1.gravity:指定该布局里面子视图的位置;无论设置为哪个属性都不会改变子视图的大小。
2.layout_weight:给个别子视图设置权重,默认权重是0;
例如有两个文本框,一个设置权重为1,另一个不设置权重,则未设置权重的文本框只会占文段内容的大小,而设置了权重的文本框会填充剩余视图。
例子:
XML文件:
<?xml version="1.0" encoding="utf-8"?>
<LinearLayout xmlns:android="http://schemas.android.com/apk/res/android"
xmlns:tools="http://schemas.android.com/tools"
android:layout_width="match_parent"
android:layout_height="match_parent"
android:orientation="vertical"
tools:context="com.example.demo.MainActivity">
    <EditText
android:layout_width="match_parent"
android:layout_height="wrap_content"
/>
    <EditText
android:layout_width="match_parent"
android:layout_height="wrap_content"
android:layout_weight="1"
/>
</LinearLayout>
注意:
1)如果在设置了权重的子视图同时还设置了大小,在分配子视图所占的位置时是先根据权重分配大小再按照所设置layout_height和layout_width分配大小。
2)内部的子控件之间的layout_weight是按照正比例分配空间
LinearLayout之间的layout_weight是按照反比例分配空间
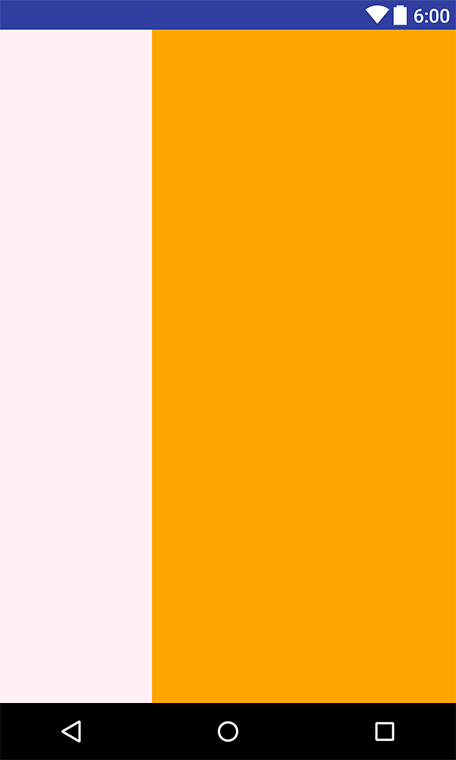
例子:
XML文件:
<?xml version="1.0" encoding="utf-8"?>
<LinearLayout xmlns:android="http://schemas.android.com/apk/res/android"
xmlns:tools="http://schemas.android.com/tools"
android:layout_width="match_parent"
android:layout_height="match_parent"
tools:context="com.example.demo.MainActivity">

    <TextView
android:layout_width="0dp"
android:layout_height="match_parent"
android:layout_weight="1"
android:background="#fff0f5"
/>

    <TextView
android:layout_width="0dp"
android:layout_height="match_parent"
android:layout_weight="2"
android:background="#ffa500"
/>
</LinearLayout>
运行截图:
3)weightSum:定义子视图的最大重量和,要大于或等于子视图总重量和,否则视图会先显示第一个子视图,若还有剩余空间再显示其他子视图。
二.RelativeLayout:是扁平视图,通过设置子视图之间的相对位置来确定视图。
当一个LinearLayout中有多层嵌套时可以选择改用RelativeLayout,来避免View树的高度超过10层。
常见属性:
1)layout_xx:设置子视图相对已给定id子视图的位置;
例如:
android:layout_above 将该控件的底部置于给定ID的控件之上;
2)
layout_alignParentxx:相对于父组件位置;
注意:子视图的添加顺序,避免出现覆盖。
三.优化UI的的两个组件
1)<include>:是能够在不同的Layout组件中使用共通的UI,但应避免在共通UI中写太多只有某个特定Layout组件才有的属性。
例子:
XML文件:
<?xml version="1.0" encoding="utf-8"?>
<TextView xmlns:android="http://schemas.android.com/apk/res/android"
    android:layout_width="0dp"
    android:layout_height="0dp"
    android:text="This is a commont ui"
    android:gravity="center"
    android:textSize="30sp"
    >

</TextView>
<?xml version="1.0" encoding="utf-8"?>
<RelativeLayout xmlns:android="http://schemas.android.com/apk/res/android"
xmlns:tools="http://schemas.android.com/tools"
android:layout_width="match_parent"
android:layout_height="match_parent"
tools:context="com.example.demo.MainActivity"
>
<include
layout="@layout/testview"
android:layout_width="match_parent"
android:layout_height="wrap_content"
/>
</RelativeLayout>
2)<ViewStub>:可以实现延时加载,其大小为0且不可视。
当某个布局在初始化加载时不需要显示,只在某些情况下才可视的情况下就可以使用<ViewStub>。实现与设置View.GONE相同的效果,但是其优点是只会在显示时才去渲染整个布局,而View.GONE是在初始化布局时就已经添加在布局树上,所以相比之下<ViewStub>效率更高。
例子:
XML文件:
<?xml version="1.0" encoding="utf-8"?>
<LinearLayout xmlns:android="http://schemas.android.com/apk/res/android"
    android:orientation="vertical" android:layout_width="match_parent"
    android:layout_height="match_parent">

    <TextView
        android:layout_width="match_parent"
        android:layout_height="wrap_content"
        android:text="This is not often use "
        android:id="@+id/tv"
        />
</LinearLayout>
<?xml version="1.0" encoding="utf-8"?>
<RelativeLayout xmlns:android="http://schemas.android.com/apk/res/android"
xmlns:app="http://schemas.android.com/apk/res-auto"
xmlns:tools="http://schemas.android.com/tools"
android:layout_width="match_parent"
android:layout_height="match_parent"
android:paddingBottom="@dimen/activity_vertical_margin"
android:paddingLeft="@dimen/activity_horizontal_margin"
app:layout_behavior="@string/appbar_scrolling_view_behavior"
tools:context="com.example.test.MainActivity"
tools:showIn="@layout/activity_main">
<Button
android:id="@+id/btnVisible"
android:layout_width="wrap_content"
android:layout_height="wrap_content"
android:onClick="btnVisible"
android:text="Visible" />
<Button
android:id="@+id/btnInflate"
android:layout_width="wrap_content"
android:layout_height="wrap_content"
android:layout_toEndOf="@id/btnVisible"
android:onClick="btnInflate"
android:text="Inflate" />
<ViewStub
android:id="@+id/not_ofent_use"
android:layout_width="match_parent"
android:layout_height="wrap_content"
android:layout_centerInParent="true"
android:layout="@layout/testview" />
private Button btnVisible;
private Button btnInflate;
private ViewStub viewStub;
private void inits() {
    btnVisible = (Button) findViewById(R.id.btnVisible);
    btnInflate = (Button) findViewById(R.id.btnInflate);
    viewStub = (ViewStub) findViewById(R.id.not_ofent_use);
    btnVisible.setOnClickListener(this);
    btnInflate.setOnClickListener(this);
}
@Override
public void onClick(View v) {
    switch (v.getId()){
        case R.id.btnVisible:
            viewStub.setVisibility(View.VISIBLE);
            break;

        case R.id.btnInflate:
            View inflateViwe = viewStub.inflate();
            TextView tv = (TextView)findViewById(R.id.tv);
            break;
    }
}
运行截图:

注意:
<ViewStub>的SetVisibility()和inflate()方法都能来显示这个View,不同的是inflate()方法返回一个引用的布局。不管用哪种方式,一旦<ViewStub>被设置为可见或者是被inflate,<ViewStub>就不存在了,这个layout的id也将变成<ViewStub>中通过“android:inflateId”属性所指定的id,所以inflate()不能调用两次。


 281
281

 被折叠的 条评论
为什么被折叠?
被折叠的 条评论
为什么被折叠?
 到【灌水乐园】发言


