


在上一篇已经把ConstraintLayou 基本使用已经掌握了,有上面基本已经可以解决80%日常布局所需,在掌握本篇你就可以再新布局上面所向披靡了,Ok,让我我们来看看进阶使用教程。
一、OKOK,先来个小菜!!设置图片比例
特别注意:需要设定比例必须是有一个方向上宽或者高固定,另外一个方向是不确定的,否则不起效果
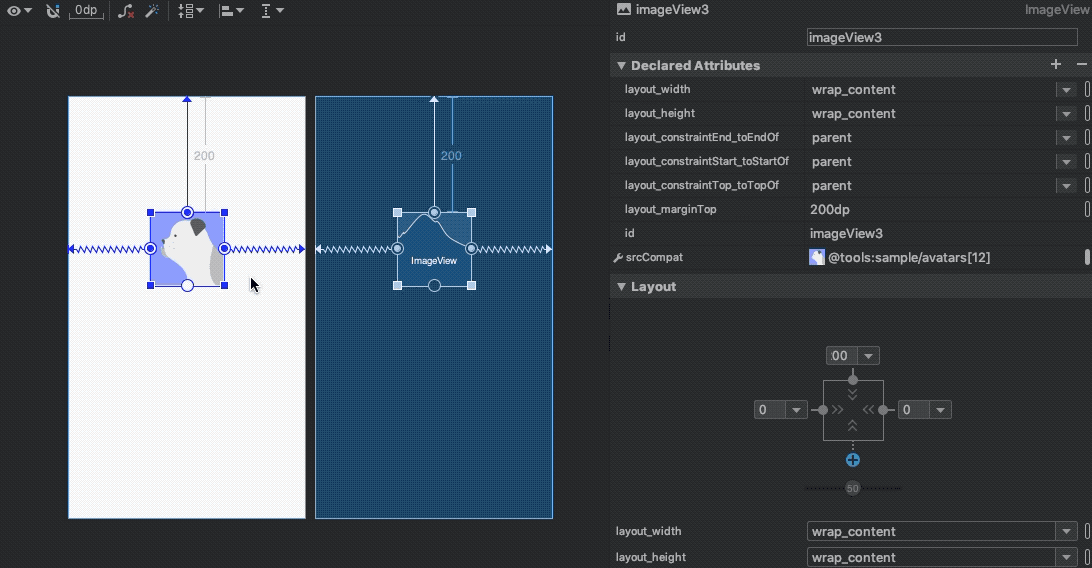
上图是以宽度固定来调整整体的比例,对应以高位标准也可以的
二、角度定位

一共有3个属性需要注意:
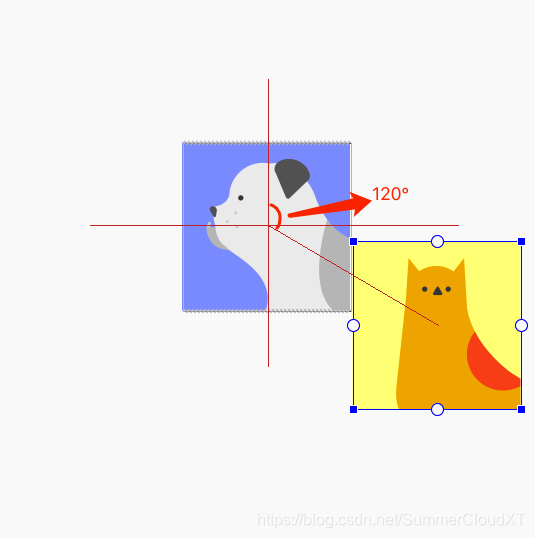
<!-- 这个是基准View的ID绑定 -->
app:layout_constraintCircle="@+id/imageView3"
<!-- 这个是以基准View标准,角度偏移量,注意没有单位 -->
app:layout_constraintCircleAngle="120"
<!-- 这个是以基准View标准,2个之前的间隔距离,注意有单位 -->
app:layout_constraintCircleRadius="90dp"
三、Chain(链条)
当遇到多个条目需要平分距离的时候,你就需要用到这个了。
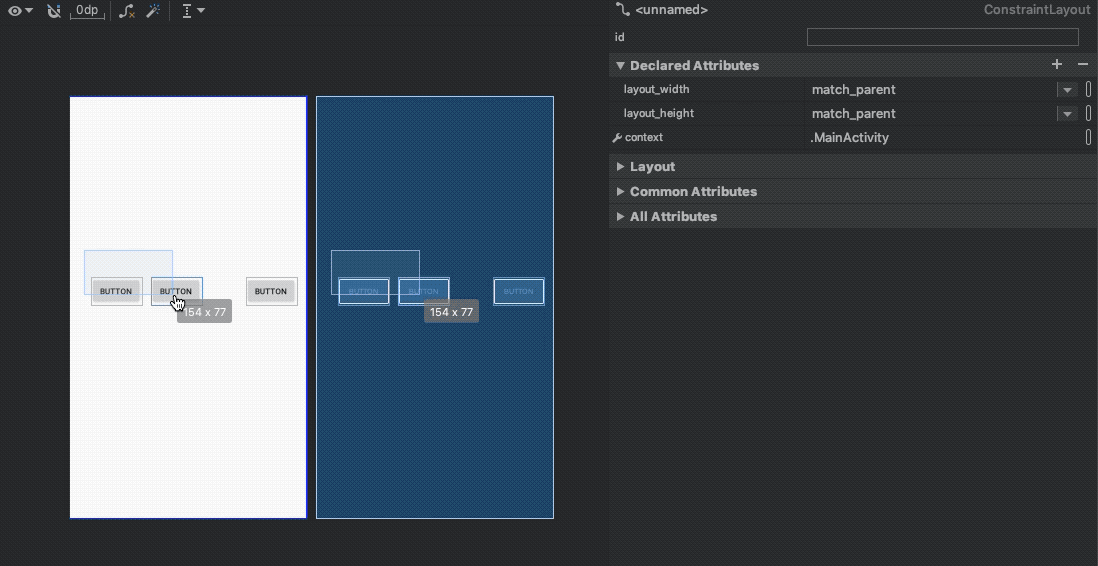
这里选中我是直接框选的,还可以按住command (mac) 或者 ctrl (win) 加鼠标点击来选中。
链条一种有2种,一个是竖着的,一个是横着的。
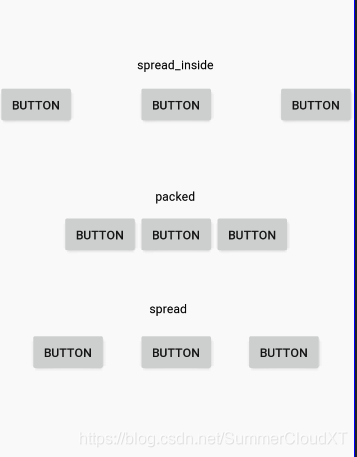
然后每种有3小种形式,如图!就不多介绍了。
四、最后ConstraintLayou动画
虽然大概率用不上,因为需求不设计如此,你也不会自己给自己找麻烦?
但还是详细说下。这里只是做了一个简单的,根据需求来实现吧,下面看下效果
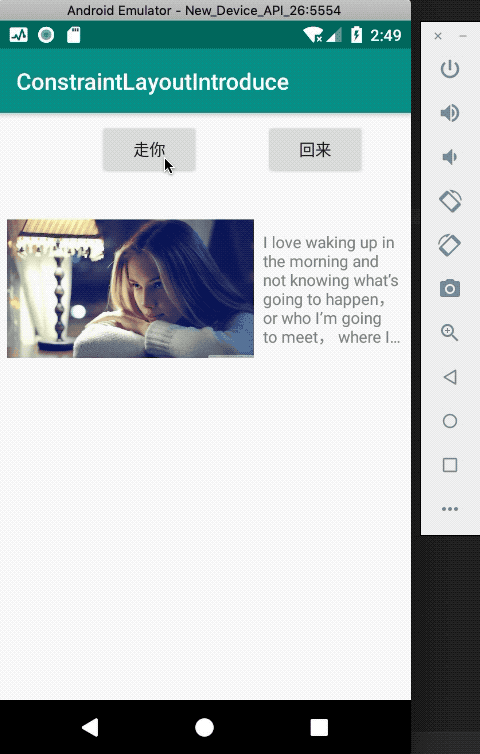
下面简单说下过程
第一,你需要准备2个xml文件,一个是动画之前,一个是动画之后的效果
下面贴下动画之前xml布局
activity_main.xml
<?xml version="1.0" encoding="utf-8"?>
<androidx.constraintlayout.widget.ConstraintLayout xmlns:android="http://schemas.android.com/apk/res/android"
    xmlns:app="http://schemas.android.com/apk/res-auto"
    xmlns:tools="http://schemas.android.com/tools"
    android:id="@+id/main_view"
    android:layout_width="match_parent"
    android:layout_height="match_parent"
    tools:context=".MainActivity">

    <ImageView
        android:id="@+id/imageView5"
        android:layout_width="215dp"
        android:layout_height="163dp"
        android:layout_marginStart="8dp"
        android:layout_marginTop="16dp"
        app:layout_constraintStart_toStartOf="parent"
        app:layout_constraintTop_toBottomOf="@+id/btn_go"
        app:srcCompat="@mipmap/beautiful_girl_4" />

    <TextView
        android:id="@+id/textView4"
        android:layout_width="0dp"
        android:layout_height="wrap_content"
        android:layout_marginStart="8dp"
        android:layout_marginEnd="8dp"
        android:ellipsize="end"
        android:maxLines="6"
        android:text="I love waking up in the morning and not knowing what’s going to happen, or who I’m going to meet, where I’m going to wind up。The road of life is like a large river,because of the power of the currents,river courses appear unexpectedly where there is no flowing water.(Tagore India)Dare and the world always yields. If it beats you sometimes, dare it again and again and it will succumb."
        app:layout_constraintBottom_toBottomOf="@+id/imageView5"
        app:layout_constraintEnd_toEndOf="parent"
        app:layout_constraintHorizontal_bias="0.0"
        app:layout_constraintStart_toEndOf="@+id/imageView5"
        app:layout_constraintTop_toTopOf="@+id/imageView5" />

    <Button
        android:id="@+id/btn_go"
        android:layout_width="wrap_content"
        android:layout_height="wrap_content"
        android:layout_marginStart="88dp"
        android:text="走你"
        app:layout_constraintBottom_toBottomOf="@+id/btn_back"
        app:layout_constraintStart_toStartOf="parent"
        app:layout_constraintTop_toTopOf="@+id/btn_back"
        app:layout_constraintVertical_bias="0.0" />

    <Button
        android:id="@+id/btn_back"
        android:layout_width="wrap_content"
        android:layout_height="wrap_content"
        android:layout_marginStart="48dp"
        android:layout_marginTop="8dp"
        android:text="回来"
        app:layout_constraintEnd_toEndOf="parent"
        app:layout_constraintHorizontal_bias="0.181"
        app:layout_constraintStart_toEndOf="@+id/btn_go"
        app:layout_constraintTop_toTopOf="parent" />
</androidx.constraintlayout.widget.ConstraintLayout>
再贴下动画之后的布局
activity_main_after.xml
<?xml version="1.0" encoding="utf-8"?>
<androidx.constraintlayout.widget.ConstraintLayout xmlns:android="http://schemas.android.com/apk/res/android"
    xmlns:app="http://schemas.android.com/apk/res-auto"
    xmlns:tools="http://schemas.android.com/tools"
    android:layout_width="match_parent"
    android:layout_height="match_parent"
    tools:context=".MainActivity">

    <ImageView
        android:id="@+id/imageView5"
        android:layout_width="0dp"
        android:layout_height="250dp"
        android:layout_marginTop="16dp"
        app:layout_constraintEnd_toEndOf="parent"
        app:layout_constraintHorizontal_bias="0.0"
        app:layout_constraintStart_toStartOf="parent"
        app:layout_constraintTop_toBottomOf="@+id/btn_go"
        app:srcCompat="@mipmap/beautiful_girl_4" />

    <TextView
        android:id="@+id/textView4"
        android:layout_width="0dp"
        android:layout_height="wrap_content"
        android:text="I love waking up in the morning and not knowing what’s going to happen, or who I’m going to meet, where I’m going to wind up。The road of life is like a large river,because of the power of the currents,river courses appear unexpectedly where there is no flowing water.(Tagore India)Dare and the world always yields. If it beats you sometimes, dare it again and again and it will succumb."
        app:layout_constraintEnd_toEndOf="parent"
        app:layout_constraintStart_toStartOf="parent"
        app:layout_constraintTop_toBottomOf="@+id/imageView5" />

    <Button
        android:id="@+id/btn_go"
        android:layout_width="wrap_content"
        android:layout_height="wrap_content"
        android:layout_marginStart="88dp"
        android:text="走你"
        app:layout_constraintBottom_toBottomOf="@+id/btn_back"
        app:layout_constraintStart_toStartOf="parent"
        app:layout_constraintTop_toTopOf="@+id/btn_back"
        app:layout_constraintVertical_bias="0.0" />

    <Button
        android:id="@+id/btn_back"
        android:layout_width="wrap_content"
        android:layout_height="wrap_content"
        android:layout_marginStart="48dp"
        android:layout_marginTop="8dp"
        android:text="回来"
        app:layout_constraintEnd_toEndOf="parent"
        app:layout_constraintHorizontal_bias="0.181"
        app:layout_constraintStart_toEndOf="@+id/btn_go"
        app:layout_constraintTop_toTopOf="parent" />
</androidx.constraintlayout.widget.ConstraintLayout>
看下怎么玩的
public class MainActivity extends AppCompatActivity {

    private ConstraintLayout mMainLayout;

    @Override
    protected void onCreate(Bundle savedInstanceState) {
        super.onCreate(savedInstanceState);
        setContentView(R.layout.activity_main);


        mMainLayout = findViewById(R.id.main_view);
        //创建2个约束的集合
        final ConstraintSet constraintSet1 = new ConstraintSet();
        final ConstraintSet constraintSet2 = new ConstraintSet();
        //复制各自布局的约束
        constraintSet1.clone(this, R.layout.activity_main);
        constraintSet2.clone(this, R.layout.activity_main_after);

        findViewById(R.id.btn_go).setOnClickListener(new View.OnClickListener() {
            @Override
            public void onClick(View view) {
                //通过TransitionManager来执行过渡动画
                TransitionManager.beginDelayedTransition(mMainLayout);
                constraintSet2.applyTo(mMainLayout);
            }
        });

        findViewById(R.id.btn_back).setOnClickListener(new View.OnClickListener() {
            @Override
            public void onClick(View view) {
                TransitionManager.beginDelayedTransition(mMainLayout);
                constraintSet1.applyTo(mMainLayout);
            }
        });

    }
}
好了,就是这么简单。
到这基本就已经介绍完所有的ConstraintLayou在日常会用的到的了,学会这个已经可以完成日常开发的99%了,如果中见有遗漏或者错误,请留言,我会及时更正的。
最后下篇会介绍 ConstraintLayou 一些好用技巧和开发中可能会遇到的坑,敬请期待吧。。。


 1296
1296


 被折叠的 条评论
为什么被折叠?
被折叠的 条评论
为什么被折叠?
 到【灌水乐园】发言


