


1.CAShapeLayer
CAShapeLayer具有path属性,(是CGPath对象),可以使用这个属性与UIBezierPath画出想要的图形。该子类根据其fill color和strokeColor值对该路径填充或者描边,或二者都有,并显示结果。fillColor默认值是黑色,二strokenColor没有默认值。CAShapeLayer也可能有contents,该形状显示在内容图像的上方,但没有任何属性允许你指定合成模式(compositioning mode)。
普通CALayer在被初始化时是需要给一个frame值的,这个frame值一般都与给定view的bounds值一致,它本身是有形状的,而且是矩形.
CAShapeLayer在初始化时也需要给一个frame值,但是,它本身没有形状,它的形状来源于你给定的一个path,然后它去取CGPath值,它与CALayer有着很大的区别
CAShapeLayer有着几点很重要:
1. 它依附于一个给定的path,必须给与path,而且,即使path不完整也会自动首尾相接
2. strokeStart以及strokeEnd代表着在这个path中所占用的百分比
3. CAShapeLayer动画仅仅限于沿着边缘的动画效果,它实现不了填充效果
2.UIBezierPath
//根据一个矩形画曲线
+ (UIBezierPath *)bezierPathWithRect:(CGRect)rect
//根据矩形框的内切圆画曲线
+ (UIBezierPath *)bezierPathWithOvalInRect:(CGRect)rect
//根据矩形画带圆角的曲线
+ (UIBezierPath *)bezierPathWithRoundedRect:(CGRect)rect cornerRadius:(CGFloat)cornerRadius
//在矩形中,可以针对四角中的某个角加圆角
+ (UIBezierPath *)bezierPathWithRoundedRect:(CGRect)rect byRoundingCorners:(UIRectCorner)corners cornerRadii:(CGSize)cornerRadii
参数:
corners:枚举值,可以选择某个角
cornerRadii:圆角的大小
//以某个中心点画弧线 + (UIBezierPath *)bezierPathWithArcCenter:(CGPoint)center radius:(CGFloat)radius startAngle:(CGFloat)startAngle endAngle:(CGFloat)endAngle clockwise:(BOOL)clockwise;
参数:
center:弧线中心点的坐标
radius:弧线所在圆的半径
startAngle:弧线开始的角度值
endAngle:弧线结束的角度值
clockwise:是否顺时针画弧线
//画二元曲线,一般和moveToPoint配合使用
- (void)addQuadCurveToPoint:(CGPoint)endPoint controlPoint:(CGPoint)controlPoint
参数:
endPoint:曲线的终点
controlPoint:画曲线的基准点
//以三个点画一段曲线,一般和moveToPoint配合使用
- (void)addCurveToPoint:(CGPoint)endPoint controlPoint1:(CGPoint)controlPoint1 controlPoint2:(CGPoint)controlPoint2
参数:
endPoint:曲线的终点
controlPoint1:画曲线的第一个基准点
controlPoint2:画曲线的第二个基准点
3.demo 代码:
</pre><pre code_snippet_id="1663153" snippet_file_name="blog_20160426_2_349623" name="code" class="objc">//
//  cameraView.m
//  bezierPath
//
//  Created by admin on 16/4/26.
//  Copyright © 2016年 tinghou. All rights reserved.
//
//颜色
#define Color [UIColor colorWithRed:237/255.0 green:82/255.0 blue:41/255.0 alpha:1]

#import "cameraView.h"
//#import "Tools.h"
@implementation cameraView

-(id)initWithFrame:(CGRect)frame {

    self = [super initWithFrame:frame];
    if (self) {

        // 中间空心洞的区域
        self.cutRect = CGRectMake(CGRectGetMidX(frame) - 115,
                                  CGRectGetMidY(frame) - 115 - 30,
                                  230,
                                  230);

        UIBezierPath *path = [UIBezierPath bezierPathWithRect:frame];
 // 挖空心洞 显示区域
        UIBezierPath *cutRectPath = [UIBezierPath bezierPathWithRect:self.cutRect];
//        将circlePath添加到path上
        [path appendPath:cutRectPath];
        path.usesEvenOddFillRule = YES;

        CAShapeLayer *fillLayer = [CAShapeLayer layer];
        fillLayer.path = path.CGPath;
        fillLayer.fillRule = kCAFillRuleEvenOdd;
        fillLayer.opacity = 0.5;//透明度
        fillLayer.backgroundColor = [UIColor lightGrayColor].CGColor;
        [self.layer addSublayer:fillLayer];

        // 边界校准线
        const CGFloat lineWidth = 2;
        UIBezierPath *linePath = [UIBezierPath bezierPathWithRect:CGRectMake(self.cutRect.origin.x - lineWidth,
                                                                             self.cutRect.origin.y - lineWidth,
                                                                             self.cutRect.size.width / 4.0,
                                                                             lineWidth)];
//        追加路径
        [linePath appendPath:[UIBezierPath bezierPathWithRect:CGRectMake(self.cutRect.origin.x - lineWidth,
                                                                         self.cutRect.origin.y - lineWidth,
                                                                         lineWidth,
                                                                         self.cutRect.size.height / 4.0)]];

        [linePath appendPath:[UIBezierPath bezierPathWithRect:CGRectMake(self.cutRect.origin.x + 230 - self.cutRect.size.width / 4.0 + lineWidth,
                                                                         self.cutRect.origin.y - lineWidth,
                                                                         self.cutRect.size.width / 4.0,
                                                                         lineWidth)]];
        [linePath appendPath:[UIBezierPath bezierPathWithRect:CGRectMake(self.cutRect.origin.x + 230 ,
                                                                         self.cutRect.origin.y - lineWidth,
                                                                         lineWidth,
                                                                         self.cutRect.size.height / 4.0)]];

        [linePath appendPath:[UIBezierPath bezierPathWithRect:CGRectMake(self.cutRect.origin.x - lineWidth,
                                                                         self.cutRect.origin.y + 230 - self.cutRect.size.height / 4.0 + lineWidth,
                                                                         lineWidth,
                                                                         self.cutRect.size.height / 4.0)]];
        [linePath appendPath:[UIBezierPath bezierPathWithRect:CGRectMake(self.cutRect.origin.x - lineWidth,
                                                                         self.cutRect.origin.y + 230,
                                                                         self.cutRect.size.width / 4.0,
                                                                         lineWidth)]];

        [linePath appendPath:[UIBezierPath bezierPathWithRect:CGRectMake(self.cutRect.origin.x + 230,
                                                                         self.cutRect.origin.y + 230 - self.cutRect.size.height / 4.0 + lineWidth,
                                                                         lineWidth,
                                                                         self.cutRect.size.height / 4.0)]];
        [linePath appendPath:[UIBezierPath bezierPathWithRect:CGRectMake(self.cutRect.origin.x + 230 - self.cutRect.size.width / 4.0 + lineWidth,
                                                                         self.cutRect.origin.y + 230,
                                                                         self.cutRect.size.width / 4.0,
                                                                                                      lineWidth)]];

        CAShapeLayer *pathLayer = [CAShapeLayer layer];
        pathLayer.path = linePath.CGPath;// 从贝塞尔曲线获取到形状
        pathLayer.fillColor = Color.CGColor; // 闭环填充的颜色
//        pathLayer.lineCap       = kCALineCapSquare;               // 边缘线的类型
//        pathLayer.strokeColor = [UIColor blueColor].CGColor; // 边缘线的颜色
//        pathLayer.lineWidth     = 4.0f;                           // 线条宽度
        [self.layer addSublayer:pathLayer];

//        扫描条动画
        UIImageView *line = [[UIImageView alloc] initWithFrame:CGRectMake(self.cutRect.origin.x,
                                                                          self.cutRect.origin.y,
                                                                          self.cutRect.size.width,
                                                                          lineWidth)];
        line.image = [[UIImage imageNamed:@"line"] imageWithRenderingMode:UIImageRenderingModeAlwaysTemplate];
        line.tintColor = Color;
        [self addSubview:line];

        // 上下游走动画
        CABasicAnimation *animation=[CABasicAnimation animationWithKeyPath:@"transform.translation.y"];
        animation.fromValue = @0;
        animation.toValue = [NSNumber numberWithFloat:self.cutRect.size.height];
        animation.autoreverses = YES;
        animation.duration = 3;
        animation.repeatCount = FLT_MAX;
        [line.layer addAnimation:animation forKey:nil];
4.效果
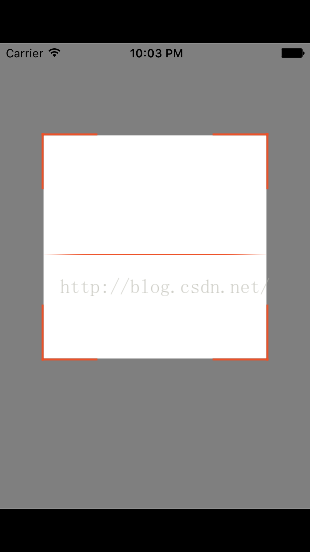

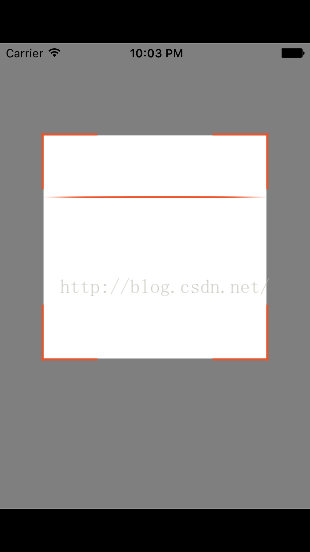
5关键点分析fillLayer.fillRule = kCAFillRuleEvenOdd
<span style="font-size:14px;"> fillLayer.fillRule = kCAFillRuleEvenOdd;</span>利用layer的FillRule属性生成一个空心的layer
SVG的图形填充规则通过fill-rule属性来指定。
-
‘fill-rule’
-
有效值: nonzero | evenodd | inherit 默认值: nonzero 应用于: shape形状类元素 和 文字内容类元素 可继承: 是 比例: 无 媒体: 可见 动画可用: 是
‘fill-rule’ 属性用于指定使用哪一种算法去判断画布上的某区域是否属于该图形“内部” (内部区域将被填充)。对一个简单的无交叉的路径,哪块区域是“内部” 是很直观清除的。但是,对一个复杂的路径,比如自相交或者一个子路径包围另一个子路径,“内部”的理解就不那么明确了。
‘fill-rule’ 属性提供两种选项用于指定如何判断图形的“内部”:
-
nonzero
- 字面意思是“非零”。按该规则,要判断一个点是否在图形内,从该点作任意方向的一条射线,然后检测射线与图形路径的交点情况。从0开始计数,路径从左向右穿过射线则计数加1,从右向左 穿过射线则计数减1。得出计数结果后,如果结果是0,则认为点在图形外部,否则认为在内部。下图演示了 nonzero 规则:
-
 evenodd
- 字面意思是“奇偶”。 按该规则, 要判断一个点是否在图形内,从该点作任意方向的一条射线,然后检测射线与图形路径的交点的数量。如果结果是奇数则认为点在内部,是偶数则认为点在外部。 下图演示了 evenodd 规则:
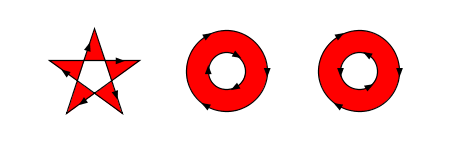
(提示: 上述解释未指出当路径片段与射线重合或者相切的时候怎么办,因为任意方向的射线都可以,那么只需要简单的选择另一条没有这种特殊情况的射线即可。)


 5893
5893

 被折叠的 条评论
为什么被折叠?
被折叠的 条评论
为什么被折叠?
 到【灌水乐园】发言


