最近在研究CAS单点登录,被客户翻来覆去的要求搞得头昏脑涨。
今天竟然要求用户名可以输中文,有没有常识啊
不过也多亏了这些日子的调查,对CAS的一些细节有了更加深入的理解。
1.用户名为中文的解决方法
在CAS登录时有中文并没有问题,CAS会返回给其他系统一个Ticket。
而子系统得到Ticket后,通过Ticket去CAS取用户名时,发生以下错误:
严重: Servlet.service() for servlet jsp threw exception
org.xml.sax.SAXParseException: The element type "cas:user" must be terminated by the matching end-tag "</cas:user>"
说明user的返回值中,中文变成了乱码导致异常抛出。
解决方法如下:
找到"\cas\src\main\webapp\WEB-INF\view\jsp\protocol\2.0\casServiceValidationSuccess.jsp"
在头上添加红字
<span style="color:#ff0000;"><strong><%@ page pageEncoding="gb2312"%></strong></span>
<%@ page session="false" %>
<%@ taglib prefix="c" uri="http://java.sun.com/jsp/jstl/core" %>
<%@ taglib uri="http://java.sun.com/jsp/jstl/functions" prefix="fn" %>
<cas:serviceResponse xmlns:cas='http://www.yale.edu/tp/cas'>
  <cas:authenticationSuccess>
    <cas:user>${fn:escapeXml(assertion.chainedAuthentications[fn:length(assertion.chainedAuthentications)-1].principal.id)}</cas:user>
    <c:if test="${not empty pgtIou}">
      <cas:proxyGrantingTicket>${pgtIou}</cas:proxyGrantingTicket>
    </c:if>
    <c:if test="${fn:length(assertion.chainedAuthentications) > 1}">
      <cas:proxies>
        <c:forEach var="proxy" items="${assertion.chainedAuthentications}" varStatus="loopStatus" begin="0" end="${fn:length(assertion.chainedAuthentications)-2}" step="1">
          <cas:proxy>${fn:escapeXml(proxy.principal.id)}</cas:proxy>
        </c:forEach>
      </cas:proxies>
    </c:if>

  </cas:authenticationSuccess>
</cas:serviceResponse>
</span>说明:在server验证成功后,casServiceValidationSuccess.jsp负责生成与客户端交互的xml信息,默认只包括用户名
因此,这个页面的编码改成gb2312的话,就能显示中文了

其他:
①百度上找了很多文章,都说转成UTF-8,害我调查了整整一天
也许每个人情况不一样吧,下面是UTF-8的解决方法,但是对我并没有用。
在web.xml中,添加编码过滤器:
<span style="font-size:12px;"><!-- 字符编码过滤 -->
  <filter>
     <filter-name>characterEncodingFilter</filter-name>
     <filter-class>org.springframework.web.filter.CharacterEncodingFilter</filter-class>
     <init-param>
      <param-name>encoding</param-name>
      <param-value><span style="color:#ff0000;">UTF-8</span></param-value>
     </init-param>
     <init-param>
      <param-name>forceEncoding</param-name>
      <param-value>true</param-value>
     </init-param>
 </filter>
 <filter-mapping>
   <filter-name>characterEncodingFilter</filter-name>
   <url-pattern>/*</url-pattern>
 </filter-mapping></span>
②上面的UTF-8改成gb2312也不对:
<!-- 字符编码过滤 -->
  <filter>
     <filter-name>characterEncodingFilter</filter-name>
     <filter-class>org.springframework.web.filter.CharacterEncodingFilter</filter-class>
     <init-param>
      <param-name>encoding</param-name>
      <param-value><span style="color:#ff0000;">gb2312</span></param-value>
     </init-param>
     <init-param>
      <param-name>forceEncoding</param-name>
      <param-value>true</param-value>
     </init-param>
 </filter>
 <filter-mapping>
   <filter-name>characterEncodingFilter</filter-name>
   <url-pattern>/*</url-pattern>
 </filter-mapping>
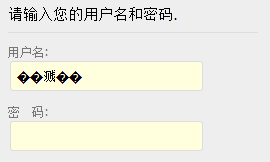
这样加完以后,CAS登录界面中,中文用户名会变成这样:

2.CAS登录后返回更多信息
Java客户端获取:
AttributePrincipal principal = (AttributePrincipal) request.getUserPrincipal();
String username = principal.getName();
我们的程序中也可能遇到需要得到更多如姓名,手机号,email等更多用户信息的情况。
cas各种版本配置方式也不尽相同,这里讲的是目前最新版本3.4.4。
配置方式如下:
一、首先需要配置属性attributeRepository,首先,你需要到WEB-INF目录找到
deployerConfigContext.xml文件,同时配置attributeRepository如下:
<span style="font-size:12px;"><bean  class="org.jasig.services.persondir.support.jdbc.SingleRowJdbcPersonAttributeDao" id="attributeRepository">
  <constructor-arg index="0" ref="casDataSource"/>
  <constructor-arg index="1" value="select * from userinfo where {0}"/>
    <property name="queryAttributeMapping">
      <map>
        <span style="color:#ff0000;">//这里的key需写username,value对应数据库用户名字段</span>
        <entry key="username" value="loginname"/>
      </map>
    </property>
    <property name="resultAttributeMapping">
      <map>
<span style="white-space:pre">	</span><span style="color:#ff0000;"><!--key为对应的数据库字段名称,value为提供给客户端获取的属性名字,系统会自动填充值-->  </span>
        <entry key="id" value="id"/>
        <entry key="mobile" value="mobile"/>
        <entry key="email" value="email"/>
      </map>
    </property>
</bean></span>
其中queryAttributeMapping是组装sql用的查询条件属性,如下表中
结合 封装成查询sql就是select * from userinfo where loginname=#username#,resultAttributeMapping是sql执行完毕后返回的结构属性, key对应数据库字段,value对应客户端获取参数。
二、配置用户认证凭据转化的解析器
也是在deployerConfigContext.xml中,找到
credentialsToPrincipalResolvers,为UsernamePasswordCredentialsToPrincipalResolver注入attributeRepository,那么attributeRepository就会被触发并通过此类进行解析,红色为新添部分。
<span style="font-size:12px;"><property name="credentialsToPrincipalResolvers">
  <list>
    <bean class="org.jasig.cas.authentication.principal.UsernamePasswordCredentialsToPrincipalResolver">
      <span style="color:#ff0000;"><property name="attributeRepository" ref="attributeRepository"/></span>
    </bean>
    <bean class="org.jasig.cas.authentication.principal.HttpBasedServiceCredentialsToPrincipalResolver"/>
  </list>
</property></span>
三、修改WEB-INF/view/jsp/protocol/2.0/casServiceValidationSuccess.jsp
在server验证成功后,这个页面负责生成与客户端交互的xml信息,在默认的casServiceValidationSuccess.jsp中,只包括用户名,并不提供其他的属性信息,因此需要对页面进行扩展,如下,红色为新添加部分
<span style="font-size:12px;"><cas:serviceResponse xmlns:cas='http://www.yale.edu/tp/cas'>
<cas:authenticationSuccess>
  <cas:user>${fn:escapeXml(assertion.chainedAuthentications[fn:length(assertion.chainedAuthentications)-1].principal.id)}</cas:user>
<span style="color:#ff0000;">
  <c:if test="${fn:length(assertion.chainedAuthentications[fn:length(assertion.chainedAuthentications)-1].principal.attributes) > 0}">
    <cas:attributes>
      <c:forEach var="attr" items="${assertion.chainedAuthentications[fn:length(assertion.chainedAuthentications)-1].principal.attributes}">
        <cas:${fn:escapeXml(attr.key)}>${fn:escapeXml(attr.value)}</cas:${fn:escapeXml(attr.key)}>
      </c:forEach>
    </cas:attributes>
  </c:if></span>

  <c:if test="${not empty pgtIou}">
    <cas:proxyGrantingTicket>${pgtIou}</cas:proxyGrantingTicket>
  </c:if>
  <c:if test="${fn:length(assertion.chainedAuthentications) > 1}">
    <cas:proxies>
      <c:forEach var="proxy" items="${assertion.chainedAuthentications}" varStatus="loopStatus" begin="0" end="${fn:length(assertion.chainedAuthentications)-2}" step="1">
        <cas:proxy>${fn:escapeXml(proxy.principal.id)}</cas:proxy>
      </c:forEach>
    </cas:proxies>
  </c:if>
</cas:authenticationSuccess>
</cas:serviceResponse></span>
通过完成上面三个步骤的配置后,server端的工作就完成了。
以下是java客户端获取:
<span style="font-size:12px;">AttributePrincipal principal = (AttributePrincipal) request.getUserPrincipal();
Map attributes = principal.getAttributes();
String email=attributes .get(</span><span style="font-size: 14px;">"email");</span>


 1万+
1万+

 被折叠的 条评论
为什么被折叠?


