


是AV,MP是封装好的,用起来非常简单,但是自定义样式就基本不可能了。AVPlayer存在于AVFundation中,更接近
于底层,所以灵活性更强大,废话不多说,咱们先简单写个Demo看下他的工作原理,然后模仿网易新闻写个界面出
来,这里用到了一个封装的框架,如果不熟悉内部原理的同学可以先看看我写的第一个Demo,基本所有逻辑都有。
这里容我啰嗦一句:
开发中,单纯的使用AVPlayer类是无法播放视频的,需要将视频层添加到AVPLayerLayer层,这样视频才能显示出
来,Layer的定义方式有两种,一种是下面这种直接使用PlayerLayer,还有一个就是自己做一个View,然后把他自身的Layer改成playerLayer
第一种方式:
- self.playerLayer = [AVPlayerLayer playerLayerWithPlayer:self.player];
- self.playerLayer.videoGravity = AVLayerVideoGravityResizeAspect;
- self.playerLayer.frame = self.view.bounds;
- [self.view.layer addSublayer:self.playerLayer];
- //修改当前view的 layer的 class
- +(Class)layerClass
- {
- //AVPlayerLayer
- return [AVPlayerLayer class];
- }
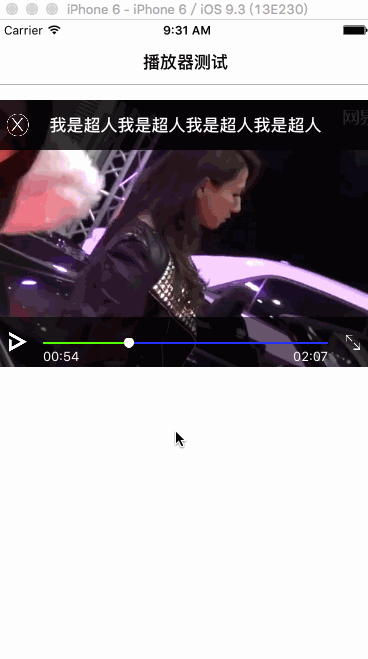
不BB了,直接看图说话,先看看最终的效果图


只能上传2M的东东,这视频一帧一帧消耗太快了,都不敢多录了,各位大爷将就着看吧。。。。。。
不要来打我,不然我让我表哥打死你

先简单介绍下AVPlayer的用法
很多朋友应该和我一样,一开始接触视频的时候都不知道用什么东东来写,如果是大神
就直接下载Demo吧。小白来介绍下,我也第一次用
第一:初始化播放器
- // 初始化播放器item
- self.playerItem = [[AVPlayerItem alloc] initWithURL:[NSURL URLWithString:@"http://flv2.bn.netease.com/videolib3/1608/30/zPuaL7429/SD/zPuaL7429-mobile.mp4"]];
- self.player = [[AVPlayer alloc] initWithPlayerItem:self.playerItem];
- // 初始化播放器的Layer
- self.playerLayer = [AVPlayerLayer playerLayerWithPlayer:self.player];
- // layer的frame
- self.playerLayer.frame = self.backView.bounds;
- // layer的填充属性 和UIImageView的填充属性类似
- // AVLayerVideoGravityResizeAspect 等比例拉伸,会留白
- // AVLayerVideoGravityResizeAspectFill // 等比例拉伸,会裁剪
- // AVLayerVideoGravityResize // 保持原有大小拉伸
- self.playerLayer.videoGravity = AVLayerVideoGravityResizeAspectFill;
- // 把Layer加到底部View上
- [self.backView.layer insertSublayer:self.playerLayer atIndex:0];
第二:给播放器加监听以及屏幕旋转的通知
- // 监听播放器状态变化
- [self.playerItem addObserver:self forKeyPath:@"status" options:NSKeyValueObservingOptionNew context:nil];
- // 监听缓存进去,就是大家所看到的一开始进去底部灰色的View会迅速加载
- [self.playerItem addObserver:self forKeyPath:@"loadedTimeRanges" options:NSKeyValueObservingOptionNew context:nil];
- //旋转屏幕通知
- [[NSNotificationCenter defaultCenter] addObserver:self
- selector:@selector(onDeviceOrientationChange)
- name:UIDeviceOrientationDidChangeNotification
- object:nil
- ];
第三步:实现KVO的监听方法
- // 监听播放器的变化属性
- - (void)observeValueForKeyPath:(NSString *)keyPath ofObject:(id)object change:(NSDictionary<NSString *,id> *)change context:(voidvoid *)context
- {
- if ([keyPath isEqualToString:@"status"])
- {
- AVPlayerItemStatus statues = [change[NSKeyValueChangeNewKey] integerValue];
- switch (statues) {
- // 监听到这个属性的时候,理论上视频就可以进行播放了
- case AVPlayerItemStatusReadyToPlay:
- // 最大值直接用sec,以前都是
- // CMTimeMake(帧数(slider.value * timeScale), 帧/sec)
- self.slider.maximumValue = CMTimeGetSeconds(self.playerItem.duration);
- [self initTimer];
- // 启动定时器 5秒自动隐藏
- if (!self.autoDismissTimer)
- {
- self.autoDismissTimer = [NSTimer timerWithTimeInterval:8.0 target:self selector:@selector(autoDismissView:) userInfo:nil repeats:YES];
- [[NSRunLoop currentRunLoop] addTimer:self.autoDismissTimer forMode:NSDefaultRunLoopMode];
- }
- break;
- case AVPlayerItemStatusUnknown:
- break;
- // 这个就是不能播放喽,加载失败了
- case AVPlayerItemStatusFailed:
- // 这时可以通过`self.player.error.description`属性来找出具体的原因
- break;
- default:
- break;
- }
- }
- else if ([keyPath isEqualToString:@"loadedTimeRanges"]) // 监听缓存进度的属性
- {
- // 计算缓存进度
- NSTimeInterval timeInterval = [self availableDuration];
- // 获取总长度
- CMTime duration = self.playerItem.duration;
- CGFloat durationTime = CMTimeGetSeconds(duration);
- // 监听到了给进度条赋值
- [self.progressView setProgress:timeInterval / durationTime animated:NO];
- }
- }
AVPlayerItemStatusReadyToPlay
AVPlayerItemStatusFailed
这两个属性还比较好理解,是个人都知道,但是这个是什么鬼
AVPlayerItemStatusUnknown
内部是这么解释的
Indicates that the status of the player item is not yet known because it has not tried to load new media resources
for playback.
fk u 我英语不好,看不懂啊,估计是playerItem这个视频资源对象挂了,识别不了,暂时不知道怎么处理

第四步:调用Player的方法观察时间变化更新播放进度
来个官方的说话,显得我比较牛B

- // 调用plaer的对象进行UI更新
- - (void)initTimer
- {
- // player的定时器
- __weak typeof(self)weakSelf = self;
- // 每秒更新一次UI Slider
- [self.player addPeriodicTimeObserverForInterval:CMTimeMake(1, 1) queue:dispatch_get_main_queue() usingBlock:^(CMTime time) {
- // 当前时间
- CGFloat nowTime = CMTimeGetSeconds(weakSelf.playerItem.currentTime);
- // 总时间
- CGFloat duration = CMTimeGetSeconds(weakSelf.playerItem.duration);
- // sec 转换成时间点
- weakSelf.nowLabel.text = [weakSelf convertToTime:nowTime];
- weakSelf.remainLabel.text = [weakSelf convertToTime:(duration - nowTime)];
- // 不是拖拽中的话更新UI
- if (!weakSelf.isDragSlider)
- {
- weakSelf.slider.value = CMTimeGetSeconds(weakSelf.playerItem.currentTime);
- }
- }];
- }
- // sec 转换成指定的格式
- - (NSString *)convertToTime:(CGFloat)time
- {
- // 初始化格式对象
- NSDateFormatter *fotmmatter = [[NSDateFormatter alloc] init];
- // 根据是否大于1H,进行格式赋值
- if (time >= 3600)
- {
- [fotmmatter setDateFormat:@"HH:mm:ss"];
- }
- else
- {
- [fotmmatter setDateFormat:@"mm:ss"];
- }
- // 秒数转换成NSDate类型
- NSDate *date = [NSDate dateWithTimeIntervalSince1970:time];
- // date转字符串
- return [fotmmatter stringFromDate:date];
- }
第五步:给背景View加个手势,点击的时候让title和时间进度条消失或者几秒钟自动消失
- // 启动定时器 5秒自动隐藏
- // 咱们这种初始化定时器的方式需要自己手动加到runloop上
- // scheduledTimerWithTimeInterval用这个的时候就不需要手动加到runloop中
- if (!self.autoDismissTimer)
- {
- self.autoDismissTimer = [NSTimer timerWithTimeInterval:8.0 target:self selector:@selector(autoDismissView:) userInfo:nil repeats:YES];
- [[NSRunLoop currentRunLoop] addTimer:self.autoDismissTimer forMode:NSDefaultRunLoopMode];
- }
- #pragma mark - 自动隐藏bottom和top
- - (void)autoDismissView:(NSTimer *)timer
- {
- // player的属性rate
- /* indicates the current rate of playback; 0.0 means "stopped", 1.0 means "play at the natural rate of the current item" */
- if (self.player.rate == 0)
- {
- // 暂停状态就不隐藏
- }
- else if (self.player.rate == 1)
- {
- if (self.bottomView.alpha == 1)
- {
- [UIView animateWithDuration:1.0 animations:^{
- self.bottomView.alpha = 0;
- self.topView.alpha = 0;
- }];
- }
- }
- }
第六步:来个全屏小屏幕切换示例
其实切换的时候就是把只之前的Layer移除,然后重新布局,加到KeyWindow中去
- // 全屏显示
- -(void)toFullScreenWithInterfaceOrientation:(UIInterfaceOrientation )interfaceOrientation{
- // 先移除之前的
- [self.backView removeFromSuperview];
- // 初始化
- self.backView.transform = CGAffineTransformIdentity;
- if (interfaceOrientation==UIInterfaceOrientationLandscapeLeft) {
- self.backView.transform = CGAffineTransformMakeRotation(-M_PI_2);
- }else if(interfaceOrientation==UIInterfaceOrientationLandscapeRight){
- self.backView.transform = CGAffineTransformMakeRotation(M_PI_2);
- }
- // BackView的frame能全屏
- self.backView.frame = CGRectMake(0, 0, kScreenWidth, kScreenHeight);
- // layer的方向宽和高对调
- self.playerLayer.frame = CGRectMake(0, 0, kScreenHeight, kScreenWidth);
- // remark 约束
- [self.bottomView mas_remakeConstraints:^(MASConstraintMaker *make) {
- make.height.mas_equalTo(50);
- make.top.mas_equalTo(kScreenWidth-50);
- make.left.equalTo(self.backView).with.offset(0);
- make.width.mas_equalTo(kScreenHeight);
- }];
- [self.topView mas_remakeConstraints:^(MASConstraintMaker *make) {
- make.height.mas_equalTo(50);
- make.left.equalTo(self.backView).with.offset(0);
- make.width.mas_equalTo(kScreenHeight);
- }];
- [self.closeButton mas_remakeConstraints:^(MASConstraintMaker *make) {
- make.left.equalTo(self.backView).with.offset(5);
- make.height.mas_equalTo(30);
- make.width.mas_equalTo(30);
- make.top.equalTo(self.backView).with.offset(10);
- }];
- [self.titleLabel mas_remakeConstraints:^(MASConstraintMaker *make) {
- make.left.equalTo(self.topView).with.offset(45);
- make.right.equalTo(self.topView).with.offset(-45);
- make.center.equalTo(self.topView);
- make.top.equalTo(self.topView).with.offset(0);
- }];
- [self.nowLabel mas_remakeConstraints:^(MASConstraintMaker *make) {
- make.left.equalTo(self.slider.mas_left).with.offset(0);
- make.top.equalTo(self.slider.mas_bottom).with.offset(0);
- make.size.mas_equalTo(CGSizeMake(100, 20));
- }];
- [self.remainLabel mas_remakeConstraints:^(MASConstraintMaker *make) {
- make.right.equalTo(self.slider.mas_right).with.offset(0);
- make.top.equalTo(self.slider.mas_bottom).with.offset(0);
- make.size.mas_equalTo(CGSizeMake(100, 20));
- }];
- // 加到window上面
- [[UIApplication sharedApplication].keyWindow addSubview:self.backView];
- }
- // 缩小到cell
- -(void)toCell{
- // 先移除
- [self.backView removeFromSuperview];
- __weak typeof(self)weakSelf = self;
- [UIView animateWithDuration:0.5f animations:^{
- weakSelf.backView.transform = CGAffineTransformIdentity;
- weakSelf.backView.frame = CGRectMake(0, 80, kScreenWidth, kScreenHeight / 2.5);
- weakSelf.playerLayer.frame = weakSelf.backView.bounds;
- // 再添加到View上
- [weakSelf.view addSubview:weakSelf.backView];
- // remark约束
- [self.bottomView mas_remakeConstraints:^(MASConstraintMaker *make) {
- make.left.equalTo(weakSelf.backView).with.offset(0);
- make.right.equalTo(weakSelf.backView).with.offset(0);
- make.height.mas_equalTo(50);
- make.bottom.equalTo(weakSelf.backView).with.offset(0);
- }];
- [self.topView mas_remakeConstraints:^(MASConstraintMaker *make) {
- make.left.equalTo(weakSelf.backView).with.offset(0);
- make.right.equalTo(weakSelf.backView).with.offset(0);
- make.height.mas_equalTo(50);
- make.top.equalTo(weakSelf.backView).with.offset(0);
- }];
- [self.closeButton mas_makeConstraints:^(MASConstraintMaker *make) {
- make.left.equalTo(weakSelf.backView).with.offset(5);
- make.centerY.equalTo(weakSelf.topView);
- make.size.mas_equalTo(CGSizeMake(30, 30));
- }];
- }completion:^(BOOL finished) {
- }];
- }
基本逻辑差不多介绍完了,效果就这样的

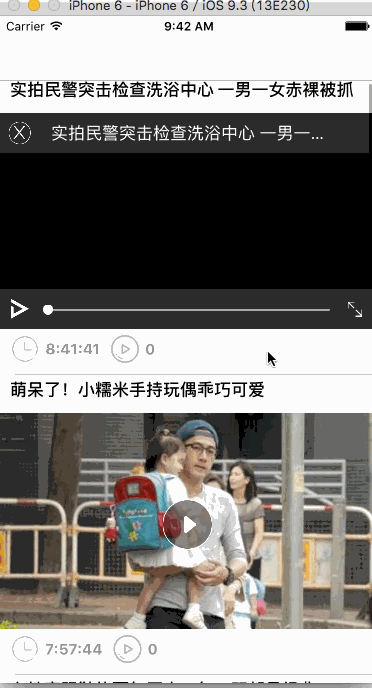
下面咱们试着写个网易播放视频的Demo,在tableView中使用下,效果图已经在最上面了
这里无非多了几个属性
@property (nonatomic,strong)NSIndexPath *currentIndexPath; // 当前播放的cell
@property (nonatomic,assign)BOOL isSmallScreen; //是否放置在window上
@property(nonatomic,strong)ViedoTableViewCell *currentCell; // 当前cell
分析1:全屏小屏切换的时候回到指定的cell,那么先点击播放记录位置
1.第一种cell播放:Layer是加载到cell上的背景图片区域的 滚动的时候要记录当前cell
2.第二种全屏播放:Layer是加载到Window上的 frame全屏
3.第三种小窗播放:它其实就是全屏播放的一个特例,也是加载到Window上的,frame自定义
其实不同状态的切换无非就是Layer所在View的位置不停切换
下面这个方法就是记录当前播放的cell下标
- #pragma mark - 播放器播放
- - (void)startPlayVideo:(UIButton *)sender
- {
- // 获取当前的indexpath
- self.currentIndexPath = [NSIndexPath indexPathForRow:sender.tag inSection:0];
- // iOS 7 和 8 以上获取cell的方式不同
- if ([UIDevice currentDevice].systemVersion.floatValue>=8||[UIDevice currentDevice].systemVersion.floatValue<7) {
- self.currentCell = (ViedoTableViewCell *)sender.superview.superview;
- }else{//ios7系统 UITableViewCell上多了一个层级UITableViewCellScrollView
- self.currentCell = (ViedoTableViewCell *)sender.superview.superview.subviews;
- }
- ViedoModel *model = [self.viedoLists objectAtIndex:sender.tag];
- // 小窗口的时候点击播放另一个 先移除掉
- if (self.isSmallScreen) {
- [self releaseWMPlayer];
- self.isSmallScreen = NO;
- }
- // 当有上一个在播放的时候 点击 就先release
- if (self.wmPlayer) {
- [self releaseWMPlayer];
- self.wmPlayer = [[WMPlayer alloc]initWithFrame:self.currentCell.mainImageView.bounds];
- self.wmPlayer.delegate = self;
- self.wmPlayer.closeBtnStyle = CloseBtnStyleClose;
- self.wmPlayer.URLString = model.mp4URL;
- self.wmPlayer.titleLabel.text = model.title;
- // [wmPlayer play];
- }else{
- // 当没有一个在播放的时候
- self.wmPlayer = [[WMPlayer alloc]initWithFrame:self.currentCell.mainImageView.bounds];
- self.wmPlayer.delegate = self;
- self.wmPlayer.closeBtnStyle = CloseBtnStyleClose;
- self.wmPlayer.titleLabel.text = model.title;
- self.wmPlayer.URLString = model.mp4URL;
- }
- // 把播放器加到当前cell的imageView上面
- [self.currentCell.mainImageView addSubview:self.wmPlayer];
- [self.currentCell.mainImageView bringSubviewToFront:self.wmPlayer];
- [self.currentCell.playButton.superview sendSubviewToBack:self.currentCell.playButton];
- [self.tableView reloadData];
- }
分析2:上下滚动的时候根据坐标切换cell显示还是小窗显示
- #pragma mark scrollView delegate
- - (void)scrollViewDidScroll:(UIScrollView *)scrollView
- {
- if(scrollView ==self.tableView){
- if (self.wmPlayer==nil) {
- return;
- }
- if (self.wmPlayer.superview) {
- // 当前cell在tableView中的frame
- // (lldb) po rectInTableView
- // (origin = (x = 0, y = 0), size = (width = 375, height = 300))
- CGRect rectInTableView = [self.tableView rectForRowAtIndexPath:self.currentIndexPath];
- // 把当前的frame从tableView转换到屏幕View上面去
- // (lldb) po rectInSuperview
- // (origin = (x = 0, y = 61), size = (width = 375, height = 300))
- CGRect rectInSuperview = [self.tableView convertRect:rectInTableView toView:[self.tableView superview]];
- NSLog(@"Y轴变化:%lf,currentCell:%lf",rectInSuperview.origin.y,self.currentCell.mainImageView.frame.size.height);
- // 当网上移出屏幕的时候或者往下移出屏幕的时候,根据逻辑是否加载到小窗上来
- if (rectInSuperview.origin.y<-self.currentCell.mainImageView.frame.size.height ||rectInSuperview.origin.y>kScreenHeight-kNavbarHeight-kTabBarHeight) {//往上拖动
- // 如果已经小屏幕显示了,就不做任何操作
- if ([[UIApplication sharedApplication].keyWindow.subviews containsObject:self.wmPlayer]&&self.isSmallScreen) {
- self.isSmallScreen = YES;
- }else{
- //放widow上,小屏显示 这里的逻辑和展示到全屏是一样的道理,只是位置和frame自己定义就好了,想放哪就放哪
- [self toSmallScreen];
- }
- }else{
- // 如果已经在cell里面了,那么就不做任何操作
- if ([self.currentCell.mainImageView.subviews containsObject:self.wmPlayer]) {
- }else{
- // 如果进入屏幕,而且未在cell上,那么动画回currentCell
- [self toCell];
- }
- }
- }
- }
- }
- // 滚动的时候小屏幕,放window上显示
- -(void)toSmallScreen{
- //放widow上
- [self.wmPlayer removeFromSuperview];
- __weak typeof(self)weakSelf = self;
- [UIView animateWithDuration:0.5f animations:^{
- weakSelf.wmPlayer.transform = CGAffineTransformIdentity;
- // 设置window上的位置
- weakSelf.wmPlayer.frame = CGRectMake(kScreenWidth/2,kScreenHeight-kTabBarHeight + 40 -(kScreenWidth/2)*0.75, kScreenWidth/2, (kScreenWidth/2)*0.75);
- weakSelf.wmPlayer.playerLayer.frame = weakSelf.wmPlayer.bounds;
- // 下面就是更新布局的代码,此处省略了,需要的去下载Demo看看
分析3:用MJRefresh做个JD的加载动画(随便做的,大家随便感受下)

- MKJRefreshHeader * header = [MKJRefreshHeader headerWithRefreshingTarget:self refreshingAction:@selector(refreshData)];
- header.stateLabel.hidden = YES;
- header.lastUpdatedTimeLabel.hidden = YES;
- header.mj_h = 80;
- self.tableView.mj_header = header;
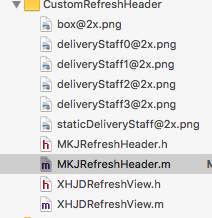 这是JD的加载动画View以及重写的MJHeader文件
这里简单的写个重写的方法示例,具体需要看的大家去下载Demo
- - (void)setState:(MJRefreshState)state
- {
- MJRefreshCheckState
- // 根据状态做事情
- // 刷新完毕
- if (state == MJRefreshStateIdle) {
- if (oldState == MJRefreshStateRefreshing) {
- self.arrowView.transform = CGAffineTransformIdentity;
- [UIView animateWithDuration:MJRefreshSlowAnimationDuration animations:^{
- self.loadingView1.alpha = 0.0;
- } completion:^(BOOL finished) {
- // 如果执行完动画发现不是idle状态,就直接返回,进入其他状态
- if (self.state != MJRefreshStateIdle) return;
- self.loadingView1.alpha = 1.0;
- [self.loadingView1 endRefresing];
- self.arrowView.hidden = NO;
- }];
- } else { // 拉倒即将刷新的时候,又往回缩,不进行刷新
- [self.loadingView1 endRefresingDown];
- self.arrowView.hidden = NO;
- [UIView animateWithDuration:MJRefreshFastAnimationDuration animations:^{
- self.arrowView.transform = CGAffineTransformIdentity;
- }];
- }
- } else if (state == MJRefreshStatePulling) { // 继续往下拉的时候
- [self.loadingView1 refreing];
- NSLog(@"连接点");
- self.arrowView.hidden = NO;
- [UIView animateWithDuration:MJRefreshFastAnimationDuration animations:^{
- self.arrowView.transform = CGAffineTransformMakeRotation(0.000001 - M_PI);
- }];
- } else if (state == MJRefreshStateRefreshing) { // 刷新
- self.loadingView1.alpha = 1.0; // 防止refreshing -> idle的动画完毕动作没有被执行
- [self.loadingView1 refreing];
- self.arrowView.hidden = YES;
- }
- }
尼玛啊,一口气写了那么多,语文水平还没及格的我真的感觉身体被掏空了

篇幅有点多了,感觉没必要什么都写出来,需要的同学去研究下Demo吧,感谢看到这
里的小伙伴,你们都是好人,好人一生平安啊,要不再点个赞???!!!

简单Demo示例地址:点击打开简单Demo链接
类似网易视频播放最终Demo地址:点击打开网易Demo链接


 7064
7064

 被折叠的 条评论
为什么被折叠?
被折叠的 条评论
为什么被折叠?
 到【灌水乐园】发言


