SuperMap iClient3D 11i (2023) SP1 for Cesium之倾斜摄影单体化对象全显

作者:nannan

目录

前言

一、实现思路

1.1 查询全部面对象

1.2 添加实体面对象

1.3 选中实体并显示属性

1.4 设置鼠标移动事件

二、运行效果


前言

       在支持工作中,小编遇到有客户想要对倾斜摄影做单体化,并使它全部显示渲染出来的问题。需求:

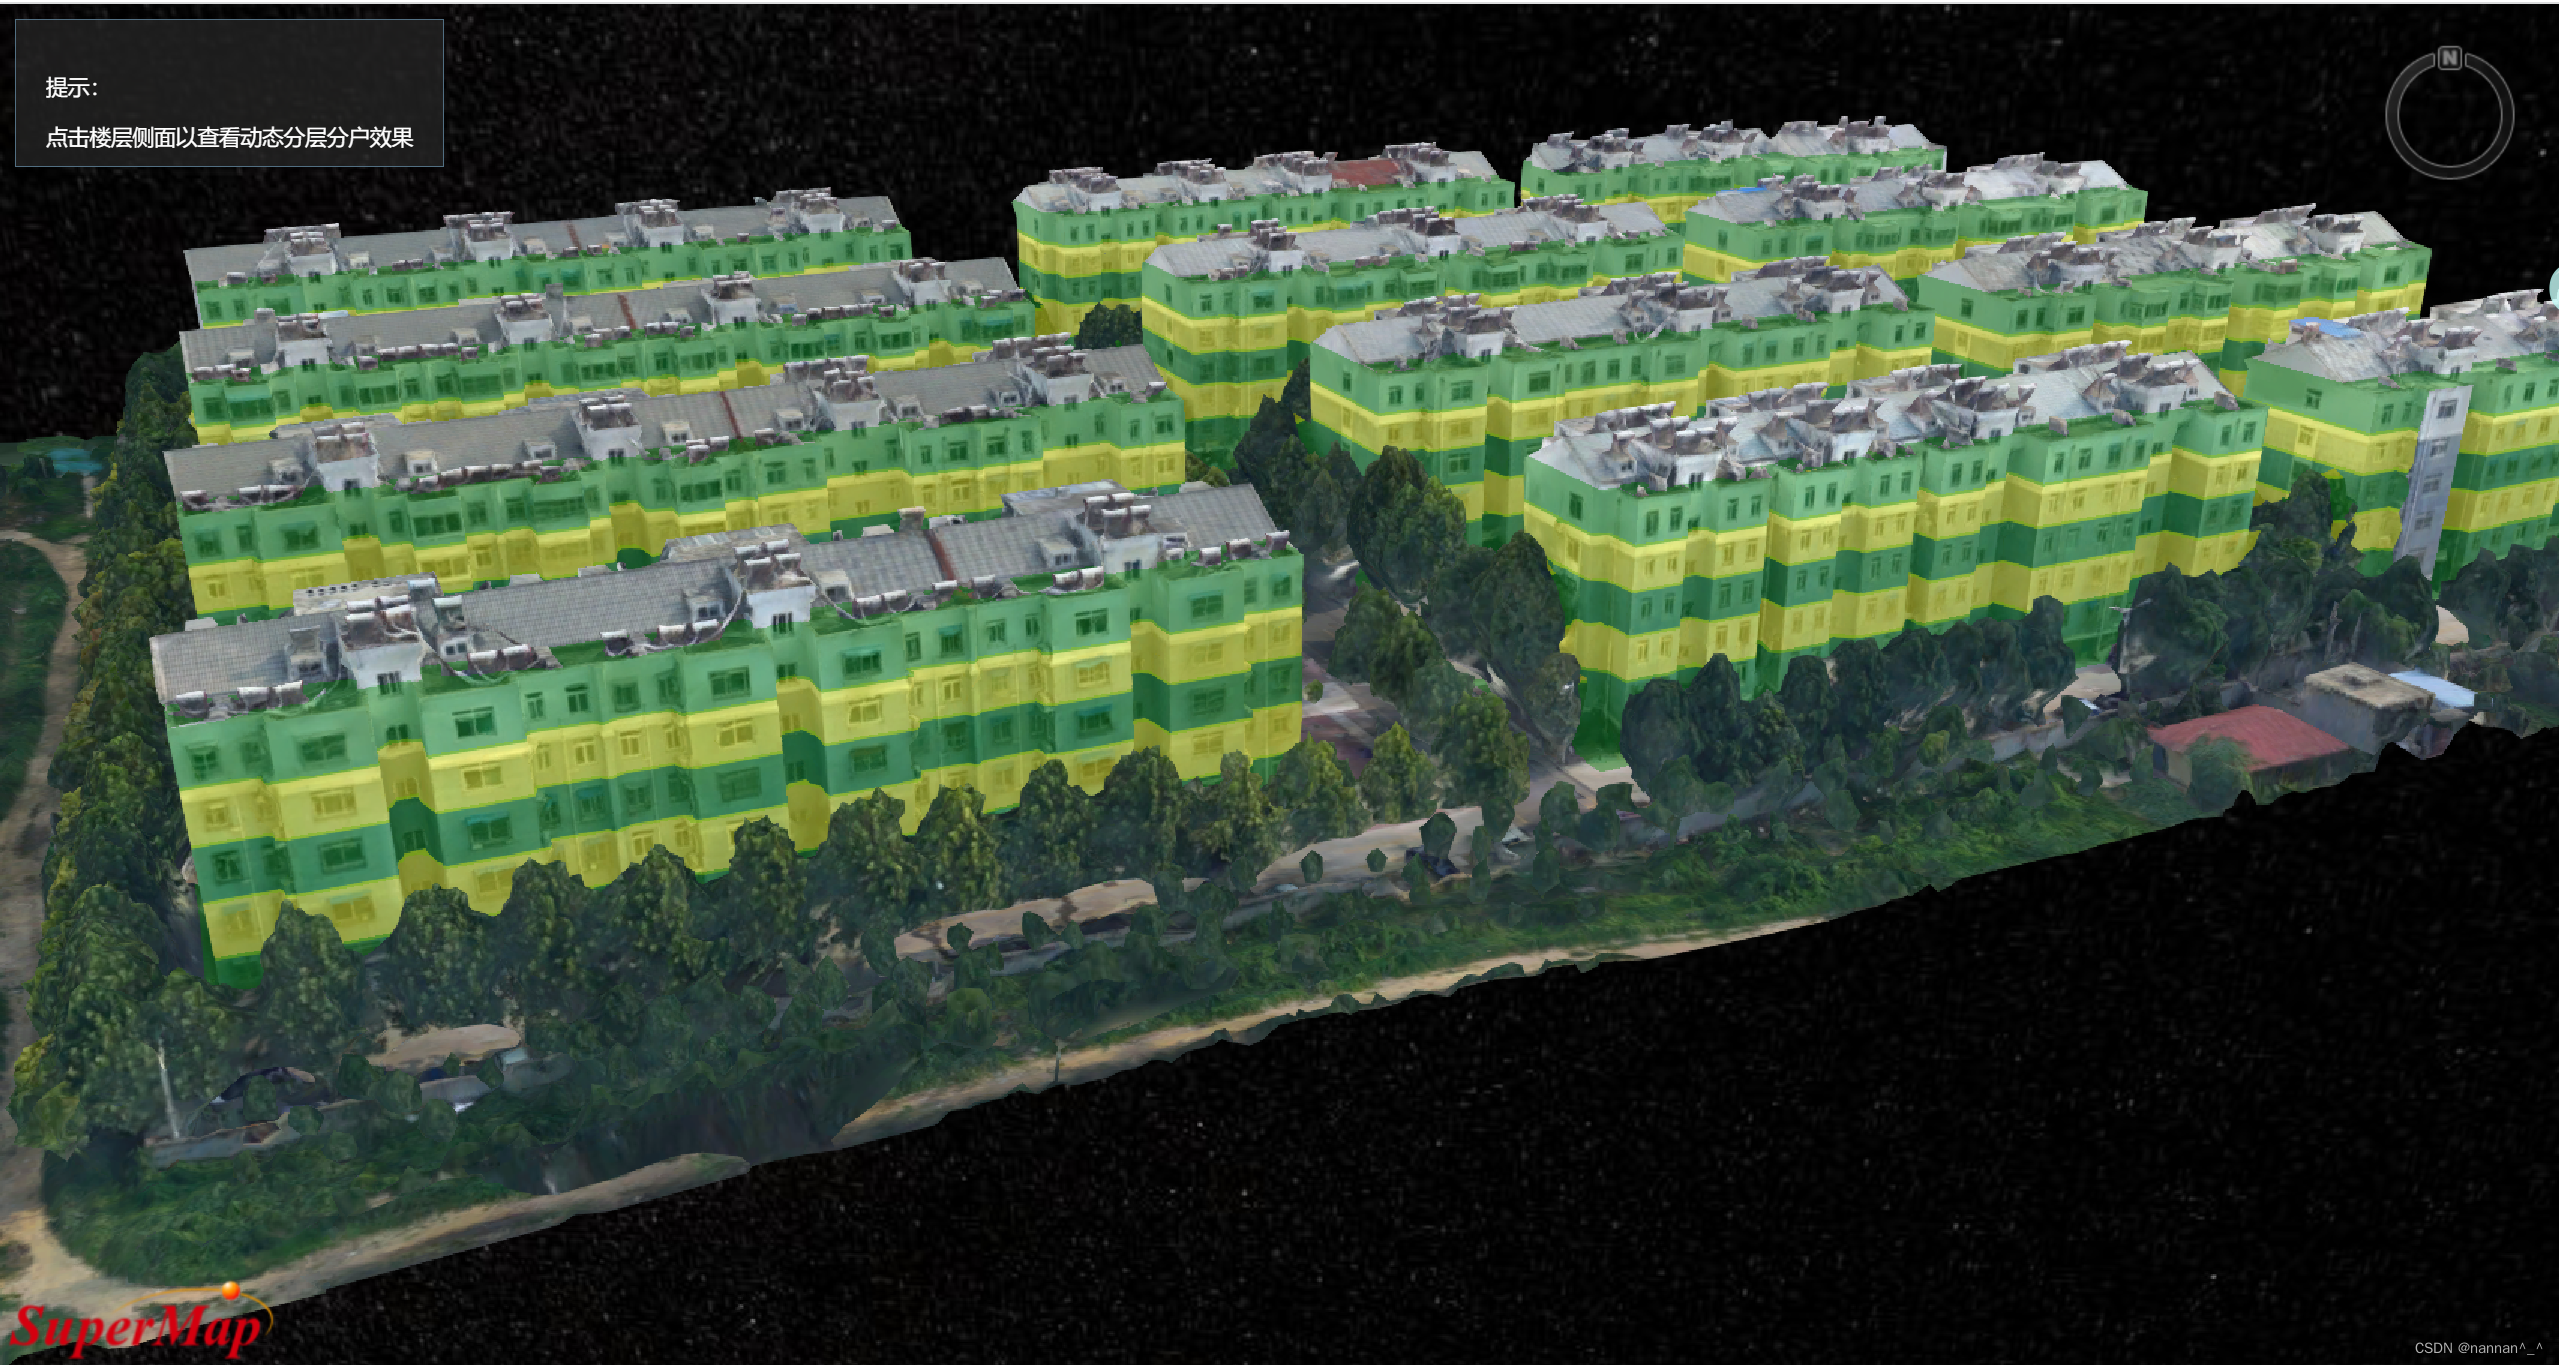
       (1)采用两种颜色间隔表示楼层,使之单体化效果更直观;

       (2)有贴对象的效果,更逼真。不想要矢量面拉伸成方块那种效果,比较假;

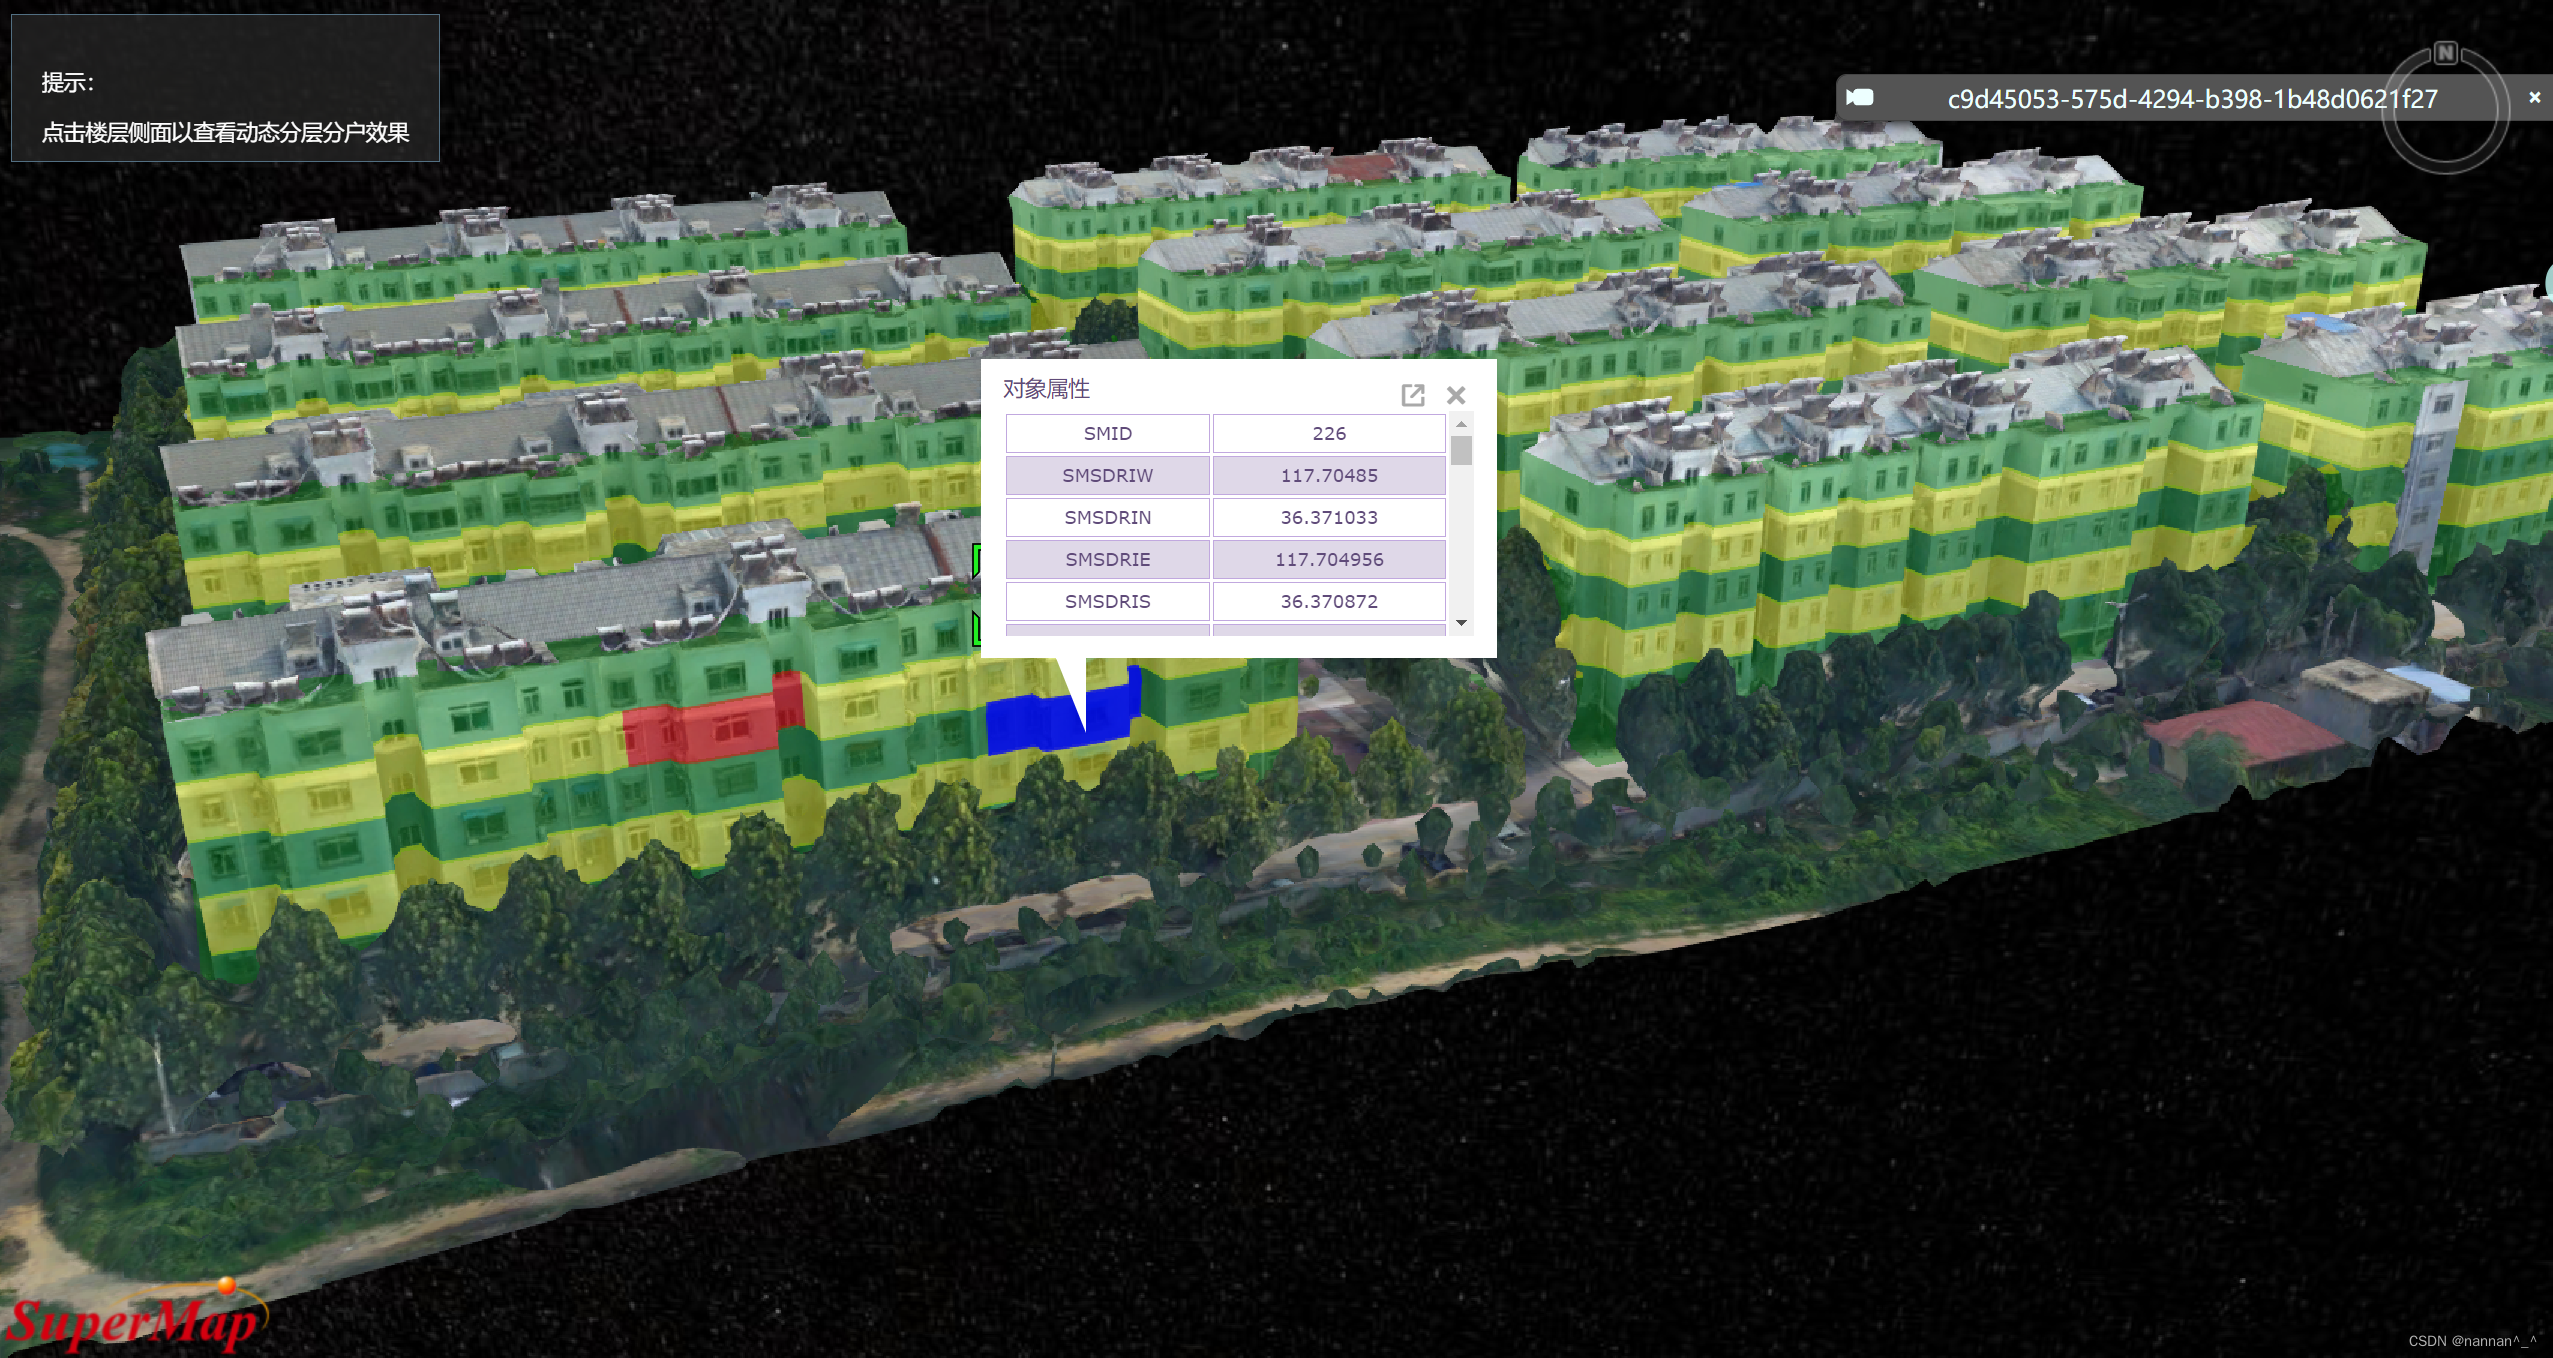
       (3)鼠标实时监听单体化面,可追踪当前鼠标在哪个单体化面区域;

       (4)有选中效果,并可以弹出属性框。

根据以上需求,小编在官网范例分层分户查询的基础上,进行二次开发,下面和小编一起来实战吧。

一、实现思路

1.1 查询全部面对象

       主要用到SQL语句(SMID>0),查询数据服务分层分户面中的所有面对象。

doSqlQuery('SMID>0');

       执行SQL查询语句,因本次实现的功能需要两种查询语句,一种是查询全部面对象,另一种是根据鼠标选择获取当前分层分户面对象,所以需在doSqlQuery(SQL)函数中根据SQL语句来判断执行后续事件。

function doSqlQuery(SQL) {
					var getFeatureParam, getFeatureBySQLService, getFeatureBySQLParams;
					getFeatureParam = new SuperMap.REST.FilterParameter({
						attributeFilter: SQL
					});
					getFeatureBySQLParams = new SuperMap.REST.GetFeaturesBySQLParameters({
						queryParameter: getFeatureParam,
						toIndex: -1,
						datasetNames: ["mian:" + "mian"] // 本例中“户型面”为数据源名称,“专题户型面2D”为楼层面相应的数据集名称
					});
					var url = URL_CONFIG.SCP_FCFH_DATA; // 数据服务地址
					if(SQL == 'SMID>0') {
						getFeatureBySQLService = new SuperMap.REST.GetFeaturesBySQLService(url, {
							eventListeners: {
								"processCompleted": onQueryComplete1, // 查询成功时的回调函数
								"processFailed": processFailed // 查询失败时的回调函数
							}
						});
					} else {
						getFeatureBySQLService = new SuperMap.REST.GetFeaturesBySQLService(url, {
							eventListeners: {
								"processCompleted": onQueryComplete, // 查询成功时的回调函数
								"processFailed": processFailed // 查询失败时的回调函数
							}
						});
					}
					getFeatureBySQLService.processAsync(getFeatureBySQLParams);
				}


1.2 添加实体面对象

       当SQL = 'SMID>0'时,执行onQueryComplete1的回调函数,获取底部高程bottomHeight和拉伸高度extrudeHeight,构建polygon实体面,并使用groundBottomAltitude和groundExtrudedHeight分别设置贴对象面的底部高程和拉伸高程。

       客户需求是采用两种颜色间隔表示楼层,使之单体化效果更直观。小编这里根据获取的底部高程值进行过滤,当底部高程为33和39时,面颜色为黄色,其它情况时显示绿色。

function onQueryComplete1(queryEventArgs) {
					// 首先移除之前添加标识实体

					let features = queryEventArgs.originResult.features;
					for(var i = 0; i < features.length; i++) {

						var bottomHeight = Number(features[i].fieldValues[features[i].fieldNames.indexOf('BOTTOM')]); // 底部高程
						var extrudeHeight = Number(features[i].fieldValues[features[i].fieldNames.indexOf('LSG')]); // 层高(拉伸高度)
						var points3D = []; // [经度, 纬度, 经度, 纬度, ...]的形式,存放楼层面上的点坐标
						for(var pt of features[i].geometry.points) {
							points3D.push(pt.x, pt.y);
						}
						console.log(bottomHeight);
						if(bottomHeight == 33 || bottomHeight == 39) {
							viewer.entities.add({
								polygon: {
									hierarchy: Cesium.Cartesian3.fromDegreesArray(points3D),
									material: Cesium.Color.YELLOW.withAlpha(0.4),
									classificationType: Cesium.ClassificationType.S3M_TILE, // 贴在S3M模型表面
									groundBottomAltitude: bottomHeight,
									groundExtrudedHeight: extrudeHeight
								},
							});
						}else{//bottomHeight == 42 || bottomHeight == 36||bottomHeight == 28
							viewer.entities.add({
								polygon: {
									hierarchy: Cesium.Cartesian3.fromDegreesArray(points3D),
									material: Cesium.Color.GREEN.withAlpha(0.4),
									classificationType: Cesium.ClassificationType.S3M_TILE, // 贴在S3M模型表面
									groundBottomAltitude: bottomHeight,
									groundExtrudedHeight: extrudeHeight
								},
							});
						}

					}

				}

1.3 选中实体并显示属性

       这部分内容官网倾斜分层分户范例里已有,这里不做赘述。小编这里只是将面的选中风格修改为了蓝色。

material:Cesium.Color.BLUE.withAlpha(0.8),
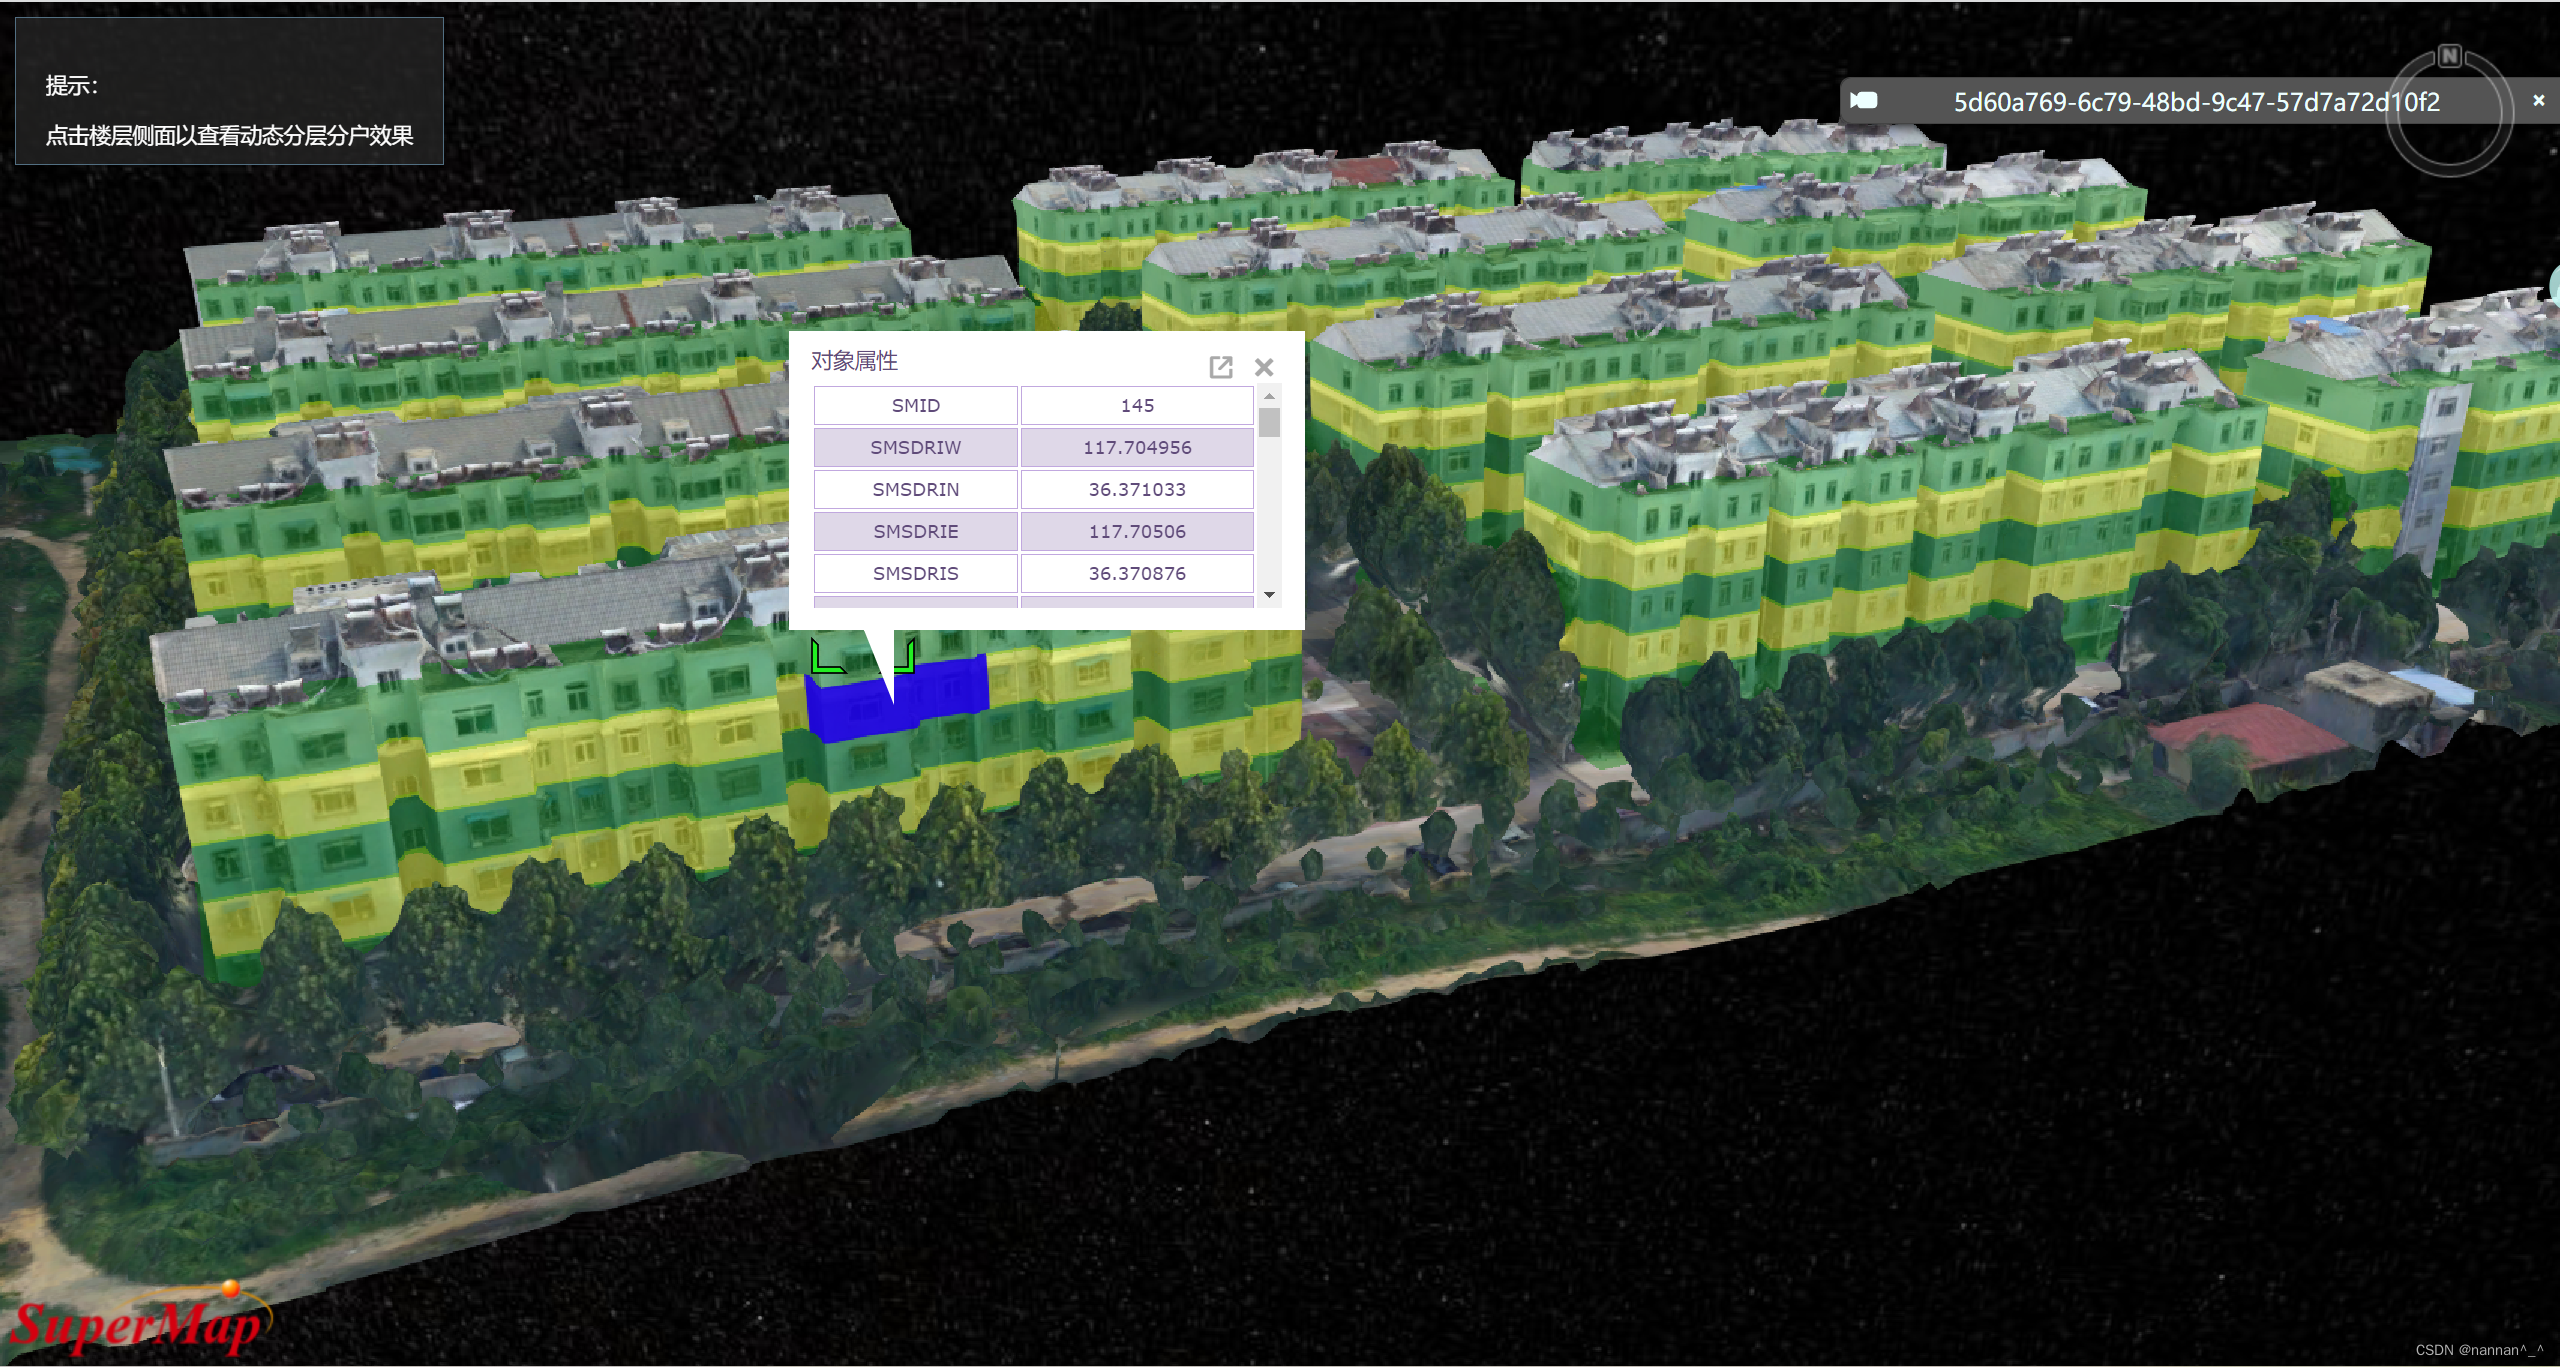
1.4 设置鼠标移动事件

        鼠标移动事件前需要提前创建一个临时存储选中对象高亮风格的参数;

let highlighted = {
	feature: undefined,
	originalColor: '',
	id: ''
};

鼠标在场景中移动需考虑以下4种情况:

(1)没有移动到实体面的范围内时,鼠标会获取不到pickedFeature,则跳出不执行后面的代码。

//没有定义,则跳出不执行后面的代码
if(!Cesium.defined(pickedFeature)) {
		return;
	}

(2)移动到实体面的范围内时,将pickedFeature颜色设置为红色。但是会发现选择另一个实体面时,前一个实体面的颜色不恢复原状,这里我们需要判断pickedFeature的底部高程值,如果是33和39,则highlighted.feature 的颜色设置为黄色,反之则设置为绿色。这样就可以移动后实体面恢复为原始色的效果。

let value = pickedFeature.id.polygon._groundBottomAltitude._value;
if(value == 33 || value == 39) {
		highlighted.feature ?.polygon.material.color.setValue(Cesium.Color.YELLOW.withAlpha(0.4));
} else {
	highlighted.feature ?.polygon.material.color.setValue(Cesium.Color.GREEN.withAlpha(0.4));
}
highlighted.id = pickedFeature.id.id;
highlighted.feature = pickedFeature.id;
pickedFeature.id.polygon.material.color.setValue(Cesium.Color.RED.withAlpha(0.5));

(3)先移动到实体面范围后再移出时,其实体着色恢复为初始状态。

如果highlighted.feature被定义了,也就是之前有触发到实体上,其实体着色恢复为初始状态
if(Cesium.defined(highlighted.feature)) {
if(highlighted.feature.polygon._groundBottomAltitude._value == 33 || highlighted.feature.polygon._groundBottomAltitude._value == 39) {
highlighted.feature.polygon.material.color.setValue(Cesium.Color.YELLOW.withAlpha(0.4))
	} else {
highlighted.feature.polygon.material.color.setValue(Cesium.Color.GREEN.withAlpha(0.4))
	}
highlighted.feature = undefined;
}

(4)当鼠标在选中对象上停留后移除时,选中对象的风格仍保持为蓝色

//当鼠标选中实体后实体的颜色保持为选中状态即蓝色
if(lastHouseEntity) {
	lastHouseEntity.polygon.material=Cesium.Color.BLUE.withAlpha(0.8);
}

全部代码请见https://download.csdn.net/download/nan620403/88625875

二、运行效果

倾斜摄影单体化全显

  • 1
    点赞
  • 4
    收藏
    觉得还不错? 一键收藏
  • 0
    评论
实现将S3M模型绕某倾斜摄影三维模型服务循环飞行的过程可以分为以下几步: 1. 创建Cesium Viewer对象SuperMap iClient3D的场景。 ```javascript var viewer = new Cesium.Viewer("cesiumContainer"); var scene = viewer.scene; var iClient3D = new SuperMap.Web.iClient3DLayer(scene); ``` 2. 创建DynamicLayer3D图层对象,设置图层参数。 ```javascript var dynamicLayer3D = new SuperMap.Web.iClient3D.DynamicLayer3D({ url: "http://localhost:8090/iserver/services/3D-Model/rest/realspace", // 倾斜摄影三维模型服务地址 name: "s3m_layer", // 图层名称 datasources: ["gugong"], // 数据源名称 visible: true // 图层可见性 }); ``` 这里需要注意的是,需要在倾斜摄影三维模型服务中发布S3M模型,并将其归属到指定的数据源中。 3. 将DynamicLayer3D图层添加到SuperMap iClient3D的场景中。 ```javascript iClient3D.addLayer(dynamicLayer3D); ``` 4. 获取倾斜摄影三维模型的高度信息。 ```javascript var terrainProvider = new Cesium.CesiumTerrainProvider({ url: "http://localhost:8090/iserver/services/3D-Model/rest/realspace/datas/gugong/config", }); var ellipsoid = scene.globe.ellipsoid; var promise = Cesium.sampleTerrainMostDetailed(terrainProvider, [camera.positionCartographic]); Cesium.when(promise, function(updatedPositions) { var height = updatedPositions[0].height; camera.position = ellipsoid.cartographicToCartesian( new Cesium.Cartographic.fromDegrees(116.403964, 39.915119, height + 7000) ); camera.up = new Cesium.Cartesian3(0, 0, 1); camera.lookAt(new Cesium.Cartesian3(116.403964, 39.915119, height + 100), new Cesium.Cartesian3(0, 0, height + 7000)); }); ``` 这里需要使用Cesium的sampleTerrainMostDetailed方法来获取倾斜摄影三维模型的高度信息,并将相机位置设置在模型上方。 5. 创建动画函数,实现循环飞行效果。 ```javascript var heading = 0; function flyLoop() { var pitch = Cesium.Math.toRadians(30); var roll = Cesium.Math.toRadians(0); heading += Cesium.Math.toRadians(1); if (heading > Cesium.Math.TWO_PI) { heading -= Cesium.Math.TWO_PI; } var position = Cesium.Cartesian3.fromDegrees( 116.403964 + Math.cos(heading) * 0.01, 39.915119 + Math.sin(heading) * 0.01, camera.positionCartographic.height ); camera.setView({ destination: position, orientation: { heading: heading, pitch: pitch, roll: roll } }); } ``` 这里的循环飞行效果是通过不断修改相机位置和方向实现的。 6. 调用动画函数,启动循环飞行效果。 ```javascript setInterval(flyLoop, 50); ``` 这里使用setInterval函数每隔50毫秒调用一次动画函数,实现循环飞行效果。 完整代码如下所示: ```javascript var viewer = new Cesium.Viewer("cesiumContainer"); var scene = viewer.scene; var iClient3D = new SuperMap.Web.iClient3DLayer(scene); var dynamicLayer3D = new SuperMap.Web.iClient3D.DynamicLayer3D({ url: "http://localhost:8090/iserver/services/3D-Model/rest/realspace", name: "s3m_layer", datasources: ["gugong"], visible: true }); iClient3D.addLayer(dynamicLayer3D); var terrainProvider = new Cesium.CesiumTerrainProvider({ url: "http://localhost:8090/iserver/services/3D-Model/rest/realspace/datas/gugong/config", }); var ellipsoid = scene.globe.ellipsoid; var promise = Cesium.sampleTerrainMostDetailed(terrainProvider, [camera.positionCartographic]); Cesium.when(promise, function(updatedPositions) { var height = updatedPositions[0].height; camera.position = ellipsoid.cartographicToCartesian( new Cesium.Cartographic.fromDegrees(116.403964, 39.915119, height + 7000) ); camera.up = new Cesium.Cartesian3(0, 0, 1); camera.lookAt(new Cesium.Cartesian3(116.403964, 39.915119, height + 100), new Cesium.Cartesian3(0, 0, height + 7000)); }); var heading = 0; function flyLoop() { var pitch = Cesium.Math.toRadians(30); var roll = Cesium.Math.toRadians(0); heading += Cesium.Math.toRadians(1); if (heading > Cesium.Math.TWO_PI) { heading -= Cesium.Math.TWO_PI; } var position = Cesium.Cartesian3.fromDegrees( 116.403964 + Math.cos(heading) * 0.01, 39.915119 + Math.sin(heading) * 0.01, camera.positionCartographic.height ); camera.setView({ destination: position, orientation: { heading: heading, pitch: pitch, roll: roll } }); } setInterval(flyLoop, 50); ```

“相关推荐”对你有帮助么?

  • 非常没帮助
  • 没帮助
  • 一般
  • 有帮助
  • 非常有帮助
提交
评论
添加红包

请填写红包祝福语或标题

红包个数最小为10个

红包金额最低5元

当前余额3.43前往充值 >
需支付:10.00
成就一亿技术人!
领取后你会自动成为博主和红包主的粉丝 规则
hope_wisdom
发出的红包
实付
使用余额支付
点击重新获取
扫码支付
钱包余额 0

抵扣说明:

1.余额是钱包充值的虚拟货币,按照1:1的比例进行支付金额的抵扣。
2.余额无法直接购买下载,可以购买VIP、付费专栏及课程。

余额充值