


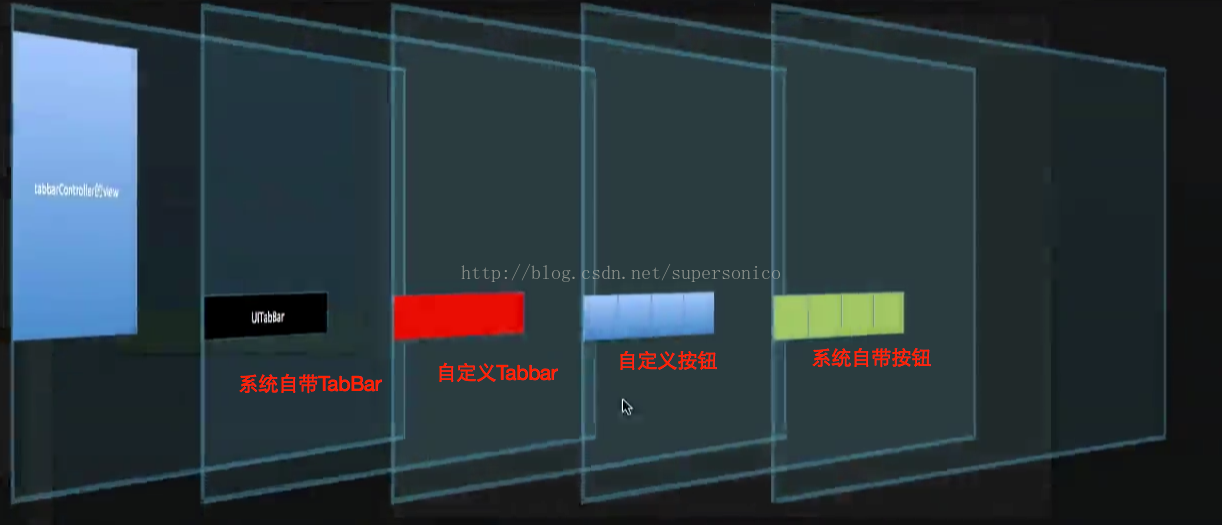
1.TabBar的层次结构
2.自定义TabBar的背景
可以将一个很短的图片拉长作为背景图片,方法:
self.backgroundColor = [UIColor colorWithPatternImage:[UIImage imageWithName:@"tabbar_background"]];
- (id)initWithFrame:(CGRect)frame
{
    if (self = [super initWithFrame:frame]) {
        if (!iOS7) { // 非iOS7下,设置tabbar的背景
            self.backgroundColor = [UIColor colorWithPatternImage:[UIImage imageWithName:@"tabbar_background"]];
        }
    }
    return self;
}可以通过拷贝Item,然后修改Value中的值为imageWithName:

3.设置点击选中的按钮
@property (nonatomic, weak) IWTabBarButton *selectedButton;
- (void)addTabBarButtonWithItem:(UITabBarItem *)item
{
    // 1.创建按钮
    IWTabBarButton *button = [[IWTabBarButton alloc] init];
    [self addSubview:button];

    // 2.设置数据
    button.item = item;

    // 3.监听按钮点击
    [button addTarget:self action:@selector(buttonClick:) forControlEvents:UIControlEventTouchDown];

    // 4.默认选中第0个按钮
    if (self.subviews.count == 1) {
        [self buttonClick:button];
    }
}
- (void)buttonClick:(IWTabBarButton *)button
{
//1.当年被选中的按钮取消选中
self.selectedButton.selected = NO;
//2.被点击的按钮设置选中
button.selected = YES;
//3.被点击的按钮变为选中按钮
self.selectedButton = button;
}
4.自定义按钮
①设置按钮内部图片在上面,文字描述在下面
// 内部图片的frame
- (CGRect)imageRectForContentRect:(CGRect)contentRect
{
    CGFloat imageW = contentRect.size.width;
    CGFloat imageH = contentRect.size.height * IWTabBarButtonImageRatio;
    return CGRectMake(0, 0, imageW, imageH);
}

// 内部文字的frame
- (CGRect)titleRectForContentRect:(CGRect)contentRect
{
    CGFloat titleY = contentRect.size.height * IWTabBarButtonImageRatio;
    CGFloat titleW = contentRect.size.width;
    CGFloat titleH = contentRect.size.height - titleY;
    return CGRectMake(0, titleY, titleW, titleH);
}
// 重写去掉高亮状态
- (void)setHighlighted:(BOOL)highlighted {}
③设置图片和文字状态
- (id)initWithFrame:(CGRect)frame
{

    self = [super initWithFrame:frame];
    if (self) {
        // 图标居中
        self.imageView.contentMode = UIViewContentModeCenter;
        // 文字居中
        self.titleLabel.textAlignment = NSTextAlignmentCenter;
        // 字体大小
        self.titleLabel.font = [UIFont systemFontOfSize:11];
        // 文字颜色
        [self setTitleColor:IWTabBarButtonTitleColor forState:UIControlStateNormal];
        [self setTitleColor:IWTabBarButtonTitleSelectedColor forState:UIControlStateSelected];

        if (!iOS7) { // 非iOS7下,设置按钮选中时的背景
            [self setBackgroundImage:[UIImage imageWithName:@"tabbar_slider"] forState:UIControlStateSelected];
        }
    }
    return self;
}
④对按钮的属性进行封装
@property (nonatomic, strong) UITabBarItem *item;
// 设置item
- (void)setItem:(UITabBarItem *)item
{
    _item = item;

    [self setTitle:item.title forState:UIControlStateNormal];
    [self setImage:item.image forState:UIControlStateNormal];
    [self setImage:item.selectedImage forState:UIControlStateSelected];

}
5.TabBar内部的点击通过代理或者通知告诉控制器
在TarBar的头文件中添加代理对象:
#import <UIKit/UIKit.h>

@class IWTabBar;

@protocol IWTabBarDelegate <NSObject>

@optional
- (void)tabBar:(IWTabBar *)tabBar didSelectedButtonFrom:(int)from to:(int)to;

@end

@interface IWTabBar : UIView
- (void)addTabBarButtonWithItem:(UITabBarItem *)item;

@property (nonatomic, weak) id<IWTabBarDelegate> delegate;

@end
/**
 *  监听按钮点击
 */
- (void)buttonClick:(IWTabBarButton *)button
{
    // 1.通知代理
    if ([self.delegate respondsToSelector:@selector(tabBar:didSelectedButtonFrom:to:)]) {
        [self.delegate tabBar:self didSelectedButtonFrom:self.selectedButton.tag to:button.tag];
    }
    // 2.设置按钮的状态
    //1.当年被选中的按钮取消选中
    self.selectedButton.selected = NO;
    //2.被点击的按钮设置选中
    button.selected = YES;
    //3.被点击的按钮变为选中按钮
    self.selectedButton = button;
}@interface MRRootTabBarController ()<IWTabBarDelegate>
获得代理:
customTabBar.delegate = self;
/**
 *  监听tabbar按钮的改变
 *  @param from   原来选中的位置
 *  @param to     最新选中的位置
 */
- (void)tabBar:(IWTabBar *)tabBar didSelectedButtonFrom:(int)from to:(int)to
{
    self.selectedIndex = to;
}


 664
664

 被折叠的 条评论
为什么被折叠?
被折叠的 条评论
为什么被折叠?
 到【灌水乐园】发言


