


一、Keil常用注解
@brief:简介,简单介绍函数作用
@param:介绍函数参数
@arg:函数参数
@note:补充说明
@return:返回说明
@retval:返回值说明
二、点亮LED灯的main函数编写
#include "stm32f10x.h"                  // Device header

int main(){
	RCC_APB2PeriphClockCmd(RCC_APB2Periph_GPIOA,ENABLE);//开启时钟

	GPIO_InitTypeDef GPIO_InitStructure;
	GPIO_InitStructure.GPIO_Mode=GPIO_Mode_Out_PP;
	GPIO_InitStructure.GPIO_Pin=GPIO_Pin_0;
	GPIO_InitStructure.GPIO_Speed=GPIO_Speed_50MHz;
	GPIO_Init(GPIOA,&GPIO_InitStructure);

	//GPIO_ResetBits(GPIOA,GPIO_Pin_0);
	GPIO_SetBits(GPIOA,GPIO_Pin_0);

	while(1){

	}
}
1、GPIO八种模式
枚举类型enum中,定义若干枚举常量
typedef enum
{ GPIO_Mode_AIN = 0x0,//模拟输入
  GPIO_Mode_IN_FLOATING = 0x04,//浮空输入
  GPIO_Mode_IPD = 0x28,//下拉输入
  GPIO_Mode_IPU = 0x48,//上拉输入
  GPIO_Mode_Out_OD = 0x14,//开漏输出
  GPIO_Mode_Out_PP = 0x10,//推挽输出
  GPIO_Mode_AF_OD = 0x1C,//复用开漏输出
  GPIO_Mode_AF_PP = 0x18//复用推挽输出
}GPIOMode_TypeDef;
推挽是指 I/O 端口有很强的电流推动能力,可以输出一定量的电流,用于推动一些元器件(如 LED)工作。
推挽输出高低电平均有驱动能力。
开漏则是弱电流的输出,用于逻辑电平的数据信号通信。
开漏输出高电平相当于高阻态,没有驱动能力,低电平有驱动能力。把点亮LED中的输出模式改成GPIO_InitStructure.GPIO_Mode=GPIO_Mode_Out_PP;来验证
2、GPIO的输出函数
void GPIO_SetBits(GPIO_TypeDef* GPIOx, uint16_t GPIO_Pin);
//把指定的端口设置为高电平
void GPIO_ResetBits(GPIO_TypeDef* GPIOx, uint16_t GPIO_Pin);
//把指定的端口设置为低电平
void GPIO_WriteBit(GPIO_TypeDef* GPIOx, uint16_t GPIO_Pin, BitAction BitVal);
//前两个参数指定端口,第三个参数根据第三个参数的值来设置指定端口
void GPIO_Write(GPIO_TypeDef* GPIOx, uint16_t PortVal);
//同时对16个端口进行写入操作
GPIOA
GPIO的分组,如 GPIOA,GPIOB,GPIOC等的宏定义。
GPIO_Pin
指定具体的引脚,如GPIO_Pin_0,GPIO_Pin_1这样的宏定义。
三、点亮LED灯
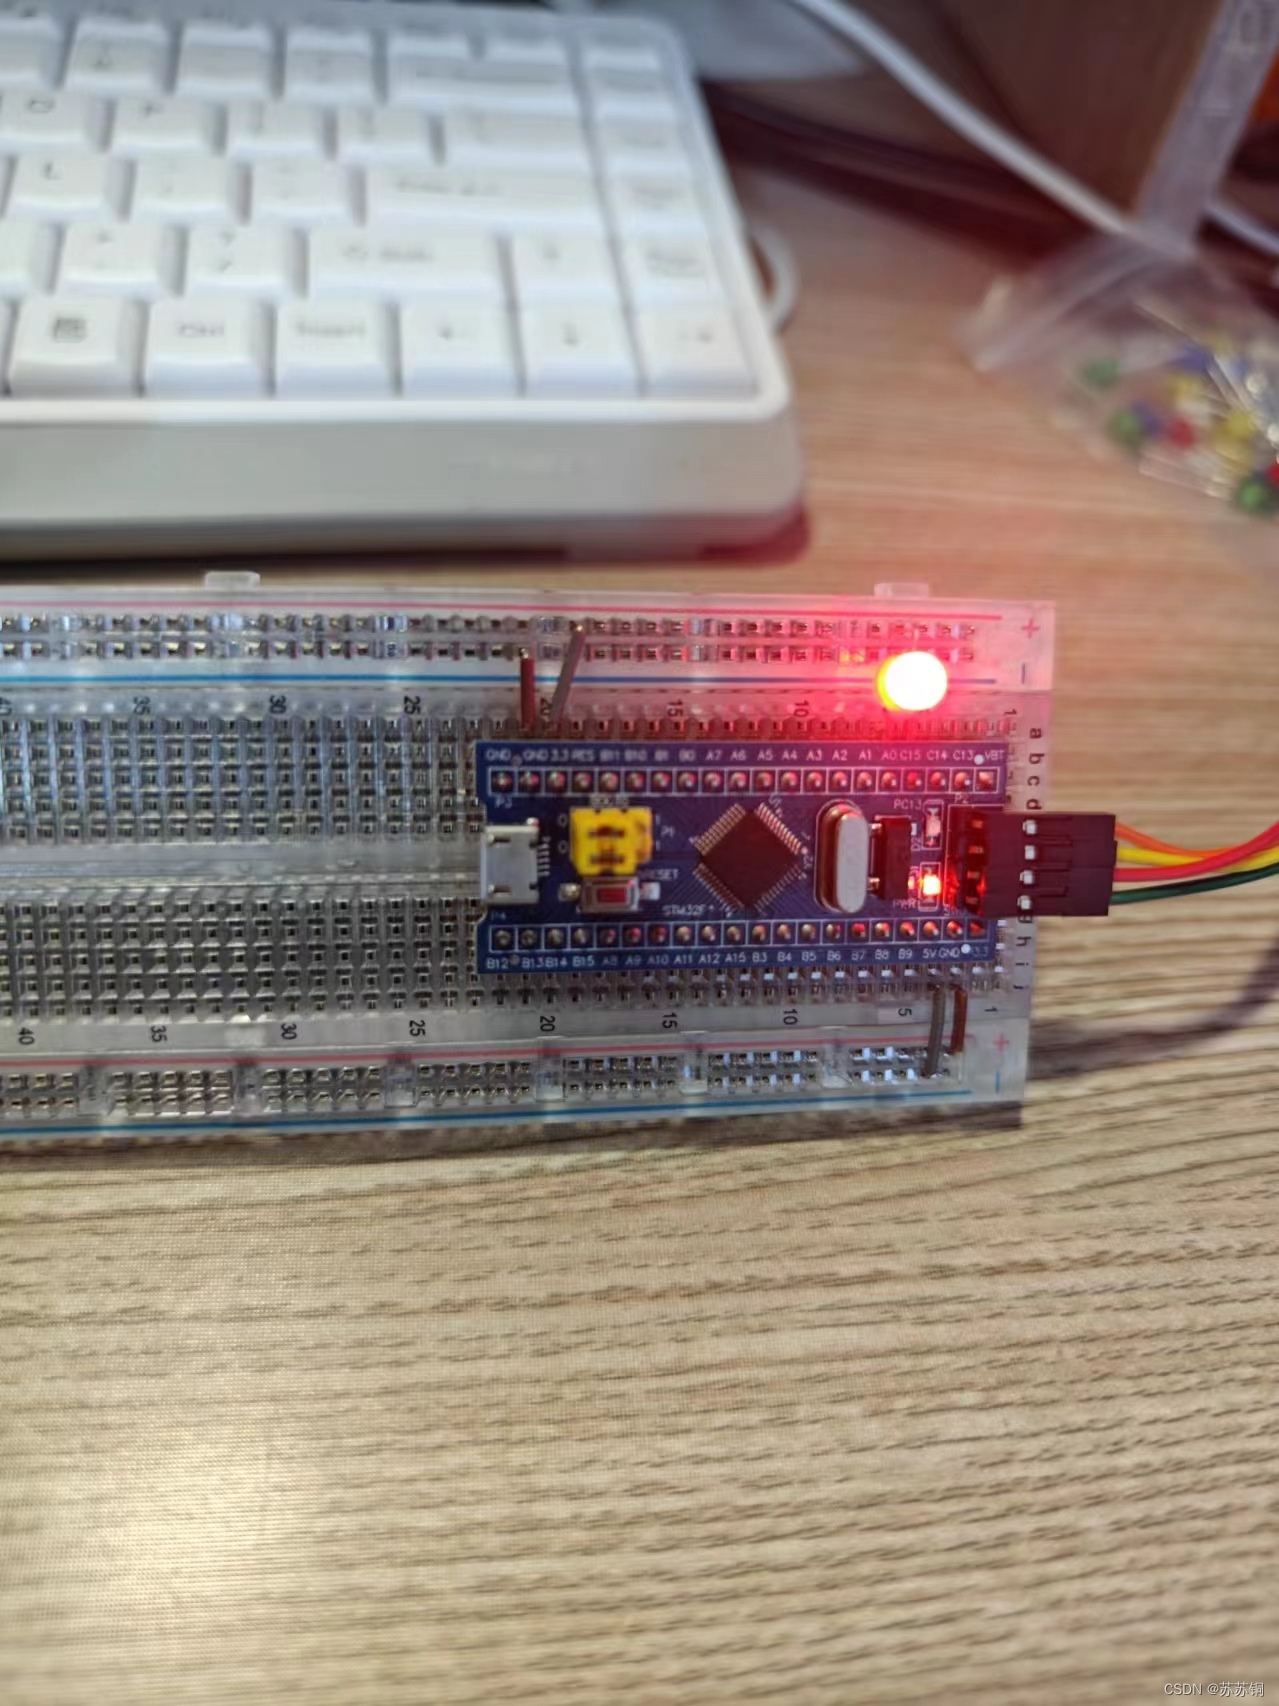
LED灯点不亮
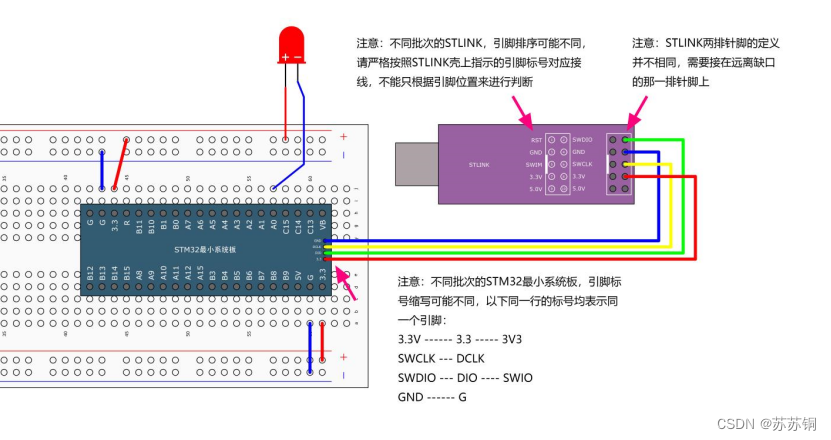
途中遇到一次问题,是因为LED灯的正负极接反了导致点不亮,长脚接正极,
在上图中搞错了,误以为蓝色的是长脚,接了负极,但其实长短脚是去掉带颜色的蓝红线的长短,所以红色那边应该是长脚
四、LED流水灯
#include "stm32f10x.h"                  // Device header
#include <Delay.h>		//延时函数模块
int main(){
	RCC_APB2PeriphClockCmd(RCC_APB2Periph_GPIOA,ENABLE);//开启时钟

	GPIO_InitTypeDef GPIO_InitStructure;
	GPIO_InitStructure.GPIO_Mode=GPIO_Mode_Out_PP;
	GPIO_InitStructure.GPIO_Pin=GPIO_Pin_0|GPIO_Pin_1|GPIO_Pin_2\
|GPIO_Pin_3|GPIO_Pin_4|GPIO_Pin_5|GPIO_Pin_6|GPIO_Pin_7;//按位或,0001|0010|0100=0111
	GPIO_InitStructure.GPIO_Speed=GPIO_Speed_50MHz;
	GPIO_Init(GPIOA,&GPIO_InitStructure);

	while(1){
		GPIO_Write(GPIOA,~0x0001);//0000 0000 0000 0001
		Delay_ms(500);
		GPIO_Write(GPIOA,~0x0002);//0000 0000 0000 0010
		Delay_ms(500);
		GPIO_Write(GPIOA,~0x0004);//0000 0000 0000 0100
		Delay_ms(500);
		GPIO_Write(GPIOA,~0x0008);//0000 0000 0000 1000
		Delay_ms(500);
		GPIO_Write(GPIOA,~0x0010);//0000 0000 0001 0000
		Delay_ms(500);
		GPIO_Write(GPIOA,~0x0020);//0000 0000 0010 0000
		Delay_ms(500);
		GPIO_Write(GPIOA,~0x0040);//0000 0000 0100 0000
		Delay_ms(500);
		GPIO_Write(GPIOA,~0x0080);//0000 0000 1000 0000
		Delay_ms(500);
	}
}
按位或
按位或来指定要配置的引脚
延时函数模块
Delay的应用


 2440
2440

 被折叠的 条评论
为什么被折叠?
被折叠的 条评论
为什么被折叠?
 到【灌水乐园】发言


