


目录
本示例基于 spring-framework-5.2.7.RELEASE + Gradle + jdk1.8.0_131编译
在开始之前,请确保电脑中已经装好了的对应版本的JDK。
1、源码下载
从官网下载源码:Spring Framework

选择想要编译的具体版本(Tags),点击 Code,下载即可

2、构建工具准备
下载完成后,会得到 spring-framework-5.2.7.RELEASE.zip 压缩文件。
解压该文件后,找到 gradle 目录,在该目录下有一个 wrapper 文件夹,里边就是我们编译当前版本所需要使用的构建工具 gradle。//gradle 和 maven一样,是一个项目管理和构建工具

gradle 版本信息可以在 gradle-wrapper.properties 文件中看到,如果本地已经安装了 gradle 工具,看看是否与 gradle-wrapper.properties 中的版本一致,建议编译时使用与Spring官方一致的版本。

为 build.gradle 添加国内镜像
build.gradle 文件在解压后的 spring-framework-5.2.7.RELEASE 文件中,这个文件就相当于使用 Maven 时的 pom.xml 文件,用来管理项目的依赖等信息。我们在这个文件中添加国内镜像,可以加快依赖的下载速度。
在 build.gradle内容中 configure -> dependencyManagement 下找到 repositories 项,添加进去即可,添加后完整的 repositories 项内容如下:
repositories {
	mavenCentral()//官方自带
	maven { url "https://repo.spring.io/libs-spring-framework-build" }//官方自带
	maven{ url 'https://maven.aliyun.com/nexus/content/groups/public/'}//手动添加项
	maven{ url 'https://maven.aliyun.com/nexus/content/repositories/jcenter'}//手动添加项
}
3、编译compileTestJava模块
简单的准备后,就可以开始编译了。
在源码所在文件夹的搜索栏内输入 cmd 命令,即可跳转到所在目录的命令行窗口,在当前命令行窗口输入以下指令:
gradlew :spring-oxm:compileTestJava注意,gradlew 后是有一个空格的,为了避免空格的中英文格式窜乱,可以直接复制上边命令,示例如下:

如果是第一次编译,还需要远程去下载 gradle,这个速度可能会非常的慢,需要耐心等待。//这里需要等待n...分钟,可以先去做点其他事
如果编译失败出现:
Error resolving plugin [id: 'io.spring.gradle-enterprise-conventions', version: '0.0.2']

首先,将 build.gradle 中的 id ‘io.spring.gradle-enterprise-conventions’ version '0.0.2’ 注释掉

保存设置后,重新编译,当出现以下提示,即编译成功

4、导入项目到IDEA中
将项目导入到 IDEA 中,按照如下配置,open ->选择项目所在位置://项目使用的依赖管理工具是Gradle

注:导入后等待编译,不要着急,需要一点时间编译完成。

5、添加 gradle 模块/测试
首先,创建一个 gradle 模块,new->model->gradle-->输入模块名称

然后,在新建模块下的 build.gradle 中添加如下依赖:
dependencies {
    testCompile group: 'junit', name: 'junit', version: '4.12'
    compile(project(":spring-beans"))
    compile(project(":spring-core"))
    compile(project(":spring-context"))
    optional(project(":spring-aop"))
}
接下来,随意添加任意的 bean 代码,此处的 bean 为 Hello:
public class Hello {
	public void sayHello(){
		System.out.println("Hello Spring!");
	}
}
使用以下程序,对 bean 的有效性进行简单的测试://判断容器是否可以正确的创建 bean
public class MainStat {
	public static void main(String[] args) {
		//加载配置文件,生产Bean
		ApplicationContext context = new AnnotationConfigApplicationContext(Hello.class);
		//获取Bean
		Hello hello = (Hello) context.getBean("hello");
		//使用Bean
		hello.sayHello();
	}
}
如果能正确进行以下输出,则表示上述的所有编译过程正确

可能出现的问题:
Error:(354, 51) java: 找不到符号:
符号: 变量 CoroutinesUtils
位置: 类 org.springframework.core.ReactiveAdapterRegistry.CoroutinesRegistrar
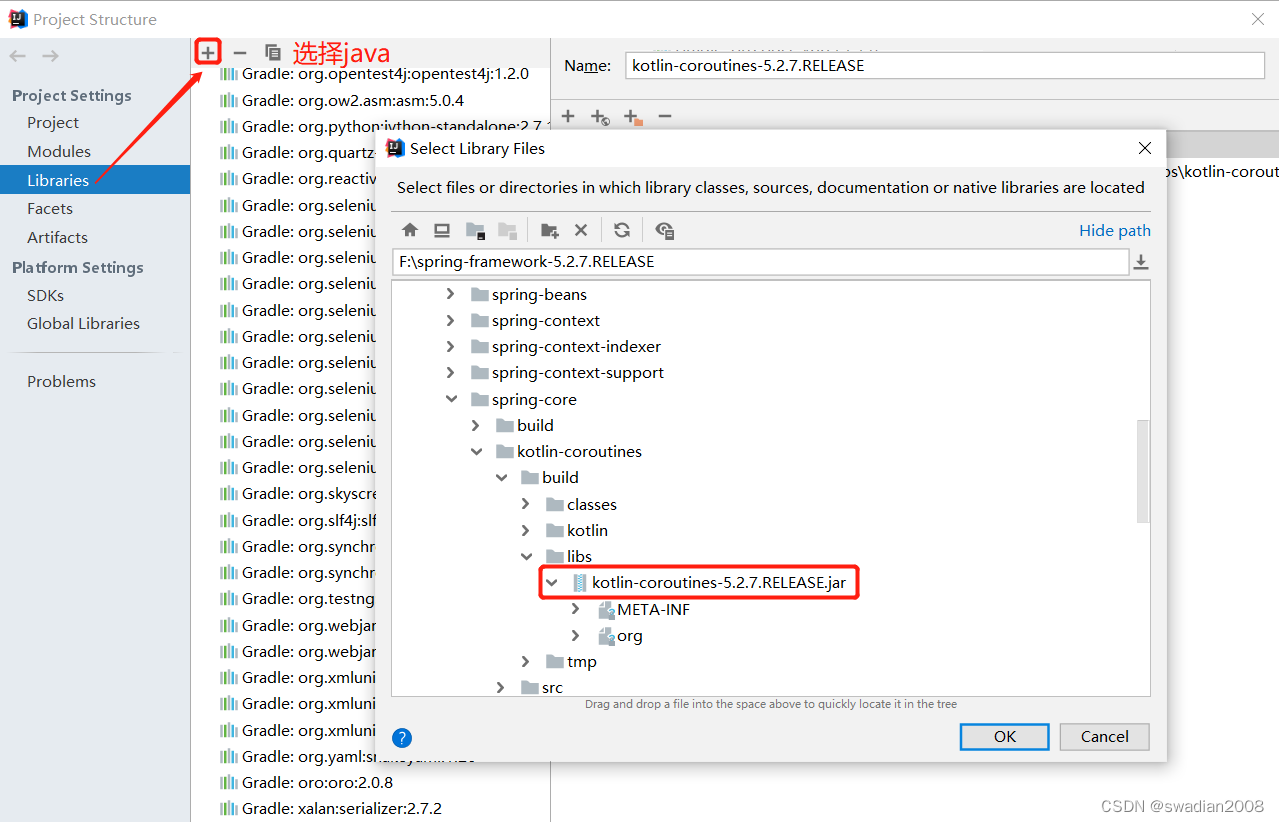
然后选择 spring-core.main ,确定后,重新编译即可(如果继续报错,使用IDEA重新编译一下)
kotlin/sequences/Sequence错误:
这个错误在 idea 的插件中升级 kotlin 即可,如下所示:

至此,全文结束。


 466
466


 被折叠的 条评论
为什么被折叠?
被折叠的 条评论
为什么被折叠?
 到【灌水乐园】发言


