


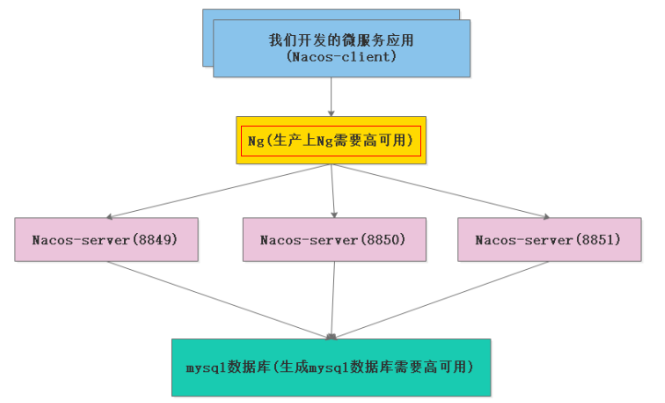
搭建nacos+mysql+nginx注册中心
一、准备linux虚拟机
1、虚拟机配置
2cpu+8G内存+200G硬盘
2、linux版本
centos7.6,uname -a
二、安装mysql5.7
1.下载mysql-5.7
cd /usr/local/
wget http://dev.mysql.com/get/Downloads/MySQL-5.7/mysql-5.7.30-linux-glibc2.12-x86_64.tar
2、解压 mysql-5.7
tar -xvf mysql-5.7.30-linux-glibc2.12-x86_64.tar
tar -zxvf mysql-5.7.30-linux-glibc2.12-x86_64.tar.gz
3、将其拷贝到/usr/local/mysql目录下
mv mysql-5.7.30-linux-glibc2.12-x86_64 mysql
4、修改配置文件
vim /etc/my.cnf
[mysqld]
bind-address=0.0.0.0
port=3306
user=mysql
basedir=/usr/local/mysql
datadir=/usr/local/mysql/data/mysql
socket=/tmp/mysql.sock
log-error=/usr/local/mysql/data/mysql/mysql.err
pid-file=/usr/local/mysql/data/mysql/mysql.pid
#character config
character_set_server=utf8mb4
symbolic-links=0
explicit_defaults_for_timestamp=true
[client]
default-character-set=utf8
[mysql]
default-character-set=utf8

#skip-grant-tables
5、初始化数据库
cd /usr/local/mysql/bin/
./mysqld --defaults-file=/etc/my.cnf --basedir=/usr/local/mysql/ --datadir=/usr/local/mysql/data/mysql/ --user=mysql --initialize
6、查看root用户密码
cat /data/mysql/mysql.err
7、启动mysql
#先将mysql.server放置到/etc/init.d/mysql中
cp /usr/local/mysql/support-files/mysql.server /etc/init.d/mysql
#启动
service mysql start
8、登录mysql
(1)如果第一次登录拒绝则修改my.cnf文件
#增加下行内容
skip-grant-tables
(2)修改root密码
SET PASSWORD = PASSWORD('123456');
ALTER USER 'root'@'localhost' PASSWORD EXPIRE NEVER;
FLUSH PRIVILEGES;
(3)增加远程访问功能
use mysql                                            #访问mysql库
update user set host = '%' where user = 'root';      #使root能再任何host访问
FLUSH PRIVILEGES;
(4)修改my.cnf文件,注释掉skip-grant-tables
#skip-grant-tables
三、nacos的集群搭建
1、下载nacos1.4.1
https://github.com/alibaba/nacos/tags
2、安装nacos
(1)解压nacos-server-1.4.1.tar.gz
cd /usr/local/nacos
tar -zxvf nacos-server-1.4.1.tar.gz
(2)将解压的 nacos 拷贝三份出来
cd /usr/local/
cp -r nacos nacos8849
cp -r nacos nacos8850
cp -r nacos nacos8851
3、配置nacos
(1)修改 nacos8849/conf 目录下的 application.properties
server.port=8849

spring.datasource.platform=mysql

# 数据库实例数量
db.num=1

# 数据库的连接信息
db.url.0=jdbc:mysql://128.128.7.254:3306/nacos?characterEncoding=utf8&connectTimeout=1000&socketTimeout=3000&autoReconnect=true
db.user=root
db.password=123456
(2) 进入 nacos8849/conf 目录下,拷贝原来的 cluster.conf.example 为 cluster.conf文件,并修改里面的内容
128.128.7.254:8849
128.128.7.254:8850
128.128.7.254:8851
(3) nacos8849 的配置就完成了,nacos8850 和 nacos8851 也做同样的配置,只是application.properties端口分别为server.port=8850和server.port=8851
4、启动 nacos 集群之前要先做一些准备工作
(1)先创建一个数据库,数据库表的脚本在 nacos 的包中的 nacos/conf/nacosmysql.sql
创建nacos数据库
use nacos
source nacosmysql.sql
(2)需要修改nacos-server的 启动脚本jvm参数。(虚拟机的内存分配的少,需要修改jvm参数变小)
修改 nacos8849(50、51)/bin/startup.sh 文件

(3)分别启动nacos8849(50、51)/bin/startup.sh
(4)测试安装的 nacos
 分别测试登录地址,如下:

http://192.168.172.1:8849/nacos
http://192.168.172.1:8850/nacos
http://192.168.172.1:8851/nacos
5、安装nginx
(1)安装依赖库、
yum -y install make zlib zlib-devel gcc-c++ libtool openssl openssl-devel pcre pcre-devel
(2)下载并解压:下载nginx 最新稳定版本;(http://nginx.org/en/download.html )
cd /usr/local/nginx
wget http://nginx.org/download/nginx-1.14.0.tar.gz
tar -zxvf nginx-1.14.0.tar.gz   #解压
(3)进入到解压的目录,使用cofigure命令创建一个makeFile文件
./configure \
--prefix=/usr/local/nginx \
--pid-path=/var/run/nginx/nginx.pid \
--lock-path=/var/lock/nginx.lock \
--error-log-path=/var/log/nginx/error.log \
--http-log-path=/var/log/nginx/access.log \
--with-http_gzip_static_module \
--http-client-body-temp-path=/var/temp/nginx/client \
--http-proxy-temp-path=/var/temp/nginx/proxy \
--http-fastcgi-temp-path=/var/temp/nginx/fastcgi \
--http-uwsgi-temp-path=/var/temp/nginx/uwsgi \
--http-scgi-temp-path=/var/temp/nginx/scgi \
--with-http_stub_status_module \
--with-http_ssl_module \
--with-file-aio \
--with-http_realip_module
说明:–prefix=/usr/local/nginx 表示软件安装到/usr/local/nginx下面。
(4)编译和安装
make & make install
(5)进入安装位置 /usr/local/nginx 查看目录结构下有 html、sbin、conf 目录;
其中html是里面首页html文件。conf里面是配置文件。sbin里面只执行文件。
(6)启动nginx
进入sbin目录,执行命令;
./nginx
(7)常用命令
#查看命令帮助
./nginx -?

#启动方式
./nginx     #默认方式启动
./nginx -c /tmp/nginx.conf     #指定配置文件启动
./nginx -p /usr/local/nginx/   #指定nginx程序目录启动

#停止方式
./nginx -s stop      #强制停止
./nginx -s quit      #优雅停止

#检查一下配置文件
./nginx -t

#重新加载配置文件
./nginx -s reload

#重新打开日志文件
./nginx -s reopen

#设置全局命令,如下表示设置启动用户为root
./nginx -g "user root;"
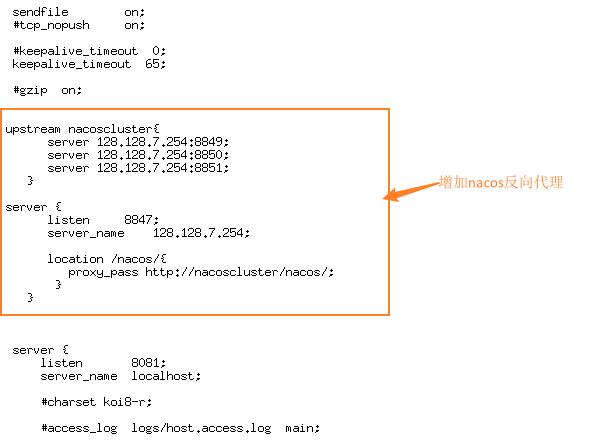
6、将nginx实现nacos负责均衡
(1)修改nginx.conf
#user  nobody;
worker_processes  1;

#error_log  logs/error.log;
#error_log  logs/error.log  notice;
#error_log  logs/error.log  info;

#pid        logs/nginx.pid;


events {
    worker_connections  1024;
}


http {
    include       mime.types;
    default_type  application/octet-stream;

    #log_format  main  '$remote_addr - $remote_user [$time_local] "$request" '
    #                  '$status $body_bytes_sent "$http_referer" '
    #                  '"$http_user_agent" "$http_x_forwarded_for"';

    #access_log  logs/access.log  main;

    sendfile        on;
    #tcp_nopush     on;

    #keepalive_timeout  0;
    keepalive_timeout  65;

    #gzip  on;


   upstream nacoscluster{
         server 128.128.7.254:8849;
         server 128.128.7.254:8850;
         server 128.128.7.254:8851;
      }

   server {
         listen     8847;
         server_name    128.128.7.254;

         location /nacos/{
            proxy_pass http://nacoscluster/nacos/;
          }
      }


    server {
        listen       8081;
        server_name  localhost;

        #charset koi8-r;

        #access_log  logs/host.access.log  main;

        location / {
            root   html;
            index  index.html index.htm;
        }

        #error_page  404              /404.html;

        # redirect server error pages to the static page /50x.html
        #
        error_page   500 502 503 504  /50x.html;
        location = /50x.html {
            root   html;
        }

        # proxy the PHP scripts to Apache listening on 127.0.0.1:80
        #
        #location ~ \.php$ {
        #    proxy_pass   http://127.0.0.1;
        #}

        # pass the PHP scripts to FastCGI server listening on 127.0.0.1:9000
        #
        #location ~ \.php$ {
        #    root           html;
        #    fastcgi_pass   127.0.0.1:9000;
        #    fastcgi_index  index.php;
        #    fastcgi_param  SCRIPT_FILENAME  /scripts$fastcgi_script_name;
        #    include        fastcgi_params;
        #}

        # deny access to .htaccess files, if Apache's document root
        # concurs with nginx's one
        #
        #location ~ /\.ht {
        #    deny  all;
        #}
    }


    # another virtual host using mix of IP-, name-, and port-based configuration
    #
    #server {
    #    listen       8000;
    #    listen       somename:8080;
    #    server_name  somename  alias  another.alias;

    #    location / {
    #        root   html;
    #        index  index.html index.htm;
    #    }
    #}


    # HTTPS server
    #
    #server {
    #    listen       443 ssl;
    #    server_name  localhost;

    #    ssl_certificate      cert.pem;
    #    ssl_certificate_key  cert.key;

    #    ssl_session_cache    shared:SSL:1m;
    #    ssl_session_timeout  5m;

    #    ssl_ciphers  HIGH:!aNULL:!MD5;
    #    ssl_prefer_server_ciphers  on;

    #    location / {
    #        root   html;
    #        index  index.html index.htm;
    #    }
    #}

}
(2)重启nginx
(3)重128.128.7.254:8847/nacos测试是否成功
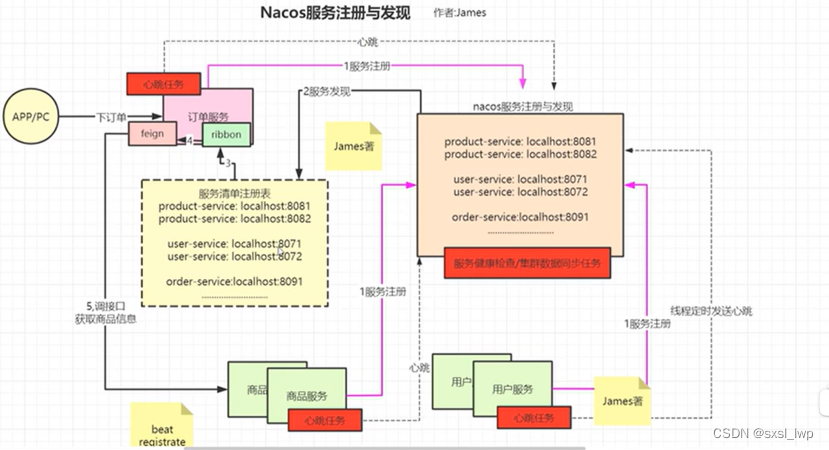
四、nacos源码分析
1、nacos框架
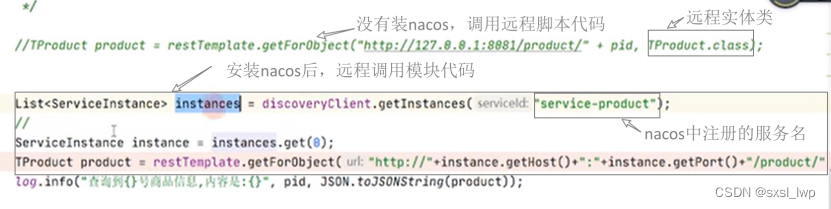
2、远程调用模块的演变
1、未安装nacos与安装nacos之变化
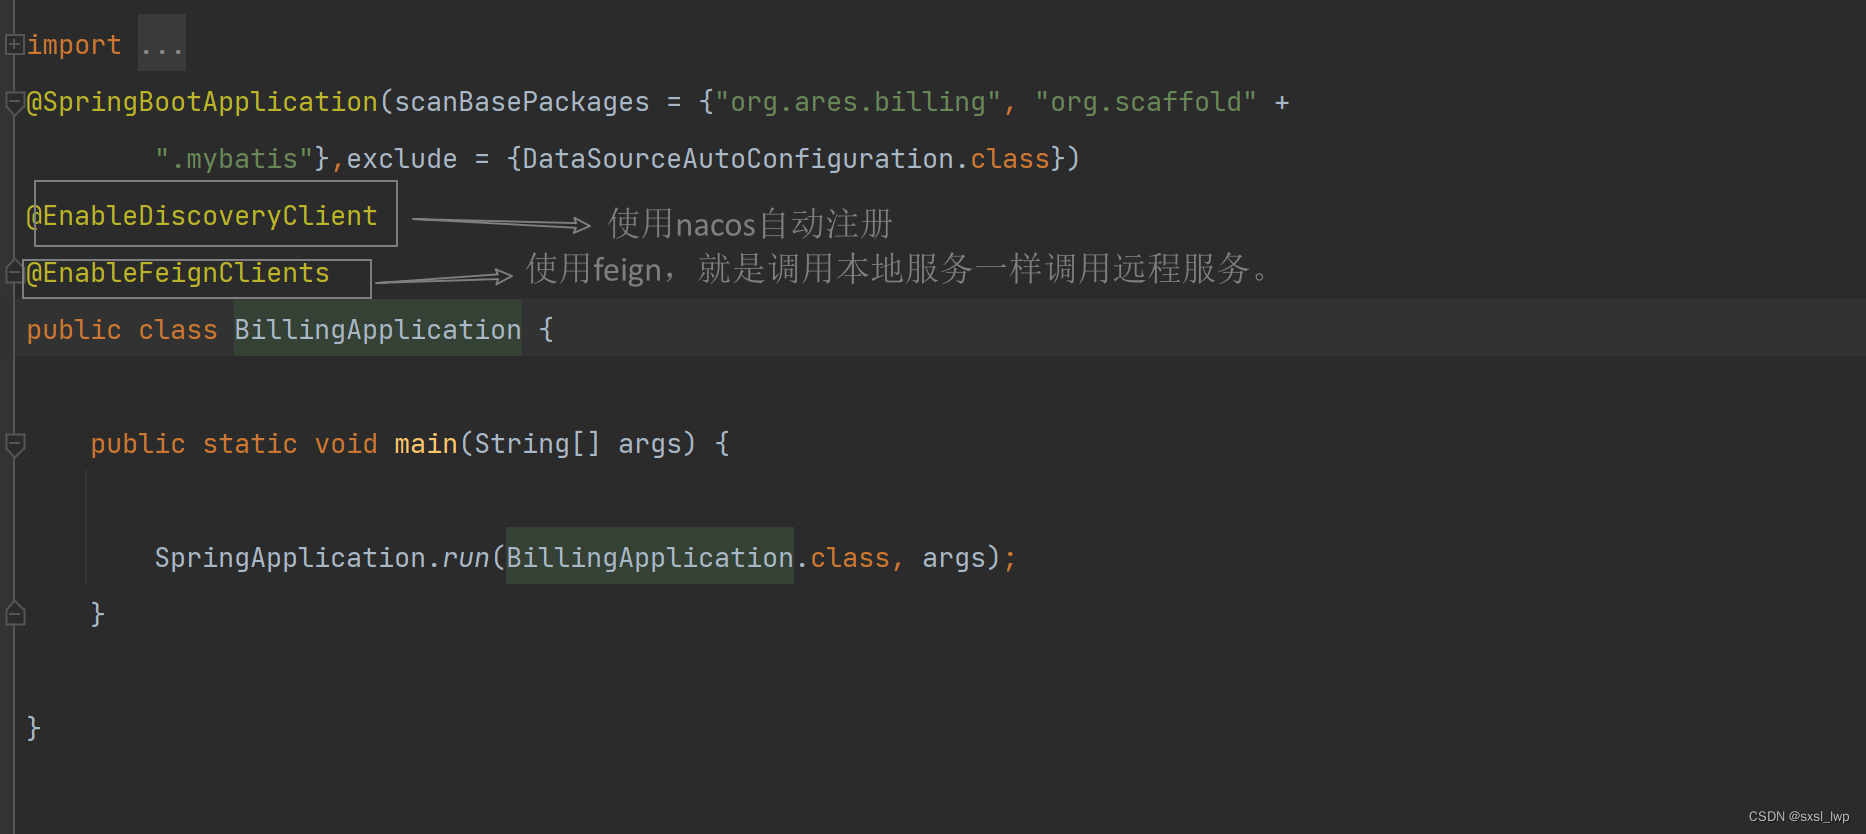
2、Feign的使用
(1)主程序上添加的注解
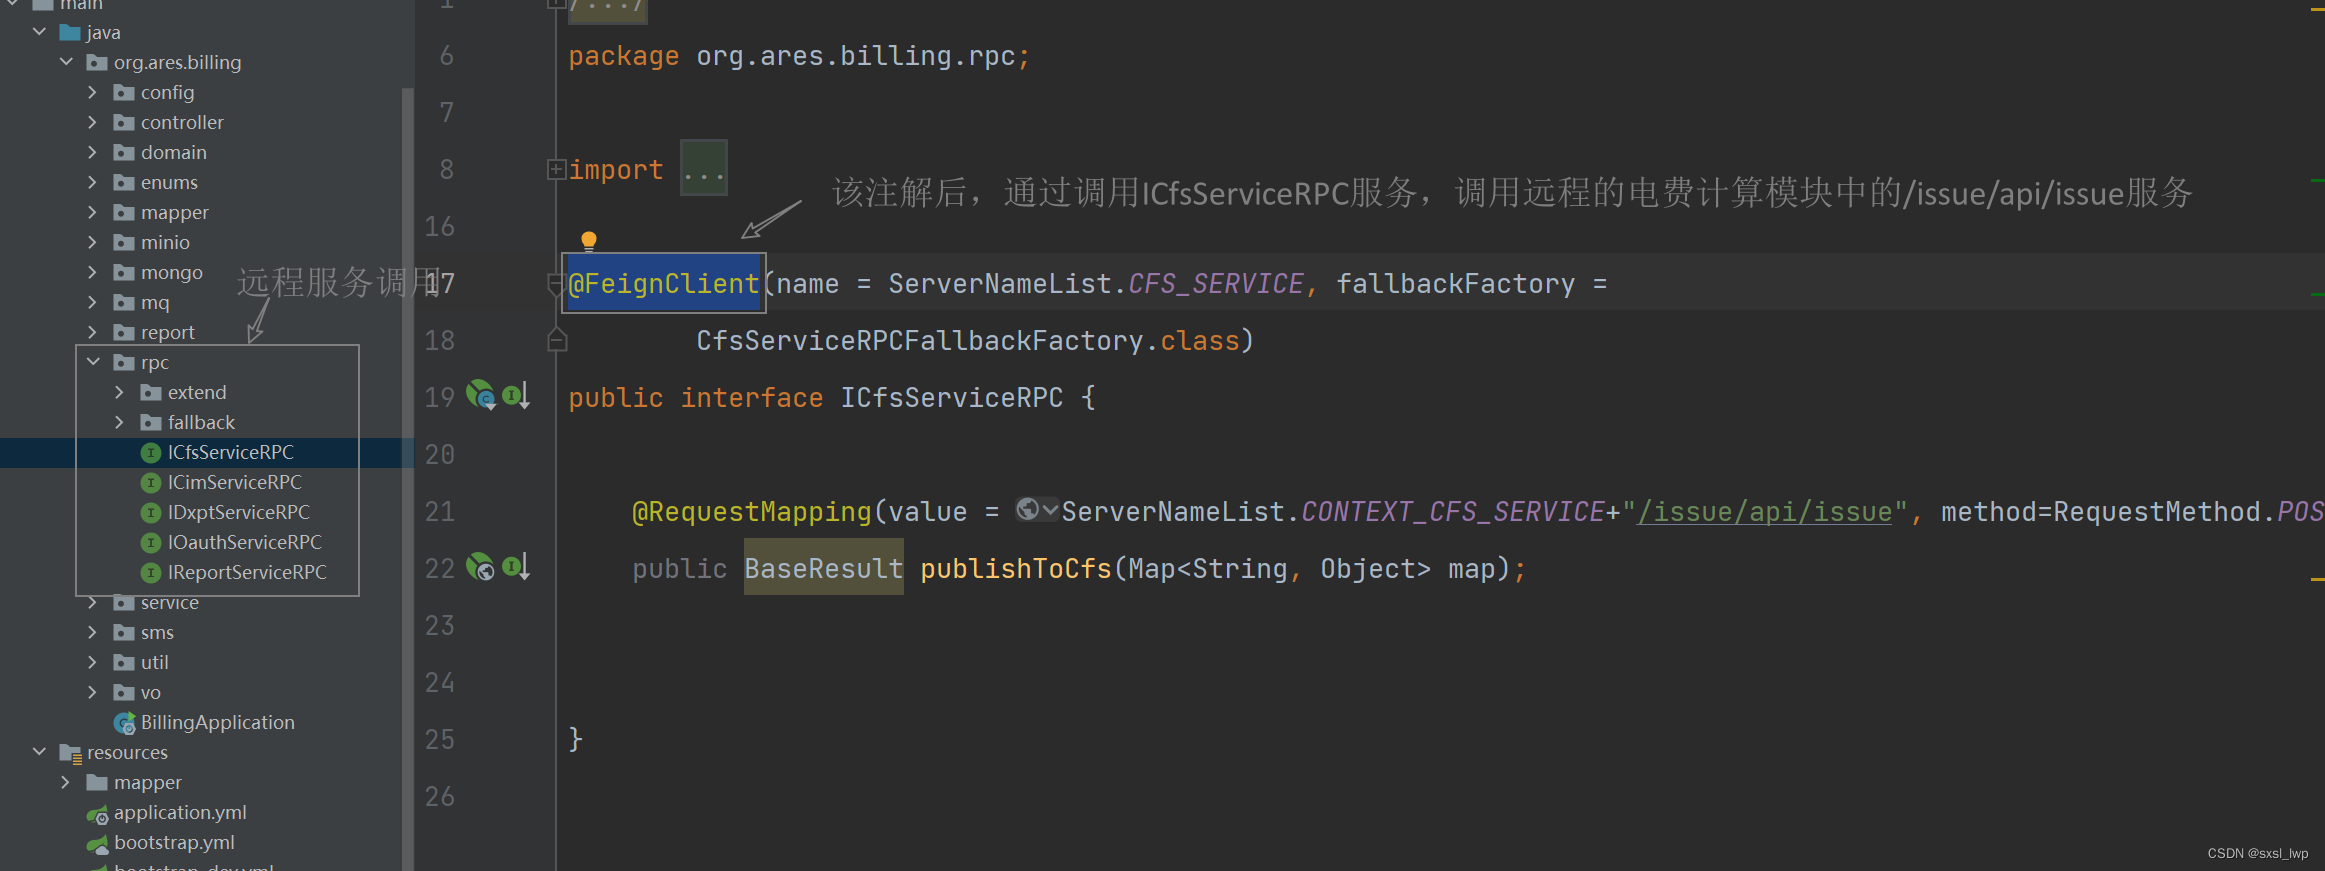
(2)编写一个本地服务,用@FeignClient后,可以通过调用给服务调用对应的远程服务。


 774
774


 被折叠的 条评论
为什么被折叠?
被折叠的 条评论
为什么被折叠?
 到【灌水乐园】发言


