


系列文章目录
一、Linux基础详解,
二、网编三要素和SSH原理
三、shell编程(补充)
前言
本文主要讲述了Linux基础,网编三要素和SSH原理,虚拟机搭建,shell编程(补充)。
一、linux简介
计算机组成:  硬件和软件

硬件组成: 冯-诺依曼体系结构   (控制器  运算器  存储器  输入设备  输出设备)

软件组成: 系统软件(操作系统)   和   应用软件(各种第三方软件)

操作系统作用: 承上启下(用户使用第三方应用软件和硬件之间的桥梁)

linux诞生:  林纳斯-托瓦兹 , 1991年上大学期间开始开发

linux系统组成:  linux系统内核 和  系统级应用程序

linux发行版: 基于开源免费的linux内核开发出的操作系统(本课程主要学习centos版本)
二、虚拟机简介
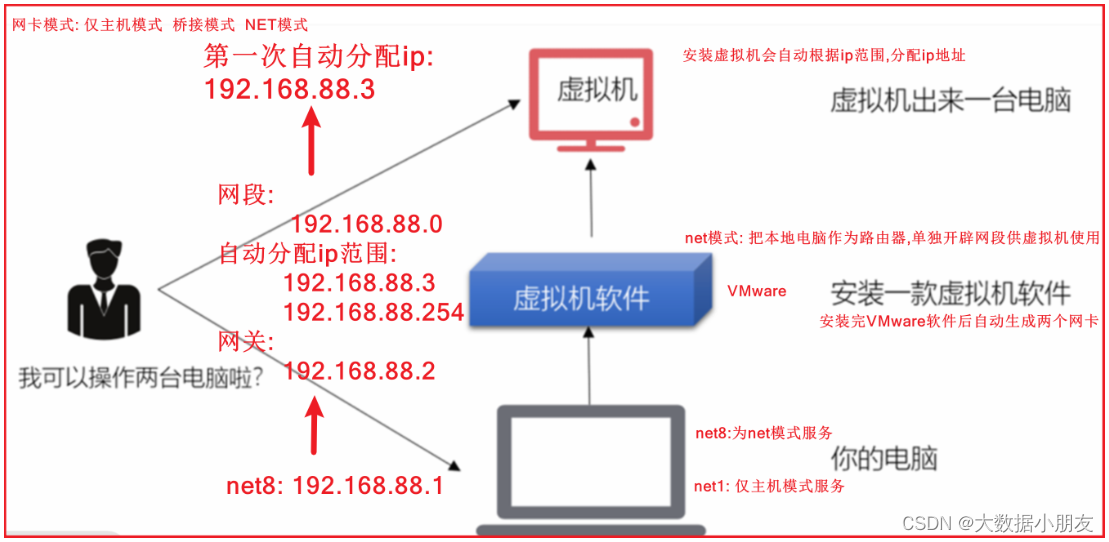
虚拟网卡模式:  NAT模式  桥接模式  仅主机模式
NAT模式:虚拟机将你的Windows电脑当做路由器上网,也就是借助Windows电脑上网
仅主机模式:虚拟机无法上网,只能和你的Windows电脑互通
桥接模式:虚拟机将自己接入你Windows电脑所在的网络中,也就是借助你Windows电脑用的路由器上网

DHCP:(Dynamic Host Configuration Protocol)动态主机配置协议 ,向客户端动态分配 IP 地址和配置信息。
NAT:(Network Address Translation),是指网络地址转换, 主要把内部网ip地址转换成外部网能够识别的ip地址
DNS:(Domain Name System,域名系统),因特网上作为域名和IP地址相互映射的一个分布式数据库,根据域名找到对应的IP地址
  举例: 当你在浏览器输入www.baidu.com的时候,先在本地找找不到就去DNS服务器找www.baidu.com对应的ip地址,找到后根据ip找主机
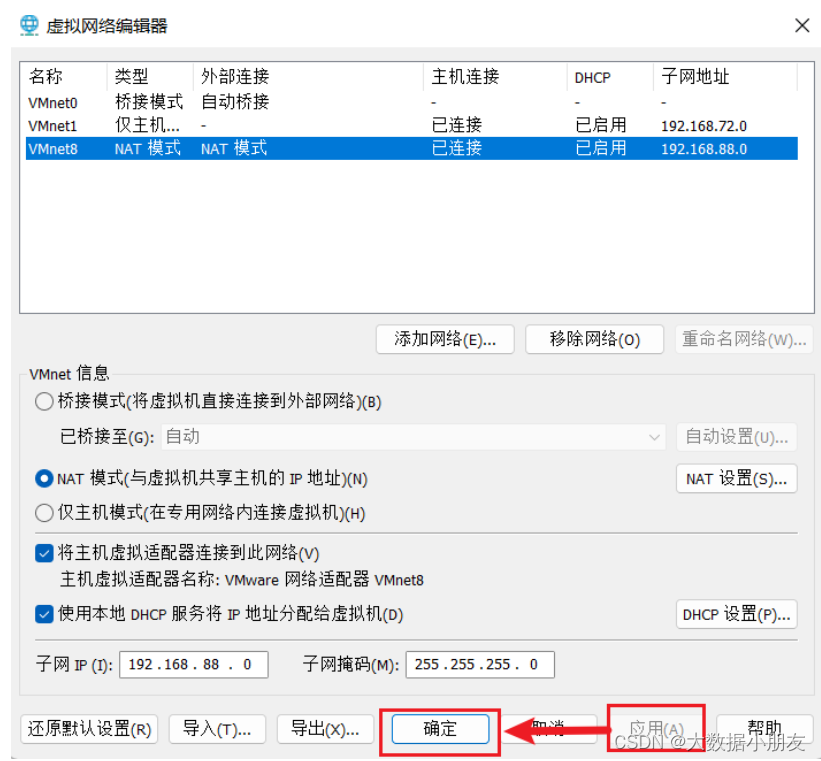
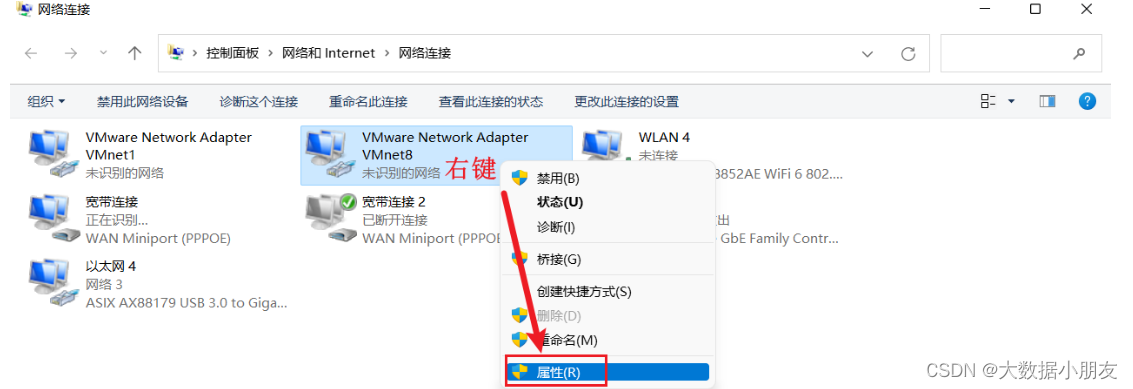
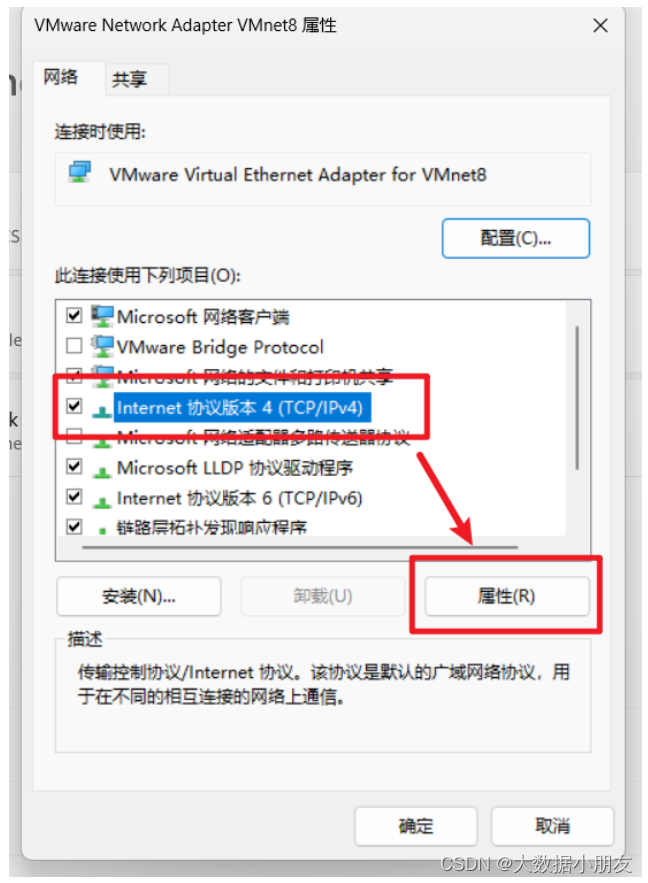
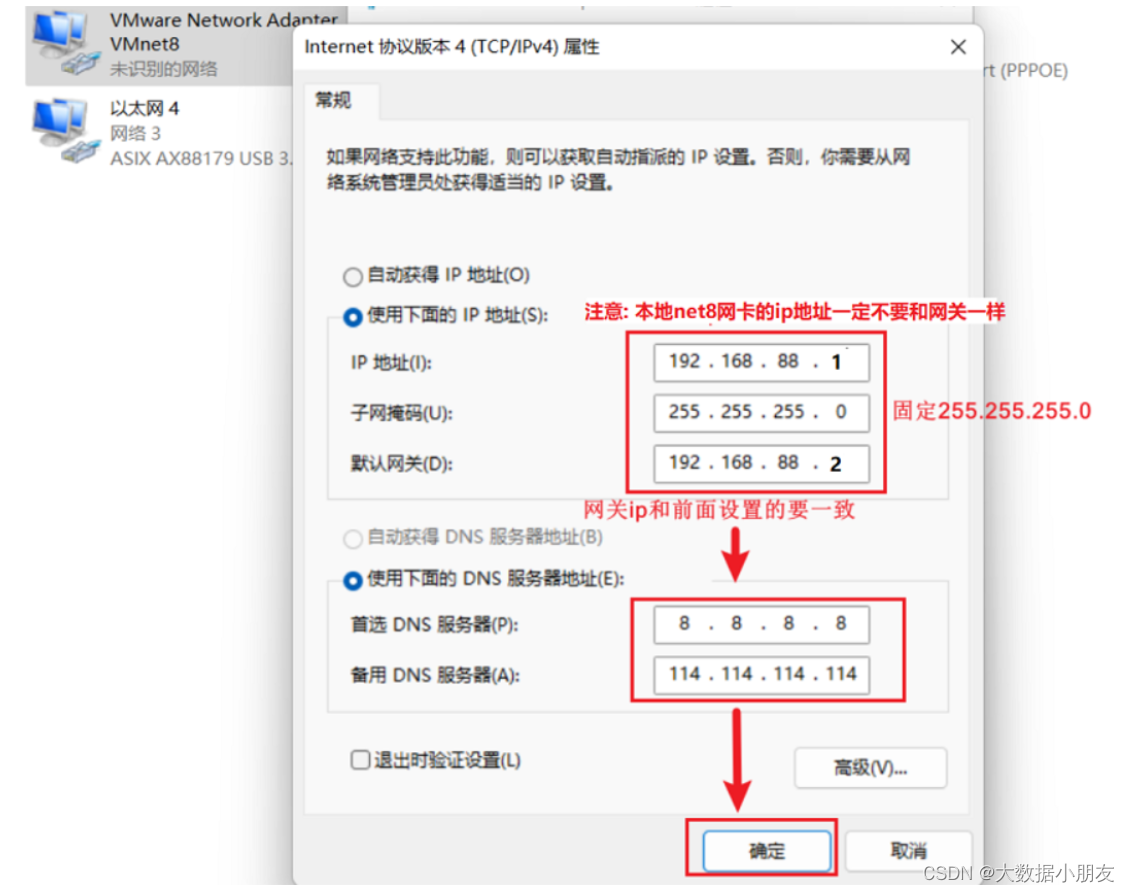
1、设置VMware网卡
1.1 修改VMware中网络
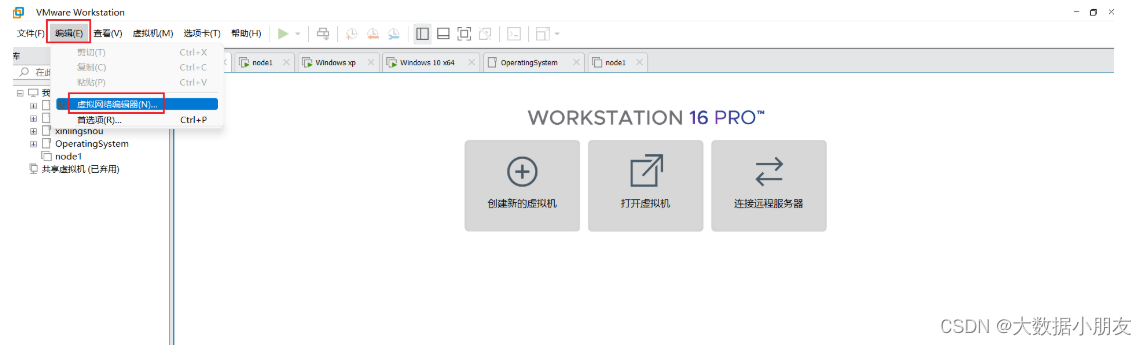
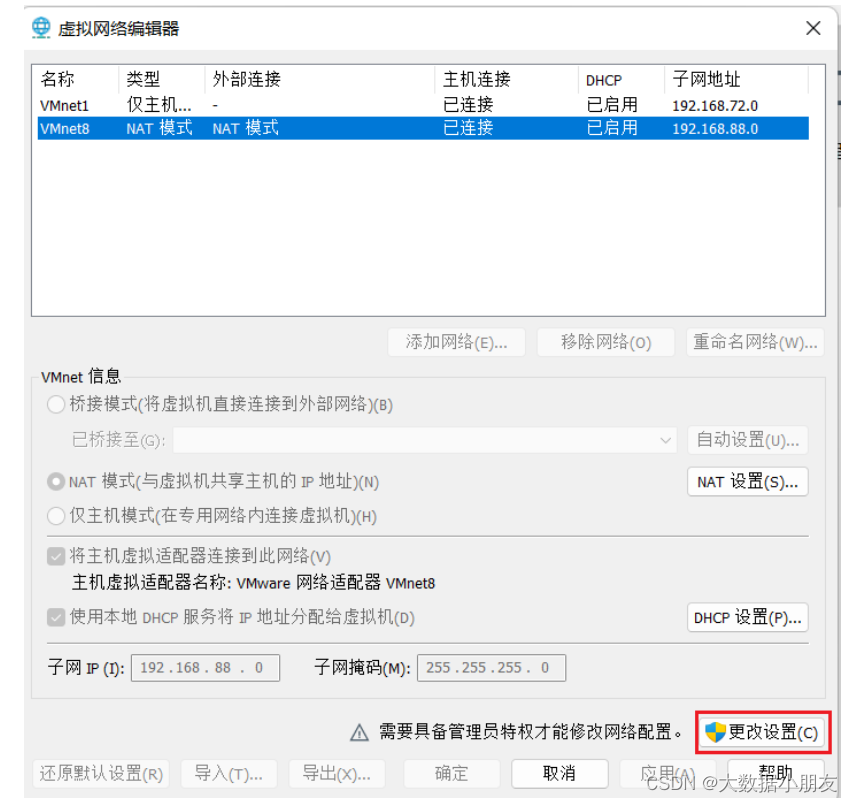
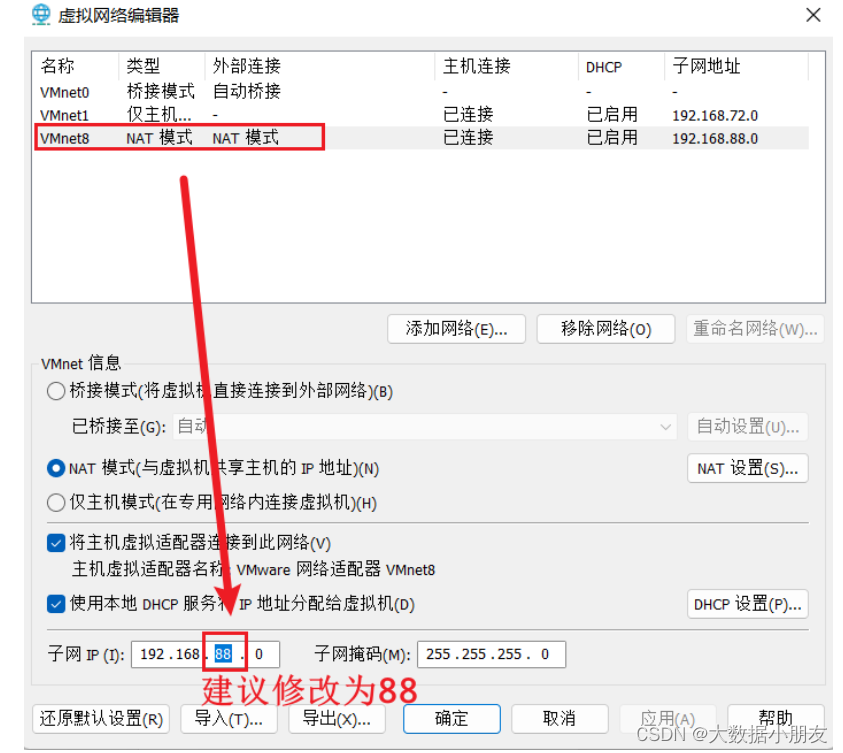
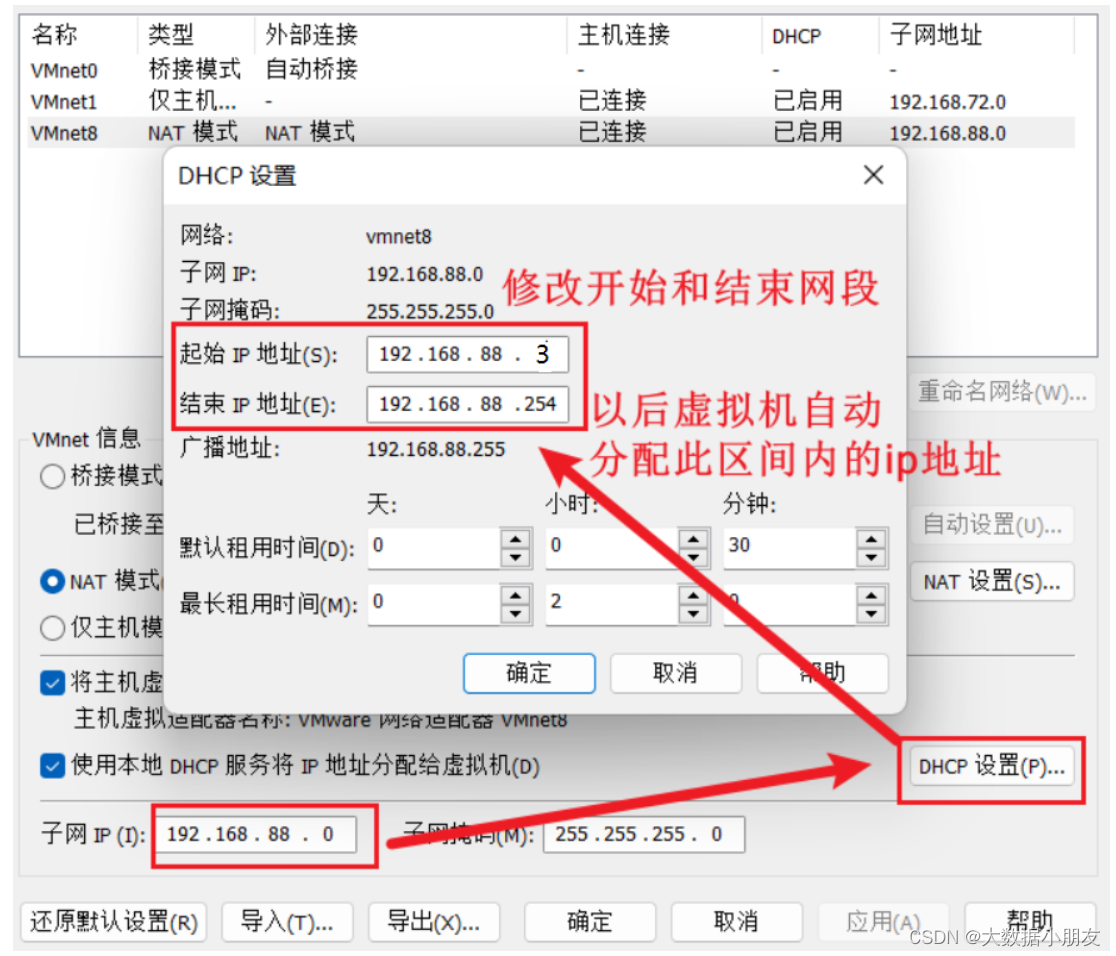
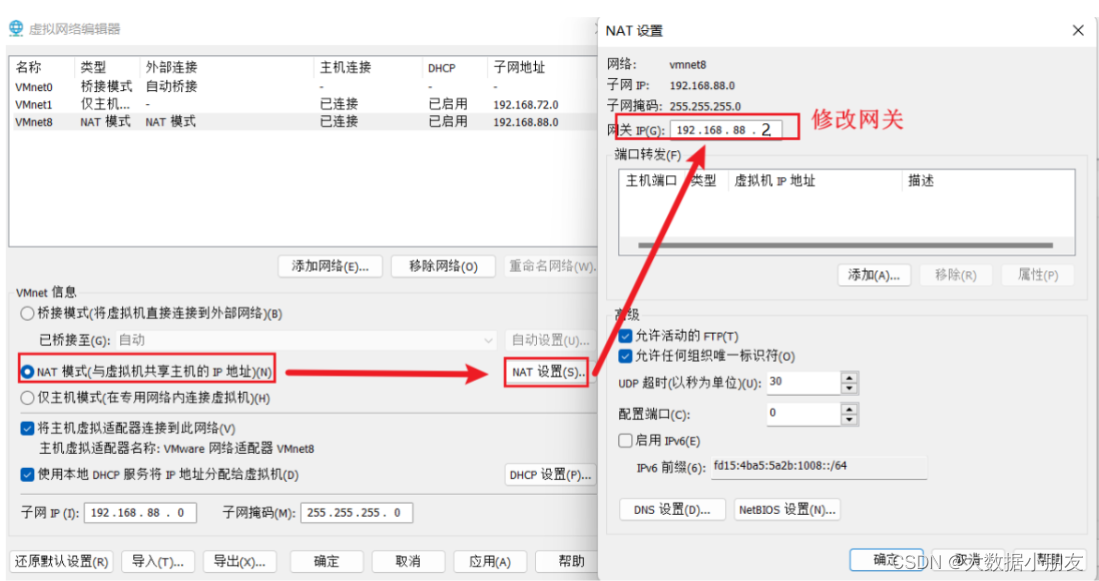
最后先应用再确定!!!
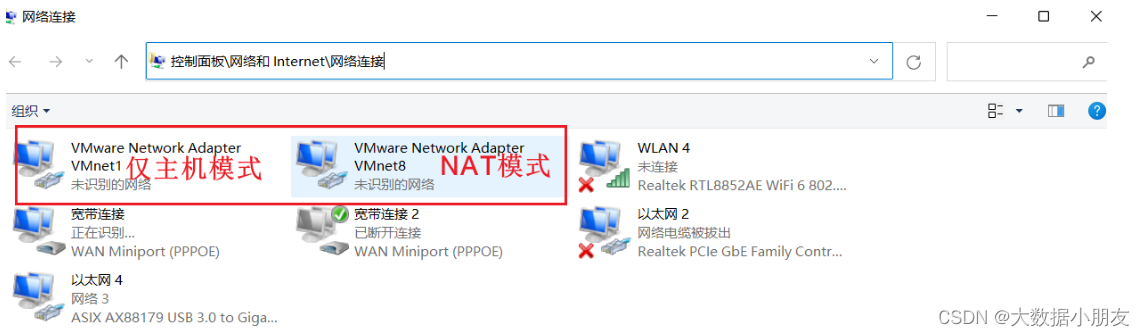
1.2 修改本地net8网卡ip
2、安装命令版裸机
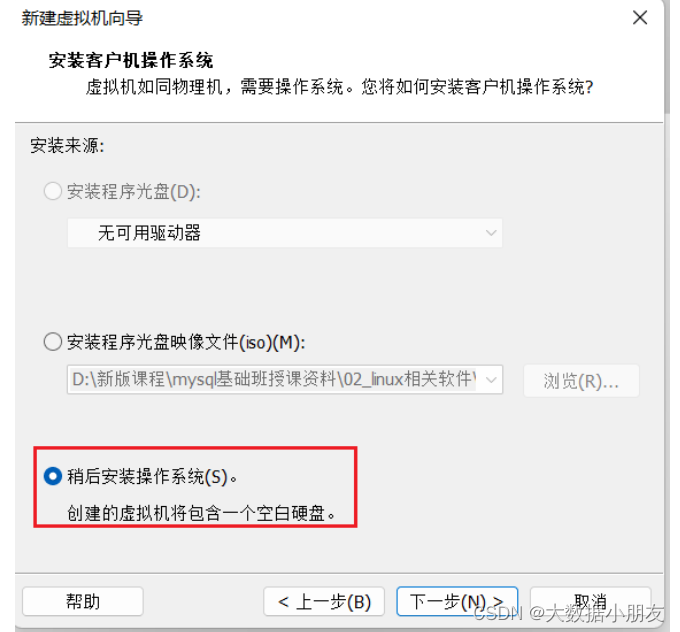

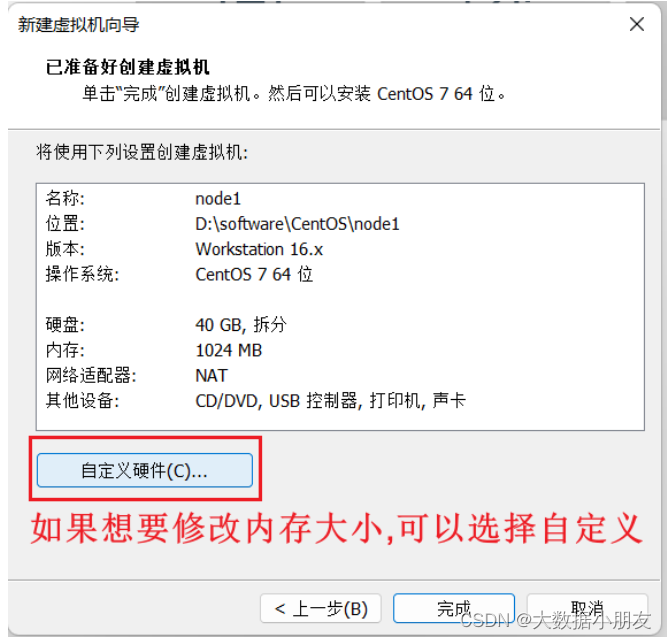
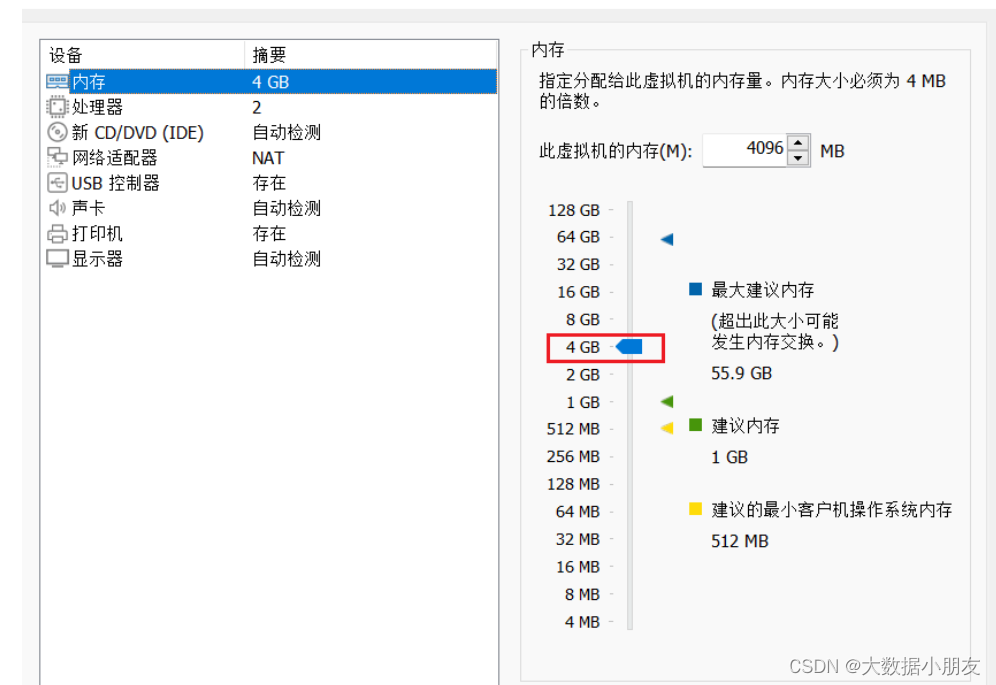
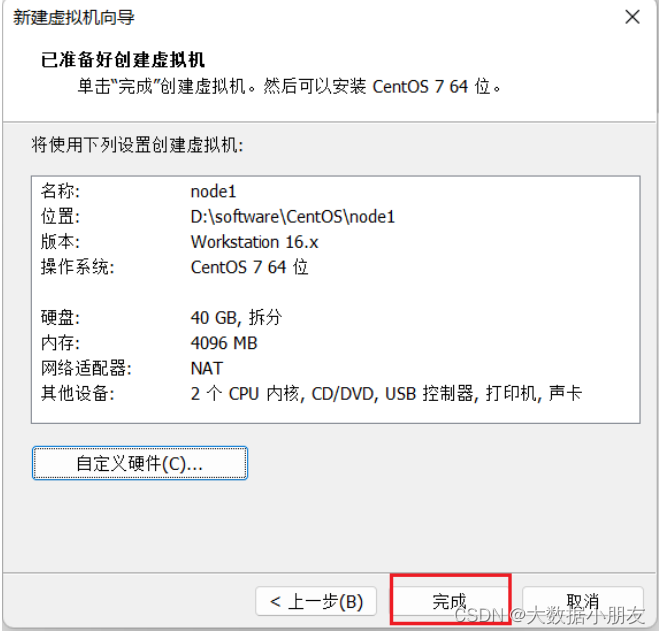
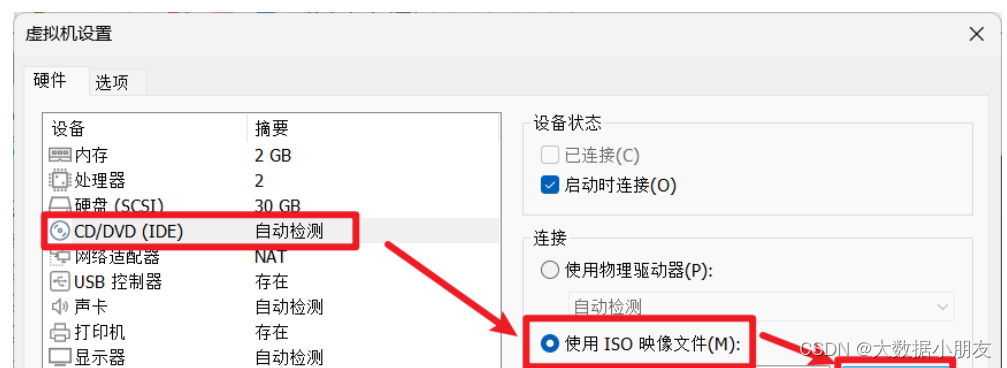
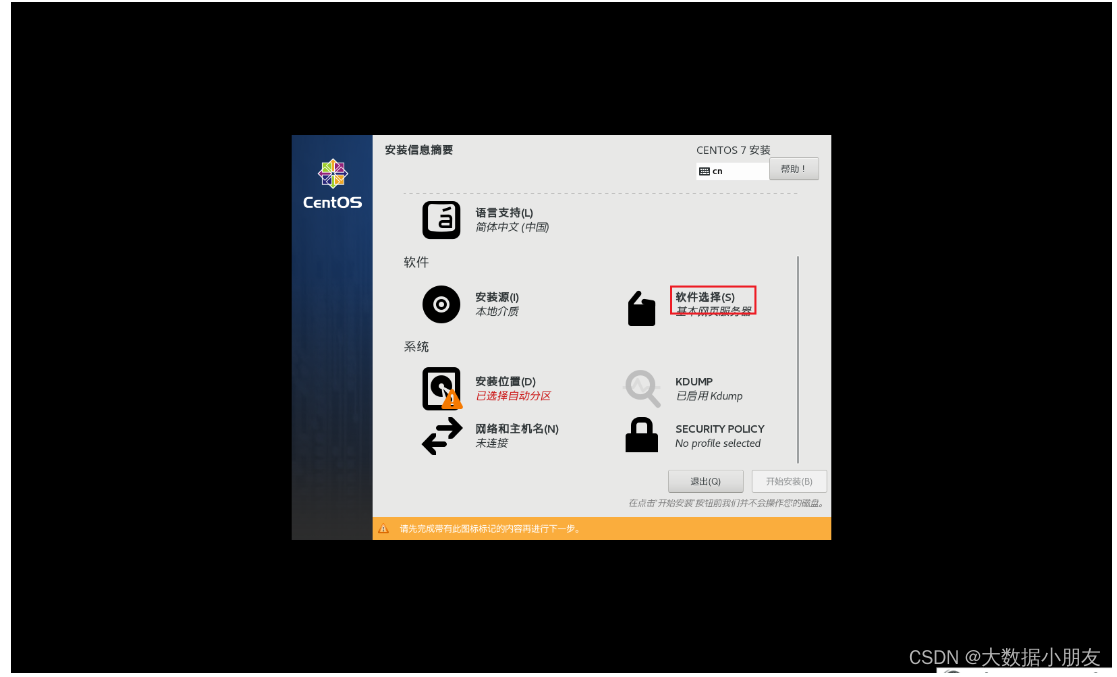
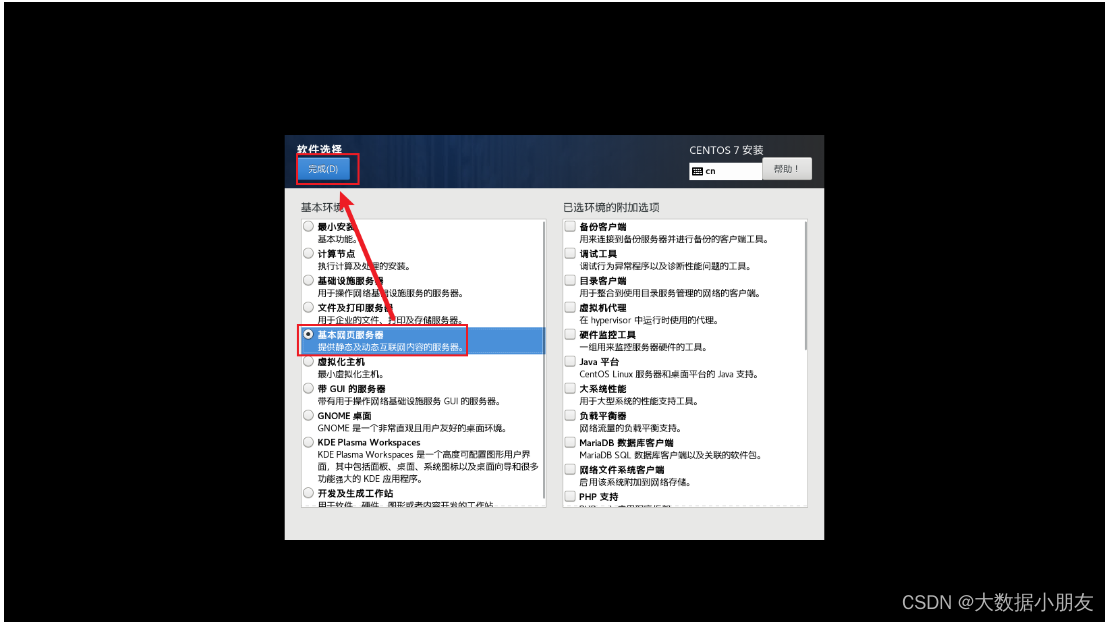
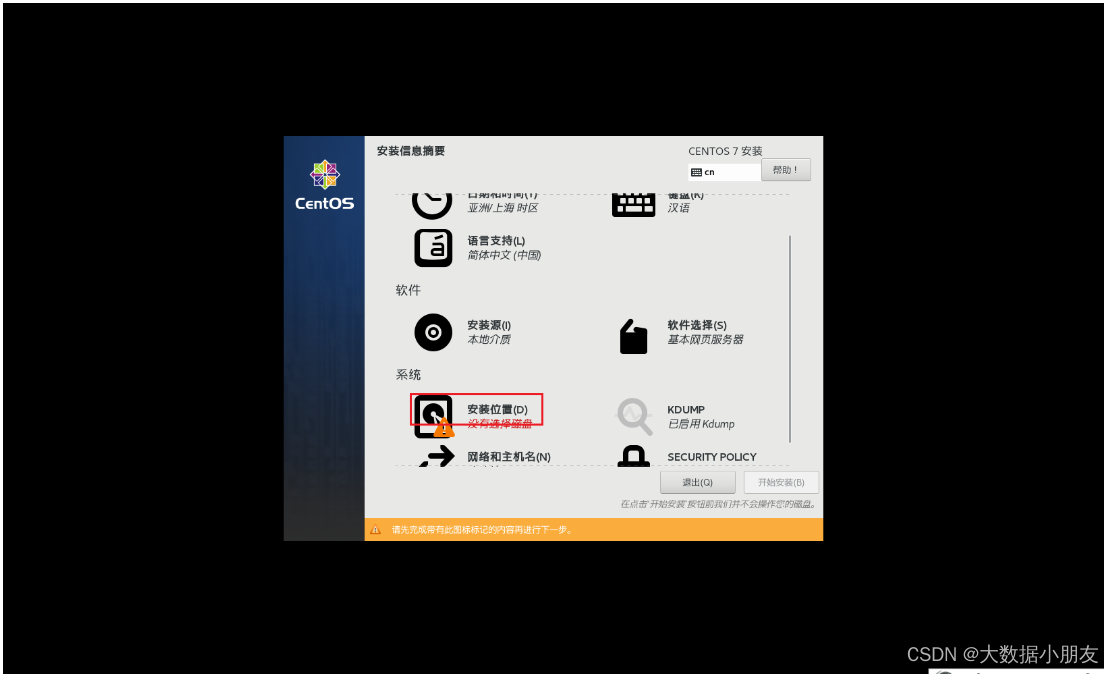
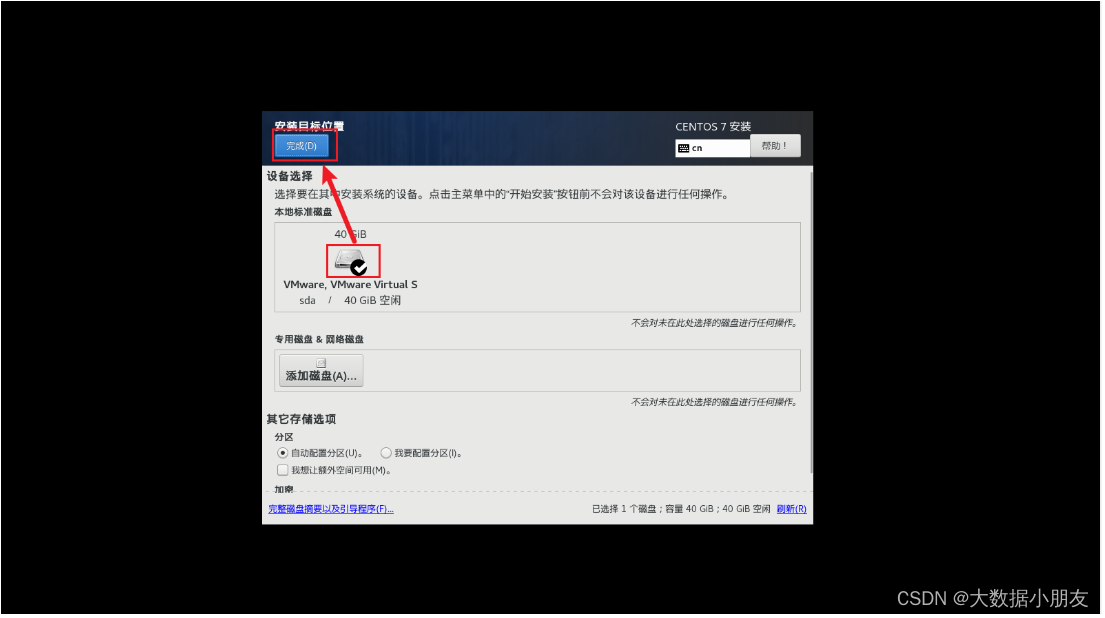
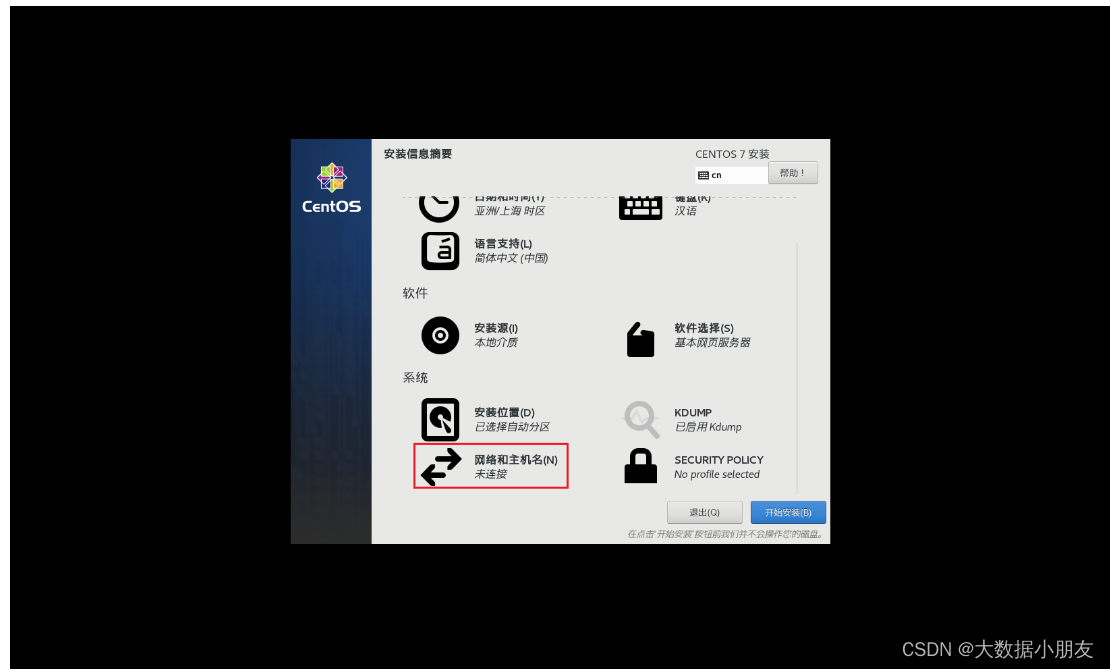
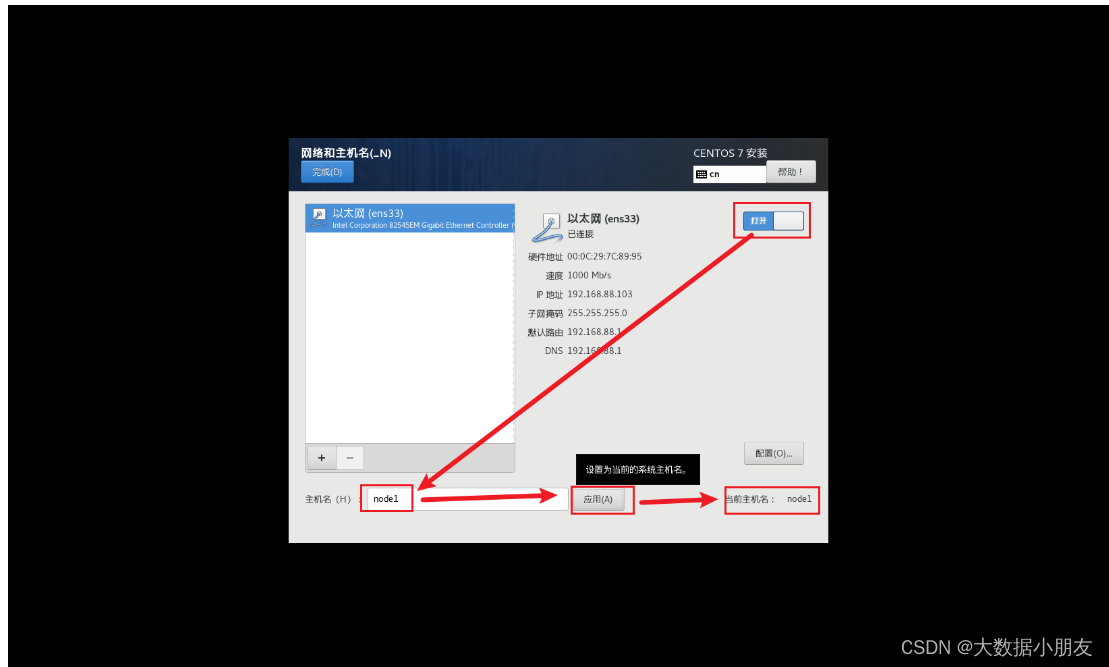
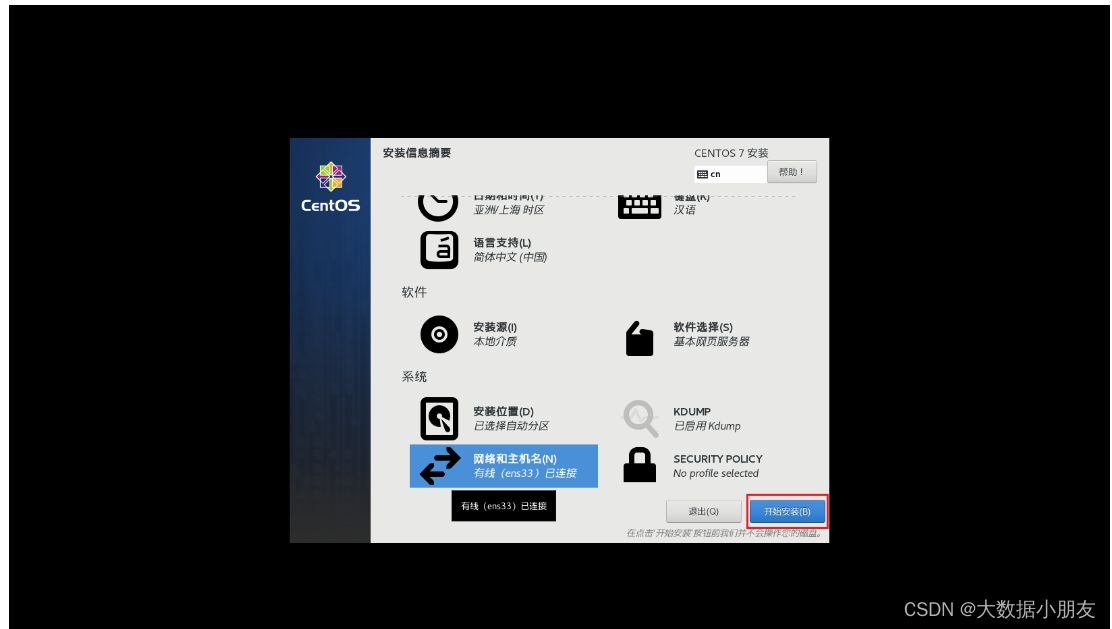
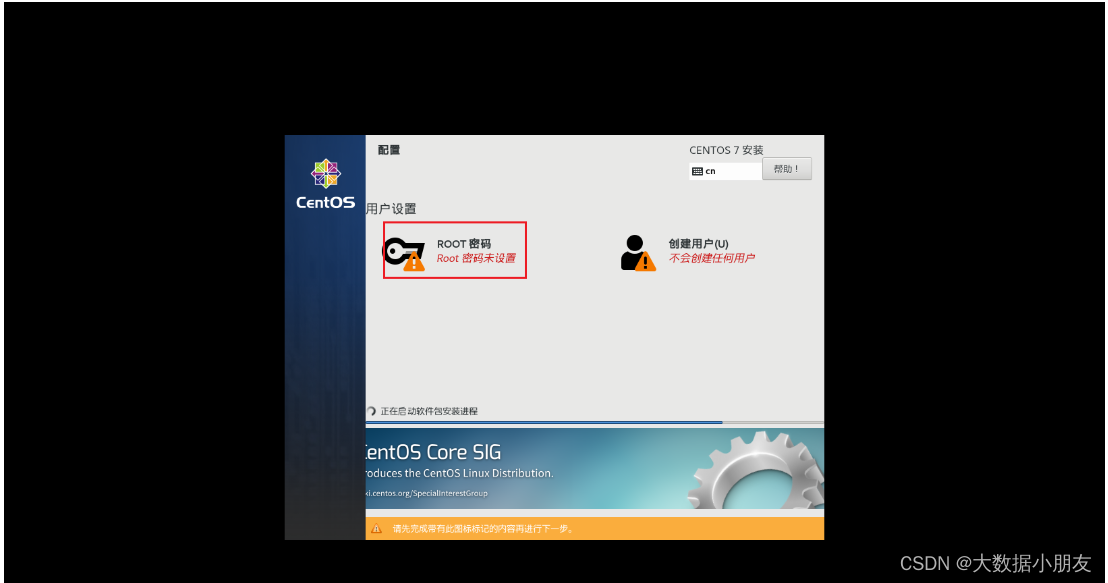
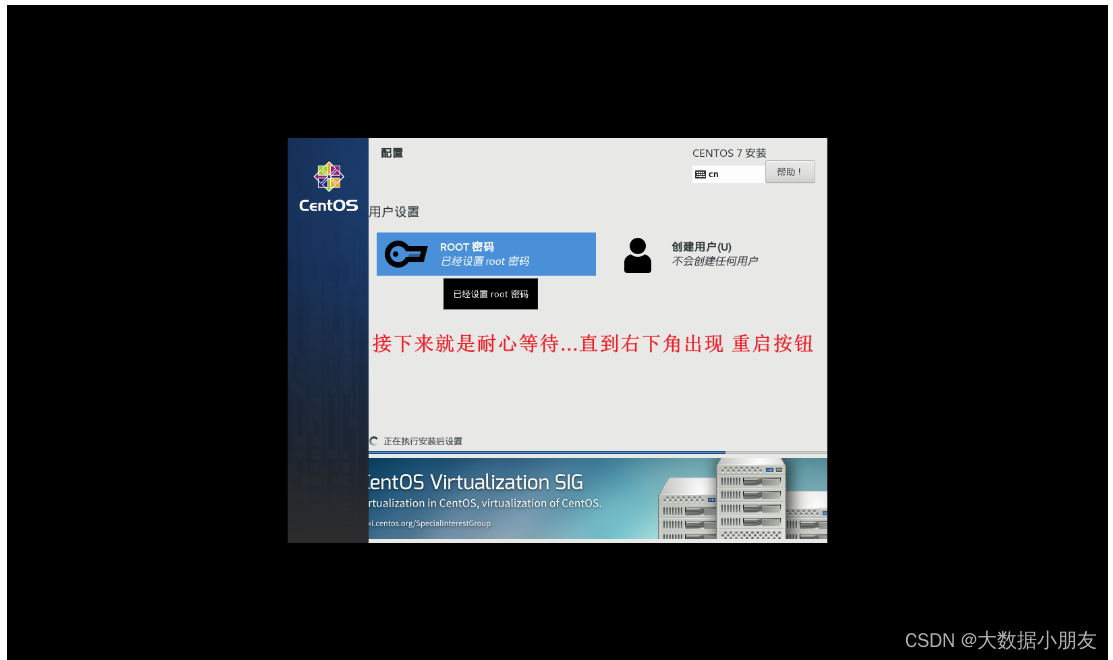
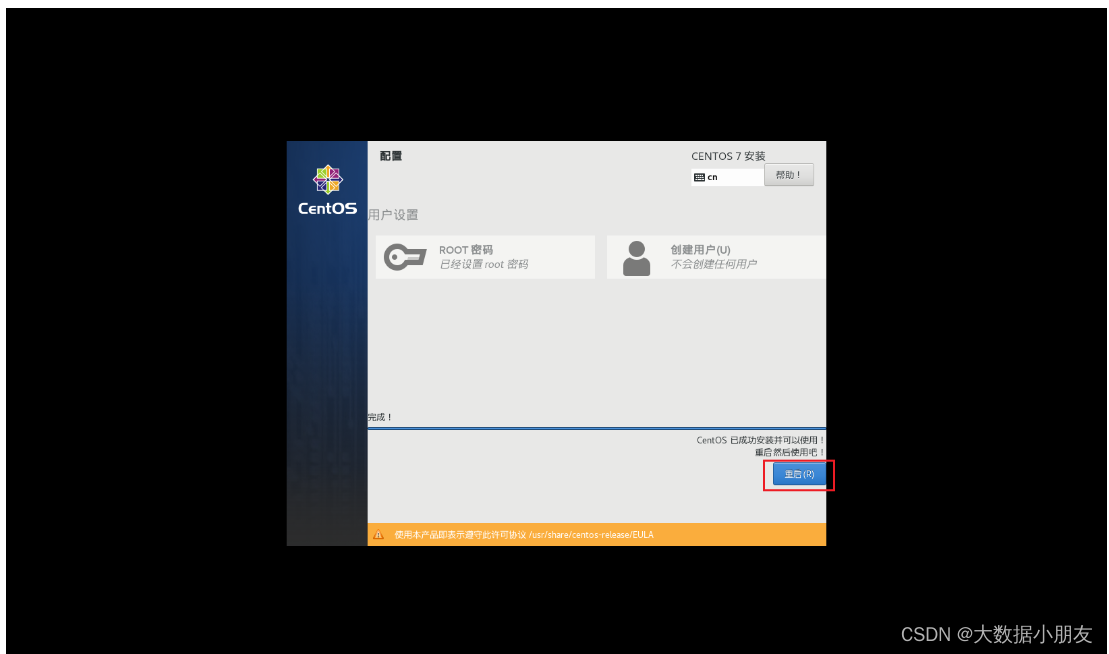
3、安装centos操作系统
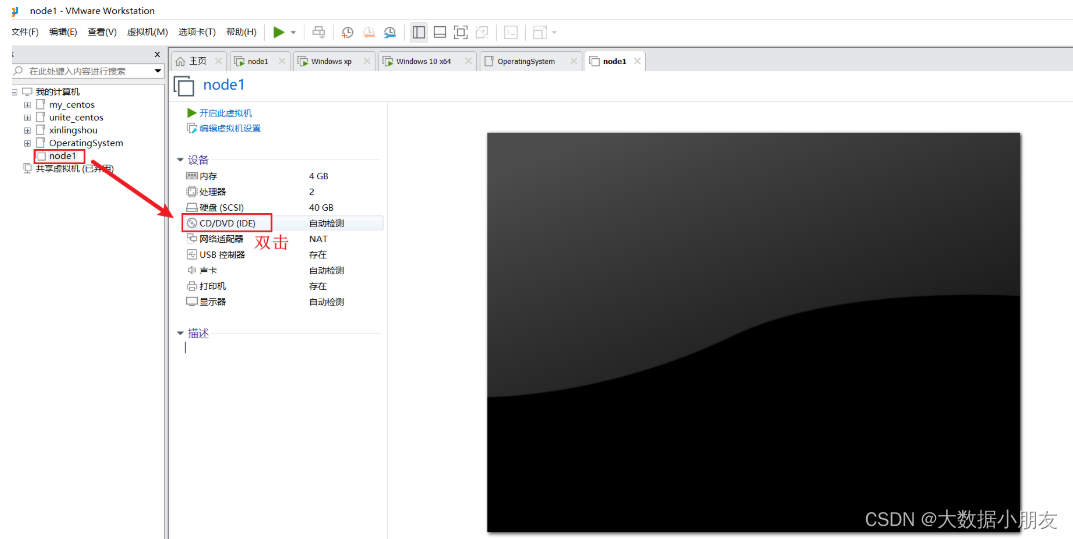
镜像文件选择Centos-7-x86_64-DVD-1909.iso文件,博主已经上传到资源,自己也可以去官网下载,适合自己的版本


ping www.baidu.com
三、网编三要素和SSH原理
1、网编三要素
网络编程三要素: ip地址  端口(端口号)  协议

ip地址: 根据ip地址能够找到对应唯一的网络设备

端口: 应用程序的入口,但是往往要先使用端口号来找到对应的端口,再根据端口连接上对应的进程

协议: 多个进程之间网络传输的规则
	tcp: 传输控制协议(TCP,Transmission Control Protocol)是一种面向连接的、可靠的、基于字节流的传输层通信协议
	udp: 用户数据报协议(UDP,User Datagram Protocol)是一种无连接的、不可靠的、之间发送封装的 IP 数据包的通信协议
2、SSH原理
SSH协议:文件传输协议secret file transfer protocol, Secure FTP或SFTP是一种数据流连线档案存取、传输和管理功能的网络传输协议。

OpenSSH: 是 SSH (Secure SHell) 协议的免费开源实现。SSH协议族可以用来进行远程控制, 或在计算机之间传送文件。

Secure Shell: (安全外壳协议,简称SSH)是一种加密的网络传输协议,可在不安全的网络中为网络服务提供安全的传输环境。

常用命令: ssh-keygen: 生成公钥(rsa.pub)和私钥(rsa)  密钥

服务名称: sshd
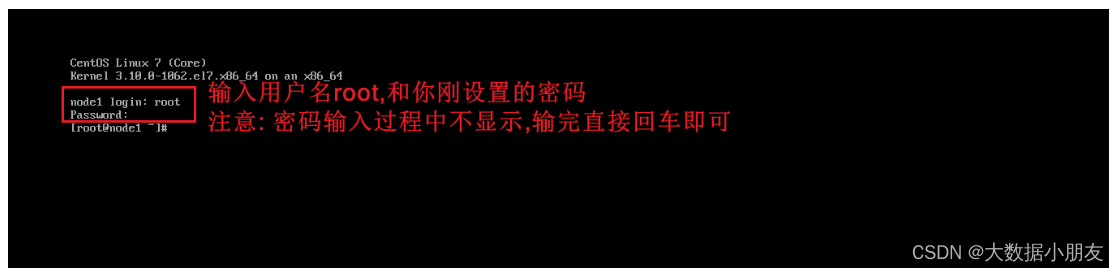
Linux查看服务器的IP信息:ifconfig
Windows查看服务器的IP信息:ipconfig
四、基础linux命令
1、linux目录结构
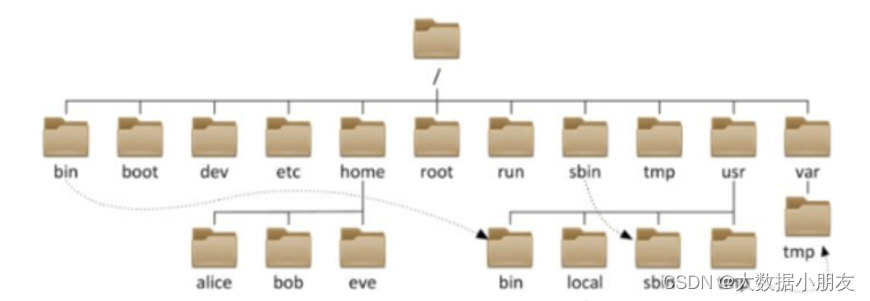
只有一个根目录:  /
多个目录分隔符:  /
如何区分根目录和分隔符: 以/开头的是根目录,后面的都是分隔符    举例: /usr/local
2、基础四大命令
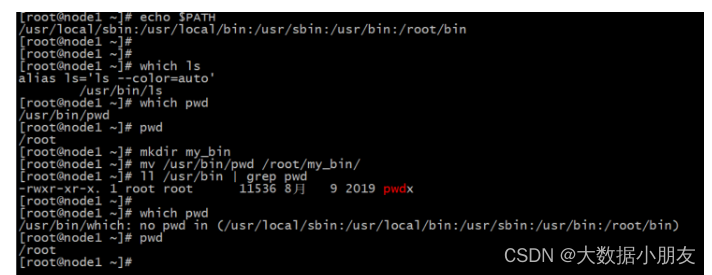
ls: 查看当前目录了下所有内容
cd 目录名: 切换目录
pwd: 查看当前所在位置
clear: 清屏
[root@node1 ~]# cd /
[root@node1 /]# pwd
/
[root@node1 /]# ls
bin   dev  home  lib64  mnt  proc  run   srv  tmp  var
boot  etc  lib   media  opt  root  sbin  sys  usr
[root@node1 /]# clear
3、linux命令格式
command [-options] [parameter]

说明:
- command : 命令名, 相应功能的英文单词或单词的缩写
- [-options] : 选项, 可用来对命令进行控制, 也可以省略
- parameter  : 传给命令的参数, 可以是 零个、一个 或者 多个
4、ls命令
ls [-a -l -h] [路径] : 查看指定路径下文件列表  注意: 默认都是当前路径

参数 -a : 展示出隐藏文件。all             注意: .开头就是隐藏文件
参数 -l : 以详细信息展示文件。list   	   注意: ls -l 可以简化为ll
参数 -h : 配合-l使用,人性化展示文件大小
[root@node1 ~]# ls
anaconda-ks.cfg
[root@node1 ~]# ls -a
.   anaconda-ks.cfg  .bash_logout   .bashrc  .config  .tcshrc
..  .bash_history    .bash_profile  .cache   .cshrc
[root@node1 ~]# ls -l
总用量 4
-rw-------. 1 root root 1270 7月  29 10:01 anaconda-ks.cfg
[root@node1 ~]# ls -a -l
总用量 28
dr-xr-x---.  4 root root  164 7月  29 10:20 .
dr-xr-xr-x. 17 root root  237 7月  29 10:57 ..
-rw-------.  1 root root 1270 7月  29 10:01 anaconda-ks.cfg
-rw-------.  1 root root   34 7月  29 10:20 .bash_history
-rw-r--r--.  1 root root   18 12月 29 2013 .bash_logout
-rw-r--r--.  1 root root  176 12月 29 2013 .bash_profile
-rw-r--r--.  1 root root  176 12月 29 2013 .bashrc
drwxr-xr-x.  3 root root   18 7月  29 10:02 .cache
drwxr-xr-x.  3 root root   18 7月  29 10:02 .config
-rw-r--r--.  1 root root  100 12月 29 2013 .cshrc
-rw-r--r--.  1 root root  129 12月 29 2013 .tcshrc
[root@node1 ~]# ll
总用量 4
-rw-------. 1 root root 1270 7月  29 10:01 anaconda-ks.cfg
[root@node1 ~]# ll -h
总用量 4.0K
-rw-------. 1 root root 1.3K 7月  29 10:01 anaconda-ks.cfg
[root@node1 ~]# ll -a -h
总用量 28K
dr-xr-x---.  4 root root  164 7月  29 10:20 .
dr-xr-xr-x. 17 root root  237 7月  29 10:57 ..
-rw-------.  1 root root 1.3K 7月  29 10:01 anaconda-ks.cfg
-rw-------.  1 root root   34 7月  29 10:20 .bash_history
-rw-r--r--.  1 root root   18 12月 29 2013 .bash_logout
-rw-r--r--.  1 root root  176 12月 29 2013 .bash_profile
-rw-r--r--.  1 root root  176 12月 29 2013 .bashrc
drwxr-xr-x.  3 root root   18 7月  29 10:02 .cache
drwxr-xr-x.  3 root root   18 7月  29 10:02 .config
-rw-r--r--.  1 root root  100 12月 29 2013 .cshrc
-rw-r--r--.  1 root root  129 12月 29 2013 .tcshrc
[root@node1 ~]# ls -l /
总用量 24
-rw-r--r--.   1 root root   12 7月  29 10:57 a.txt
lrwxrwxrwx.   1 root root    7 7月  29 09:58 bin -> usr/bin
dr-xr-xr-x.   5 root root 4096 7月  29 10:02 boot
drwxr-xr-x.  20 root root 3220 7月  29 10:02 dev
drwxr-xr-x.  85 root root 8192 7月  29 10:02 etc
drwxr-xr-x.   2 root root    6 4月  11 2018 home
lrwxrwxrwx.   1 root root    7 7月  29 09:58 lib -> usr/lib
lrwxrwxrwx.   1 root root    9 7月  29 09:58 lib64 -> usr/lib64
drwxr-xr-x.   2 root root    6 4月  11 2018 media
drwxr-xr-x.   2 root root    6 4月  11 2018 mnt
drwxr-xr-x.   3 root root   16 7月  29 09:59 opt
dr-xr-xr-x. 127 root root    0 7月  29 10:02 proc
dr-xr-x---.   4 root root  164 7月  29 10:20 root
drwxr-xr-x.  32 root root  940 7月  29 10:02 run
lrwxrwxrwx.   1 root root    8 7月  29 09:58 sbin -> usr/sbin
drwxr-xr-x.   2 root root    6 4月  11 2018 srv
dr-xr-xr-x.  13 root root    0 7月  29 10:02 sys
drwxrwxrwt.   9 root root  257 7月  29 10:43 tmp
drwxr-xr-x.  13 root root  155 7月  29 09:58 usr
drwxr-xr-x.  21 root root 4096 7月  29 10:02 var
5、cd和pwd和clear命令
cd [路径] : 切换到指定路径下
家目录: 普通用户的家目录:/home/普通用户名     root用户的家目录:/root
如何快速回家: cd ~    注意: ~可以省略
快速切换到上次所在的路径: cd -
切换到上一级目录: cd ..

pwd : 查看当前路径

clear:  清屏       快捷键: ctrl+L
[root@node1 /]# clear

[root@node1 ~]# ls
anaconda-ks.cfg
[root@node1 ~]# cd home
-bash: cd: home: 没有那个文件或目录
[root@node1 ~]# cd /home
[root@node1 home]# cd /
[root@node1 /]# cd home
[root@node1 home]# cd /
[root@node1 /]# ls
a.txt  bin  boot  dev  etc  home  lib  lib64  media  mnt  opt  proc  root  run  sbin  srv  sys  tmp  usr  var
[root@node1 /]# cd /home

[root@node1 home]# pwd
/home
6、相对路径和绝对路径
1. 相对路径和绝对路径
绝对路径: 以根目录'/'做起点,描述路径的方式,路径以/开头
相对路径: 以当前目录做起点,描述路径的方式,路径不需以/开头
如无特殊需求,后续学习中,将经常使用相对路径表示

2. 特殊路径符有哪些?
.  表示当前目录,  比如:  cd .    或 cd ./Desktop
.. 表示上一级目录,比如: cd ..  或 cd ../..
[root@node1 ~]# cd .
[root@node1 ~]# pwd
/root
[root@node1 ~]# cd ..
[root@node1 /]# pwd
/
[root@node1 /]# ls
a.txt  boot  etc   lib    media  opt   root  sbin  sys  usr
bin    dev   home  lib64  mnt    proc  run   srv   tmp  var
[root@node1 /]# cd /home
[root@node1 home]# cd ..
[root@node1 /]# cd home
[root@node1 home]# cd ..
[root@node1 /]# cd ./home
[root@node1 home]# cd ..

[root@node1 /]# cd /usr/local
[root@node1 local]# cd ../..

[root@node1 /]# cd
[root@node1 ~]# ls
anaconda-ks.cfg
[root@node1 ~]# cd /home
7、mkdir命令
mkdir [-p] 目录路径 : 创建指定目录
	-p:可选,表示自动创建不存在的父目录,适用于创建连续多层级的目录

创建一级目录: mkdir 目录路径
创建多个同级目录: mkdir 目录路径1  目录路径2 ...
创建父子嵌套目录: mkdir -p 目录路径1/目录路径2/...
[root@node1 /]# mkdir binzi
[root@node1 /]# ls
bin    boot  etc   lib    media  opt   root  sbin  sys  usr
binzi  dev   home  lib64  mnt    proc  run   srv   tmp  var
[root@node1 /]# cd binzi
[root@node1 binzi]# cd /
[root@node1 /]# cd /binzi
[root@node1 binzi]# ls
[root@node1 binzi]# mkdir sql/python/java
mkdir: 无法创建目录"sql/python/java": 没有那个文件或目录
[root@node1 binzi]# mkdir -p sql/python/java
[root@node1 binzi]# ls
sql
[root@node1 binzi]# cd sql
[root@node1 sql]# cd python/java
[root@node1 java]# pwd
/binzi/sql/python/java
8、touch命令
touch 文件路径: 创建指定空文件

创建一个文件: touch 文件路径
创建多个文件: touch 文件路径1  文件路径2 ...
[root@node1 java]# cd /binzi
[root@node1 binzi]# ls
sql
[root@node1 binzi]# touch hello.sql
hello.sql  sql
[root@node1 binzi]# ll
总用量 0
-rw-r--r--. 1 root root  0 3月  15 15:14 hello.sql
drwxr-xr-x. 3 root root 20 3月  15 15:10 sql
[root@node1 binzi]# cd sql
[root@node1 sql]# ls
python
[root@node1 sql]# touch 1.py 2.py 3.py 4.txt 5.txt 6.txt
[root@node1 sql]# ls
1.py  2.py  3.py  4.txt  5.txt  6.txt  python
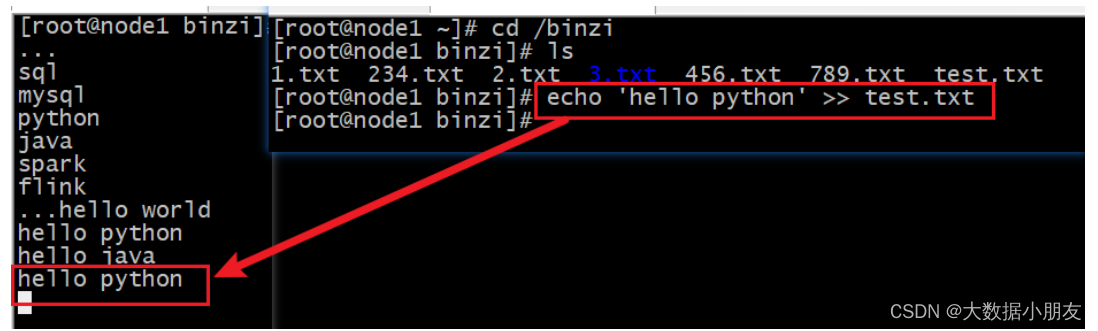
9、echo命令
echo 要打印的内容

注意: 默认打印到控制台,但是经常配合重定向符号使用

注意: echo配合反引号``可以先识别出关键字,然后把对应的内容输出
[root@node1 sql]# echo "helloworld"
helloworld
[root@node1 sql]# echo 'helloworld'
helloworld
[root@node1 sql]# echo helloworld
helloworld
[root@node1 test]# echo 'ls'
ls
[root@node1 test]# echo `ls`
1.txt 2.txt 3.py a b c
10、重定向符号
> : 覆盖写入
>> : 追加写入

注意: 一般都是配合echo使用。工作中一般是在需要将程序运行的日志写入到指定位置的时候用到。
[root@node1 sql]# echo 'helloworld' > 4.txt
[root@node1 sql]# cat 4.txt
helloworld
[root@node1 sql]# echo '我很帅' > 4.txt
[root@node1 sql]# cat 4.txt
我很帅
[root@node1 sql]# echo '' > 4.txt
[root@node1 sql]# cat 4.txt

[root@node1 sql]# echo '你好' >> 4.txt
[root@node1 sql]# echo '我好' >> 4.txt
[root@node1 sql]# echo '大家好' >> 4.txt
[root@node1 sql]# cat 4.txt

你好
我好
大家好
[root@node1 sql]# pwd
/binzi/sql
[root@node1 sql]# echo 'pwd' >> 4.txt
[root@node1 sql]# cat 4.txt

你好
我好
大家好
pwd
[root@node1 sql]# echo `pwd` >> 4.txt
[root@node1 sql]# cat 4.txt

你好
我好
大家好
pwd
/binzi/sql
[root@node1 sql]# ls
1.py  2.py  3.py  4.txt  5.txt  6.txt  python
[root@node1 sql]# echo `ls` >> 4.txt
[root@node1 sql]# cat 4.txt

你好
我好
大家好
pwd
/binzi/sql
1.py 2.py 3.py 4.txt 5.txt 6.txt python
11、cat_more_less命令
前提: 先利用客户端上传一个大文件test.txt
cat [-n] 文件 :  cat查看文件内容,一般建议查看小文件
		  -n :显示行号

more [-num] 文件:  more查看文件内容,一般建议查看大文件(可以翻页)
		  空格: 下一页
		  b  : 上一页
		  q  : 退出
		  -x : 展示条数  举例: more -10 文件

less [-N] 文件: less查看文件内容,一般建议查看大文件(可以翻页,可以搜索)
		  -N : 显示行号
		  空格: 下一页
		  b  : 上一页
		  q  : 退出
		  /内容: 搜索指定内容
[root@node1 binzi]# cat  test.txt
[root@node1 binzi]# cat -n test.txt

[root@node1 binzi]# more test.txt
[root@node1 binzi]# more -10 test.txt

[root@node1 binzi]# less test.txt
[root@node1 binzi]# less -N test.txt
12、cp命令
复制的英文单词: copy
cp [-r] 要复制的文件或者文件夹  目标位置 : 复制文件或者文件夹到指定目标位置

注意: -r 主要用于复制文件夹

注意: cp复制文件后,源文件依然存在
[root@node1 binzi]# cp test.txt sql
[root@node1 binzi]# cd sql
[root@node1 sql]# ls
1.py  2.py  3.py  4.txt  5.txt  6.txt  python  test.txt
[root@node1 sql]# cp test.txt test2.txt
[root@node1 sql]# ls
1.py  2.py  3.py  4.txt  5.txt  6.txt  python  python2  test2.txt  test.txt
[root@node1 sql]# cat test2.txt

[root@node1 sql]# cd python2
[root@node1 python2]# ls
java
[root@node1 python2]# cd ..
[root@node1 sql]# cp -r python python2
[root@node1 sql]# ls
1.py  2.py  3.py  4.txt  5.txt  6.txt  python  python2 test2.txt test.txt
[root@node1 sql]# cd python2
[root@node1 python2]# ls
java  python
13、mv命令
移动的英文单词: move
mv 要移动的文件或者文件夹  目标位置: 移动文件或者文件夹到指定目标位置

注意: 目标位置是文件,文件不存在就会直接改名    如果想要把文件移动到目录中,此目录一定要存在,否则当成了普通文件改名

注意: mv移动文件后,源文件不存在
[root@node1 sql]# ls
1.py  2.py  3.py  4.txt  5.txt  6.txt  python  python2  test2.txt  test.txt
[root@node1 sql]# mv test.txt test3.txt
[root@node1 sql]# ls
1.py  2.py  3.py  4.txt  5.txt  6.txt  python  python2  test2.txt  test3.txt
[root@node1 sql]# mv test3.txt aaa
[root@node1 sql]# ls
1.py  2.py  3.py  4.txt  5.txt  6.txt  aaa  python  python2  test2.txt
[root@node1 sql]# ll
...
-rw-r--r--. 1 root root 455 3月  15 16:10 aaa
-rw-r--r--. 1 root root 455 3月  15 16:18 test2.txt
[root@node1 sql]# mv test2.txt python
[root@node1 sql]# ls
1.py  2.py  3.py  4.txt  5.txt  6.txt  aaa  python  python2
[root@node1 sql]# cd python
[root@node1 python]# ls
java  test2.txt
14、rm命令
移除的英文单词: remove
rm [-r -f] 要删除的文件或者文件夹:  删除指定的文件或者文件夹

注意: -r 主要用于删除文件夹        -f :主要用于强制删除文件或者文件夹

删除文件(有提示): rm 文件路径
删除文件(无提示): rm -f 文件路径
删除目录(有提示): rm -r 目录路径
删除目录(无提示): rm -rf 文件路径
[root@node1 sql]# ls
1.py  2.py  3.py  4.txt  5.txt  6.txt  aaa  python  python2

[root@node1 sql]# rm 1.py
rm:是否删除普通空文件 "1.py"?y
[root@node1 sql]# rm -f 2.py
[root@node1 sql]# rm -f 3.py 4.txt 5.txt 6.txt
[root@node1 sql]# ls
aaa  python  python2

[root@node1 sql]# rm python
rm: 无法删除"python": 是一个目录
[root@node1 sql]# rm -r python
rm:是否进入目录"python"? y
rm:是否删除目录 "python/java"?y
rm:是否删除普通文件 "python/test2.txt"?y
rm:是否删除目录 "python"?y
[root@node1 sql]# ls
aaa  python2
[root@node1 sql]# rm -rf python2
[root@node1 sql]# ls
aaa
[root@node1 sql]# rm -rf /binzi/
[root@node1 sql]# cd ..
cd: 获取当前目录时出错: getcwd: 无法访问父目录: 没有那个文件或目录
15、通配符
* :  任意个字符   类似于sql模糊查询中的 %

? :  任意1个字符  类似于sql模糊查询中的 _
[root@node1 /]# mkdir binzi
[root@node1 /]# ls
bin    boot  etc   lib    media  opt   root  sbin  sys  usr
binzi  dev   home  lib64  mnt    proc  run   srv   tmp  var
[root@node1 /]# touch /binzi/1.txt
[root@node1 /]# touch /binzi/2.txt /binzi/3.txt /binzi/4.txt /binzi/5.txt
[root@node1 /]# cd binzi
[root@node1 binzi]# ls
1.txt  2.txt  3.txt  4.txt  5.txt
[root@node1 binzi]# touch 123.txt 456.txt 789.txt
[root@node1 binzi]# ls
123.txt  1.txt  2.txt  3.txt  456.txt  4.txt  5.txt  789.txt
[root@node1 binzi]# rm 1*
rm:是否删除普通空文件 "123.txt"?y
rm:是否删除普通空文件 "1.txt"?y
[root@node1 binzi]# ls
2.txt  3.txt  456.txt  4.txt  5.txt  789.txt
[root@node1 binzi]# rm -f *5*
[root@node1 binzi]# ls
2.txt  3.txt  4.txt  789.txt
[root@node1 binzi]# rm -f *.txt
[root@node1 binzi]# ls

[root@node1 binzi]# touch 1.txt 2.txt 234.txt  123.txt 456.txt 789.txt
[root@node1 binzi]# ls
123.txt  1.txt  234.txt  2.txt  456.txt  789.txt
[root@node1 binzi]# touch 112.txt 1123.txt
[root@node1 binzi]# ls
1123.txt  112.txt  123.txt  1.txt  234.txt  2.txt  456.txt  789.txt
[root@node1 binzi]# rm -f ?2*
[root@node1 binzi]# ls
1123.txt  112.txt  1.txt  234.txt  2.txt  456.txt  789.txt
[root@node1 binzi]# rm -f ??2*
[root@node1 binzi]# ls
1.txt  234.txt  2.txt  456.txt  789.txt
16、which和find
which 命令:  查找命令所在位置

主要: find命令也可以结合通配符使用,不加路径代表当前路径下查找

find [查找路径] -name 文件名: 根据文件名查找
find [查找路径] -size [+ -]大小: 根据文件大小查找
					+: 大于
					-: 小于

find [查找路径] -type [d f] -name 文件名: 根据文件类型查找
					d: 文件夹
					f: 文件
[root@node1 /]# find / -name 'test'
[root@node1 /]# find  -name 'test'
[root@node1 /]# find  -name 'test*'
[root@node1 /]# find  -name '*test'
[root@node1 /]# find  -name '*test*'
[root@node1 /]# find  -size +10M
[root@node1 /]# find -type d -name 'test'
[root@node1 /]# find -type f -name 'test'
17、管道符 |
管道使用格式:  命令1 | 命令2 | 命令3 ...

解释: 把命令1的结果传递给命令2,然后再把命令2的结果传递给命令3,依次类推...

注意: 管道一般配合grep命令使用较多

sort: 排序
[root@node1 binzi]# touch 3.txt 2.txt 4.txt 1.txt 5.txt
[root@node1 binzi]# mkdir aa bb
[root@node1 binzi]# find -name '*.txt'

[root@node1 binzi]# find -name '*.txt' | sort   技巧: 把所有txt文件查询出来,然后排序,效果明显
[root@node1 binzi]# cat test.txt | less
18、grep命令
grep [-n] 关键字 文件路径: 在指定文件中搜索指定关键字

注意: -n 主要用于显示搜索到结果的行号

注意: 管道|一般配合grep命令使用较多
[root@node1 binzi]# ls
1.txt  234.txt  2.txt  3.txt  456.txt  789.txt
[root@node1 binzi]# cat 1.txt
python java sql
[root@node1 binzi]# echo `ls` >> 1.txt
[root@node1 binzi]# cat 1.txt
python java sql
1.txt 234.txt 2.txt 3.txt 456.txt 789.txt
[root@node1 binzi]# grep 'sql' 1.txt
python java sql
[root@node1 binzi]# grep '234' 1.txt
1.txt 234.txt 2.txt 3.txt 456.txt 789.txt
[root@node1 binzi]# grep -n '234' 1.txt
2:1.txt 234.txt 2.txt 3.txt 456.txt 789.txt
[root@node1 binzi]# ls
1.txt  234.txt  2.txt  3.txt  456.txt  789.txt
[root@node1 binzi]# ls | grep 234
234.txt

[root@node1 binzi]# find -name '*.txt' | grep 78
./789.txt
[root@node1 binzi]#
19、wc命令
wc [-l -w] 文件路径:  统计指定文件内容的行数或者单词数

-l :  行数

-w :  单词数   注意:空格分隔
[root@node1 test]# echo 'java sql python' >> test.txt
[root@node1 test]# echo 'linux hadoop hive' >> test.txt
[root@node1 test]# echo 'spark flink' >> test.txt
[root@node1 test]# cat test.txt
java sql python
linux hadoop hive
spark flink

[root@node1 test]# wc test.txt
3  8 46 test.txt
[root@node1 test]# wc -c test.txt
46 test.txt
[root@node1 test]# wc -m test.txt
46 test.txt
[root@node1 test]# wc -l test.txt
3 test.txt
[root@node1 test]# wc -w test.txt
8 test.txt

[root@node1 test]# echo 'helloworld' >> test.txt
[root@node1 test]# wc -w test.txt
9 test.txt
[root@node1 test]#
20、head和tail
head [-num] 文件路径: 查看文件的头部几行 默认前10行 当然-num可以指定任意行数
tail [-num] 文件路径: 查看文件的尾部几行 默认后10行 当然-num可以指定任意行数
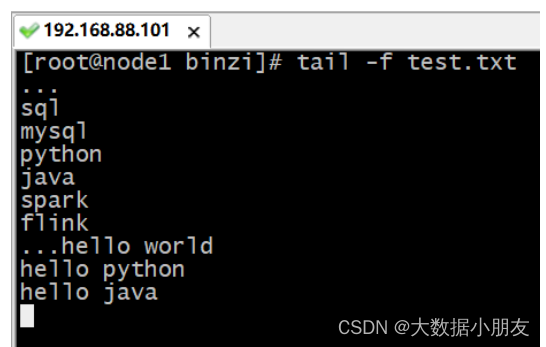
tail -f 文件路径: 常用。持续跟踪查看指定文件内部变化
[root@node1 binzi]# head test.txt
[root@node1 binzi]# head -3 test.txt

[root@node1 binzi]# tail test.txt
[root@node1 binzi]# tail -3 test.txt
[root@node1 binzi]# tail -f test.txt        注意: -f持续跟踪文件内容   可以使用ctrl+c退出
21、vi编辑器
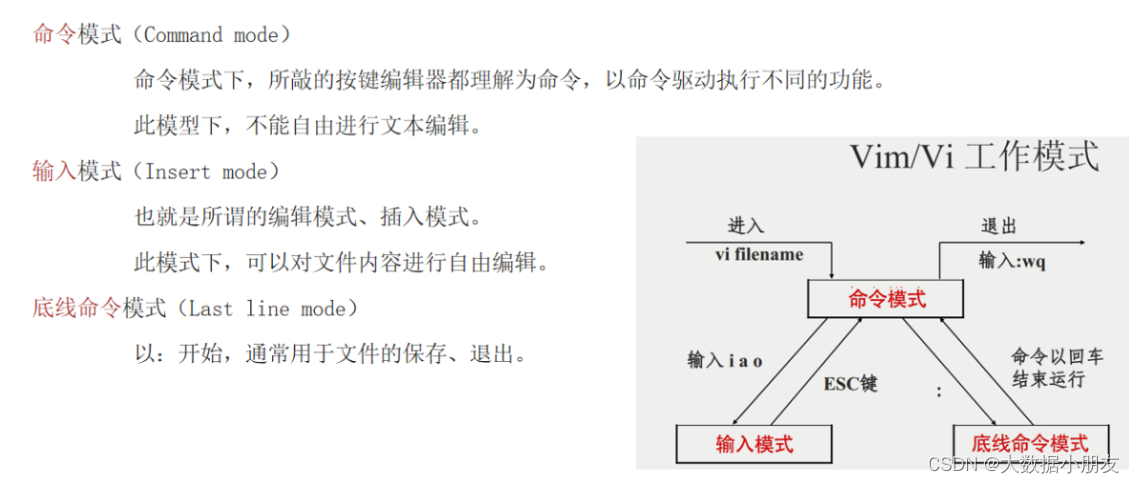
21.1 vi操作文件三大步
打开文件: vim 文件名.后缀名     注意: 如果文件存在就打开,不存在就创建

编辑文件: 输入i进入文件进行编辑

保存文件:
1.先进入命令模式: 按ESC键
2.进入底线命令模式: 输入冒号:
3.输入命令: w(保存)  q(退出)  q!(强制退出)  wq(保存并退出)   wq!(强制保存并退出)
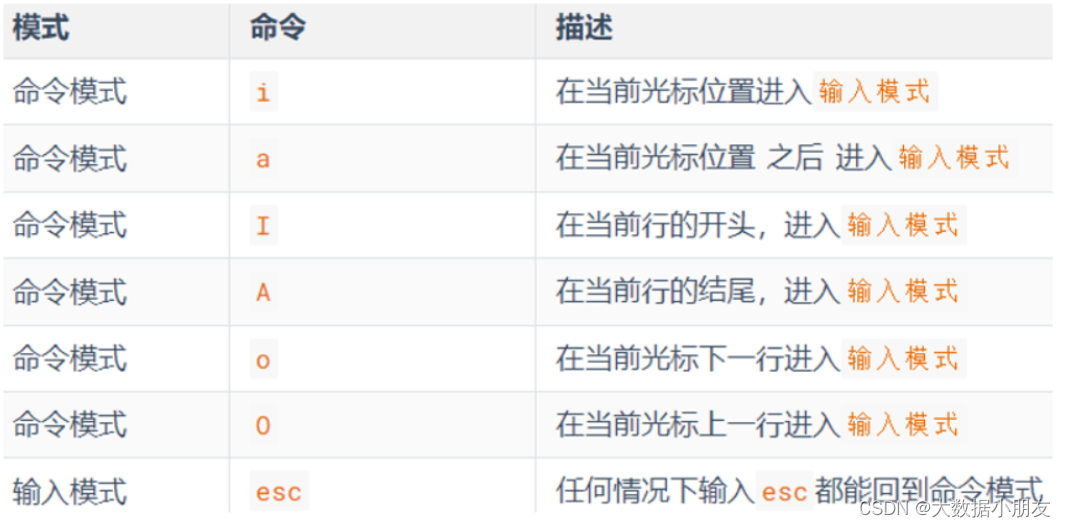
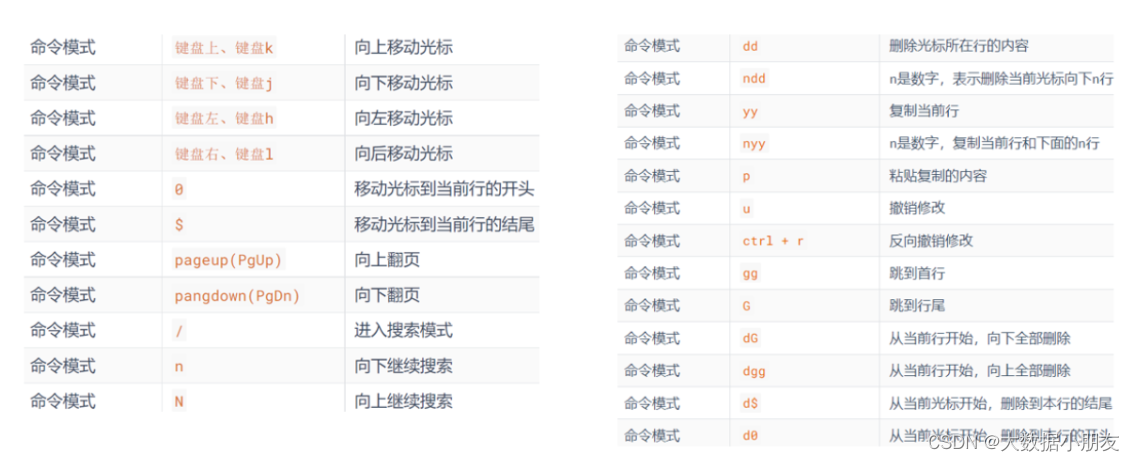
21.2 vi其他命令
五、shell编程(补充)
1、shell简介
Shell语言:是一个 C 语言编写的脚本语言,它是用户与 Linux 的桥梁

shell编程:通常指的是学习shell命令语法后,利用这套语法开发脚本程序,操作、访问内核服务。而不是使用C语言去编写一个shell程序。

shell解释器: unix默认sh,Linux的默认是Bash:全称是bash shell,bash兼容sh,针对sh编写的Shell代码可以不加修改地在bash中运行。
2、shell变量
shell中有3种变量: 用户变量、环境变量、特殊变量
用户变量在编程过程中使用量最多
环境变量主要是在程序运行时需要设置
特殊变量在对参数判断和命令返回值判断时会使用
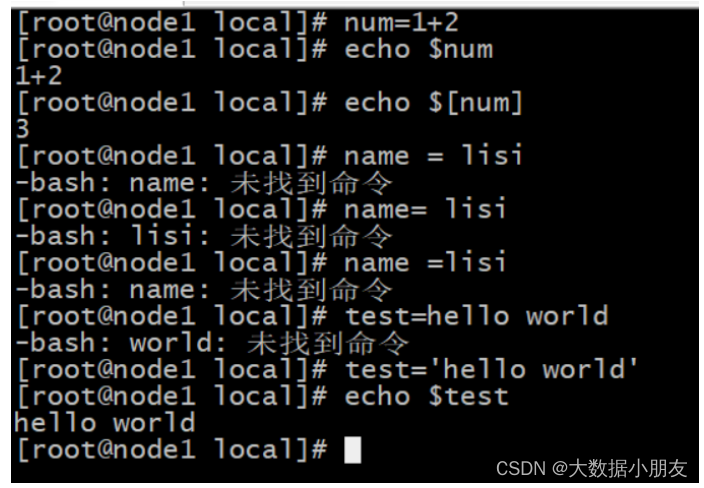
变量的定义语法: 变量名=变量值
变量的定义需遵循的规则
1)变量名可以由字母、数字和下划线组成,但是不能以数字开头,不能使用关键字
2)在 Bash中,变量的默认类型都是字符串型,如果要进行数值运算,则必须使用特殊命令
3)变量用等号"="连接值,"="左右两侧不能有空格。
4)变量值中如果有空格,则需要使用单引号或双引号包含,如 test="hello world!"
5)在变量值中,可以使用转义符"\"。
2.1、用户变量
定义普通变量: 变量名=变量值
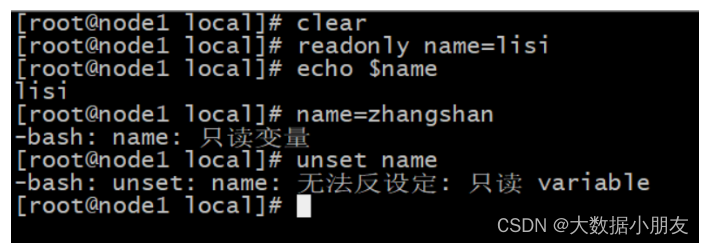
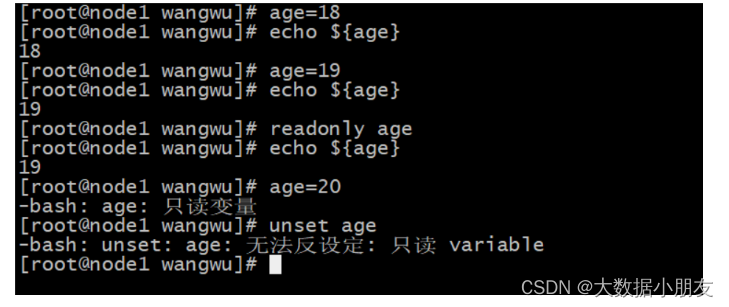
定义只读变量: readonly 变量名=变量值
注意:
1- 等号左右两边不能有空格
2- 普通变量和只读变量只在当前会话(session)/生命周期中有效。如果退出了,那么就没有了
3- 只读变量不能修改值
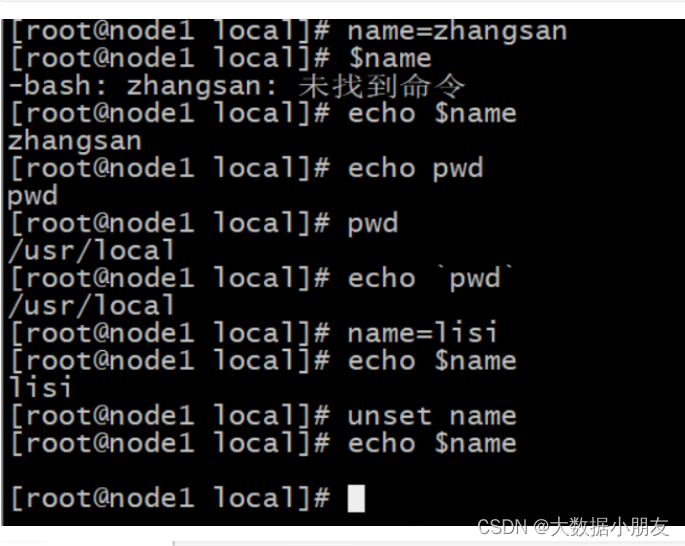
获取变量值: echo ${变量名} 或者 echo $变量名
删除普通变量: unset 普通变量名
修改普通变量值: 变量名=变量值
修改普通变量为只读变量: readonly 普通变量名
[root@cent1 test]# name = "张三"
bash: name: command not found...
[root@cent1 test]# name="张三"
[root@cent1 test]# echo name
name
[root@cent1 test]# echo $name
张三
[root@cent1 test]# echo $name
张三
[root@cent1 test]# echo $name666

[root@cent1 test]# echo ${name}666
张三666
[root@cent1 test]# unset name
[root@cent1 test]# echo ${name}666
666
[root@cent1 test]# echo ${name}

[root@cent1 test]# readonly age=18
[root@cent1 test]# echo $age
18
[root@cent1 test]# unset age
-bash: unset: age: cannot unset: readonly variable

[root@cent1 ~]# exit
logout

Last login: Sat Mar 18 09:03:37 2023 from 192.168.88.1
[root@cent1 ~]# echo $age
2.2、环境变量
环境变量: 是操作系统在运行的时候,记录的一些和系统相关的变量,用来辅助程序/shell脚本的运行
注意: 推荐环境变量的名称全部使用大写
查看系统记录的环境变量: env
常见的环境变量: HOSTNAME SHELL USER PATH ...
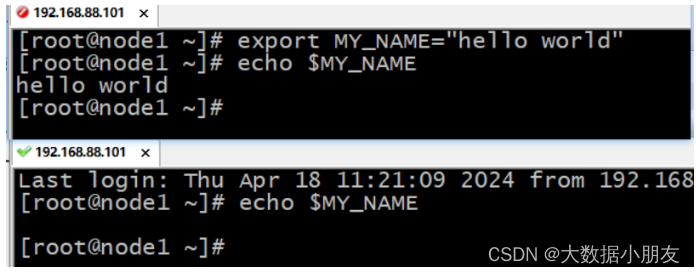
自定义环境变量格式: export 变量名=变量值
临时设置: 直接在命令行中写export 变量名=变量值
注意: 临时环境变量只在当前会话(session)/生命周期中有效。如果退出了,那么就没有了
永久设置:
1- /etc/profile文件中设置: 所有用户有效
2- ~/.bashrc文件中设置: 所属用户有效
注意: 让永久设置生效的两种方式
1- source 前面两个中对应的文件路径。推荐
例如: source /etc/profile
2- 重新连接当前会话(session)
[root@cent1 test22]# env
HOSTNAME=cent1
SHELL=/bin/bash
USER=root
PATH=/usr/local/sbin:/usr/local/bin:/usr/sbin:/usr/bin:/root/bin
[root@cent1 test22]# echo $SHELL
/bin/bash
[root@cent1 test22]# echo $USER
root
[root@cent1 test22]# echo $HOSTNAME
cent1
[root@cent1 test22]# echo $PATH
/usr/local/sbin:/usr/local/bin:/usr/sbin:/usr/bin:/root/bin
[root@cent1 test22]# env | grep PATH
PATH=/usr/local/sbin:/usr/local/bin:/usr/sbin:/usr/bin:/root/bin

[root@cent1 ~]# export ITHEIMA=666
[root@cent1 ~]# echo $ITHEIMA

[root@cent1 ~]# vim /etc/profile
...
# 文件最后一行添加并保存
export BIGDATA=666888
[root@cent1 ~]# source /etc/profile
[root@cent1 ~]# exit
logout
login
[root@cent1 ~]# echo $BIGDATA
666888
2.3、特殊变量
我们可以在执行 Shell 脚本时,向脚本传递参数,这时候可以使用特殊变量来获取参数
在执行Shell程序脚本时,可以向shell脚本动态传递参数。好处是某些配置属性不用写死在脚本中。
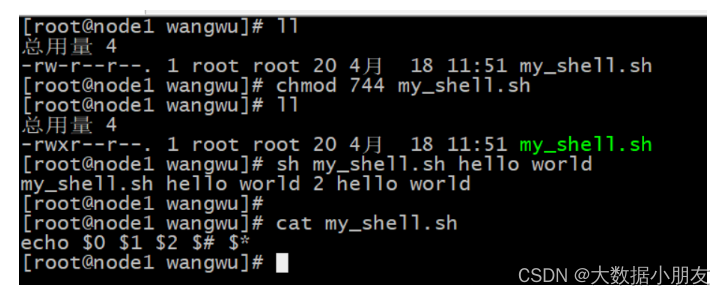
动态传递参数的方式: sh shell脚本文件 参数1 参数2 ...
Shell常用的特殊变量在shell脚本内部支持接收参数并使用:
$0: 得到shell脚本名称
$n: n是具体的数字,从1开始往后递增。获取对应位置的参数
$#: 传递给shell脚本的参数个数
$*: 将所有传递进来的参数使用字符串进行保存
echo $0 $1 $2 $# $*
2.4、三种变量对比总结
| 类型 | 频率 | 用途 |
|---|---|---|
| 用户变量 | 最多 | 临时定义变量。自己用的时候临时进行定义,可以在命令行也可以在shell脚本 |
| 环境变量 | 比较少 | 一般和linux软件安装配置有关。为了能够快速的执行某些脚本 |
| 特殊变量 | 比较少 | 主要是用来接收参数信息和内容 |
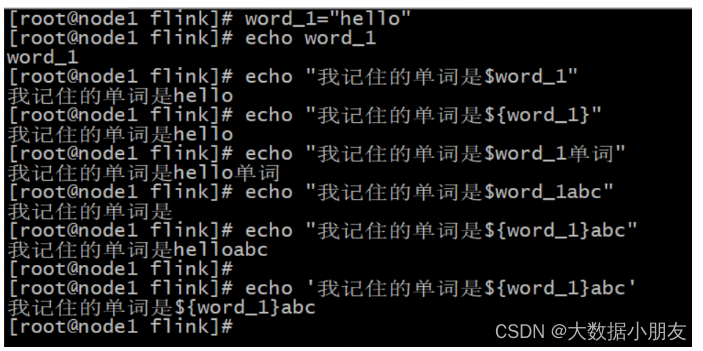
3、字符串数据类型
定义字符串: 变量名=变量值 变量名='变量值' 变量名="变量值"
建议: 推荐使用双引号,因为能够对特殊内容(例如linux命令)或者用户变量能够特殊的处理。而单引号里面全部当成普通字符串进行处理
示例:
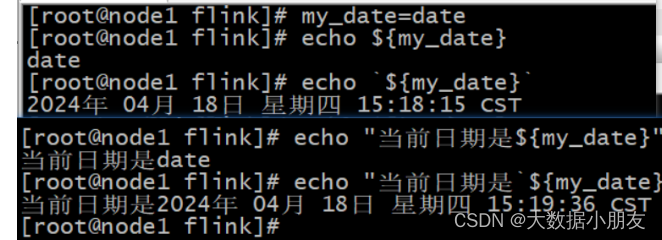
1- echo "当前我在的目录是`pwd`"
2- echo "我记住的单词是${word_1}abc"
[root@cent1 ~]# name=斌子
[root@cent1 ~]# age='18'
[root@cent1 ~]# gender="男人"
[root@cent1 ~]# echo $name $age $gender
斌子 28 男人
[root@cent1 ~]# echo '我的名字是${name} 年龄是${age} 性别是${gender}'
我的名字是${name} 年龄是${age} 性别是${gender}
[root@cent1 ~]# echo "我的名字是${name} 年龄是${age} 性别是${gender}"
我的名字是斌子 年龄是28 性别是男人
[root@cent1 ~]# echo "${name} ${age} ${gender}"
斌子 28 男人


[root@cent1 ~]# date
Sat Mar 18 11:51:16 CST 2023
[root@cent1 ~]# echo date
date
[root@cent1 ~]# echo `date`
Sat Mar 18 11:51:29 CST 2023

[root@cent1 ~]# now1=date
[root@cent1 ~]# echo $now1
date
[root@cent1 ~]# now2=`date`
[root@cent1 ~]# echo $now2
Sat Mar 18 11:52:17 CST 2023

[root@cent1 ~]# echo '现在的日期是${now2}'
现在的日期是${now2}
[root@cent1 ~]# echo '现在的日期是date'
现在的日期是date
[root@cent1 ~]# echo '现在的日期是`date`'
现在的日期是`date`

[root@cent1 ~]# echo "现在的日期是${now2}"
现在的日期是Sat Mar 18 11:52:17 CST 2023
[root@cent1 ~]# echo "现在的日期是`date`"
现在的日期是Sat Mar 18 11:56:58 CST 2023

4、shell命令和shell脚本
shell命令、shell脚本:本质上都是属于shell编程;
shell命令:倾向于在linux命令行中使用,适合逻辑简单场景;
shell脚本:倾向于在脚本文件中编写,适合复杂逻辑处理。
注意: 1.shell脚本文件一般以.sh结尾 2.文件第一行一般为#!/bin/bash
shell脚本的执行方式:
方式一:sh 脚本路径
注意: 脚本路径可以是相对,也可以是绝对路径
这种执行方式,脚本文件不需要具有可执行权限。
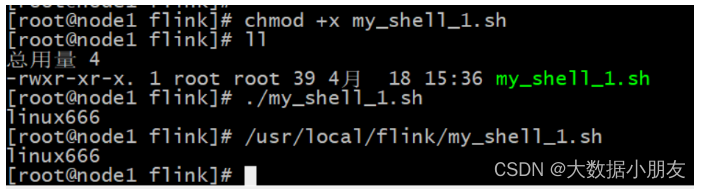
方式二:相对路径执行
格式: ./脚本路径
注意: 这种执行方式,必须保证脚本文件具有可执行权限。
方式三:绝对路径执行
格式: /脚本的绝对路径
注意: 这种执行方式,必须保证脚本文件具有可执行权限。
shell脚本也可以动态传参: sh 脚本 参数1 参数2 ... 注意: 脚本内部可以使用特殊变量获取
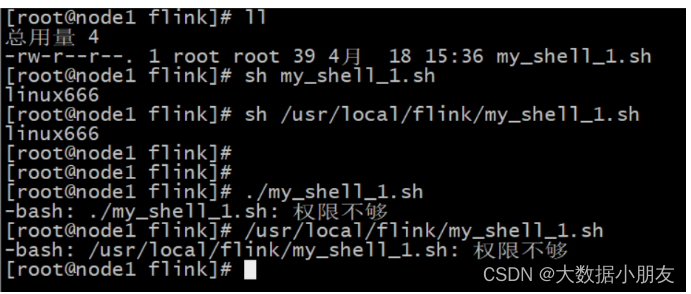
4.1、案例1:脚本中变量操作
创建一个my_shell_1.sh脚本文件,要求此脚本内先定义一个字符串变量str并赋值linux666,然后打印该字符串
最后保存并执行此脚本注意:
①shell脚本后缀名没有要求,通常以.sh结尾在shell中除了第一行的#表示特殊格式外,其他地方的#符号一般表示注释。
②#! 是一个约定的标记,它告诉系统
这个脚本需要什么解释器来执行
③相对路径方式如果不加./直接执行脚本
默认去系统环境变量中查找
my_shell_1.sh脚本内容如下:
#!/bin/bash

str=linux666

echo ${str}
4.2、案例2:脚本中获取参数
1.编写一个脚本文件my_shell_2.sh,在里面使用之前学习的特殊变量分别获取当前脚本文件名称,传入参数个数并分别获取对应参数内容
2.执行my_shell_2.sh脚本文件,传入3个参数分别为:张三 18 男
3.使用sh命令方式执行my_shell_2.sh脚本文件
my_shell_2.sh脚本内容:
#!/bin/bash

echo "脚本名称$0"
echo "第一个参数内容$1"
echo "第二个参数内容$2"
echo "第三个参数内容$3"
echo "参数个数$#"
echo "所有参数内容$*"


执行结果:
[root@node1 flink]# sh my_shell_2.sh zhangsan 18 nan
脚本名称my_shell_2.sh
第一个参数内容zhangsan
第二个参数内容18
第三个参数内容nan
参数个数3
所有参数内容zhangsan 18 nan
[root@node1 flink]# sh my_shell_2.sh "zhangsan 666" 18 nan
脚本名称my_shell_2.sh
第一个参数内容zhangsan 666
第二个参数内容18
第三个参数内容nan
参数个数3
所有参数内容zhangsan 666 18 nan
[root@node1 flink]#


 7602
7602

 被折叠的 条评论
为什么被折叠?
被折叠的 条评论
为什么被折叠?
 到【灌水乐园】发言


