


流程

首先我们需要一点一点演变,当然了不管怎么变DispatcherServlet在web.xml的搭载时不变的
<!DOCTYPE web-app PUBLIC
        "-//Sun Microsystems, Inc.//DTD Web Application 2.3//EN"
        "http://java.sun.com/dtd/web-app_2_3.dtd" >

<web-app>
    <!--过滤器解决post中文乱码问题-->
    <filter>
        <filter-name>encoding</filter-name>
        <filter-class>org.springframework.web.filter.CharacterEncodingFilter</filter-class>
        <init-param>
            <param-name>encoding</param-name>
            <param-value>UTF-8</param-value>
        </init-param>
    </filter>
    <filter-mapping>
        <filter-name>encoding</filter-name>
        <url-pattern>/*</url-pattern>
    </filter-mapping>
    <!--前端控制器-->
    <servlet>
        <servlet-name>dispatcher</servlet-name>
        <servlet-class>
            org.springframework.web.servlet.DispatcherServlet
        </servlet-class>
        <init-param>
            <param-name>contextConfigLocation</param-name>
            <param-value>WEB-INF/applicationContext.xml</param-value>
        </init-param>
        <!--开猫加载全部controller-->
        <load-on-startup>1</load-on-startup>
    </servlet>
    <servlet-mapping>
        <servlet-name>dispatcher</servlet-name>
        <url-pattern>/</url-pattern>
    </servlet-mapping>

</web-app>
那么DispatcherServlet就配置完了,我们看看SpringMVC最原始的一个版本
下面时applicationcontext.xml👇
<?xml version="1.0" encoding="UTF-8"?>
<beans xmlns="http://www.springframework.org/schema/beans"
       xmlns:xsi="http://www.w3.org/2001/XMLSchema-instance"
       xmlns:context="http://www.springframework.org/schema/context"
       xsi:schemaLocation="http://www.springframework.org/schema/beans
        http://www.springframework.org/schema/beans/spring-beans-4.0.xsd
        http://www.springframework.org/schema/context
        http://www.springframework.org/schema/context/spring-context-4.0.xsd">
    <!-- 处理器映射器 -->
	<bean class ="org.springframework.web.servlet.handler.BeanNameUrlHandlerMapping"></bean>
	<!-- 处理器适配器 -->
	<bean class ="org.springframework.web.servlet.mvc.SimpleControllerHandlerAdapter"></bean>
	<!-- 视图解析器 -->
	<bean class ="org.springframework.web.servlet.view.InternalResourceViewResolver"></bean>
	<!--处理器-->
	<bean name="/hello.action" class ="com.etoak.controller.HelloController"></bean>
</beans>
处理器映射器会拿着我们自己写的处理器生成一个Object类型的handle(我理解的就是我们处理器类型的一个对象),处理器适配器会拿着这个handle判断一下是不是符合自己本类的要求的处理器类型👇比如SimpleControllerHandlerAdapter(以下简称sc)这个处理器适配器就要求处理器实现Controller接口

如果是的话,它会执行处理器,并返回处理器方法的返回类型,比如sc 会拿着HelloController执行handleRequest这个方法,而我们仅仅是重写Controler接口的该方法,所以返回类型是SpringMVC的作者规定好的,我们如果用sc那么就要在处理器中返回ModelAndView

ok,那么ModelAndView是什么呢?试图解析器又是怎么解析的它?
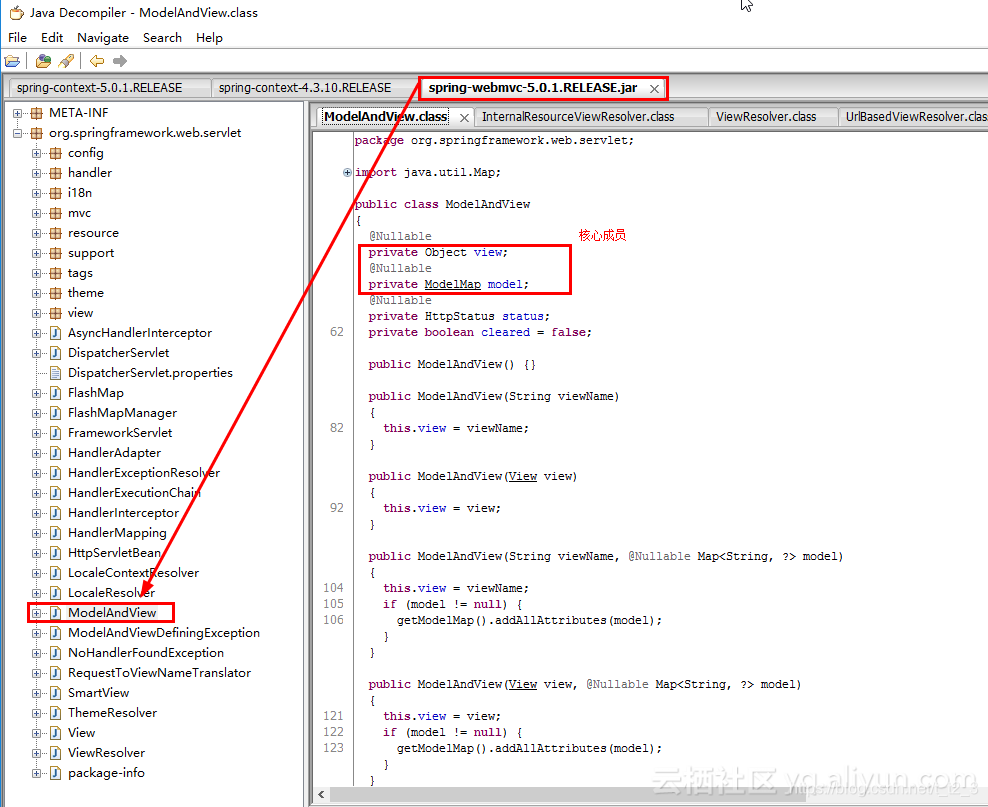
ModelAndView是Spring中标准的类,完全是Spring自己封装的对象。Spring API中如此描述这个对象:
public class ModelAndView extends java.lang.Object
Holder for both Model and View in the web MVC framework. Note that these are entirely distinct. This class merely holds both to make it possible for a controller to return both model and view in a single return value.
Represents a model and view returned by a handler, to be resolved by a DispatcherServlet. The view can take the form of a String view name which will need to be resolved by a ViewResolver object; alternatively a View object can be specified directly. The model is a Map, allowing the use of multiple objects keyed by name.
用人话解释一下ModelAndView是干什么用的,ModelAndView包含两部分:一个View和一个Model
View由setViewName()方法来决定,决定让ViewResolver去哪里找View文件,并找到是哪个jsp文件;
Model由addObject()方法来决定,它的本质是java的HashMap,键值对;
用人话来解释ModelAndView的功能就是,Model负责渲染View找到的文件,让你找到代表View的jsp,用Model去渲染jsp中的页面。
其他处理器适配器和处理器映射器
三种种处理器适配器
SimpleServletHandlerAdpter
看到了吧它需要我们的处理器是一个Serlet实现类,所以

HttpRequestHandlerAdapter
它需要我们的处理器实现HttpRequestHandler接口

RequestMappingHandlerAdapter
这个处理器映射器不要求我们的Controller实现或者继承任何的接口或父类所以一般搭配RequestMappingHandlerMapping和扫描器使用(下面会说)

三种处理器映射器
首先处理器映射器是服务与我们的处理器的,这三种类型无非就是按照处理器的某些属性来分配路由
SimpleUrlHandlerMapping
根据bean的id分配路由
 <bean class="org.springframework.web.servlet.handler.SimpleUrlHandlerMapping" >
<!--怎么调set方法-->
     <property name="mappings">
         <props>
             <prop key="/hello">helloController</prop>
         </props>
     </property>
  </bean>
  <!--配置处理器-->
	<bean id="helloController" class="com.etoak.Controlelr.HelloController"></bean>
BeanNameUrlHandlerMapping
根据bean的name分配路由
<bean class ="org.springframework.web.servlet.handler.BeanNameUrlHandlerMapping">
</bean>
<bean name="/hello.action" class ="com.etoak.controller.HelloController"></bean>
RequestMappingHandlerMapping
开始使用扫描仪扫描包中的@Controller@RequetMapping注解,根据注解分配路由,而加上@Controller之后我们的处理器不需要再实现任何接口,所以它一定要求处理器适配器用RequestMappingHandlerAdapter(因为它对处理器没有要求)
<bean class="org.springframework.web.servlet.mvc.method.annotation.RequestMappingHandlerMapping"></bean>
注解扫描器
<context:component-scan base-package="com.etoak"></context:component-scan>
最终版
<?xml version="1.0" encoding="UTF-8"?>
<beans xmlns="http://www.springframework.org/schema/beans"
       xmlns:xsi="http://www.w3.org/2001/XMLSchema-instance"
       xmlns:context="http://www.springframework.org/schema/context"
       xmlns:mvc="http://www.springframework.org/schema/mvc"
       xsi:schemaLocation="http://www.springframework.org/schema/beans
        http://www.springframework.org/schema/beans/spring-beans-4.0.xsd
        http://www.springframework.org/schema/context
        http://www.springframework.org/schema/context/spring-context-4.0.xsd
         http://www.springframework.org/schema/mvc
        http://www.springframework.org/schema/mvc/spring-mvc-4.0.xsd
">
	<!--扫描注解@Controller@RequestMapping-->
    <context:component-scan base-package="com.etoak"></context:component-scan><!--扫描@Controller自动找配置器-->
	<!--自动创建出上述两种处理器适配器和3中处理器映射器 需要哪个用哪个-->
    <mvc:annotation-driven></mvc:annotation-driven>
    <!--加载静态资源-->
    <mvc:default-servlet-handler></mvc:default-servlet-handler><!--静态资源加载-->
    <!--视图解析器-->
    <bean class="org.springframework.web.servlet.view.InternalResourceViewResolver">
    	<!--前缀-->
        <property name="prefix" value="/jsps/"></property>
        <!--后缀-->
        <property name="suffix" value=".jsp"></property>
    </bean>
</beans>
六种处理器的接收参数的类型
我们的视图解析器支持六大返回类型
1 Servlet
  @RequestMapping("/servlet")
    public String servlet(HttpServletRequest req, HttpServletResponse resp){
        String name =req.getParameter("name");
        System.out.println("name" +name);
        //向request域传值
        req.setAttribute("result","使用HttpServletRequest向Request域传递数据 "+name);
        //
        return "param";//==mv.setViewName("param")
    }
2 基本数据类型
    @RequestMapping("/simple")
    public ModelAndView simple(@RequestParam(required = false,defaultValue = "100") int id, @RequestParam String name){
        ModelAndView mv =new ModelAndView();
        String idAndName =id +"\t"+name;
        System.out.println(idAndName);
        mv.addObject("result" ,"使用ModelAndView向Request传递数据 "+idAndName);
        mv.setViewName("param");
        return mv;
    }
3 数组
    //第三种接收参数的方式 使用model
    @RequestMapping(value = "/array",method = RequestMethod.POST)
    public String array(String[] hobbies, Model model){
        for (String hobby : hobbies) {
            System.out.println(hobby);
        }
        model.addAttribute("result" ,"使用Model向request传递数据");
        return "param";
    }
4集合list
    @PostMapping("/list")
    //当请求头是content-Type 是application/x-www/form-urlencoded(from),并且List参数写在方法参数时必须加@RequestParam
    public String list(@RequestParam List<String> hobbies, ModelMap modelMap){
        hobbies.forEach(x-> System.out.println(x));
        modelMap.addAttribute("result","使用ModelMap向Request域传值");
        return "param";
    }
5 bean类
    @PostMapping("/bean")
    public String bean(Student student, Map<String,Object> map){
        System.out.println(student);
        map.put("result","使用Map向request域传值");
        return "param";
    }
6 map
   @PostMapping("/map")
    public void map(@RequestParam Map<String,Object> map,HttpServletResponse resp) throws IOException {
        //怎么返回一个字符串 纯文本
        System.out.println(map);
        resp.setCharacterEncoding("UTF-8");
        resp.setContentType("text/plain;charset=UTF-8");
        PrintWriter pw = resp.getWriter();
        pw.print("success");
        pw.flush();
        pw.close();
    }
总结
前后端不分离的Springmvc就这些内容啦 原创不易,喜欢记得点赞哦


 1291
1291

 被折叠的 条评论
为什么被折叠?
被折叠的 条评论
为什么被折叠?
 到【灌水乐园】发言


