


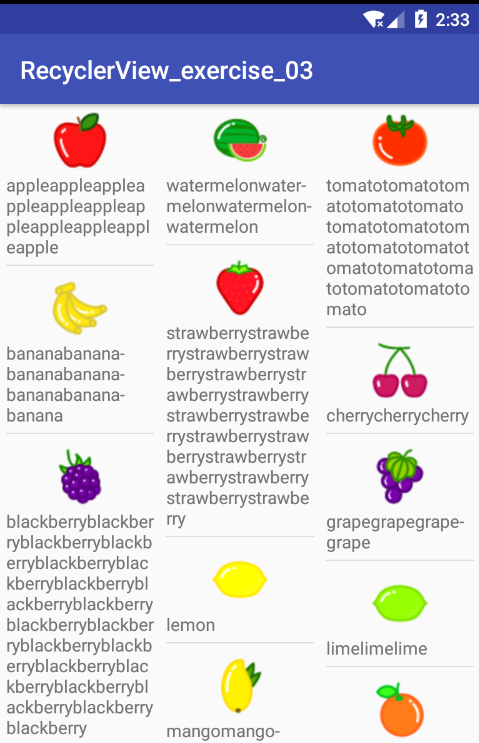
前两天在继续熟悉和记忆RecyclerView的时候,练习完Vertical和Horizontal后,新开了一个工程继续练习瀑布流。正常来说我想要得到的效果图是:
然而我得到了效果图是:
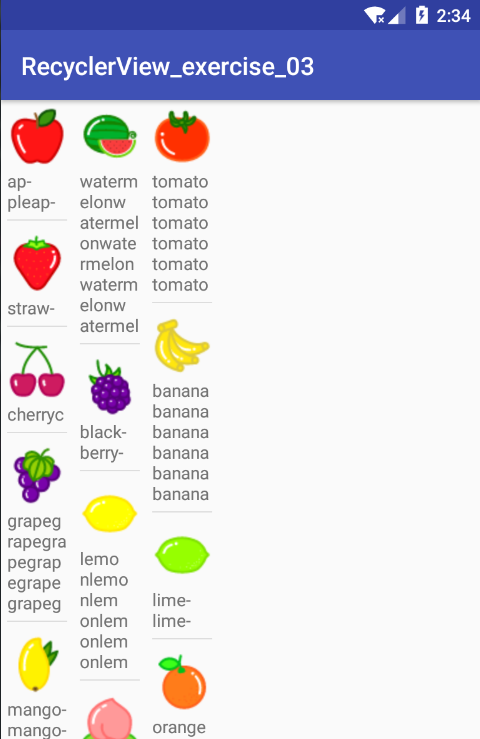
检查了一边xml文件,发现我放置RecyclerView的activity_main中使用了默认的constraintLayout,没有改成LinearLayout,虽然我检查了把recyclerview、constraintLayout和fruit_item都改成了宽为match_parent,但好像并没有起作用。改为了LinearLayout后则一切正常,因此这次就大致看看constraintLayout是何方妖怪。
************************************
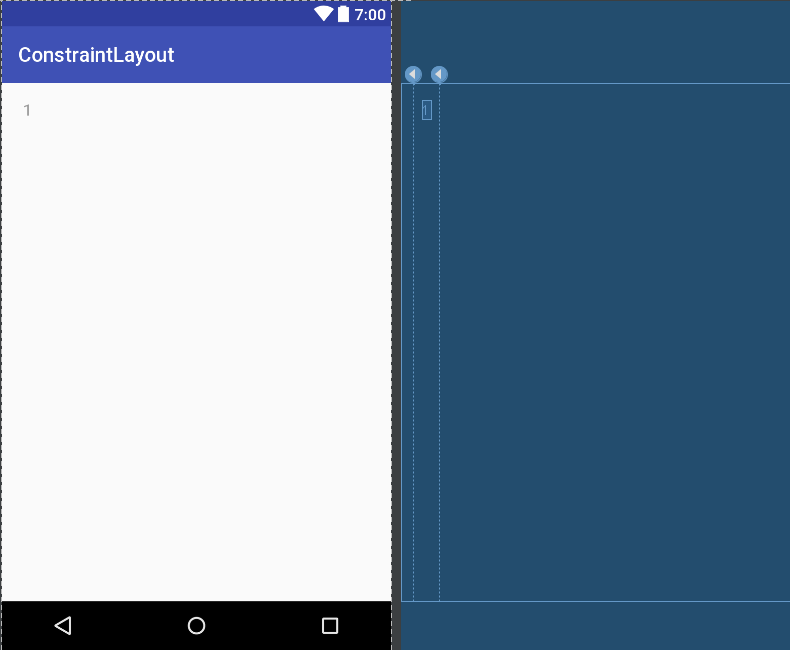
ConstrainLayout——约束性布局,在打开design面板后会有两个界面。左边是预览的效果图,右边蓝图则是可以查看各个控件关系、属性的图。
整个布局的用法主要靠和别的控件或者和父布局之间的约束关系进行操作,使用起来像RelativeLayout。因此可以利用RelativeLayout的使用方法去记忆这个布局的使用方法。
我目前使用到的ContraintLayout的注意点有:
1、match_parent不起作用
match_parent这个属性将不会在ConstraintLayout之中得到实现。来看看使用match_parent和使用控件约束的写法和效果:
<?xml version="1.0" encoding="utf-8"?>
<android.support.constraint.ConstraintLayout xmlns:android="http://schemas.android.com/apk/res/android"
    xmlns:app="http://schemas.android.com/apk/res-auto"
    xmlns:tools="http://schemas.android.com/tools"
    android:layout_width="match_parent"
    android:layout_height="match_parent"
    tools:context="com.example.tahlia.myapplication.MainActivity">

    <ImageView
        android:id="@+id/match_parent"
        android:layout_width="368dp"
        android:layout_height="20dp"
        android:background="#ff0000"
        tools:layout_editor_absoluteY="0dp"
        tools:layout_editor_absoluteX="8dp" />

    <ImageView
        android:id="@+id/constraintLayout"
        android:layout_width="0dp"
        android:layout_height="20dp"
        android:background="#ffff00"
        app:layout_constraintLeft_toLeftOf="parent"
        app:layout_constraintRight_toRightOf="parent"
        app:layout_constraintTop_toBottomOf="@+id/match_parent"/>

</android.support.constraint.ConstraintLayout>
※ 11行中我所写的是match_parent,但编辑器会自动进行更正。14、15行也同样是编辑器自动加入的定位。
代码中把宽度设定成了0dp,并不是说宽度就是0dp,而是说明这个控件的宽度由其他条件进行约束。这有点像线性布局里使用weight进行排布时,宽度也设定成0dp一样,不是说宽度就是0dp,只是宽度将会由别的条件进行设定。来看看效果:
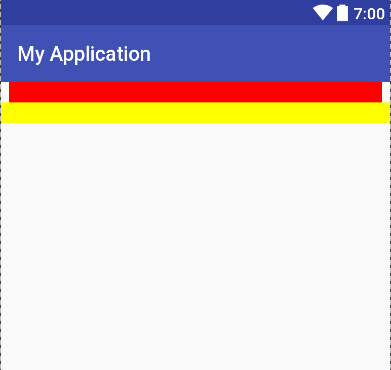
这里就可以清楚地看见两者之间的差别了。在ConstraintLayout中使用match_parent并不能达到填充满父布局的效果,而是由编辑器自动更正成一个数值。想要实现match_parent,解决办法则是使用约束对齐实现。
app:layout_constraintLeft_toLeftOf="parent"
app:layout_constraintRight_toRightOf="parent"
app:layout_constraintTop_toBottomOf="@+id/match_parent"/>
※ 这三行代码分别表示:
表示将当前控件(当前的ImageView)的左边缘 与 父布局的左边缘 对齐
将当前控件(当前的ImageView)的右边缘 与 父布局的右边缘 对齐
将当前控件(当前的ImageView)的上边缘 与 id为match_parent的控件的下边缘 对齐
至于match_parent的x位置的8dp,貌似是默认的数值。
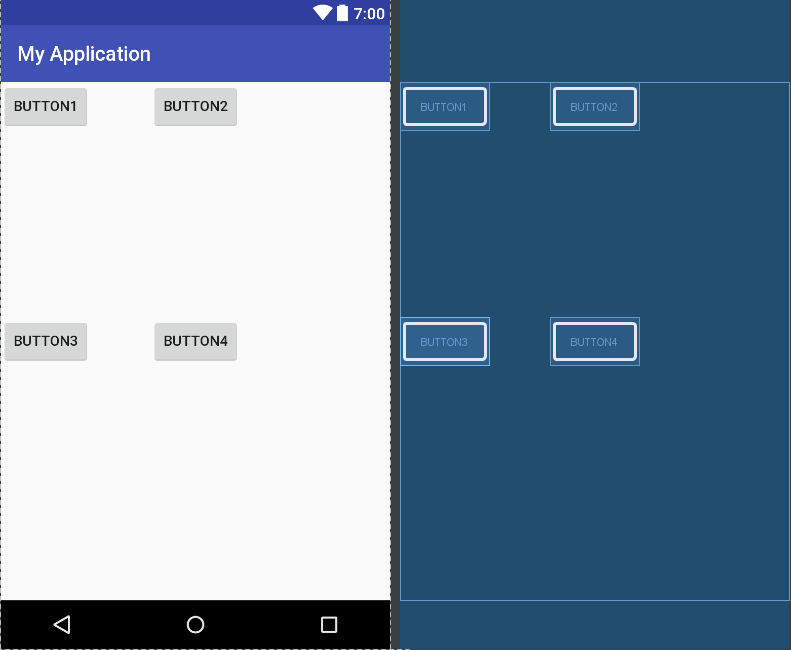
2、控件使用约束进行居中
在RelativeLayout中,如果想要一个控件进行居中的话,我们可以使用layout_centervertical="true"、layout_centerHorizontal="true"、centerInParent="true"进行设定。在ConstraintLayout中,则是通过以下语句进行设定:
<Button
        android:id="@+id/button1"
        android:layout_width="wrap_content"
        android:layout_height="wrap_content"
        android:text="button1" />

    <Button
        android:id="@+id/button2"
        android:layout_width="wrap_content"
        android:layout_height="wrap_content"
        android:text="button2"
        app:layout_constraintLeft_toLeftOf="parent"
        app:layout_constraintRight_toRightOf="parent"/>

    <Button
        android:id="@+id/button3"
        android:layout_width="wrap_content"
        android:layout_height="wrap_content"
        android:text="button3"
        app:layout_constraintTop_toTopOf="parent"
        app:layout_constraintBottom_toBottomOf="parent"/>

    <Button
        android:id="@+id/button4"
        android:layout_width="wrap_content"
        android:layout_height="wrap_content"
        android:text="button4"
        app:layout_constraintLeft_toLeftOf="parent"
        app:layout_constraintRight_toRightOf="parent"
        app:layout_constraintTop_toTopOf="parent"
        app:layout_constraintBottom_toBottomOf="parent"/>
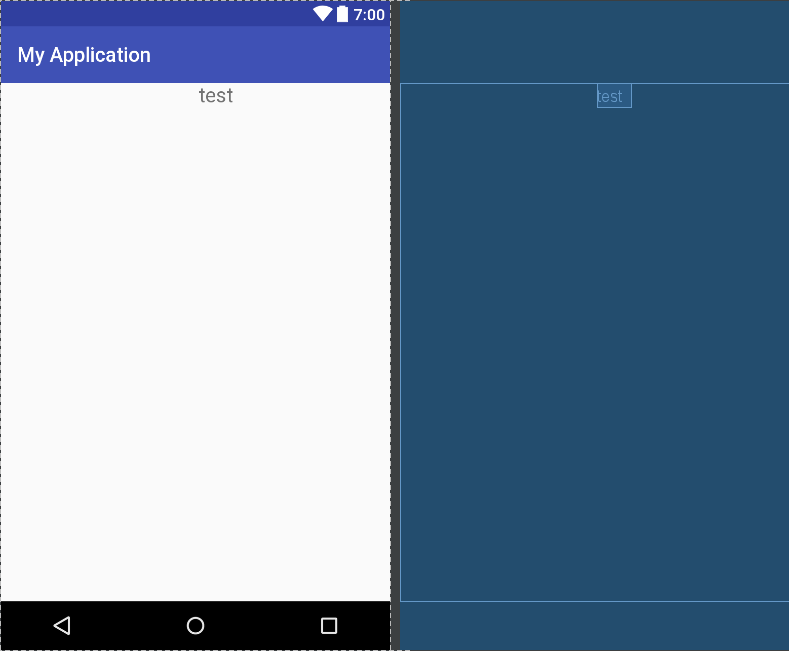
3、margin的使用
尽管match_parent不起作用了,但margin仍是可以起作用的。只不过用法上需要改变一下。按照我猜测的写法,代码如下:
<TextView
        android:layout_width="wrap_content"
        android:layout_height="wrap_content"
        app:layout_constraintLeft_toLeftOf="parent"
        app:layout_constraintRight_toRightOf="parent"
        android:text="test"
        android:textSize="20sp"
        android:layout_marginTop="20dp"/>
文本居中,然后marginTop设置为20dp,来看看效果:

从布局蓝图中看到,marginTop并没有起作用。这里是因为在ConstraintLayout中,需要对控件进行约束(也就是要有控件依赖的对象)。这里我们制定了控件左右约束,实现了水平居中效果,但我们并没有为文本设定上下的约束,margin并没有依赖对象,导致了文本的marginTop不起作用。为了验证,对左右已经约束了的控件进行margin操作,在这个TextView中加入:marginLeft="40dp",效果如下:
明显能看出来Textview的左右距离不一样了。那么为了令我们的marginTop同样起效果,将代码改为:
<TextView
        android:layout_width="wrap_content"
        android:layout_height="wrap_content"
        app:layout_constraintLeft_toLeftOf="parent"
        app:layout_constraintRight_toRightOf="parent"
        android:text="test"
        android:textSize="20sp"
        android:layout_marginTop="20dp"
        app:layout_constraintTop_toTopOf="parent"/>			->多加了这一行约束
来看看效果:

这里看到,marginTop已经起作用啦!
4、偏移
如果我们想让一个控件在居中的确情况之下往上下左右进行偏移的话,上面有一个方法,就是使用margin。但是ConstraintLayout有一个更好的属性,就是bias(偏移)。在ConstraintLayout中,控件有两个属性,app:layout_constraintHorizontal_bias和app:layout_constraintVerticall_bias,取值为0,0.1…1。同样的,需要在被约束的情况之下才会起作用。来看代码:
<TextView
        android:id="@+id/no_bias"
        android:layout_width="wrap_content"
        android:layout_height="wrap_content"
        app:layout_constraintLeft_toLeftOf="parent"
        app:layout_constraintRight_toRightOf="parent"
        android:text="no bias"/>

    <TextView
        android:id="@+id/bias_0.5"
        android:layout_width="wrap_content"
        android:layout_height="wrap_content"
        app:layout_constraintLeft_toLeftOf="parent"
        app:layout_constraintRight_toRightOf="parent"
        app:layout_constraintTop_toBottomOf="@id/no_bias"
        app:layout_constraintHorizontal_bias="0.5"
        android:text="0.5bias"/>

    <TextView
        android:id="@+id/bias_0.2"
        android:layout_width="wrap_content"
        android:layout_height="wrap_content"
        app:layout_constraintLeft_toLeftOf="parent"
        app:layout_constraintRight_toRightOf="parent"
        app:layout_constraintTop_toBottomOf="@id/no_bias"
        app:layout_constraintHorizontal_bias="0.2"
        android:text="0.2bias"/>

    <TextView
        android:id="@+id/bias_0.8"
        android:layout_width="wrap_content"
        android:layout_height="wrap_content"
        app:layout_constraintLeft_toLeftOf="parent"
        app:layout_constraintRight_toRightOf="parent"
        app:layout_constraintTop_toBottomOf="@id/no_bias"
        app:layout_constraintHorizontal_bias="0.8"
        android:text="0.8bias"/>
这里设置了4个TextView,分别是没有设置偏移,偏移0.2、0.5、0.8的对比。效果如下:

可以看出居中其实就是偏移0.5,两者的效果是相同的。当然了,在这里我只设置了左右的约束,在没有设置上下约束的情况下,使用constraintVertical_bias并不起任何作用。
*************************


 1390
1390

 被折叠的 条评论
为什么被折叠?
被折叠的 条评论
为什么被折叠?
 到【灌水乐园】发言


