


命令模式
定义:将请求封装成对象,以便使用不同的请求队列或者日志来参数化其它对象。
命令模式把发出命令和执行命令的责任分隔开,委派给不同的对象,减少之间的耦合。允许请求方与发送方独立开来,请求方并不需要知道接收请求的方的接口。
也就是说行为请求者与行为实现者之间呈现的松耦合
1、以餐厅点餐为例,服务员不需要知道客户点的是什么,他只要负责将菜单交给厨师就ok了,下面,我们利用一个打开电灯为例来说明简单的命令模式:
    //首先我们来看一个电灯的例子
    class Light
    {
        String strDescription = "";
        public Light()
        { }
        public Light(String strDesc)
        {
            strDescription = strDesc;
        }
        public void on()
        {
            Console.WriteLine(strDescription + " Light is on");
        }
        public void off()
        {
            Console.WriteLine(strDescription + " light is off");
        }
    }
    interface Command
    {
        void execute();
        //public void on();
    }

    //假设要打开电灯的命令。使用on与off
    class LightOnCommand : Command
    {
        Light light;
        public LightOnCommand(Light light)
        {
            this.light = light;
        }

        public void execute()
        {
            light.on();
        }
        public void undo()//撤销的命令与执行的命令正好相反
        {
            light.off();
        }
    }

    class LightoffCommand : Command
    {
        Light light;
        public LightoffCommand(Light light)
        {
            this.light = light;
        }
        public void execute()
        {
            light.off();
        }
        public void undo()
        {
            light.on();
        }
    }

    class SimpleRemoteControl
    {
        public Command slot;
        public SimpleRemoteControl() { }
        public void setCommand(Command command)
        {
            slot = command;
        }
        public void buttonWasPressed()
        {
            slot.execute();
        }
    }
上面是调用的方式,从中我们可以看见远程控制对象在选择了操作对象之后,只要下达命令,具体的对象就能够正确的执行。
UML图为:

SimpleControl内设置一个Command对象,就能够进行操作。
2、那么能不能实现一组动作呢,进一步的根据不同的装备但是客户无需知道具体的执行步骤。
//下面对一个遥控器进行扩展,假设遥控器中有很多的插槽,每个的按键都对应着不同的功能。
    class NoCommand : Command
    {
        public void execute() { }
    }

    class RemoteControl
    {
        Command[] onCommands;
        Command[] offCommands;//为了简略,只控制两个电器
        public RemoteControl()
        {
            onCommands = new Command[3];
            offCommands = new Command[3];
            Command noCommand = new NoCommand();
            for (int i = 0; i < 2; i++)
            {
                onCommands[i] = noCommand;
                offCommands[i] = noCommand;
            }
        }
        //此函数接收不同的插槽中的打开与关闭的命令
        public void setCommand(int slot, Command onCommand, Command offCommand)
        {
            onCommands[slot] = onCommand;
            offCommands[slot] = offCommand;
        }
        public void onButtonWasPushed(int slot)
        {
            if (onCommands[slot] != null)
            {
                onCommands[slot].execute();
            }
        }
        public void offButtonWasPushed(int slot)
        {
            if (offCommands[slot] != null)//检查插槽是否加载了命令。
            {
                offCommands[slot].execute();
            }
        }

        public String toString()
        {
            StringBuilder stringBuilder = new StringBuilder();
            stringBuilder.Append("\n-----Remote Control -----\n");
            for (int i = 0; i < onCommands.Length; i++)
            {
                stringBuilder.Append("\n[slot" + i + "]  " + onCommands[i].GetType().Name + "  " + offCommands[i].GetType().Name);
            }
            return stringBuilder.ToString();
        }
    }


    //添加一个音响类
    class Stereo
    {
        String strDescription = "";
        public Stereo() { }
        public Stereo(String strDescription)
        {
            this.strDescription = strDescription;
        }

        public void on()
        {
            Console.WriteLine(strDescription + " stereo is on");
        }
        public void off()
        {
            Console.WriteLine(strDescription + " stereo is off");
        }
        public void setCd()
        {
            Console.WriteLine(strDescription + " stereo is set for CD input");

        }
        public void setDvd() { }
        public void setRadio() { }
        public void setVolume()
        {
            Console.WriteLine(strDescription + " stereo is set for Volume ");
        }
    }

    //相应的加入音响的命令类
    class StereoOnCommand : Command
    {
        Stereo stero;
        public StereoOnCommand(Stereo stero)
        {
            this.stero = stero;
        }
        public void execute()
        {
            stero.on();
            stero.setCd();//打开CD
            stero.setVolume();//调节音量
        }
    }
    class StereoOffCommand : Command
    {
        Stereo stereo;
        public StereoOffCommand(Stereo stereo)
        {
            this.stereo = stereo;
        }
        public void execute()
        {
            stereo.off();
        }
    }
//遥控器的例子
RemoteControl remoteControl = new RemoteControl();
//将所有的装置创建在合适的位置
Light livingRoomLight = new Light("Living Room");//卧室的灯
Light kitchenLight = new Light("Kitchen");//厨房的灯
Stereo stereo = new Stereo("Living Room");
//创建所有的电灯命令对象
LightOnCommand livingRoomLightOn = new LightOnCommand(livingRoomLight);
LightoffCommand livingRoomLightOff = new LightoffCommand(livingRoomLight);
LightOnCommand kitchenLightOn = new LightOnCommand(kitchenLight);
LightoffCommand kitchenLightOff = new LightoffCommand(kitchenLight);
//创建音响的开关命令
StereoOnCommand stereoOn = new StereoOnCommand(stereo);
StereoOffCommand stereoOff = new StereoOffCommand(stereo);
remoteControl.setCommand(0, livingRoomLightOn, livingRoomLightOff);
remoteControl.setCommand(1, kitchenLightOn, kitchenLightOff);
remoteControl.setCommand(2, stereoOn, stereoOff);
Console.WriteLine(remoteControl.toString());
Console.WriteLine();
//发出命令
remoteControl.onButtonWasPushed(0);
remoteControl.onButtonWasPushed(1);
remoteControl.onButtonWasPushed(2);
Console.WriteLine();
remoteControl.offButtonWasPushed(0);
remoteControl.offButtonWasPushed(1);
remoteControl.offButtonWasPushed(2);对应的UML图为:
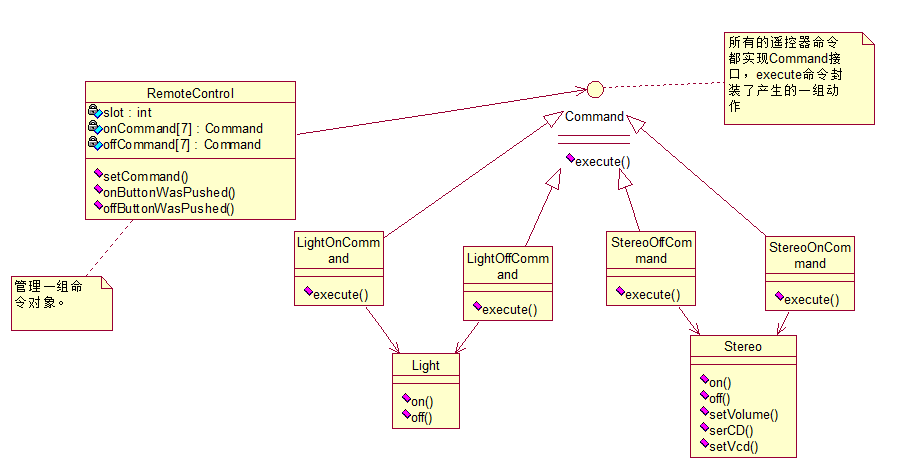
运行结果为:
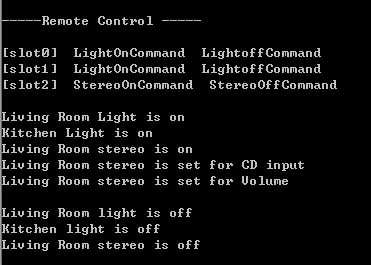
可见添加的控制类实现了对所有电器的封装,那么命令者模式有什么好处呢?
主要的为将执行动作给独立出来,封装下面的接口,因为执行动作对象并不是操作的对象,因此,利用Command这个中间类来解耦合。现在的疑问是,为什么不直接让命令者去做这些事情呢,而是分开添加装置与执行命令这两个方法。个人的理解是,通过这种方法你可以对这些对象进行更多的操作,比如你要对它们的动作进行撤销,而不仅仅是执行。书中的解释是:尽量设计“傻瓜”命令对象,它只能理解调用接受者的一个行为。
那么现在还存在的一个问题是,如何能够实现撤销的动作,其实主要的命令模式的本质已经讲完了。在于通过命令对象之间的沟通。在实际应用中有没有这种命令呢。书中谈及工作队列,让我想起MFC中的消息队列这个机制,同样它也是将所有的消息放在队列中,通过不断的获取消息->翻译消息->执行消息。那么这个执行消息对于消息队列来说,它是不能够获知的。因为消息包括窗口消息、控件通知、命令消息,不同的执行内容不一。作为消息队列,只需触发该消息即可。
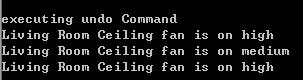
3、撤销动作
  interface Command1
    {
        void execute();
        void undo();
    }
    class NoCommand1 : Command1
    {
        public void execute() { }
        public void undo() { }
    }
    class RemoteControlWithUndo
    {
        Command1[] onCommands;
        Command1[] offCommands;
        Command1 undoCommand;
        int slotNum;
        public RemoteControlWithUndo(int slotNum)
        {
            onCommands = new Command1[slotNum];
            offCommands = new Command1[slotNum];
            Command1 noCommand = new NoCommand1();

            for (int i = 0; i < slotNum; i++)
            {
                onCommands[i] = noCommand;
                offCommands[i] = noCommand;
            }
            undoCommand = noCommand;
        }

        public void setCommand(int slot, Command1 onCommand, Command1 offCommand)
        {
            onCommands[slot] = onCommand;
            offCommands[slot] = offCommand;
        }
        //关键思想是设置了一个撤销的命令,得到当前操作的插槽号,据此执行撤销命令
        public void onButtonWasPushed(int slot)
        {
            onCommands[slot].execute();
            undoCommand = offCommands[slot];
        }

        public void offButtonWasPushed(int slot)
        {
            offCommands[slot].execute();
            undoCommand = onCommands[slot];
        }
        public void undoButtonWasPushed()
        {
            undoCommand.execute();
        }
    }

    //下面我们测试一个电扇,因为电扇有很多的状态,如何实现它的撤销功能呢??

    class CeilingFun
    {
        public const int HIGH = 3;
        public const int MEDIUM = 2;
        public const int LOW = 1;
        public const int OFF = 0;
        String location;
        int speed;

        public CeilingFun(String location)
        {
            this.location = location;
            speed = OFF;
        }

        public void high()
        {
            speed = HIGH;
            Console.WriteLine(location + " Ceiling fan is on high");
        }
        public void medium()
        {
            speed = MEDIUM;
            Console.WriteLine(location + " Ceiling fan is on medium");
        }
        public void low()
        {
            speed = LOW;
            Console.WriteLine(location + " Ceiling fan is on low");
        }
        public void off()
        {
            speed = OFF;
            Console.WriteLine(location + " Ceiling fan is on off");
        }
        //获取当前的速度
        public int getSpeed()
        {
            return speed;
        }
    }
    class CeilingFanHighCommand : Command1
    {
        CeilingFun ceilingFun;
        int prevSpeed;
        public CeilingFanHighCommand(CeilingFun ceilingFun)
        {
            this.ceilingFun = ceilingFun;
        }
        public void execute()
        {
            prevSpeed = ceilingFun.getSpeed();
            ceilingFun.high();
        }
        public void undo()
        {
            if (prevSpeed == CeilingFun.HIGH)
            {
                ceilingFun.high();
            }
            else if (prevSpeed == CeilingFun.MEDIUM)
            {
                ceilingFun.medium();
            }
            else if (prevSpeed == CeilingFun.LOW)
            {
                ceilingFun.low();
            }
            else if (prevSpeed == CeilingFun.OFF)
            {
                ceilingFun.off();
            }
        }
    }
    class CeilingFanMediumCommand : Command1
    {
         CeilingFun ceilingFun;
        int prevSpeed;
        public CeilingFanMediumCommand(CeilingFun ceilingFun)
        {
            this.ceilingFun = ceilingFun;
        }
        public void execute()
        {
            prevSpeed = ceilingFun.getSpeed();
            ceilingFun.medium();
        }
        public void undo()
        {
            if (prevSpeed == CeilingFun.HIGH)
            {
                ceilingFun.high();
            }
            else if (prevSpeed == CeilingFun.MEDIUM)
            {
                ceilingFun.medium();
            }
            else if (prevSpeed == CeilingFun.LOW)
            {
                ceilingFun.low();
            }
            else if (prevSpeed == CeilingFun.OFF)
            {
                ceilingFun.off();
            }
        }
    }
    public class RemoteLoader2
    {
        public static void test()
        {
            RemoteControlWithUndo remoteControl = new RemoteControlWithUndo(1);
            CeilingFun ceilingFun = new CeilingFun("Living Room");
            CeilingFanHighCommand ceilingFunHighCommand = new CeilingFanHighCommand(ceilingFun);
            CeilingFanMediumCommand ceilingFunMediumCommand = new CeilingFanMediumCommand(ceilingFun);
            remoteControl.setCommand(0, ceilingFunHighCommand, ceilingFunMediumCommand);
            remoteControl.onButtonWasPushed(0);
            remoteControl.offButtonWasPushed(0);
            remoteControl.undoButtonWasPushed();
        }

    }
    //如果想要一键控制所有的电器,那么添加一个类,将所有的电器置于容器中
小结:
命令模式为交互对象之间的松耦合而设计。


 1727
1727


 被折叠的 条评论
为什么被折叠?
被折叠的 条评论
为什么被折叠?
 到【灌水乐园】发言


