


疯狂安卓书籍的学习
如何自定义view
先建一个view类 重写ondraw方法
   public class DrawView extends View {
    public float currentX = 40;
    public float currentY = 50;
    // 定义并创建画笔
    Paint paint = new Paint();

    public DrawView(Context context) {
        super(context);
        // TODO Auto-generated constructor stub
    }

    public DrawView(Context context, AttributeSet attrs) {
        super(context, attrs);
        // TODO Auto-generated constructor stub
    }

    @Override
    protected void onDraw(Canvas canvas) {
        // TODO Auto-generated method stub
        super.onDraw(canvas);
        //设置画笔的颜色
        paint.setColor(Color.GREEN);
        canvas.drawCircle(currentX, currentY, 15, paint);
    }

    @Override
    public boolean onTouchEvent(MotionEvent event) {
        // TODO Auto-generated method stub
        currentX=event.getX();
        currentY=event.getY();
        invalidate();//重新绘制
        //表名 该处理方法已经处理
        return true;
    }
    }
再在activity中将view类添加进去
    @Override
    protected void onCreate(Bundle savedInstanceState) {
        super.onCreate(savedInstanceState);
        setContentView(R.layout.activity_main);
        RelativeLayout view=(RelativeLayout) findViewById(R.id.root);
        DrawView drawView=new DrawView(this);
        view.addView(drawView);
    }

也可以直接在布局文件中添加这个自定义控件

    <RelativeLayout xmlns:android="http://schemas.android.com/apk/res/android"
    xmlns:tools="http://schemas.android.com/tools"
    android:layout_width="match_parent"
    android:layout_height="match_parent"
    android:id="@+id/root"
    android:paddingBottom="@dimen/activity_vertical_margin"
    android:paddingLeft="@dimen/activity_horizontal_margin"
    android:paddingRight="@dimen/activity_horizontal_margin"
    android:paddingTop="@dimen/activity_vertical_margin"
    tools:context="com.example.android.MainActivity" >

    <com.example.android.DrawView
    android:id="@+id/diydraw"
    android:layout_width="wrap_content"
    android:layout_height="wrap_content"/>

    </RelativeLayout>
效果如下
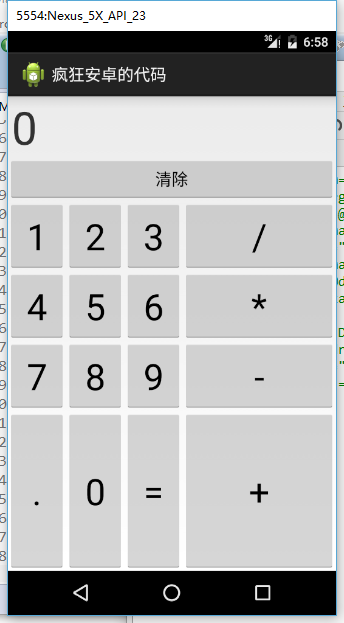
计算器
布局文件如下
    <?xml version="1.0" encoding="utf-8"?>
    <GridLayout xmlns:android="http://schemas.android.com/apk/res/android"
    android:layout_width="match_parent"
    android:layout_height="match_parent"
    android:rowCount="6"
    android:columnCount="4"
    android:id="@+id/root"
    >
    <TextView
    android:layout_width="match_parent"
    android:layout_height="wrap_content"
    android:layout_columnSpan="4"
    android:textSize="50dp"
    android:layout_marginLeft="2pt"
    android:layout_marginRight="2pt"
    android:layout_gravity="right"
    android:text="0"/>
    <Button android:layout_width="match_parent"
    android:layout_height="wrap_content"
    android:layout_columnSpan="4"
    android:text="清除"/>

    </GridLayout>
activity文件如下
    public class MainActivity extends Activity {
    GridLayout girdlayout;
    String[] omg = { "1", "2", "3", "/", "4", "5", "6", "*", "7", "8", "9", "-", ".", "0", "=", "+", };

    @Override
    protected void onCreate(Bundle savedInstanceState) {
        super.onCreate(savedInstanceState);
        setContentView(R.layout.caculator);
        girdlayout = (GridLayout) findViewById(R.id.root);
        for (int i = 0; i < omg.length; i++) {
            Button button = new Button(this);
            button.setText(omg[i]);
            button.setTextSize(40);
        button.setPadding(5, 35, 5, 35);
        //指定该组件所在列
        GridLayout.Spec rowSpec=GridLayout.spec(i/4+2);
        GridLayout.Spec columnSpec=GridLayout.spec(i%4);
        GridLayout.LayoutParams params=new GridLayout.LayoutParams(rowSpec, columnSpec);
        params.setGravity(Gravity.FILL);
        girdlayout.addView(button, params);
        }
    }

    }
效果如图
智能填充
布局文件
<LinearLayout xmlns:android="http://schemas.android.com/apk/res/android"
    xmlns:tools="http://schemas.android.com/tools"
    android:layout_width="match_parent"
    android:layout_height="match_parent"
    android:id="@+id/root"
android:orientation="vertical"
    >
<AutoCompleteTextView
    android:id="@+id/auto"
    android:layout_width="match_parent"
    android:layout_height="wrap_content"
    android:completionThreshold="1"
    />
<MultiAutoCompleteTextView
    android:id="@+id/mauto"
    android:layout_width="match_parent"
    android:layout_height="wrap_content"
    android:completionThreshold="1"
    />
</LinearLayout>

代码

public class zidongtianchong extends Activity {
    AutoCompleteTextView act;
    MultiAutoCompleteTextView mact;
    String[] omg = new String[] { "1", "12", "123", "1234", };

    @Override
    protected void onCreate(Bundle savedInstanceState) {
        super.onCreate(savedInstanceState);
        setContentView(R.layout.activity_main);
        ArrayAdapter<String> adapter = new ArrayAdapter<String>(getApplicationContext(),
                android.R.layout.simple_dropdown_item_1line, omg);
    act=(AutoCompleteTextView) findViewById(R.id.auto);
    act.setAdapter(adapter);
    mact=(MultiAutoCompleteTextView) findViewById(R.id.mauto);
    mact.setAdapter(adapter);
    //设置分割符
    mact.setTokenizer(new MultiAutoCompleteTextView.CommaTokenizer());
    }

}
效果如下:
补充:
requestWindowFeatrue(window.Featrue_Progress);
设置标题栏为progressbar;
拖动栏SeekBar的监听方法


 1071
1071


 被折叠的 条评论
为什么被折叠?
被折叠的 条评论
为什么被折叠?
 到【灌水乐园】发言


