


简介
关于Graphviz: Graphviz(英文:Graph Visualization Software的缩写)是一个由AT&T实验室启动的开源工具包,用于绘制DOT语言脚本描述的图形。它也提供了供其它软件使用的库。Graphviz是一个自由软件,其授权为Eclipse Public License。其Mac版本曾经获得2004年的苹果设计奖。
Graphviz是大名鼎鼎的贝尔实验室的几位牛人开发的一个画图工具。它的理念和一般的“所见即所得”的画图工具不一样,是“所想即所得”。Graphviz提供了dot语言来编写绘图脚本。dot的语言专门用来定义关系。我们必须先在某个文件中写上代码,最后调用命令行生成。没有找到可边写边改的集成环境。
关于dot的具体语法参看官方文档,这里就不多说。这里仅用来入门。
http://www.graphviz.org/
另外也有专门渲染DOT脚本的浏览器xdo,直接在窗口渲染,不需要生成图像文件,强烈推荐。
很多图都比较适合用DOT来定义,比如流程图,组织关系图,类图,状态转换图等等。
在刚接触DOT不到3天的时间里,我就分别在代码性能优化,协议栈状态机定义两件事情用到了DOT,感觉非常方便。
性能优化:gprof可以对一个程序运行时进行profiling,生成报告,包括函数调用关系,每个函数被调用的次数,花费的时间。但这个报告是文本的,不够直观。可以通过一个gprof2dot.py脚本,把gprof的输出翻译成一个DOT文件,然后再用Graphviz转成图片或者直接用xdot来查看。
sudo apt-get install graphviz graphviz-doc
dot -Tsvg test.dot -o test.svg
典型示例(更多例子可以参见官方文档)
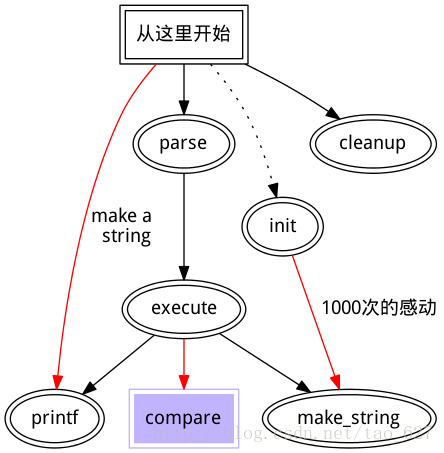
1.Fancy Graph
digraph G {
    edge[fontname="FangSong"];
    node[peripheries=2, fontname="FangSong"];
    size="16, 16";
    main[shape="box"];
    main[label="从这里开始"]
    main->parse[weight=8]
    parse->execute;
    main->init[style=dotted];
    main->cleanup;
    execute->{make_string; printf;}
    edge[color=red];
    init->make_string[label="1000次的感动"];
    main->printf[label="make a \n string"];

    node[shape=box,style=filled,color=".7 .3 1.0"];
    execute->compare;
}
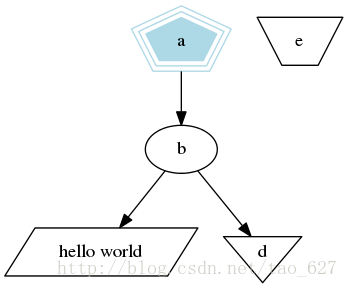
2.Polygon Graph
digraph G{
    size = "4, 4"
    a->b->c;
    b->d;

    a[shape=polygon, sides=5, peripheries=3, color=lightblue, style=filled];
    c[shape=polygon, sides=4, skew=0.4, label="hello world"];
    d[shape=invtriangle];
    e[shape=polygon, side=4, distortion=.7];
    }
效果图
3.list Graph
digraph G{
    node[shape=record, height=.1];
    node0[label="<f0> |<f1> G|<f2> "];
    node1[label="<f0> |<f1> E|<f2> "];
    node2[label="<f0> |<f1> B|<f2> "];
    node3[label="<f0> |<f1> F|<f2> "];
    node4[label="<f0> |<f1> R|<f2> "];
    node5[label="<f0> |<f1> H|<f2> "];
    node6[label="<f0> |<f1> Y|<f2> "];
    node7[label="<f0> |<f1> A|<f2> "];
    node8[label="<f0> |<f1> C|<f2> "];

    "node0":f2->"node4":f1;
    "node0":f0->"node1":f1;
    "node1":f0->"node2":f1;
    "node1":f2->"node3":f1;
    "node2":f2->"node8":f1;
    "node2":f0->"node7":f1;
    "node4":f2->"node6":f1;
    "node4":f0->"node5":f1;
}

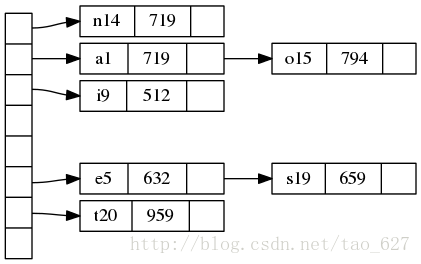
4.hash table Graph
digraph G {
    nodesep=.05;
    rankdir=LR;

    node[shape=record, width=.1, height=.1];
    node0[label="<f0> |<f1> |<f2> |<f3> |<f4> |<f5> |<f6> |", height=2.5]
    node[width=1.5];
    node1[label="{<n> n14 | 719 |<p>}"];
    node2[label="{<n> a1 | 719 |<p>}"];
    node3[label="{<n> i9 | 512 |<p>}"];
    node4[label="{<n> e5 | 632 |<p>}"];
    node5[label="{<n> t20 | 959 |<p>}"];
    node6[label="{<n> o15 | 794 |<p>}"];
    node7[label="{<n> s19 | 659 |<p>}"];

    node0:f0->node1:n;
    node0:f1->node2:n;
    node0:f2->node3:n;
    node0:f5->node4:n;
    node0:f6->node5:n;
    node2:p->node6:n;
    node4:p->node7:n;
}
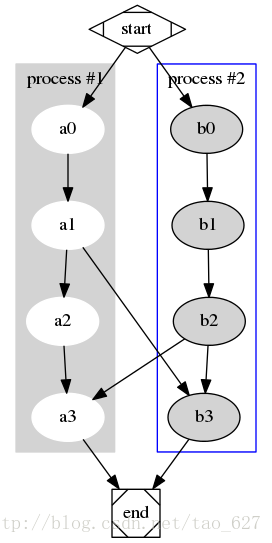
5.Process Graph
digraph G {
    subgraph cluster0 {
        node[style=filled, color=white];
        style=filled;
        color=lightgrey;
        a0->a1->a2->a3;
        label="process #1";
    }

    subgraph cluster1 {
        node[style=filled];
        color=blue;
        b0->b1->b2->b3;
        label="process #2";
    }

    start->a0;
    start->b0;
    a1->b3;
    b2->a3;
    a3->end;
    b3->end;

    start[shape=Mdiamond];
    end[shape=Msquare];
}
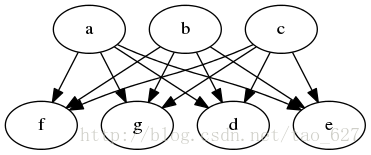
6.directed Graph
digraph G {
    {a b c} -> {d e f g}
}
7.化学分子式
graph s{
    C_0 -- H_0;
    C_0 -- H_1;
    C_0 -- H_2;
    C_0 -- C_1;
    C_1 -- H_3;
    C_1 -- H_4;
    C_1 -- H_5;
}
8.函数调用关系图
digraph s {
    node [shape=ellipse, style=filled, color="#40e0d0"];
    edge [color="#606060", penwidth=3];
    main [color=green];
    main -> init[color=blue, label="hello, I'm \llable of edge"];
    main -> mainloop;
    main -> exit;
    init -> a_init;
    init -> b_init;
    init -> c_init;
    mainloop -> select;
}
这个是有向图(directional graph), 脚本的第一个词需要换成"digraph"。常用的属性有color, style, shape, penwidth, label等。label中 \r, \l, \n 都表示换行,但对齐方式分别是 右对齐,左对齐,居中 。
9.ATS中插件collapsed_connection的流程图,一个更复杂的例子
dot -Tpng collapsed_connection.dot -o collapsed_connection.png
digraph collapsed_connection {
  accept -> TS_HTTP_POST_REMAP_HOOK;
  TS_HTTP_POST_REMAP_HOOK -> "check request method (and header)";

  "check request method (and header)" -> "get CacheUrl hash_key using MurmurHash3" [label = "GET request (required_header present)"];
  "check request method (and header)" -> "pass request" [label = "others"];
  "get CacheUrl hash_key using MurmurHash3" -> "check hash_key from hashTable";
  "check hash_key from hashTable" -> "lock URL in hashTable" [label = "not found"];
  "check hash_key from hashTable" -> "pass request" [label = "found, but marked pass"];
  "check hash_key from hashTable" -> "check hash_key from hashTable" [label = "locked or unable to get mutex, wait insert_lock_retry_time"];
  "lock URL in hashTable" -> TS_HTTP_CACHE_LOOKUP_COMPLETE_HOOK;
  TS_HTTP_CACHE_LOOKUP_COMPLETE_HOOK -> "remove URL from hashTable(1)" [label = "hit_fresh or skipped"];
  TS_HTTP_CACHE_LOOKUP_COMPLETE_HOOK -> "request origin server" [label = "miss or stale"];
  "request origin server" -> TS_HTTP_READ_RESPONSE_HDR_HOOK;
  TS_HTTP_READ_RESPONSE_HDR_HOOK -> "remove URL from hashTable(1)" [label = "not 200/OK response"];
  TS_HTTP_READ_RESPONSE_HDR_HOOK -> "check read_while_writer config";
  "check read_while_writer config" -> "remove URL from hashTable(1)" [label = "enabled"];
  "check read_while_writer config" -> TS_HTTP_TXN_CLOSE_HOOK [label = "disabled"];
  TS_HTTP_READ_RESPONSE_HDR_HOOK -> "mark pass in hashTable" [label = "non-cacheable"];
  "remove URL from hashTable(1)" -> TS_HTTP_TXN_CLOSE_HOOK;
  "mark pass in hashTable" -> TS_HTTP_TXN_CLOSE_HOOK;
  "pass request" -> TS_HTTP_TXN_CLOSE_HOOK;
  TS_HTTP_TXN_CLOSE_HOOK -> "remove URL from hashTable(2)";
  TS_HTTP_TXN_CLOSE_HOOK -> "check keep_pass_record_time" [label = "non-cacheable"];
  "check keep_pass_record_time" -> "add into KeepPassList" [label = "> 0"];
  "check keep_pass_record_time" -> "remove URL from hashTable(2)" [label = "= 0"];
  "add into KeepPassList" -> "transaction close";
  "remove URL from hashTable(2)" -> "transaction close";
  "transaction close" -> accept;

  TS_HTTP_POST_REMAP_HOOK [shape = box];
  TS_HTTP_CACHE_LOOKUP_COMPLETE_HOOK[shape = box];
  TS_HTTP_READ_RESPONSE_HDR_HOOK [shape = box];
  TS_HTTP_TXN_CLOSE_HOOK [shape = box];

  "check request method (and header)" [shape = diamond];
  "check hash_key from hashTable" [shape = diamond];
  "check read_while_writer config" [shape = diamond];
  "check keep_pass_record_time" [shape = diamond];
} 
10.使用Makefile文件来批量执行
在阅读源码过程中,如果我们编写了大量的dot文件,需要处理和展示,如果逐个编译和操作,未免太为繁琐,我们这里推荐使用一个Makefile来将所有的dot文件都包括过来。
生成图像命令
make png
清除图像命令
make clean
下面是Makefile文件
SVG_FILES = \
	HttpProxyServer-callgraph.svg \
	HttpSM-callgraph.svg \
	HttpTransact-callgraph.svg \
	HttpTransact-state-diagram.svg \
	HttpTransactAndSM-callgraph.svg

PNG_FILES = $(SVG_FILES:.svg=.png)

PDF_FILES = $(SVG_FILES:.svg=.pdf)

svg: ${SVG_FILES}

png: ${PNG_FILES}

pdf: ${PDF_FILES}

clean:
	rm -f ${SVG_FILES} ${PNG_FILES} ${PDF_FILES}

.SUFFIXES: .dot .svg .png .pdf

.dot.svg:
	dot -Tsvg $< -o $@

.dot.png:
	dot -Tpng $< -o $@

.dot.pdf:
	dot -Tpdf $< -o $@
截图如下


注意事项
1.中文乱码
graphviz默认情况下对中文支持不好,如果代码中有中文,则必须使用UTF-8的格式保存文件,并且在代码中指定字体。
进一步深究可以查看官方文档
http://www.graphviz.org/Documentation.php
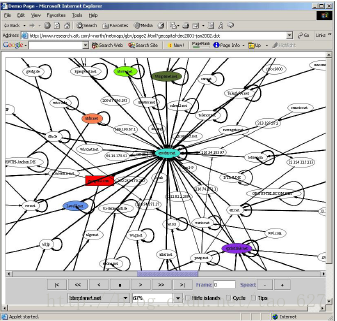
下面给出几个颇具震撼力的效果图,来自官网文档


 1810
1810


 被折叠的 条评论
为什么被折叠?
被折叠的 条评论
为什么被折叠?
 到【灌水乐园】发言


