在实际的项目中,往往并不是一个页面用几个固定路由跳转就可以实现了,一般都是多层嵌套的组件来组成整个项目,为了方便管理,我们也希望在url上能体现出这种层级关系。
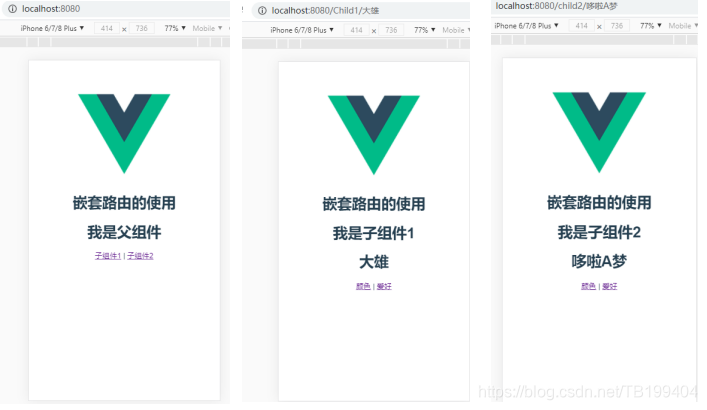
先给出实际效果图(从左到右依次为:主页面;点击主页面中子组件1后展示的页面;点击主页面中子组件2后展示的页面):
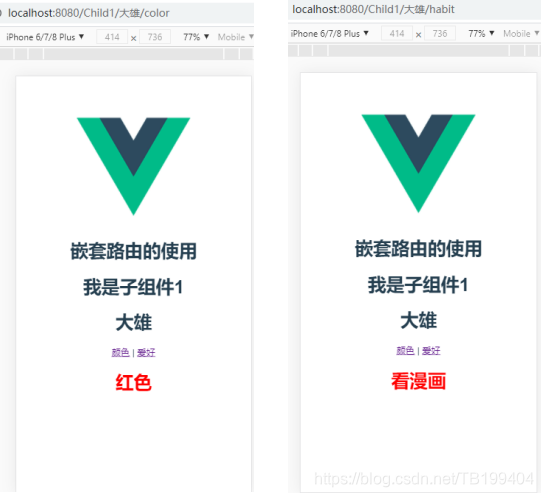
对于子组件1而言,点击颜色和爱好后展示如下:
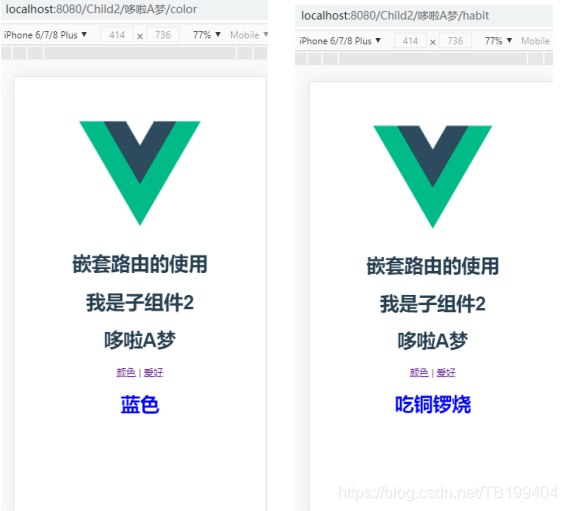
对于子组件2而言,点击颜色和爱好后:
代码风格:子组件1和子组件2都是通过路由携带的名字来动态展示页面中的内容,并且,子组件1和子组件2中颜色和爱好都是基于子组件的路由嵌套实现的。
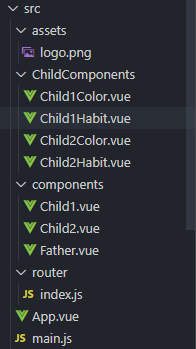
项目核心结构如下:
初始化后新增以及更改的文件内容如下(未改变的不展示):
Child1Color.vue
<template>
    <div>
        <h1 class="color">红色</h1>
    </div>
</template>

<style scoped>
 .color{
     color: red;
 }
</style>
Child1Habit.vue
<template>
    <div>
        <h1 class="color">看漫画</h1>
    </div>
</template>

<style scoped>
 .color{
     color: red;
 }
</style>
Child2Color.vue
<template>
    <div>
        <h1 class="color">蓝色</h1>
    </div>
</template>

<style scoped>
 .color{
     color: blue;
 }
</style>
Child2Habit.vue
<template>
    <div>
        <h1 class="color">吃铜锣烧</h1>
    </div>
</template>

<style scoped>
 .color{
     color: blue;
 }
</style>
Child1.vue
<template>
    <div>
        <h1>我是子组件1</h1>
        <h1>{{ $route.params.name1 }}</h1>
        <router-link to="/Child1/大雄/color">颜色</router-link> |
        <router-link to="/Child1/大雄/habit">爱好</router-link>
        <router-view />
    </div>
</template>
Child2.vue
<template>
    <div>
        <h1>我是子组件2</h1>
        <h1>{{ $route.params.name2 }}</h1>
        <router-link to="/Child2/哆啦A梦/color">颜色</router-link> |
        <router-link to="/Child2/哆啦A梦/habit">爱好</router-link>
        <router-view />
    </div>
</template>
Father.vue
<template>
  <div class="hello">
    <h1>我是父组件</h1>
    <router-link to="/Child1/大雄">子组件1</router-link> |
    <router-link to="/child2/哆啦A梦">子组件2</router-link>
    <router-view />
  </div>
</template>

<script>
export default {
  name: 'Father'
}
</script>
index.js(子组件使用了路由懒加载模式、路由嵌套 ;路由跳转使用history模式),里面的注释还请细看!
import Vue from 'vue'
import Router from 'vue-router'
import Father from '@/components/Father'

Vue.use(Router)

const routes = [
    {
      path: '/',
      name: 'Father',
      component: Father
    },{
      //这里的 :name1 其实就是一个动态匹配,实际的路由已经在Father.vue中<router-link>中的to标签决定了
      //通过这种方式我们可以在子组件Child1.vue中通过 {{ $route.params.name1 }}来获取
      path: '/Child1/:name1',
      name: 'Child1',
      component: () => import ('@/components/Child1.vue'),
      children:[
        {
          name: 'Child1Color',
          //需要注意,这里使用的其实是相对路径,因为嵌套路由相当于有继承关系
          //继承了父级路由:http://localhost:8080/Child1/大雄(因为此时的:name1为大雄)
          //所以现在的实际路径其实是:http://localhost:8080/Child1/大雄(因为此时的:name1为大雄)/color
          //如果写成了 path: '/color',那么其实你匹配的路径是:http://localhost:8080/color
          //很重要,请牢记
          path: 'color',
          component: () => import ('@/ChildComponents/Child1Color.vue')
        },{
          name: 'Child1Habit',
          path: 'habit',
          component: () => import ('@/ChildComponents/Child1Habit.vue')
        }
      ]
    },
    {
      path: '/Child2/:name2',
      name: 'Child2',
      component:() => import ('@/components/Child2.vue'),
      children:[
        {
          name: 'Child2Color',
          path: 'color',
          component: () => import ('@/ChildComponents/Child2Color.vue')
        },{
          name: 'Child2Habit',
          path: 'habit',
          component: () => import ('@/ChildComponents/Child2Habit.vue')
        }
      ]
    }
  ]

const routers = new Router({
  mode: 'history',
  routes
})

export default routers
App.vue
<template>
  <div id="app">
    <img src="./assets/logo.png">
    <h1>嵌套路由的使用</h1>
    <router-view/>
  </div>
</template>

<script>
export default {
  name: 'App'
}
</script>

<style>
#app {
  font-family: 'Avenir', Helvetica, Arial, sans-serif;
  -webkit-font-smoothing: antialiased;
  -moz-osx-font-smoothing: grayscale;
  text-align: center;
  color: #2c3e50;
  margin-top: 60px;
}
</style>
main.js
import Vue from 'vue'
import App from './App'
import router from './router'

Vue.config.productionTip = false

new Vue({
  el: '#app',
  router,
  components: { App },
  template: '<App/>'
})
在做项目的过程中,我发现每一个项目都是由无数个小知识点组成的,基础不牢,地动山摇!只有好的基础才能做出好的项目,空有空中楼台是没用的,还必须得有扎实的砖块才能垒砌梦想的城堡!加油吧,各位,为了成为更好的程序员,奥利给!


 158
158

 被折叠的 条评论
为什么被折叠?
被折叠的 条评论
为什么被折叠?
 到【灌水乐园】发言


