


目录
1 RestTemplate-> 是Web Http 客户端请求 模板工具
1.1 使用RestTemplate -> 选择执行引擎 Http客户端请求工具
2 RestTemplate 的 GET请求 -> 定时存入数据库
2.1 RestTemplate.getForObject 获取对象
2.2 RestTemplate.getForEntity 获取 对象 状态码 请求头
2.2.3 数据格式转化 -> hutool工具包->加依赖
2.2.5 定时请求获取数据 -> 存入数据库 -> 完整代码
5 项目jar部署到服务器报错 403 -> 加 HttpHeaders
0 课程视频
 https://www.bilibili.com/video/BV1tJ41147uj/?spm_id_from=333.337.search-card.all.click&vd_source=ff8b7f852278821525f11666b36f180a
1 RestTemplate-> 是Web Http 客户端请求 模板工具
1.1 使用RestTemplate -> 选择执行引擎 Http客户端请求工具
1.2 执行引擎 Http客户端请求工具
1.2.1 JDK HttpUrlConnection
// RestTemplate restTemplate = new RestTemplate();// 默认


RestTemplate restTemplate = new RestTemplate(new HttpComponentsClientHttpRequestFactory());
1.2.2 Apache HttpClient
1.2.3 OkHttp
1.2 升级版 -> WebClient -> 非阻塞
2 RestTemplate 的 GET请求 -> 定时存入数据库
2.1 RestTemplate.getForObject 获取对象
2.2 RestTemplate.getForEntity 获取 对象 状态码 请求头
2.2.1 请求获取数据
String url = "https://www.okx.com/api/v5/market/ticker?instId=BTC-USDT";
        Map<String, Long> paramMap = new HashMap<>(); // 入参 可写 可不写  这里没有入参

        ResponseEntity<HashMap> result = restTemplate.getForEntity(url, HashMap.class, paramMap);// RestDto.class 根据 这个 序列化
2.2.2 请求到的数据格式
{
"code":"0",
"msg":"",
"data":[
{"instType":"SPOT","instId":"BTC-USDT","last":"28754.7","lastSz":"0.05152543","askPx":"28754.8","askSz":"0.16142622","bidPx":"28754.7","bidSz":"0.08685457","open24h":"27951.7","high24h":"28886.3","low24h":"27662.3","volCcy24h":"278879302.893932331","vol24h":"9872.68298003","ts":"1683056681112","sodUtc0":"28073.1","sodUtc8":"28535.2"}
]
}
2.2.3 数据格式转化 -> hutool工具包->加依赖
JSONArray jsonArray = JSONUtil.parseArray(result.getBody().get("data")); // list [{},{},{}] --> list里面是字典

List<RestDto> postEntityList = jsonArray.toList(RestDto.class); // list [RestDto,RestDto,RestDto] --> list里面是实体类
2.2.4 list 里数据 for循环加入数据库
for (RestDto postEntity : postEntityList) { // 循环 取实体类list

                int xxx = dtoService.save(postEntity);
                System.out.println(xxx);
2.2.5 定时请求获取数据 -> 存入数据库 -> 完整代码
@RestController
@Component // 代表这个类确保会被springboot扫描到
public class AutoController {

    private RestTemplate restTemplate = new RestTemplate() ;
    @Resource
    private DtoService dtoService;

    @Scheduled(fixedDelay = 3000) // 定时3000ms
    public void  autoData() {

        String url = "https://www.okx.com/api/v5/market/ticker?instId=BTC-USDT";
        Map<String, Long> paramMap = new HashMap<>(); // 入参 可写 可不写  这里没有入参

        // Map<String, Object> result = restTemplate.getForObject(url, Map.class, paramMap);// RestDto.class 根据 这个 序列化
        ResponseEntity<HashMap> result = restTemplate.getForEntity(url, HashMap.class, paramMap);// RestDto.class 根据 这个 序列化


        if(result.getStatusCode()== HttpStatus.OK) {
            JSONArray jsonArray = JSONUtil.parseArray(result.getBody().get("data")); // list [{},{},{}] --> list里面是字典

            List<RestDto> postEntityList = jsonArray.toList(RestDto.class); // list [RestDto,RestDto,RestDto] --> list里面是实体类

            for (RestDto postEntity : postEntityList) { // 循环 取实体类list

                int xxx = dtoService.save(postEntity);
                System.out.println(xxx);

            }

        }

    }
}
2.3 RestTemplate.exchange各种用法
3 完整
3.1 配置
3.1.1 加依赖
<!-- https://mvnrepository.com/artifact/com.alibaba/fastjson -->
        <dependency>
            <groupId>com.alibaba</groupId>
            <artifactId>fastjson</artifactId>
            <version>2.0.29</version>
        </dependency>

<!--hutool-all 各种算法-->
        <dependency>
            <groupId>cn.hutool</groupId>
            <artifactId>hutool-all</artifactId>
            <version>5.8.12</version>
        </dependency>
3.1.2 yml 配置文件--> 正常连接数据库方式
3.2 代码
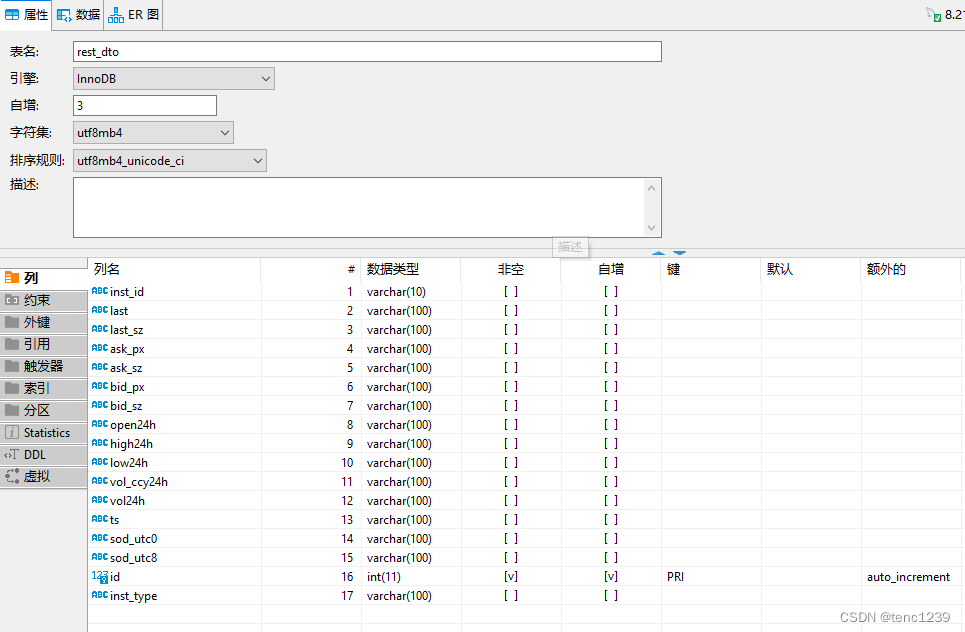
3.2.1 RestDto
@Data
@NoArgsConstructor
@AllArgsConstructor
@TableName("rest_dto") //连接数据库表名
public class RestDto implements Serializable {
    @TableId(value = "id", type = IdType.AUTO) // 解决 id 自动生成太大
    private Integer id; // 主键
    /**
     * SPOT
     */

    private String instType;
    /**
     * BTC-USDT
     */

    private String instId;
.
.
.
.
.
}
3.2.2 DtoMapper
@Mapper
public interface DtoMapper extends BaseMapper<RestDto> {
}
3.2.3 DtoService(imp)
@Service
@Transactional
public class DtoService {
    @Resource
    private DtoMapper dtoMapper;

    public int save(RestDto dto) { // 在controller中被调用

        int result = dtoMapper.insert(dto); // userMapper是操作数据库的方法

        return result ;

    }
}
3.2.4 Controller
@RestController
@Component // 代表这个类确保会被springboot扫描到
public class AutoController {

    private RestTemplate restTemplate = new RestTemplate() ;
    @Resource
    private DtoService dtoService;

    @Scheduled(fixedDelay = 3000) // 定时3000ms

    public void  autoData() {

        String url = "https://www.okx.com/api/v5/market/ticker?instId=BTC-USDT";
        Map<String, Long> paramMap = new HashMap<>(); // 入参 可写 可不写  这里没有入参

        // Map<String, Object> result = restTemplate.getForObject(url, Map.class, paramMap);// RestDto.class 根据 这个 序列化
        ResponseEntity<HashMap> result = restTemplate.getForEntity(url, HashMap.class, paramMap);// RestDto.class 根据 这个 序列化

        if(result.getStatusCode()== HttpStatus.OK) {
            JSONArray jsonArray = JSONUtil.parseArray(result.getBody().get("data")); // list [{},{},{}] --> list里面是字典

            List<RestDto> postEntityList = jsonArray.toList(RestDto.class); // list [RestDto,RestDto,RestDto] --> list里面是实体类

            for (RestDto postEntity : postEntityList) { // 循环 取实体类list

                int xxx = dtoService.save(postEntity);
                System.out.println(xxx);

            }

        }

    }
}
3.2.5 启动类
@SpringBootApplication
@MapperScan(value = "com.**.mapper")
@EnableScheduling   // 加定时
public class TestRegApplication {

    public static void main(String[] args) {
        SpringApplication.run(TestRegApplication.class, args);
    }

}
4 数据库创建表
5 项目jar部署到服务器报错 403 -> 加 HttpHeaders
SimpleClientHttpRequestFactory requestFactory = new SimpleClientHttpRequestFactory();
        requestFactory.setConnectTimeout(2000);
        requestFactory.setReadTimeout(2000);
        HttpHeaders headers = new HttpHeaders();
        headers.add("user-agent", "Mozilla/5.0 (Windows NT 10.0; Win64; x64) AppleWebKit/537.36 (KHTML, like Gecko) Chrome/54.0.2840.99 Safari/537.36");
        HttpEntity<RestDto> httpEntity = new HttpEntity<>(headers);
        RestTemplate restTemplate = new RestTemplate(requestFactory);

        ResponseEntity<JSONObject> result = restTemplate.exchange(url, HttpMethod.GET, httpEntity, JSONObject.class);
6 jar包部署到服务器
7 参考
https://my.oschina.net/u/4564900/blog/4675772![]() https://my.oschina.net/u/4564900/blog/4675772
https://my.oschina.net/u/4564900/blog/4675772


 913
913


 被折叠的 条评论
为什么被折叠?
被折叠的 条评论
为什么被折叠?
 到【灌水乐园】发言


