


前言:
整个完整的OAUTH2.0授权过程会经过IDP几类接口的交互,认证接口、获取AccessToken接口、用户信息接口,下面把相关接口按请求时序串联来讲解。
目录
OAuth 2.0 认证接口
1.认证入口接口
http://192.168.129.23:9527/sign/authz/oauth/v20/b32834accb544ea7a9a09dcae4a36403
请求参数有
id,也可以说是client_id,也就是IDP(identity provider)分配给SP(service provider)的唯一id,以RESTFUL形式传递参数
  @Operation(summary = "OAuth 2.0 认证接口", description = "传递参数应用ID,自动完成跳转认证拼接", method = "GET")
  @RequestMapping(value = {OAuth2Constants.ENDPOINT.ENDPOINT_BASE + "/{id}"}, method = RequestMethod.GET)
  public ModelAndView authorize(HttpServletRequest request, HttpServletResponse response, @PathVariable("id") String id) {

    ClientDetails clientDetails = getClientDetailsService().loadClientByClientId(id, true);
    _logger.debug("" + clientDetails);
    String authorizationUrl = "";

    try {
      authorizationUrl = String.format(OAUTH_V20_AUTHORIZATION_URL, clientDetails.getClientId(), HttpEncoder.encode(clientDetails.getRegisteredRedirectUri().toArray()[0].toString()));
    } catch (Exception e) {
      e.printStackTrace();
    }

    _logger.debug("authorizationUrl {}", authorizationUrl);
    return WebContext.redirect(authorizationUrl);
  }
这个接口不需要做拦截,只是简单组装一下url再做跳转,感觉不要这个跳转也行。
利用client_id查询数据库获取了ClientDetails,使用模板字符串拼装重定向授权URL
上面url参数中的redirect_uri来源于ClientDetails对象的registeredRedirectUri属性,也就是来自数据库if_apps_oauth_client_details表的WEB_SERVER_REDIRECT_URI字段,这是SSO管理后台WEB界面预先对每个接入SSO的应用做好的配置。
重定向跳转(redirect)到authorizationUrl。
2.授权接口,为了获取code,当前未授权
  @Operation(summary = "OAuth 2.0 认证接口", description = "传递参数client_id,response_type,redirect_uri等", method = "GET")
  @RequestMapping(value = {OAuth2Constants.ENDPOINT.ENDPOINT_AUTHORIZE, OAuth2Constants.ENDPOINT.ENDPOINT_TENCENT_IOA_AUTHORIZE}, method = RequestMethod.GET)
  public ModelAndView authorize(Map<String, Object> model, @RequestParam Map<String, String> parameters, @CurrentUser UserInfo currentUser, SessionStatus sessionStatus) {

    Principal principal = (Principal) AuthorizationUtils.getAuthentication();
    // Pull out the authorization request first, using the OAuth2RequestFactory. All further logic should
    // query off of the authorization request instead of referring back to the parameters map. The contents of the
    // parameters map will be stored without change in the AuthorizationRequest object once it is created.
    AuthorizationRequest authorizationRequest = getOAuth2RequestFactory().createAuthorizationRequest(parameters);

    Set<String> responseTypes = authorizationRequest.getResponseTypes();
    if (!responseTypes.contains(OAuth2Constants.PARAMETER.TOKEN) && !responseTypes.contains(OAuth2Constants.PARAMETER.CODE)) {
      throw new UnsupportedResponseTypeException("Unsupported response types: " + responseTypes);
    }

    if (authorizationRequest.getClientId() == null) {
      throw new InvalidClientException("A client id must be provided");
    }

    try {
      if (!(principal instanceof Authentication) || !((Authentication) principal).isAuthenticated()) {
        throw new InsufficientAuthenticationException("User must be authenticated with Spring Security before authorization can be completed.");
      }

      ClientDetails client = getClientDetailsService().loadClientByClientId(authorizationRequest.getClientId(), true);

      // The resolved redirect URI is either the redirect_uri from the parameters or the one from
      // clientDetails. Either way we need to store it on the AuthorizationRequest.
      String redirectUriParameter = authorizationRequest.getRequestParameters().get(OAuth2Constants.PARAMETER.REDIRECT_URI);
      String resolvedRedirect = redirectResolver.resolveRedirect(redirectUriParameter, client);
      if (!StringUtils.hasText(resolvedRedirect)) {
        logger.info("Client redirectUri " + resolvedRedirect);
        logger.info("Parameter redirectUri " + redirectUriParameter);
        throw new RedirectMismatchException("A redirectUri must be either supplied or preconfigured in the ClientDetails");
      }
      authorizationRequest.setRedirectUri(resolvedRedirect);

      // We intentionally only validate the parameters requested by the client (ignoring any data that may have
      // been added to the request by the manager).
      oauth2RequestValidator.validateScope(authorizationRequest, client);

      // Some systems may allow for approval decisions to be remembered or approved by default. Check for
      // such logic here, and set the approved flag on the authorization request accordingly.
      authorizationRequest = userApprovalHandler.checkForPreApproval(authorizationRequest, (Authentication) principal);
      // is this call necessary?
      boolean approved = userApprovalHandler.isApproved(authorizationRequest, (Authentication) principal);
      authorizationRequest.setApproved(approved);

      // Validation is all done, so we can check for auto approval...
      if (authorizationRequest.isApproved()) {
        if (responseTypes.contains(OAuth2Constants.PARAMETER.TOKEN)) {
          return new ModelAndView(getImplicitGrantResponse(authorizationRequest));
        }
        if (responseTypes.contains(OAuth2Constants.PARAMETER.CODE)) {
          return new ModelAndView(getAuthorizationCodeResponse(authorizationRequest,
              (Authentication) principal));
        }
      }
      Apps app = (Apps) WebContext.getAttribute(WebConstants.AUTHORIZE_SIGN_ON_APP);
      //session中为空或者id不一致重新加载
      if (app == null || !app.getId().equalsIgnoreCase(authorizationRequest.getClientId())) {
        app = appsService.get(authorizationRequest.getClientId());
        WebContext.setAttribute(WebConstants.AUTHORIZE_SIGN_ON_APP, app);
      }

      // Place auth request into the model so that it is stored in the session
      // for approveOrDeny to use. That way we make sure that auth request comes from the session,
      // so any auth request parameters passed to approveOrDeny will be ignored and retrieved from the session.
      momentaryService.put(currentUser.getSessionId(), "authorizationRequest", authorizationRequest);
      return getUserApprovalPageResponse(model, authorizationRequest, (Authentication) principal);

    } catch (RuntimeException e) {
      sessionStatus.setComplete();
      throw e;
    }
  }
SPRING MVC对这个接口做了拦截,会先进入SingleSignOnInterceptor拦截器类处理,检测cookie键值对中名为congress的值
/**
 * 单点登录拦截器器
 */
@Component
public class SingleSignOnInterceptor implements AsyncHandlerInterceptor {

  private static final Logger logger = LoggerFactory.getLogger(SingleSignOnInterceptor.class);
  @Autowired
  ApplicationConfig applicationConfig;
  @Autowired
  SessionManager sessionManager;
  @Autowired
  AuthTokenService authTokenService;
  @Autowired
  AppsService appsService;
  @Autowired
  AppsCasDetailsService casDetailsService;

  @Override
  public boolean preHandle(HttpServletRequest request, HttpServletResponse response, Object handler) throws Exception {
    logger.trace("Single Sign On Interceptor");

    AuthorizationUtils.authenticateWithCookie(request, authTokenService, sessionManager);

    if (AuthorizationUtils.isNotAuthenticated()) {
      String loginUrl = applicationConfig.getFrontendUri() + "/#/passport/login?redirect_uri=%s";
      String redirect_uri = UrlUtils.buildFullRequestUrl(request);
      String base64RequestUrl = Base64Utils.base64UrlEncode(redirect_uri.getBytes());

      logger.debug("No Authentication ... Redirect to /passport/login , redirect_uri {} , base64 {}", redirect_uri, base64RequestUrl);
      response.sendRedirect(String.format(loginUrl, base64RequestUrl));
      return false;
    }

    //判断应用访问权限
    if (AuthorizationUtils.isAuthenticated()) {

      logger.debug("preHandle {}", request.getRequestURI());
      Apps app = (Apps) WebContext.getAttribute(WebConstants.AUTHORIZE_SIGN_ON_APP);
      if (app == null) {

        String requestURI = request.getRequestURI();
        if (requestURI.contains("/authz/cas/login")) {//for CAS service

          app = casDetailsService.getAppDetails(request.getParameter(CasConstants.PARAMETER.SERVICE), true);
        } else if (requestURI.contains("/authz/jwt/")
            || requestURI.contains("/authz/api/")
            || requestURI.contains("/authz/formbased/")
            || requestURI.contains("/authz/tokenbased/")
            || requestURI.contains("/authz/api/")
            || requestURI.contains("/authz/saml20/consumer/")
            || requestURI.contains("/authz/saml20/idpinit/")
            || requestURI.contains("/authz/cas/")) { //for id end of URL

          String[] requestURIs = requestURI.split("/");
          String appId = requestURIs[requestURIs.length - 1];

          logger.debug("appId {}", appId);
          app = appsService.get(appId, true);

        } else if (requestURI.contains("/authz/oauth/v20/authorize")) {//oauth
          app = appsService.get(request.getParameter(OAuth2Constants.PARAMETER.CLIENT_ID), true);
        }
      }

      SignPrincipal principal = AuthorizationUtils.getPrincipal();
      if (principal != null && app != null) {
        if (principal.getGrantedAuthorityApps().contains(new SimpleGrantedAuthority(app.getId()))) {
          logger.trace("preHandle have authority access {}", app);
          return true;
        }
      }

      logger.debug("preHandle not have authority access " + app);
      response.sendRedirect(request.getContextPath() + "/authz/refused");
    }
    return true;
  }
}
如果没有登录,则跳转到登录页面完成登录才能继续跳转回这个接口,登录URL
http://192.168.129.23:8522/intellifsheild/#/passport/login?redirect_uri=%s
登录是一个很重要的用户跟IDP交互环节,在后面会详细介绍到,这里为了讲述逻辑利索,假设用户已经输入账号密码顺利完成了登录,先把Oauth2授权的粗线条逻辑说完整。
接口构建了一个AuthorizationRequest对象,以sessionId为key,存放到momentaryService存储类中(后面接口会从中取出使用),一个Caffeine结构的内存缓存,过期时间为5分钟。
AuthorizationRequest对象的关键属性有
clientId:客户端ID,代表请求来自的应用
state:客户端传过来的token,必须无修改传回去
scope:授权范围,枚举值有read,write,trust,openid,profile,email,phone,address,all
responseType:到底是code还是token,如果认证成功根据这个类型参数返回不同的视图
approved:是否用户已经授权,如果已授权,根据上面类型参数跳转到不同视图,否则跳转到授权页面
redirectUri:重定向到应用URL,就是上面步骤1中的redirect_uri
这时approved=false,还没经过用户授权,服务器端跳转(forward)到授权确认接口
3.授权确认接口
http://192.168.129.23:9527/sign/authz/oauth/v20/approval_confirm
  @RequestMapping(OAuth2Constants.ENDPOINT.ENDPOINT_APPROVAL_CONFIRM)
  public ModelAndView getAccessConfirmation(@RequestParam Map<String, Object> model, @CurrentUser UserInfo currentUser) {
    try {
      // Map<String, Object> model
      AuthorizationRequest clientAuth = (AuthorizationRequest) momentaryService.get(currentUser.getSessionId(), "authorizationRequest");
      ClientDetails client = clientDetailsService.loadClientByClientId(clientAuth.getClientId(), true);
      model.put("oauth_approval", authTokenService.genRandomJwt());
      model.put("auth_request", clientAuth);
      model.put("client", client);
      model.put("oauth_version", "oauth 2.0");
      Map<String, String> scopes = new LinkedHashMap<String, String>();
      for (String scope : clientAuth.getScope()) {
        scopes.put(OAuth2Constants.PARAMETER.SCOPE_PREFIX + scope, "false");
      }
      String principal = AuthorizationUtils.getPrincipal().getUsername();
      for (Approval approval : approvalStore.getApprovals(principal, client.getClientId())) {
        if (clientAuth.getScope().contains(approval.getScope())) {
          scopes.put(OAuth2Constants.PARAMETER.SCOPE_PREFIX + approval.getScope(),
              approval.getStatus() == ApprovalStatus.APPROVED ? "true" : "false");
        }
      }

      model.put("scopes", scopes);
      if (!model.containsKey(OAuth2Constants.PARAMETER.APPROVAL_PROMPT)) {
        model.put(OAuth2Constants.PARAMETER.APPROVAL_PROMPT, client.getApprovalPrompt());
      }
    } catch (Exception e) {
      _logger.debug("OAuth Access Confirmation process error.", e);
    }

    ModelAndView modelAndView = new ModelAndView("authorize/oauth_access_confirmation");
    _logger.trace("Confirmation details ");
    for (Object key : model.keySet()) {
      _logger.trace("key " + key + "=" + model.get(key));
    }

    model.put("authorizeApproveUri", applicationConfig.getFrontendUri() + "/#/authz/oauth2approve");

    modelAndView.addObject("model", model);
    return modelAndView;
  }
这个接口主要为后面页面渲染构建了一个map容器,用来放下面几个数据:
oauth_approval:利用配置文件的过期时间参数900秒,生成一个token字符串
auth_request:: 从momentaryService取出的AuthorizationRequest对象,刚才在步骤2授权接口存放进去的
client:应用对应的ClientDetails对象,对应if_apps_oauth_client_details表的数据
oauth_version: 代码里写死为oauth 2.0
scopes:略
authorizeApproveUri:
前端工程的授权页面http://192.168.129.23:8522/intellifsheild/#/authz/oauth2approve
携带上面map数据,匹配逻辑视图authorize/oauth_access_confirmation,这是一个freemark模板内嵌页面,给用户确定授权的页面,使用上面组装的map数据来渲染
<!DOCTYPE html>
<html >
<head>
	<#include  "authorize_common.ftl">
	<script type="text/javascript">
	   window.top.location.href = "${model.authorizeApproveUri}?oauth_approval=${model.oauth_approval}&clientId=${model.client.clientId!}";
	</script>
</head>

<body  style="display:none;">
	<div id="top">

	</div>
	<div class="container">
		<#if 'oauth 2.0'==model.oauth_version>
			 <!-- oauth 2.0 -->
			 <table  class="table table-bordered">
                        <tr>
                            <td colspan="2">
                                <div style="text-align: center;">
                                    <!--<p>You hereby authorize "${model.client.clientId!}" to access your protected resources.</p>-->
                                    <form id="confirmationForm" name="confirmationForm" action="<@base/>/authz/oauth/v20/authorize" method="post">
                                        <input id="user_oauth_approval" name="user_oauth_approval" value="true" type="hidden"/>
                                        <input class="button btn btn-primary mr-3" name="authorize"
                                            value='' type="submit"/>
                                    </form>
                                </div>
                            </td>
                        </tr>
              </table>
	    </#if>
    </div>
</body>
</html>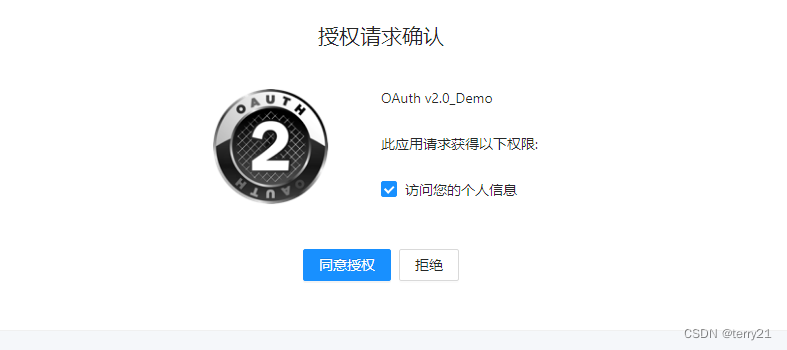
这页面是一个form表单,action="<@base/>/authz/oauth/v20/authorize"
表单隐藏了一个字段user_oauth_approval=true,当用户点击同意授权后,会跳转到上面第2步的URL:
http://192.168.129.23:9527/sign/authz/oauth/v20/authorize
4.前端工程请求后台授权确认接口,POST请求
http://192.168.129.23:9527/sign/authz/oauth/v20/authorize/approval
请求参数有
user_oauth_approval=true或者false
  @RequestMapping(value = {OAuth2Constants.ENDPOINT.ENDPOINT_AUTHORIZE + "/approval"}, params = OAuth2Constants.PARAMETER.USER_OAUTH_APPROVAL, method = RequestMethod.POST)
  public ResponseEntity<?> authorizeApproveOrDeny(@RequestParam Map<String, String> approvalParameters, @CurrentUser UserInfo currentUser, SessionStatus sessionStatus) {

    Principal principal = (Principal) AuthorizationUtils.getAuthentication();
    if (!(principal instanceof Authentication)) {
      sessionStatus.setComplete();
      throw new InsufficientAuthenticationException("User must be authenticated with Spring Security before authorizing an access token.");
    }

    AuthorizationRequest authorizationRequest = (AuthorizationRequest) momentaryService.get(currentUser.getSessionId(), "authorizationRequest");
    if (authorizationRequest == null) {
      sessionStatus.setComplete();
      throw new InvalidRequestException("Cannot approve uninitialized authorization request.");
    }

    try {
      Set<String> responseTypes = authorizationRequest.getResponseTypes();
      authorizationRequest.setApprovalParameters(approvalParameters);
      authorizationRequest = userApprovalHandler.updateAfterApproval(authorizationRequest, (Authentication) principal);
      boolean approved = userApprovalHandler.isApproved(authorizationRequest, (Authentication) principal);
      authorizationRequest.setApproved(approved);

      if (authorizationRequest.getRedirectUri() == null) {
        sessionStatus.setComplete();
        throw new InvalidRequestException("Cannot approve request when no redirect URI is provided.");
      }

      if (!authorizationRequest.isApproved()) {
        return new Message<Object>(Message.FAIL, (Object) getUnsuccessfulRedirect(authorizationRequest, new UserDeniedAuthorizationException("User denied access"), responseTypes.contains(OAuth2Constants.PARAMETER.TOKEN))).buildResponse();
      }

      if (responseTypes.contains(OAuth2Constants.PARAMETER.TOKEN)) {
        return new Message<Object>((Object) getImplicitGrantResponse(authorizationRequest)).buildResponse();
      }

      return new Message<Object>((Object) getAuthorizationCodeResponse(authorizationRequest, (Authentication) principal)).buildResponse();
    } finally {
      sessionStatus.setComplete();
    }
}从momentaryService缓存类中取出对应用户sessionId的AuthorizationRequest对象,
把前端传来参数user_oauth_approval的值true或者false设置给AuthorizationRequest对象的approved属性
5.再次来到授权接口,为了获取code,当前已授权
http://192.168.129.23:9527/sign/authz/oauth/v20/authorize
经过上面用户同意授权后,这时approved=true,跳转到AuthorizationRequest对象的redirectUri地址
这里假设授权类型是code,先忽略token类型
利用OAuth2Authentication对象生成一个authorizationCode ,这是给客户端放发的code,保存到authorizationCodeStore中,这是一个Caffeine结构的内存缓存,过期时间为3分钟。
>>>授权成功会带上几个参数
code:上面生成的authorizationCode字符串
state:客户端传过来的,要无修改返回给客户端
service:
>>>授权失败会带上几个参数
error
error_description
state
OAuth 2.0 获取AccessToken接口
6.用code换取token接口
http://192.168.129.23:9527/sign/authz/oauth/v20/token
请求参数有
grant_type=authorization_code,另外还有一种是刷新token使用的类型:refresh_token
code=上面步骤4中生成的authorizationCode
springboot配置类Oauth20AutoConfiguration对这个接口配置了filter,request会先来到TokenEndpointAuthenticationFilter处理
  public void doFilter(ServletRequest req, ServletResponse res, FilterChain chain) throws IOException,
      ServletException {

    _logger.debug("Authentication TokenEndpoint ");
    if (authenticationManager == null) {
      authenticationManager = WebContext.getBean("oauth20UserAuthenticationManager",
          AuthenticationManager.class);
    }
    if (oAuth2RequestFactory == null) {
      oAuth2RequestFactory = WebContext.getBean("oAuth2RequestFactory", OAuth2RequestFactory.class);
    }
    if (oauth20ClientAuthenticationManager == null) {
      oauth20ClientAuthenticationManager = WebContext.getBean("oauth20ClientAuthenticationManager",
          AuthenticationManager.class);
    }

    final boolean debug = _logger.isDebugEnabled();
    final HttpServletRequest request = (HttpServletRequest) req;
    final HttpServletResponse response = (HttpServletResponse) res;

    try {
      String grantType = request.getParameter(OAuth2Constants.PARAMETER.GRANT_TYPE);
      if (grantType != null && grantType.equals(OAuth2Constants.PARAMETER.GRANT_TYPE_PASSWORD)) {
        //password
        usernamepassword(request, response);
      } else {
        Authentication authentication = ClientCredentials(request, response);
        _logger.trace("getPrincipal " + authentication.getPrincipal().getClass());
        SignPrincipal auth = null;
        if (authentication.getPrincipal() instanceof SignPrincipal) {
          //authorization_code
          auth = (SignPrincipal) authentication.getPrincipal();
        } else {
          //client_credentials
          auth = new SignPrincipal((User) authentication.getPrincipal());
        }
        auth.setAuthenticated(true);
        UsernamePasswordAuthenticationToken simpleUserAuthentication = new UsernamePasswordAuthenticationToken(
            auth, authentication.getCredentials(), authentication.getAuthorities());
        AuthorizationUtils.setAuthentication(simpleUserAuthentication);
      }

    } catch (AuthenticationException failed) {
      SecurityContextHolder.clearContext();
      if (debug) {
        _logger.debug("Authentication request for failed: " + failed);
      }
      onUnsuccessfulAuthentication(request, response, failed);
      return;
    }

    chain.doFilter(request, response);
  }
filter里主要是看看有没有经过认证,取出Authentication对象,如果没有,则使用请求参数client_id和client_secret来构建认证请求UsernamePasswordAuthenticationToken对象,来完成认证。
需要保证Authentication对象存在,且属性authenticated=true才能在接口主体代码顺利执行。
经过filter来到接口主体代码
  @Operation(summary = "OAuth 2.0 获取AccessToken接口", description = "传递参数token等", method = "POST")
  @RequestMapping(value = {OAuth2Constants.ENDPOINT.ENDPOINT_TOKEN, OAuth2Constants.ENDPOINT.ENDPOINT_TENCENT_IOA_TOKEN}, method = RequestMethod.POST)
  public ResponseEntity<OAuth2AccessToken> postAccessToken(@RequestParam
  Map<String, String> parameters) throws HttpRequestMethodNotSupportedException {
    // TokenEndpointAuthenticationFilter
    OAuth2AccessToken token = null;
    try {
      Object principal = AuthorizationUtils.getAuthentication();

      if (!(principal instanceof Authentication)) {
        throw new InsufficientAuthenticationException(
            "There is no client authentication. Try adding an appropriate authentication.");
      }

      String clientId = getClientId((Authentication) principal);
      ClientDetails authenticatedClient = getClientDetailsService().loadClientByClientId(clientId, true);

      TokenRequest tokenRequest = getOAuth2RequestFactory().createTokenRequest(parameters, authenticatedClient);
      if (clientId != null && !clientId.equals("")) {
        // Only validate the client details if a client authenticated during this
        // request.
        if (!clientId.equals(tokenRequest.getClientId())) {
          // double check to make sure that the client ID in the token request is the same as that in the
          // authenticated client
          throw new InvalidClientException("Given client ID does not match authenticated client");
        }
      }
      if (authenticatedClient != null) {
        oAuth2RequestValidator.validateScope(tokenRequest, authenticatedClient);
      }
      if (!StringUtils.hasText(tokenRequest.getGrantType())) {
        throw new InvalidRequestException("Missing grant type");
      }
      if (tokenRequest.getGrantType().equals(OAuth2Constants.PARAMETER.GRANT_TYPE_IMPLICIT)) {
        throw new InvalidGrantException("Implicit grant type not supported from token endpoint");
      }

      if (isAuthCodeRequest(parameters)) {
        // The scope was requested or determined during the authorization step
        if (!tokenRequest.getScope().isEmpty()) {
          logger.debug("Clearing scope of incoming token request");
          tokenRequest.setScope(Collections.<String>emptySet());
        }
      }

      logger.debug("request parameters " + parameters);
      // The scope was requested or determined during the authorization step
      if (parameters.get(OAuth2Constants.PARAMETER.CODE) != null
          && !StringGenerator.uuidMatches(parameters.get(OAuth2Constants.PARAMETER.CODE))) {
        throw new InvalidRequestException("The code is not valid format .");
      }

      if (isRefreshTokenRequest(parameters)) {
        // A refresh token has its own default scopes, so we should ignore any added by the factory here.
        tokenRequest.setScope(OAuth2Utils.parseParameterList(parameters.get(OAuth2Constants.PARAMETER.SCOPE)));
      }
      //granter grant access token
      token = getTokenGranter().grant(tokenRequest.getGrantType(), tokenRequest);
      if (token == null) {
        throw new UnsupportedGrantTypeException("Unsupported grant type: " + tokenRequest.getGrantType());
      }
    } catch (OAuth2Exception oauth2Exception) {
      token = new DefaultOAuth2AccessToken(oauth2Exception);
    } catch (InsufficientAuthenticationException authenticationException) {
      token = new DefaultOAuth2AccessToken(
          new OAuth2Exception(authenticationException.getMessage()));
    }
    return getResponse(token);
  }
在session里获取Authentication认证对象,然后得到clientId,进而得到ClientDetails对象
利用ClientDetails对象构建TokenRequest对象,TokenRequest对象的一些属性
requestParameters
clientId
scopes
grantType:授权枚举值有
authorization_code,password,implicit,client_credentials,refresh_token,id_token,token
在AbstractTokenGranter类里调用grant方法对TokenRequest对象授权
先构建OAuth2Request对象
再构建OAuth2Authentication对象
再构建OAuth2AccessToken对象
tokenServices.createAccessToken(getOAuth2Authentication(client, tokenRequest));
这行代码里面分别创建了refreshToken和accessToken对象,accessToken中的value属性就是客户端需要的code,把它们保存到tokenStore抽象存储对象中,以code作为key
当前springboot配置文件中tokenStore接口的实现类是InMemoryTokenStore,也就是把refreshToken和accessToken对象保存到java内存ConcurrentHashMap容器中。
grant方法返回OAuth2AccessToken类型对象accessToken,返回给客户端。
OAuth 2.0 用户信息接口
7.用token请求用户信息接口
http://192.168.129.23:9527/sign/api/oauth/v20/me
请求参数有
access_token=上面步骤5中返回的accessToken对象的value属性
  @Operation(summary = "OAuth 2.0 用户信息接口", description = "传递参数access_token", method = "GET")
  @RequestMapping(value = OAuth2Constants.ENDPOINT.ENDPOINT_USERINFO, method = {RequestMethod.POST, RequestMethod.GET})
  public void apiV20UserInfo(@RequestParam(value = "access_token", required = false) String access_token, HttpServletRequest request,
      HttpServletResponse response) {

    if (StringUtils.isBlank(access_token)) {
      //for header authorization bearer
      access_token = AuthorizationHeaderUtils.resolveBearer(request);
    }

    if (!StringGenerator.uuidMatches(access_token)) {
      httpResponseAdapter.write(response, JsonUtils.gson2Json(accessTokenFormatError(access_token)), "json");
    }

    OAuth2Authentication oAuth2Authentication = null;
    try {
      oAuth2Authentication = oauth20tokenServices.loadAuthentication(access_token);
      String client_id = oAuth2Authentication.getOAuth2Request().getClientId();
      ClientDetails clientDetails = clientDetailsService.loadClientByClientId(client_id, true);
      Apps app = appsService.get(client_id);

      AbstractAuthorizeAdapter adapter;
      if (ConstsBoolean.isTrue(app.getIsAdapter())) {
        adapter = (AbstractAuthorizeAdapter) Instance.newInstance(app.getAdapter());
        try {
          BeanUtils.setProperty(adapter, "clientDetails", clientDetails);
        } catch (IllegalAccessException | InvocationTargetException e) {
          _logger.error("setProperty error . ", e);
        }
      } else {
        adapter = (AbstractAuthorizeAdapter) new OAuthDefaultUserInfoAdapter(clientDetails);
      }

      adapter.setPrincipal((SignPrincipal) oAuth2Authentication.getUserAuthentication().getPrincipal());
      adapter.setApp(app);

      Object jsonData = adapter.generateInfo();
      httpResponseAdapter.write(response, jsonData.toString(), "json");
    } catch (OAuth2Exception e) {
      HashMap<String, Object> authzException = new HashMap<String, Object>();
      authzException.put(OAuth2Exception.ERROR, e.getOAuth2ErrorCode());
      authzException.put(OAuth2Exception.DESCRIPTION, e.getMessage());
      httpResponseAdapter.write(response, JsonUtils.gson2Json(authzException), "json");
    }
  }
验证access_token 是否存在tokenStore的ConcurrentHashMap容器中,不存在抛出错误Invalid access token
如果存在则在tokenStore中取出OAuth2AccessToken对象和OAuth2Authentication对象,并销毁当前请求的access_token,因为只能一次请求有效,然后得到clientId,进而得到ClientDetails对象和Apps对象,这两个对象分别对应数据库表if_apps_oauth_client_details表和if_apps表
从Apps对象取得adapter属性字符串,这是一个类路径字符串,利用java反射机制得到adapter对象,调用adapter对象的generateInfo方法得到用户信息返回
如果Apps对象adapter属性为空,这时默认实例化OauthDefaultUserInfoAdapter对象,调用它的generateInfo方法得到用户信息返回给客户端。
默认adapter返回的具体用户信息有
  @Override
  public Object generateInfo() {

    String subject = AbstractAuthorizeAdapter.getValueByUserAttr(userInfo, clientDetails.getSubject());
    _logger.debug("userId : {} , username : {} , displayName : {} , subject : {}",
        userInfo.getId(),
        userInfo.getUsername(),
        userInfo.getDisplayName(),
        subject);

    HashMap<String, Object> beanMap = new HashMap<String, Object>();
    beanMap.put("randomId", (new StringGenerator()).uuidGenerate());
    beanMap.put("userId", userInfo.getId());
    //for spring security oauth2
    beanMap.put("user", subject);
    beanMap.put("username", subject);

    beanMap.put("displayName", userInfo.getDisplayName());
    beanMap.put("employeeNumber", userInfo.getEmployeeNumber());
    beanMap.put("email", userInfo.getEmail());
    beanMap.put("mobile", userInfo.getMobile());
    beanMap.put("realname", userInfo.getDisplayName());
    beanMap.put("birthday", userInfo.getBirthDate());
    beanMap.put("departmentId", userInfo.getDepartmentId());
    beanMap.put("department", userInfo.getDepartment());
    beanMap.put("createdate", userInfo.getCreatedDate());
    beanMap.put("title", userInfo.getJobTitle());
    beanMap.put("state", userInfo.getWorkRegion());
    beanMap.put("gender", userInfo.getGender());
    beanMap.put("institution", userInfo.getInstId());
    beanMap.put(WebConstants.ONLINE_TICKET_NAME, principal.getSession().getFormattedId());

    String info = JsonUtils.object2Json(beanMap);
    return info;
  }


 4427
4427

 被折叠的 条评论
为什么被折叠?
被折叠的 条评论
为什么被折叠?
 到【灌水乐园】发言


