


概念
Maven是java的一个依赖管理工具。所谓依赖就是指在Java开发过程中引入的各种jar包和第三方库,而可能这些库本省还要引用其他的库,这样我们直接引用的称为直接依赖,库的依赖称为间接依赖。如果我们手动去引入这些依赖,过程将变得十分繁琐,因此需要一个仓库Maven来为我们管理并引入这些依赖。Maven中把每个依赖包称为构件。
那么我们如何从仓库中准确的查找到每个构件呢?这就需要通过坐标来完成,maven仓库的坐标由groupId、artifactId、version三者组成。其中groupId为你的公司名称,artifactId为你的项目名,version为项目的版本号,package为所需要创建的包名。即我们在maven仓库中查找依赖时,先找到公司名groupId,再找到项目名,最后找到版本号即可唯一确定一个依赖。
maven的仓库分为本地仓库和远程仓库,本地仓库是指maven会将依赖包下载到本地的某个位置,查找依赖时先查找本地仓库,如果没找到才回到网上的远程仓库进行查找并下载。如果大家都访问maven的同一个仓库,会造成负载压力过大且访问过慢,因此maven在不同地方提供了镜像仓库供人们就近访问。
maven还提供了许多插件,我们可以使用插件很便捷地完成项目的构建、编译、打包等操作。
在maven中如果A依赖B,B依赖C,C依赖D,而A依赖E,E也依赖D,那么A会依赖关系较近E的D。如果两个依赖据A一样近,则会根据依赖解析的先后顺序进行依赖。
安装配置
安装:首先从Maven官网下载所需maven的压缩包,之后将其解压,最后将解压目录下的bin文件夹添加到PATH路径中就可以在命令行下使用mvn -v查看版本信息。可以看到所使用的Java版本,注意maven使用Java的版本是否为系统所使用的java
PS D:\Program\IDE\Java\maven\bin> ./mvn -v
Apache Maven 3.6.3 (cecedd343002696d0abb50b32b541b8a6ba2883f)
Maven home: D:\Program\IDE\Java\maven\bin\..
Java version: 1.8.0_231, vendor: Oracle Corporation, runtime: D:\Program\IDE\Java\jdk8\jre
Default locale: zh_CN, platform encoding: GBK
OS name: "windows 10", version: "10.0", arch: "amd64", family: "windows"在maven安装目录下的/conf/settings.xml文件是maven的全局配置文件,可以在其中对maven的不同属性进行设置。不同用户可以根据自己需要修改用户目录下/.m2/settings.xml文件,这是用户的配置文件。配置文件的优先级从高到低为:pom.xml、用户配置 settings.xml、全局系统 settings.xml。如果这些文件同时存在,在应用配置时,会合并它们的内容,如果有重复的配置,优先级高的配置会覆盖优先级低的。配置文件的主要内容如下所示
<settings xmlns="http://maven.apache.org/SETTINGS/1.0.0" xmlns:xsi="http://www.w3.org/2001/XMLSchema-instance"
    xsi:schemaLocation="http://maven.apache.org/SETTINGS/1.0.0 https://maven.apache.org/xsd/settings-1.0.0.xsd">
    <localRepository/>
    <interactiveMode/>
    <offline/>
    <pluginGroups/>
    <servers/>
    <mirrors/>
    <proxies/>
    <profiles/>
    <activeProfiles/>
</settings>
配置仓库:在<localRepository>标签中指定本地仓库的位置。
<localRepository>D:/Java/maven/repository</localRepository>
<!-- 是否需要在离线模式下运行,默认为 false。常用于服务器不能连接远程仓库的时候 -->
<offline>false</offline>
使用某个插件,如果没有指定 groupId 的时候,maven 就会使用该列表中的插件。
<!-- 是否需要使用 ~/.m2/plugin-registry.xml 文件来管理插件版本。默认为 false -->
<usePluginRegistry>false</usePluginRegistry>

<pluginGroups>
<!-- plugin 的 groupId-->
    <pluginGroup>org.codehaus.mojo</pluginGroup>
</pluginGroups>
设置镜像源:从国内镜像源下载依赖比直接使用默认下载源更快,在<mirros>标签内如下配置为阿里云的镜像源
  <mirrors>
    <mirror>
    <id>aliyunmaven</id>
    <mirrorOf>central</mirrorOf>
    <name>aliyun maven</name>
    <url>https://maven.aliyun.com/repository/public </url>
    </mirror>
  </mirrors>
代理进行配置
  <proxies>
    <proxy>
      <id>myproxy</id>
      <!-- 是否激活。当我们声明了一组代理,而某个时候只需要激活一个代理的时候 -->
      <active>true</active>
      <protocol>http</protocol>
      <host>proxy.somewhere.com</host>
      <port>8080</port>
      <username>proxyuser</username>
      <password>somepassword</password>
      <!-- 不被代理的主机名列表。该列表的分隔符由代理服务器指定,如下所示为竖线分隔 -->
      <nonProxyHosts>*.google.com|ibiblio.org</nonProxyHosts>
    </proxy>
  </proxies>
服务端的整体配置。如安全证书之类的信息应该配置在 settings.xml 文件中,避免配置在 pom.xml 中
<servers>
    <server>
        <id>server001</id>
        <!-- 鉴权用户名 -->
        <username>my_login</username>
        <!-- 鉴权密码 -->
        <password>my_password</password>
        <!-- 鉴权时使用的私钥位置。默认是 ${user.home}/.ssh/id_dsa -->
        <privateKey>${usr.home}/.ssh/id_dsa</privateKey>
        <!-- 鉴权时使用的私钥密码 -->
        <passphrase>some_passphrase</passphrase>
        <!-- 文件被创建时的权限 -->
        <filePermissions>664</filePermissions>
        <!-- 目录被创建时的权限 -->
        <directoryPermissions>775</directoryPermissions>
    </server>
</servers>
还有其他的配置属性可以在<profile>标签内进行单独设置。并且可以通过<activation>标签设置配置生效的条件,如果和其中的条件相匹配的话该profile内的设置就会被激活
<profiles>
    <profile>
        <id>test</id>

        <activation>
            <!-- 默认是否激活 -->
            <activeByDefault>false</activeByDefault>
            <!-- 当匹配的 jdk 被检测到,profile 被激活 -->
            <jdk>1.8</jdk>
            <!-- 对操作系统相关的属性进行匹配,满足条件则激活,如操作系统名name、所属家族family、体系架构arch、系统版本version -->
            <os>
                <name>Windows XP</name>
                <family>Windows</family>
                <arch>x86</arch>
                <version>5.1.2600</version>
            </os>
            <!-- maven匹配到name字段的属性为value定义的值时就会被激活 -->
            <property>
                <name>mavenVersion</name>
                <value>2.0.3</value>
            </property>
            <!-- 通过检测该文件的存在exists或不存在missing来激活 profile-->
            <file>
                <exists>${basedir}/file2.properties</exists>
                <missing>${basedir}/file1.properties</missing>
            </file>
        </activation>
        ...
    </profile>
</profiles>
可以通过配置文件中的<properties>标签传递属性值,这些值可以在 pom.xml 中的任何地方使用标记 ${X} 来使用,这里 X 是指属性的名称。在 settings.xml 文件中可以访问以下五种不同形式的属性:
- env.X:在一个变量前加上 "env." 的前缀,会返回一个 shell 环境变量。例如:"env.PATH" 指代了 $path 环境变量(在 Windows 上是 %PATH%)
- project.x:指代了 pom.xml 中对应的元素值。例如:<project><version>1.0</version></project> 通过 ${project.version} 获得 version 的值
- settings.x:指代了 settings.xml 中对应元素的值。例如:<settings><offline>false</offline></settings> 通过 ${settings.offline} 获得 offline 的值
- Java System Properties:所有可通过 java.lang.System.getProperties() 访问的属性都能在 pom.xml 中使用该形式访问,例如:${java.home}
- x:在 <properties/> 元素中,或者外部文件中设置,以 ${someVar} 的形式使用
如下所示,当该profile激活后,可以在POM文件中通过${user.install}访问到值
<profiles>
    <profile>
        ...
        <properties>
            <user.install>${user.home}/our-project</user.install>
        </properties>
        ...
    </profile>
</profiles>
在<profile>内可以通过<repositories>标签对本地仓库和远程仓库的同步等根据不同的触发条件进行相关配置。在其中可以分别针对仓库中的release版本和snapshot版本分别进行设置,release为稳定版,版本号一旦确定代码不会发生更改;snapshot是在版本号后面添加 -SNAPSHOT 字符,可以多次重新提交修改。
<profiles>
    <profile>
        ...
        <repositories>
            <repository>
                <id>codehausSnapshots</id>
                <name>Codehaus Snapshots</name>
                <url>http://snapshots.maven.codehaus.org/maven2</url>
                <layout>default</layout>
                <!-- 处理远程仓库中releases版本的下载 -->
                <releases>
                    <enabled>false</enabled>
                    <!-- 更新频率,always(一直)、daily(默认,每日)、interval:X(间隔x分钟)、never(从不) -->
                    <updatePolicy>always</updatePolicy>
                    <!-- 当 maven 验证构件校验文件失败时:ignore(忽略)、fail(失败)、 warn(警告)-->
                    <checksumPolicy>warn</checksumPolicy>
                </releases>
                <!-- 处理远程仓库中snapshots版本版本的下载 -->
                <snapshots>
                    <enabled>true</enabled>
                    <updatePolicy>never</updatePolicy>
                    <checksumPolicy>fail</checksumPolicy>
                </snapshots>
            </repository>
        </repositories>

        <!-- 对插件仓库进行设置-->
        <pluginRepositories>
            ...
        </pluginRepositories>
        ...
    </profile>
</profiles>
针对上面配置的不同<profile>标签,也可以手动进行激活而不必满足<activation>规定的条件,在<activeProfiles>内指定想要激活的profile的id即可激活
<profiles>
    ...
    <activeProfiles>
        <activeProfile>env-test</activeProfile>
    </activeProfiles>
</profiles>
配置JDK版本:maven默认使用jdk-1.5版本,如果需要指定jdk默认版本,需要在settings.xml文件中配置如下
<profiles>
    <profile>
      <id>jdk-1.8</id>
      <activation>
	    <activeByDefault>true</activeByDefault>
        <jdk>1.8</jdk>
      </activation>
	  <properties>
		<maven.compiler.source>1.8</maven.compiler.source>
		<maven.compiler.target>1.8</maven.compiler.target>
		<maven.compiler.compilerVersion>1.8</maven.compiler.compilerVersion>
	  </properties>
    </profile>
</profiles>
创建项目
maven常用的命令如下:
| mvn compile | 编译项目 |
| mvn test | 测试项目 |
| mvn package | 打包项目 |
| mvn install | 安装jar包到本地仓库 |
| mvn clean | 删除编译好的目标文件 |
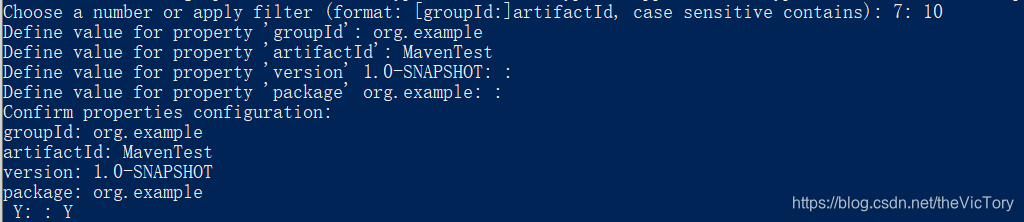
通过archetype插件创建项目:在命令行输入mvn archetype:generate会开始自动创建maven项目,如下所示会提示选择要创建的maven类型编号、并输入groupId、artifactId、version、package等内容。
如下所示为生成项目的pom.xml文件,其中<groupId>、<artifactId>、<version>为项目的坐标。<packaging>标签指定了项目默认的打包方式为jar,还可以指定为war包的方式。
<project xmlns="http://maven.apache.org/POM/4.0.0" xmlns:xsi="http://www.w3.org/2001/XMLSchema-instance"
  xsi:schemaLocation="http://maven.apache.org/POM/4.0.0 http://maven.apache.org/xsd/maven-4.0.0.xsd">
  <modelVersion>4.0.0</modelVersion>

  <groupId>org.example</groupId>
  <artifactId>MavenTest</artifactId>
  <version>1.0-SNAPSHOT</version>
  <packaging>jar</packaging>

  <name>MavenTest</name>
  <url>http://maven.apache.org</url>

  <properties>
    <project.build.sourceEncoding>UTF-8</project.build.sourceEncoding>
  </properties>

  <dependencies>
    <dependency>
      <groupId>junit</groupId>
      <artifactId>junit</artifactId>
      <version>3.8.1</version>
      <scope>test</scope>
    </dependency>
  </dependencies>
</project>
也可以在一条命令行中指定 groupId、artifactId、version、package等内容
mvn archetype:generate -DgroupId=com.tory -DartifactId=spring-mvc-study -DarchetypeArtifactId=maven-archetype-webapp最后使用jetty容器运行项目:mvn jetty:run ,注意需要在pom中引入jetty插件,当然也可以引入Tomcat插件在该容器中运行项目。
如果是spring boot项目,则可以使用mvn spring-boot:run来运行项目。在编译过程中遇到如下两个报错
Failed to execute goal org.apache.maven.plugins:maven-resources-plugin:3.2.0
Failed to execute goal org.apache.,maven.plugins:maven-compiler-plugin:3.8.1
这是由于版本依赖出现问题,需要在pom中修改插件的依赖如下:
    <build>
        <plugins>
            <plugin>
                <groupId>org.springframework.boot</groupId>
                <artifactId>spring-boot-maven-plugin</artifactId>
            </plugin>
            <plugin>
                <groupId>org.apache.maven.plugins</groupId>
                <artifactId>maven-resources-plugin</artifactId>
                <version>2.4.3</version>
            </plugin>
            <plugin>
                <groupId>org.apache.maven.plugins</groupId>
                <artifactId>maven-compiler-plugin</artifactId>
                <version>3.8.1</version>
                <configuration>
                    <source>1.8</source>
                    <target>1.8</target>
                </configuration>
            </plugin>
        </plugins>
    </build>
IDEA中使用Maven
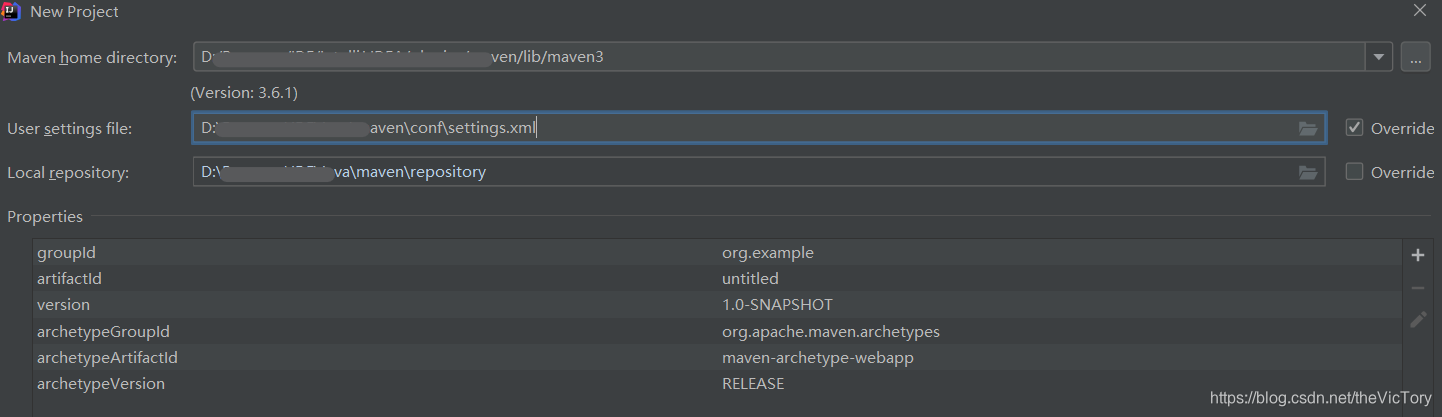
在IntelliJ IDEA中创建Maven项目更为简便,首先在IDEA中配置maven:在IDEA中打开->File | Settings | Build, Execution, Deployment | Build Tools | Maven对如下三个选项栏进行配置,分别对应maven的安装目录,配置文件及仓库的目录

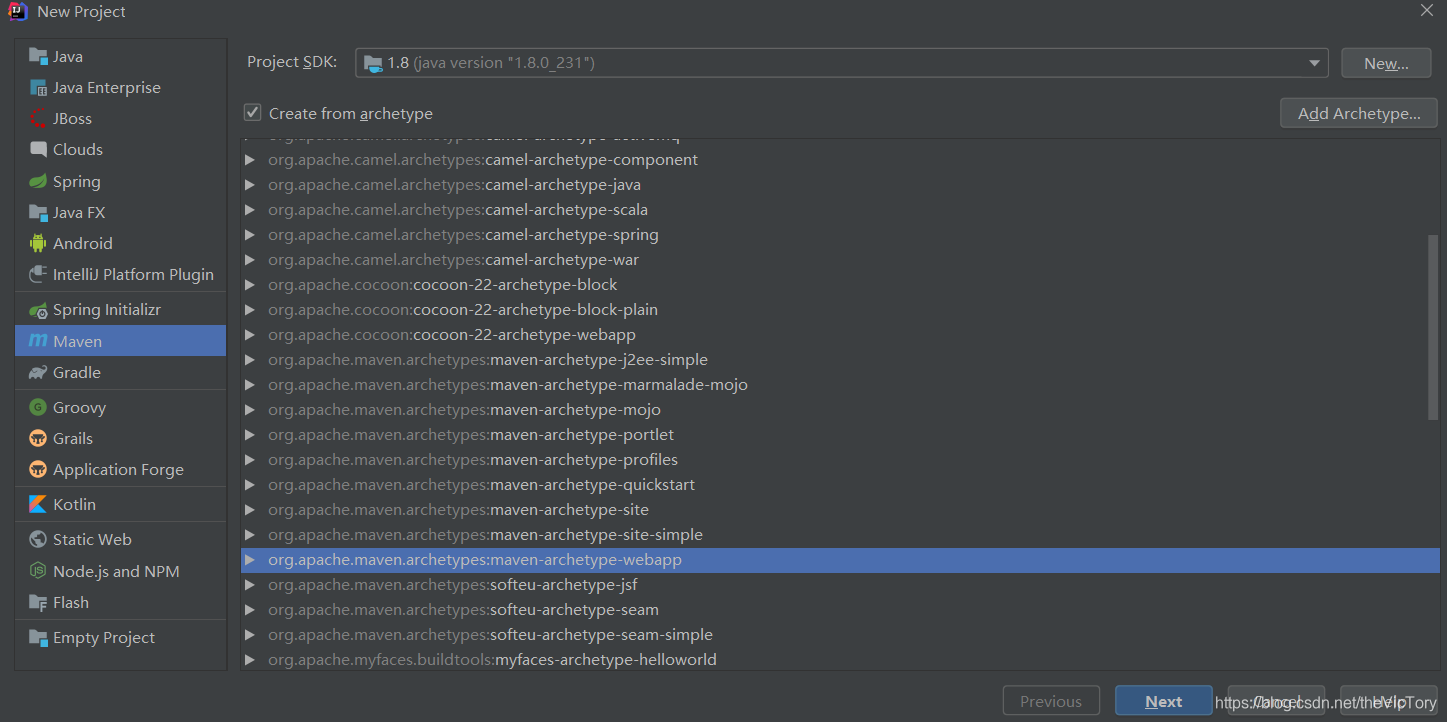
接着创建一个Maven项目,点击 File | New | Project弹出如下界面,选择maven类型并点击Next。如果需要创建模板可以勾选create from archetype并选择所需模板
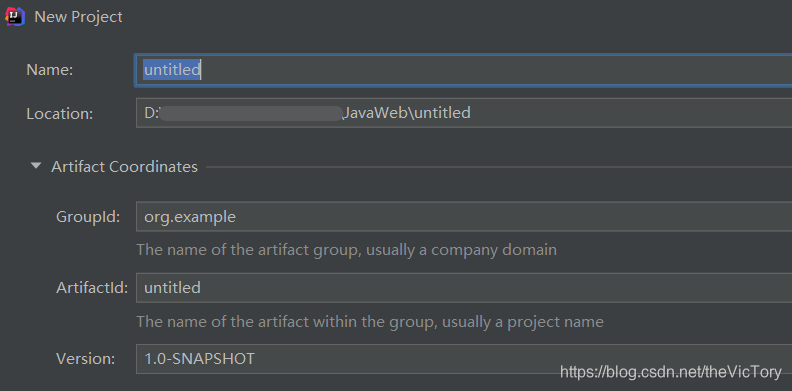
接下来设置项目名称与位置,并且设置GroupId、ArtifactId、Version信息
最后选择maven的信息,点击Finish创建完成
pom.xml文件
POM是项目对象模型(Project Object Model)的简称,创建好maven项目后会在根目录下生成pom.xml文件对依赖进行管理。如下所示,
首先<modelVersion>指定了POM的版本。
<groupId>、<artifactId>、<version>分别指定了项目的三个坐标,groupId通常由“公司名.项目名”构成,artifactId由“项目-模块名”构成。version一般由三位数字,第一个数字代表大版本号,第二个数字代表分支版本号,第三个数字代表小版本号。后面的Snapshot代表快照版本,alpha代表内测版本,beta代表公测版本,RC(Release Candidate)发行前最后的候选版本,release代表稳定版本,GA(General Availability)正式发布版。
<packaging>指定项目的打包方式,默认为jar包
<name>代表项目的名字,<url>为项目的网址
<dependencies>中通过坐标的方式引入项目需要的具体依赖。<scope>代表依赖使用的范围,这里为test代表只能在test中使用该依赖。默认为compile,在编译、测试、运行都有效,provided在编译、测试有效,runtime在测试、运行有效。还可以使用<exclusion>标签来排除引用依赖的传递依赖,比如A依赖B,B依赖C,在A中引入B依赖时不希望引用C,这时就可以使用exclusion排除C。
<build>下引入所使用的maven插件
<?xml version="1.0" encoding="UTF-8"?>
<project xmlns="http://maven.apache.org/POM/4.0.0" xmlns:xsi="http://www.w3.org/2001/XMLSchema-instance"
  xsi:schemaLocation="http://maven.apache.org/POM/4.0.0 http://maven.apache.org/xsd/maven-4.0.0.xsd">
  <!--指定POM版本-->
  <modelVersion>4.0.0</modelVersion>

  <!--项目的maven坐标-->
  <groupId>org.example</groupId>
  <artifactId>SpringMVC</artifactId>
  <version>1.0.0-SNAPSHOT</version>
  <packaging>war</packaging>

  <name>SpringMVC Maven Webapp</name>
  <!-- FIXME change it to the project's website -->
  <url>http://www.example.com</url>

  <!--项目所需依赖-->
  <dependencies>
    <dependency>
      <groupId>junit</groupId>
      <artifactId>junit</artifactId>
      <version>4.11</version>
      <scope>test</scope>
    </dependency>
  </dependencies>

  <!--所用maven插件-->
  <build>
    <finalName>SpringMVC</finalName>
    <pluginManagement>
      <plugins>
        <plugin>
          <artifactId>maven-clean-plugin</artifactId>
          <version>3.1.0</version>
        </plugin>
      </plugins>
    </pluginManagement>
  </build>
</project>
pom的依赖可以进行继承,例如在父类项目的pom的<dependencyManagement>中引入了junit依赖如下,则在子项目依赖了父项目之后就可以继承junit而不需要再次引入。
  <dependencyManagement>
    <dependencies>
      <dependency>
        <groupId>junit</groupId>
        <artifactId>junit</artifactId>
        <version>4.13</version>
        <scope>test</scope>
      </dependency>
    </dependencies>
  </dependencyManagement>
有时我们需要引入本地的jar包,例如我把auth-1.1.10.jar放在src/lib文件夹下,使用maven引入如下,其中<scope>设置为system表示这个依赖包不会从maven仓库获取,而是从本地<systemPath>获取
<dependency>
    <groupId>cmb</groupId>
    <artifactId>netpayment</artifactId>
    <version>1.0</version>
    <scope>system</scope>
    <systemPath>${basedir}/src/lib/auth-1.1.0.jar</systemPath>
</dependency>
Maven默认仅打包当前项目,而不会将依赖一起打包,如果运行在没有依赖的服务器上则有可能会报错,因此可以通过maven-assembly-plugin插件将依赖一同打包
<build>
    <plugins>
        <plugin>
            <artifactId>maven-assembly-plugin</artifactId>
            <configuration>
                <descriptorRefs>
                    <descriptorRef>jar-with-dependencies</descriptorRef>
                </descriptorRefs>
            </configuration>
            <executions>
                <execution>
                    <id>make-assembly</id>
                    <phase>package</phase>
                    <goals>
                        <goal>single</goal>
                    </goals>
                </execution>
            </executions>
        </plugin>
    </plugins>
</build>
mvnw
mvnw是Maven Wrapper的缩写。因为我们安装Maven时,默认情况下,系统所有项目都会使用全局安装的这个Maven版本。但是,对于某些项目来说,它可能必须使用某个特定的Maven版本,这个时候,就可以使用Maven Wrapper,它可以负责给这个特定的项目安装指定版本的Maven,而其他项目不受影响。
安装Maven Wrapper最简单的方式是在项目的根目录(即pom.xml所在的目录)下运行安装命令:它会自动使用最新版本的Maven。注意0.7.6是Maven Wrapper的版本
mvn -N io.takari:maven:0.7.6:wrapper
my-project
├── .mvn
│   └── wrapper
│       ├── MavenWrapperDownloader.java
│       ├── maven-wrapper.jar
│       └── maven-wrapper.properties
├── mvnw
├── mvnw.cmd
├── pom.xml
└── src
    ├── main
    │   ├── java
    │   └── resources
    └── test
        ├── java
└── resources 发现多了mvnw、mvnw.cmd和.mvn目录,我们只需要把mvn命令改成mvnw就可以使用跟项目关联的Maven操作了。


 1281
1281

 被折叠的 条评论
为什么被折叠?
被折叠的 条评论
为什么被折叠?
 到【灌水乐园】发言


