


原文:http://blog.csdn.net/duo2005duo/article/details/50696166
续上一篇Android常用开源工具(1)-Dagger2入门,这篇主要介绍Dagger单例,延迟加载,强制加载,以及使用Subcomponent等一些进阶用法。如果你还没看前一篇文章请先看前一篇文章。
实现单例
创建某些对象有时候是耗时浪费资源或者没有完全必要的,这时候Component没有必要重复地使用Module来创建这些对象。举个例子,当我们需要榨果汁时,我们榨苹果汁与榨香蕉汁可以使用相同一台榨果汁机器,我们只需要创建出一台榨果汁机器。我们可以使用@Singleton来缓存“榨果汁机器”,这样在下一次需要“榨果汁机器”时会直接使用上一次的缓存,如下
- 1
- 2
- 3
- 4
- 5
- 6
- 7
- 8
- 9
- 10
- 11
- 12
- 13
- 14
- 15
- 16
- 17
- 18
- 19
- 20
- 21
- 22
- 23
- 24
- 1
- 2
- 3
- 4
- 5
- 6
- 7
- 8
- 9
- 10
- 11
- 12
- 13
- 14
- 15
- 16
- 17
- 18
- 19
- 20
- 21
- 22
- 23
- 24
上面的例子可以看到,实现单例需要两步
1.在Module对应的Provides方法标明@Singleton
2.同时在Component类标明@Singleton
这样,JuiceComponent每次注入Container中的Machine都是同一个FruitJuiceMachine对象。
单例的保存位置
Java中,单例通常保存在一个静态域中,这样的单例往往要等到虚拟机关闭时候,该单例所占用的资源才释放。但是,Dagger通过Singleton创建出来的单例并不保持在静态域上,而是保留在Component实例中。要理解这一点,请看下面代码,续上文中的例子
- 1
- 2
- 3
- 4
- 5
- 6
- 7
- 8
- 9
- 10
- 11
- 12
- 13
- 14
- 15
- 1
- 2
- 3
- 4
- 5
- 6
- 7
- 8
- 9
- 10
- 11
- 12
- 13
- 14
- 15
c1前后两次分别注入container1,container2,每个Component对象保留各自的单例对象,而container1,container2都是使用c1来注入machine,所以他们的machine对象是相同的。而container2与container3分别使用c1,c2来注入machine,所以他们的machine对象是不同的。
自定义Scope
@Singleton就是一种Scope注解,也是Dagger2唯一自带的Scope注解,下面是@Singleton的源码
- 1
- 2
- 3
- 4
- 1
- 2
- 3
- 4
可以看到定义一个Scope注解,必须添加以下三部分:
@Scope :注明是Scope
@Documented :标记在文档
@Retention(RUNTIME) :运行时级别
对于Android,我们通常会定义一个针对整个APP全生命周期的@PerApp的Scope注解,通过仿照@Singleton
- 1
- 2
- 3
- 4
- 1
- 2
- 3
- 4
一般来说,我们通常还会定义一个针对一个Activity生命周期的@PerActivity的Scope注解,类似地:
- 1
- 2
- 3
- 4
- 1
- 2
- 3
- 4
为何我们要定义多个Scope,使用自带的Singleton不好么?这是因为使用Scope有两方面的好处:
一方面是为了给Singleton定义一个别名,这样看到这个别名,你就知道这个Singleton的有效范围。
比如你可以定义一个@PerApp
- 1
- 2
- 3
- 4
- 5
- 6
- 7
- 8
- 9
- 10
- 11
- 12
- 13
- 14
- 15
- 16
- 17
- 18
- 19
- 20
- 21
- 22
- 23
- 24
- 25
- 26
- 27
- 28
- 29
- 30
- 1
- 2
- 3
- 4
- 5
- 6
- 7
- 8
- 9
- 10
- 11
- 12
- 13
- 14
- 15
- 16
- 17
- 18
- 19
- 20
- 21
- 22
- 23
- 24
- 25
- 26
- 27
- 28
- 29
- 30
类似的,你也可以定义一个@PerActivity,有效范围是当前这个Activity,如下:
- 1
- 2
- 3
- 4
- 5
- 6
- 7
- 1
- 2
- 3
- 4
- 5
- 6
- 7
另一方面,如果两个Component间有依赖关系,那么它们不能使用相同的Scope。如果使用相同的Scope会带来语义混乱。考虑以下情况:
- 1
- 2
- 3
- 1
- 2
- 3
我们先设
1.c1中有单例V
2.假设Component1与Component2有相同的Scope
3.Component2依赖Component1
推出以下矛盾
1.由于Component1跟Component2具有相同的Scope,而c2_a,c2_b是Component2的不同实例,所以c2_a,c2_b应该具备不同的V
2.由于c2_a,c2_b的V都是存在c1中,而且在c1中应该具备唯一的V,所以c2_a,c2_b应该具备相同的V。
所以推出矛盾,证明依赖的Component间不能使用相同的Scope。
Subcomponent
如果一个Component的功能不能满足你的需求,你需要对它进行拓展,一种办法是使用Component(dependencies=××.classs)。另外一种是使用@Subcomponent,Subcomponent用于拓展原有component。同时,这将产生一种副作用——子component同时具备两种不同生命周期的scope。子Component具备了父Component拥有的Scope,也具备了自己的Scope。
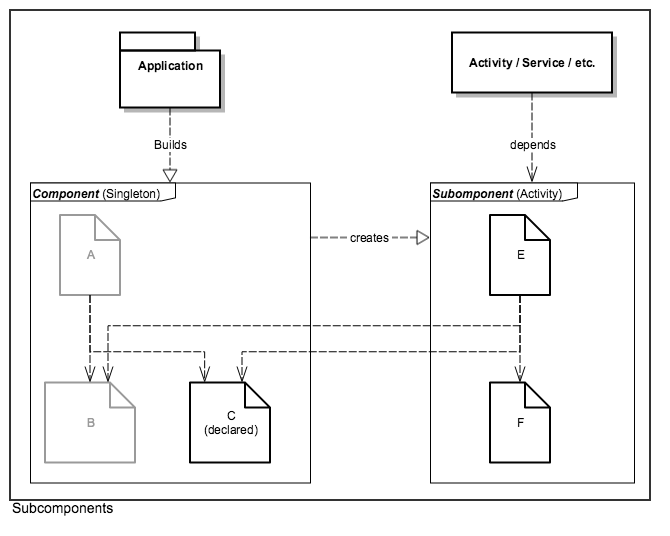
Subcomponent其功能效果优点类似component的dependencies。但是使用@Subcomponent不需要在父component中显式添加子component需要用到的对象,只需要添加返回子Component的方法即可,子Component能自动在父Component中查找缺失的依赖。
- 1
- 2
- 3
- 4
- 5
- 6
- 7
- 8
- 9
- 10
- 11
- 12
- 13
- 14
- 15
- 16
- 17
- 18
- 19
- 20
- 21
- 1
- 2
- 3
- 4
- 5
- 6
- 7
- 8
- 9
- 10
- 11
- 12
- 13
- 14
- 15
- 16
- 17
- 18
- 19
- 20
- 21
通过Subcomponent,子Component就好像同时拥有两种Scope,当注入的元素来自父Component的Module,则这些元素会缓存在父Component,当注入的元素来自子Component的Module,则这些元素会缓存在子Component中。
Lazy与Provider
Lazy和Provider都是用于包装Container中需要被注入的类型,Lazy用于延迟加载,Provide用于强制重新加载,具体如下:
- 1
- 2
- 3
- 4
- 5
- 6
- 7
- 8
- 9
- 1
- 2
- 3
- 4
- 5
- 6
- 7
- 8
- 9
值得注意的是,Provider保证每次重新加载,但是并不意味着每次返回的对象都是不同的。只有Module的Provide方法每次都创建新实例时,Provider每次get()的对象才不相同。
Multibindings
Multibindings的应用场景比较少,主要用于插件化的实现,Multibindings分成Set与Map,Map的Multibindings目前还是Beta版本,也就是说还是在试验阶段,所以只介绍简单的Set的Multibindings。
通过Multibindings,Dagger可以将不同Module产生的元素整合到同一个集合。更深层的意义是,Module在此充当的插件的角色,客户端通过这些插件的不同而获取到不同的集合。
举个例子,一个机器可以安装不同插件来做不同的事,安装扫地插件则可以扫地,安装煮饭插件则可以煮饭,下面是个完整例子。
- 1
- 2
- 3
- 4
- 5
- 6
- 7
- 8
- 9
- 10
- 11
- 12
- 13
- 14
- 15
- 16
- 17
- 18
- 19
- 20
- 21
- 22
- 23
- 24
- 25
- 26
- 27
- 28
- 29
- 30
- 31
- 32
- 33
- 34
- 1
- 2
- 3
- 4
- 5
- 6
- 7
- 8
- 9
- 10
- 11
- 12
- 13
- 14
- 15
- 16
- 17
- 18
- 19
- 20
- 21
- 22
- 23
- 24
- 25
- 26
- 27
- 28
- 29
- 30
- 31
- 32
- 33
- 34
上文是使用Multibindings实现Set的整合,此外Multibindings还支持Map,由于Dagger对Map的支持还处在试验阶段,所以不深入介绍。所以有兴趣的话可以直接阅读官方文档


 322
322

 被折叠的 条评论
为什么被折叠?
被折叠的 条评论
为什么被折叠?
 到【灌水乐园】发言


