


参考资料
参考资料连接:Kubernetes-Containerd简化搭建 - 晓风残月的博客
1.节点创建并完成初始化
1.1 节点要求
2核,2G内存,禁用交换分区。
1.2 安装ifconfig工具
yum search ifconfig

yum install -y net-tools.x86_64
1.3 安装工具包
yum install -y chrony yum-utils zlib zlib-devel openssl openssl-devel \
net-tools vim wget lsof unzip zip bind-utils lrzsz telnet
1.4 处理无法挂起问题
参考资料:https://blog.csdn.net/nathan8/article/details/113916533
setenforce 0
sed -i 's/^SELINUX=enforcing$/SELINUX=permissive/' /etc/selinux/config
1.5 关闭防火墙
# 防火墙停止
systemctl stop firewalld.service
# 查询防火墙状态
systemctl status firewalld
# 关闭防火墙开启自启
systemctl disable firewalld
1.6 关闭selinux
1.2.3完成处理。
1.7 修改hostname
hostnamectl set-hostname master 备注:kubeadm默认会将hostname中的值作为节点的name注册到k8s中。
1.8 关闭swap
swapoff -a
sed -ri 's/.*swap.*/#&/' /etc/fstab
1.9 时间同步
systemctl enable chronyd --now
chronyc sources
1.10 安装生效ipvs
1.10.1 ipvs
cat > /etc/sysconfig/modules/ipvs.modules <<EOF
#!/bin/bash
modprobe -- ip_vs
modprobe -- ip_vs_rr
modprobe -- ip_vs_wrr
modprobe -- ip_vs_sh
modprobe -- nf_conntrack_ipv4
EOF
1.10.2 配置权限
chmod 755 /etc/sysconfig/modules/ipvs.modules && bash /etc/sysconfig/modules/ipvs.modules && lsmod | grep -e ip_vs -e nf_conntrack_ipv41.10.3 安装ipset和ipvsadm
yum install -y ipset ipvsadm1.11 配置ipvs
modprobe br_netfilter备注:
modprobe命令 用于智能地向内核中加载模块或者从内核中移除模块。
br_netfilter 透明防火墙(Transparent Firewall)又称桥接模式防火墙(Bridge Firewall)。简单来说,就是在网桥设备上加入防火墙功能。透明防火墙具有部署能力强、隐蔽性好、安全性高的优点。
cat > /etc/sysctl.d/k8s.conf << EOF
net.bridge.bridge-nf-call-ip6tables = 1
net.bridge.bridge-nf-call-iptables = 1
net.ipv4.ip_forward = 1
EOF
1.11.1 验证
sysctl --system 1.11.2 参数说明
bridge-nf 使得 netfilter 可以对 Linux 网桥上的 IPv4/ARP/IPv6 包过滤,常用的选项包括:
net.bridge.bridge-nf-call-arptables:是否在 arptables 的 FORWARD 中过滤网桥的 ARP 包
net.bridge.bridge-nf-call-ip6tables:是否在 ip6tables 链中过滤 IPv6 包
net.bridge.bridge-nf-call-iptables:是否在 iptables 链中过滤 IPv4 包
net.bridge.bridge-nf-filter-vlan-tagged:是否在 iptables/arptables 中过滤打了 vlan 标签的包。
1.11.3 备注
每次重启服务器后需要执行 modprobe br_netfilter 命令。具体原理不太清楚。
1.12 生成快照
这里完成后生成一份master节点服务器的快照。
2.安装containerd
2.1 安装libseccomp
yum install libseccomp -y2.2 创建containerd目录并进入
mkdir -p /usr/etc/containerd && cd /usr/etc/containerd2.3 下载containerd压缩包
2.3.1 在线
wget https://download.fastgit.org/containerd/containerd/releases/download/v1.5.5/cri-containerd-cni-1.5.5-linux-amd64.tar.gz2.3.2 离线
2.4 解压缩
tar -C / -xzf cri-containerd-cni-1.5.5-linux-amd64.tar.gz2.5 修改配置
echo "export PATH=$PATH:/usr/local/bin:/usr/local/sbin" >> ~/.bashrc
source ~/.bashrc
2.5.1 说明
.bashrc,这个文件主要保存个人的一些个性化设置,如命令别名、路径等。
2.6 创建文件夹,这个是为了安装配置文件
mkdir -p /etc/containerd2.7 设置开启自动启动
systemctl enable containerd --now2.7.1 说明
2.7.1.1 资料来源
https://blog.csdn.net/weixin_39963341/article/details/1111072372.7.1.2 systemctl 相关命令
systemctl 提供了一组子命令来管理单个的 unit,其命令格式为:
systemctl [command] [unit]
command 主要有:
start:立刻启动后面接的 unit。
stop:立刻关闭后面接的 unit。
restart:立刻关闭后启动后面接的 unit,亦即执行 stop 再 start 的意思。
reload:不关闭 unit 的情况下,重新载入配置文件,让设置生效。
enable:设置下次开机时,后面接的 unit 会被启动。
disable:设置下次开机时,后面接的 unit 不会被启动。
status:目前后面接的这个 unit 的状态,会列出有没有正在执行、开机时是否启动等信息。
is-active:目前有没有正在运行中。
is-enable:开机时有没有默认要启用这个 unit。
kill :不要被 kill 这个名字吓着了,它其实是向运行 unit 的进程发送信号。
show:列出 unit 的配置。
mask:注销 unit,注销后你就无法启动这个 unit 了。
unmask:取消对 unit 的注销。
2.8 查看版本,确认安装成功
ctr version响应如下图所示:

2.9 配置containerd
2.9.1 创建文件
vi /etc/containerd/config.toml2.9.2 配置文件内容
disabled_plugins = []
imports = []
oom_score = 0
plugin_dir = ""
required_plugins = []
root = "/var/lib/containerd"
state = "/run/containerd"
version = 2

[cgroup]
  path = ""

[debug]
  address = ""
  format = ""
  gid = 0
  level = ""
  uid = 0

[grpc]
  address = "/run/containerd/containerd.sock"
  gid = 0
  max_recv_message_size = 16777216
  max_send_message_size = 16777216
  tcp_address = ""
  tcp_tls_cert = ""
  tcp_tls_key = ""
  uid = 0

[metrics]
  address = ""
  grpc_histogram = false

[plugins]

  [plugins."io.containerd.gc.v1.scheduler"]
    deletion_threshold = 0
    mutation_threshold = 100
    pause_threshold = 0.02
    schedule_delay = "0s"
    startup_delay = "100ms"

  [plugins."io.containerd.grpc.v1.cri"]
    disable_apparmor = false
    disable_cgroup = false
    disable_hugetlb_controller = true
    disable_proc_mount = false
    disable_tcp_service = true
    enable_selinux = false
    enable_tls_streaming = false
    ignore_image_defined_volumes = false
    max_concurrent_downloads = 3
    max_container_log_line_size = 16384
    netns_mounts_under_state_dir = false
    restrict_oom_score_adj = false
    sandbox_image = "k8s.gcr.io/pause:3.5"
    selinux_category_range = 1024
    stats_collect_period = 10
    stream_idle_timeout = "4h0m0s"
    stream_server_address = "127.0.0.1"
    stream_server_port = "0"
    systemd_cgroup = false
    tolerate_missing_hugetlb_controller = true
    unset_seccomp_profile = ""

    [plugins."io.containerd.grpc.v1.cri".cni]
      bin_dir = "/opt/cni/bin"
      conf_dir = "/etc/cni/net.d"
      conf_template = ""
      max_conf_num = 1

    [plugins."io.containerd.grpc.v1.cri".containerd]
      default_runtime_name = "runc"
      disable_snapshot_annotations = true
      discard_unpacked_layers = false
      no_pivot = false
      snapshotter = "overlayfs"

      [plugins."io.containerd.grpc.v1.cri".containerd.default_runtime]
        base_runtime_spec = ""
        container_annotations = []
        pod_annotations = []
        privileged_without_host_devices = false
        runtime_engine = ""
        runtime_root = ""
        runtime_type = ""

        [plugins."io.containerd.grpc.v1.cri".containerd.default_runtime.options]

      [plugins."io.containerd.grpc.v1.cri".containerd.runtimes]

        [plugins."io.containerd.grpc.v1.cri".containerd.runtimes.runc]
          base_runtime_spec = ""
          container_annotations = []
          pod_annotations = []
          privileged_without_host_devices = false
          runtime_engine = ""
          runtime_root = ""
          runtime_type = "io.containerd.runc.v2"

          [plugins."io.containerd.grpc.v1.cri".containerd.runtimes.runc.options]
            BinaryName = ""
            CriuImagePath = ""
            CriuPath = ""
            CriuWorkPath = ""
            IoGid = 0
            IoUid = 0
            NoNewKeyring = false
            NoPivotRoot = false
            Root = ""
            ShimCgroup = ""
            SystemdCgroup = true

      [plugins."io.containerd.grpc.v1.cri".containerd.untrusted_workload_runtime]
        base_runtime_spec = ""
        container_annotations = []
        pod_annotations = []
        privileged_without_host_devices = false
        runtime_engine = ""
        runtime_root = ""
        runtime_type = ""

        [plugins."io.containerd.grpc.v1.cri".containerd.untrusted_workload_runtime.options]

    [plugins."io.containerd.grpc.v1.cri".image_decryption]
      key_model = "node"

    [plugins."io.containerd.grpc.v1.cri".registry]
      config_path = ""

      [plugins."io.containerd.grpc.v1.cri".registry.auths]

      [plugins."io.containerd.grpc.v1.cri".registry.configs]

      [plugins."io.containerd.grpc.v1.cri".registry.headers]

      [plugins."io.containerd.grpc.v1.cri".registry.mirrors]
      # 在这个地方新增镜像仓库地址
        [plugins."io.containerd.grpc.v1.cri".registry.mirrors."docker.io"]
          endpoint = ["https://kvuwuws2.mirror.aliyuncs.com"]
        [plugins."io.containerd.grpc.v1.cri".registry.mirrors."k8s.gcr.io"]
          endpoint = ["https://registry.aliyuncs.com/k8sxio"]

    [plugins."io.containerd.grpc.v1.cri".x509_key_pair_streaming]
      tls_cert_file = ""
      tls_key_file = ""

  [plugins."io.containerd.internal.v1.opt"]
    path = "/opt/containerd"

  [plugins."io.containerd.internal.v1.restart"]
    interval = "10s"

  [plugins."io.containerd.metadata.v1.bolt"]
    content_sharing_policy = "shared"

  [plugins."io.containerd.monitor.v1.cgroups"]
    no_prometheus = false

  [plugins."io.containerd.runtime.v1.linux"]
    no_shim = false
    runtime = "runc"
    runtime_root = ""
    shim = "containerd-shim"
    shim_debug = false

  [plugins."io.containerd.runtime.v2.task"]
    platforms = ["linux/amd64"]

  [plugins."io.containerd.service.v1.diff-service"]
    default = ["walking"]

  [plugins."io.containerd.snapshotter.v1.aufs"]
    root_path = ""

  [plugins."io.containerd.snapshotter.v1.btrfs"]
    root_path = ""

  [plugins."io.containerd.snapshotter.v1.devmapper"]
    async_remove = false
    base_image_size = ""
    pool_name = ""
    root_path = ""

  [plugins."io.containerd.snapshotter.v1.native"]
    root_path = ""

  [plugins."io.containerd.snapshotter.v1.overlayfs"]
    root_path = ""

  [plugins."io.containerd.snapshotter.v1.zfs"]
    root_path = ""

[proxy_plugins]

[stream_processors]

  [stream_processors."io.containerd.ocicrypt.decoder.v1.tar"]
    accepts = ["application/vnd.oci.image.layer.v1.tar+encrypted"]
    args = ["--decryption-keys-path", "/etc/containerd/ocicrypt/keys"]
    env = ["OCICRYPT_KEYPROVIDER_CONFIG=/etc/containerd/ocicrypt/ocicrypt_keyprovider.conf"]
    path = "ctd-decoder"
    returns = "application/vnd.oci.image.layer.v1.tar"

  [stream_processors."io.containerd.ocicrypt.decoder.v1.tar.gzip"]
    accepts = ["application/vnd.oci.image.layer.v1.tar+gzip+encrypted"]
    args = ["--decryption-keys-path", "/etc/containerd/ocicrypt/keys"]
    env = ["OCICRYPT_KEYPROVIDER_CONFIG=/etc/containerd/ocicrypt/ocicrypt_keyprovider.conf"]
    path = "ctd-decoder"
    returns = "application/vnd.oci.image.layer.v1.tar+gzip"

[timeouts]
  "io.containerd.timeout.shim.cleanup" = "5s"
  "io.containerd.timeout.shim.load" = "5s"
  "io.containerd.timeout.shim.shutdown" = "3s"
  "io.containerd.timeout.task.state" = "2s"

[ttrpc]
  address = ""
  gid = 0
  uid = 0
2.10 启动containerd
systemctl daemon-reload
systemctl enable containerd --now
2.10.1 验证
crictl version响应信息:

2.11 保存快照,containerd安装
3 安装kubeadm
3.1 配置阿里源镜像
cat > /etc/yum.repos.d/kubernetes.repo << EOF
[kubernetes]
name=Kubernetes
baseurl=https://mirrors.aliyun.com/kubernetes/yum/repos/kubernetes-el7-x86_64
enabled=1
gpgcheck=0
repo_gpgcheck=0
gpgkey=https://mirrors.aliyun.com/kubernetes/yum/doc/yum-key.gpg https://mirrors.aliyun.com/kubernetes/yum/doc/rpm-package-key.gpg
EOF
3.2 安装工具组件,kubelat、kubectl、kubeadm
yum makecache fast

yum install -y kubelet-1.22.10 kubeadm-1.22.10 kubectl-1.22.10 --disableexcludes=kubernetes
kubeadm是一个快捷搭建kubernetes(k8s)的安装工具,它提供了kubeadm init 以及 kubeadm join这两个命令来快速创建kubernetes集群。
kubelet负责创建Pod,并管理这个Pod的生命周期,这里面包括:Pod的增删改查等操作。
kubectl 是 Kubernetes 的命令行工具(CLI),是 Kubernetes 用户和管理员必备的管理工具。
3.2.1 验证
kubeadm version响应:
![]()
3.3 设置开机启动
--加载新的unit 配置文件
systemctl daemon-reload
systemctl enable --now kubelet
3.3.1 说明
在CentOS中,运行systemctl enable --now command可以在系统启动时启用服务,同时立即启动该服务。
systemctl enable --now xxx 和 systemctl enable xxx --now 都行
3.4 安装命令补全工具
yum install -y bash-completion
source <(crictl completion bash)
crictl completion bash >/etc/bash_completion.d/crictl
source <(kubectl completion bash)
kubectl completion bash >/etc/bash_completion.d/kubectl
source /usr/share/bash-completion/bash_completion
3.5 拉取镜像
3.5.1 拉取coredns
ctr -n k8s.io i pull docker.io/coredns/coredns:1.8.4
ctr -n k8s.io i tag docker.io/coredns/coredns:1.8.4 registry.aliyuncs.com/k8sxio/coredns:v1.8.4
3.5.2 拉取pause
ctr -n k8s.io i pull registry.aliyuncs.com/k8sxio/pause:3.5
ctr -n k8s.io i tag registry.aliyuncs.com/k8sxio/pause:3.5 k8s.gcr.io/pause:3.5
3.6 保存快照,kubeadm部署成功
4. 创建node节点
4.1 克隆三个node节点
4.2 启动后先执行ipv命令
注:所有节点
modprobe br_netfilter4.3 修改hostname
4.3.1 node01输入
通过hostnamectl修改临时hostname (Transient hostname)
hostnamectl set-hostname node01修改hostname文件修改静态hostname
> /etc/hostname && echo 'node01' > /etc/hostname备注:执行
hostnamectl可以看到如下信息:

其中Static hostname就是在/etc/hostname文件中保存的hostname,Transient hostname就是通过hostnamectl修改的hostname值。如果只通过hostnamectl修改,重启后hostname会变回Static hostname,所以需要两个地方都变。这样第一不需要重启服务,在文件中变更是需要重启服务才能生效的;第二如果需要重启也不需要再次变更。
4.3.2 node02输入
> hostnamectl set-hostname node02/etc/hostname && echo 'node02' > /etc/hostname4.3.3 node03输入
> hostnamectl set-hostname node03/etc/hostname && echo 'node03' > /etc/hostname4.3.4 确认
hostnamectl显示内容4.3.1中有说明。
4.3.5 说明,可能出现如下提示,不影响安装。

4.4 配置host(所有节点都执行)
备注:注意修改ip
cat >> /etc/hosts << EOF
masterIp   master
node01Ip   node01
node02Ip   node02
node03Ip   node03
EOF
5. 启动master节点
5.1 kubeadm常用命令
| kubeadm init | 用于搭建控制平面节点 |
| kubeadm join | 用于搭建工作节点并将其加入到集群中 |
| kubeadm upgrade | 用于升级 Kubernetes 集群到新版本 |
| kubeadm config | 如果你使用了 v1.7.x 或更低版本的 kubeadm 版本初始化你的集群,则使用kubeadm upgrade来配置你的集群 |
| kubeadm reset | 用于恢复通过 kubeadm init 或者 kubeadm join 命令对节点进行的任何变更 |
| kubeadm certs | 用于管理 Kubernetes 证书 |
| kubeadm kubeconfig | 用于管理 kubeconfig 文件 |
| kubeadm version | 用于打印 kubeadm 的版本信息 |
| kubeadm alpha | 用于预览一组可用于收集社区反馈的特性 |
5.2 配置配置文件镜像
5.2.1 切换目录
mkdir -p /usr/etc/kubeadm && cd /usr/etc/kubeadm5.2.2 创建配置文件
vi kubeadm.yaml5.2.3 配置文件内容
注意:在advertiseAddress位置需要改成你的master节点的ip
apiVersion: kubeadm.k8s.io/v1beta3
bootstrapTokens:
- groups:
  - system:bootstrappers:kubeadm:default-node-token
  token: abcdef.0123456789abcdef
  ttl: 24h0m0s
  usages:
  - signing
  - authentication
kind: InitConfiguration
localAPIEndpoint:
  advertiseAddress: 192.168.127.131 #1.指定master节点内网IP
  bindPort: 6443
nodeRegistration:
  criSocket: /run/containerd/containerd.sock    #2.修改为containerd的socket地址
  imagePullPolicy: IfNotPresent
  name: master    #3.设置为master的主机名称
  taints:
  - effect: "NoSchedule" #4.给master添加污点,master节点不能调度应用
    key: "node-role.kubernetes.io/master"
--- # 新增如下kubeproxy的配置
apiVersion: kubeproxy.config.k8s.io/v1alpha1
kind: KubeProxyConfiguration
mode: ipvs  # 修改kube-proxy 模式为ipvs,默认为iptables
---
apiServer:
  timeoutForControlPlane: 4m0s
apiVersion: kubeadm.k8s.io/v1beta3
certificatesDir: /etc/kubernetes/pki
clusterName: kubernetes
controllerManager: {}
dns: {}
etcd:
  local:
    dataDir: /var/lib/etcd
imageRepository: registry.aliyuncs.com/k8sxio #修改成阿里云的image镜像地址
kind: ClusterConfiguration
kubernetesVersion: 1.22.10  #指定k8s版本号,默认这里忽略了小版本号
networking:
  dnsDomain: cluster.local
  serviceSubnet: 10.96.0.0/12
  podSubnet: 10.244.0.0/16  #添加 pod 子网地址
scheduler: {}
---
apiVersion: kubelet.config.k8s.io/v1beta1
authentication:
  anonymous:
    enabled: false
  webhook:
    cacheTTL: 0s
    enabled: true
  x509:
    clientCAFile: /etc/kubernetes/pki/ca.crt
authorization:
  mode: Webhook
  webhook:
    cacheAuthorizedTTL: 0s
    cacheUnauthorizedTTL: 0s
cgroupDriver: systemd # 默认已经是`systemd`,最好再检查下,如果不是改过来
clusterDNS:
- 10.96.0.10
clusterDomain: cluster.local
cpuManagerReconcilePeriod: 0s
evictionPressureTransitionPeriod: 0s
fileCheckFrequency: 0s
healthzBindAddress: 127.0.0.1
healthzPort: 10248
httpCheckFrequency: 0s
imageMinimumGCAge: 0s
kind: KubeletConfiguration
logging: {}
memorySwap: {}
nodeStatusReportFrequency: 0s
nodeStatusUpdateFrequency: 0s
rotateCertificates: true
runtimeRequestTimeout: 0s
shutdownGracePeriod: 0s
shutdownGracePeriodCriticalPods: 0s
staticPodPath: /etc/kubernetes/manifests
streamingConnectionIdleTimeout: 0s
syncFrequency: 0s
volumeStatsAggPeriod: 0s
5.2.4 执行验证命令
cat kubeadm.yaml | grep advertiseAddress响应内容如下,注意这里的地址是master地址:
advertiseAddress: 192.168.127.131 #1.指定master节点内网IP5.2.5 上传镜像
kubeadm config images list --config kubeadm.yaml5.3 启动master
5.3.1 拉取镜像
备注:速度可能有点慢
kubeadm config images pull --config kubeadm.yaml 响应如下:

5.3.2 初始化
kubeadm init --config kubeadm.yaml可能出现异常提示为:/proc/sys/net/bridge/bridge-nf-call-iptables does not exist,内容如下图:

执行下文命令:
modprobe br_netfilter5.3.3 成功响应
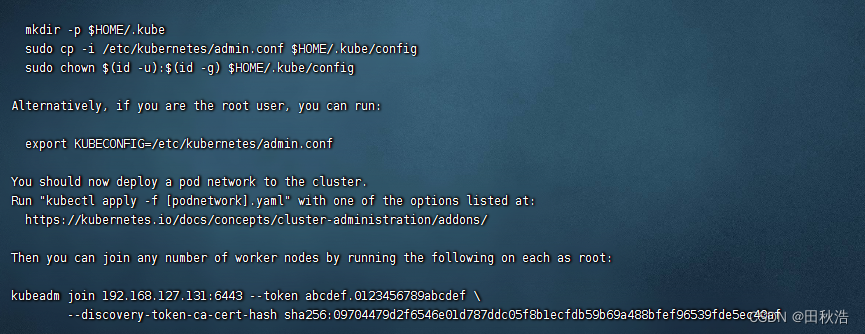
5.3.4 记录node节点加入命令
kubeadm join 192.168.127.131:6443 --token abcdef.0123456789abcdef \
        --discovery-token-ca-cert-hash sha256:09704479d2f6546e01d787ddc05f8b1ecfdb59b69a488bfef96539fde5ec40af
5.3.5 执行成功提示中提到的命令
mkdir -p $HOME/.kube
sudo cp -i /etc/kubernetes/admin.conf $HOME/.kube/config
sudo chown $(id -u):$(id -g) $HOME/.kube/config
#如果root用户安装k8s需要执行以下命令,如果非root忽略
export KUBECONFIG=/etc/kubernetes/admin.conf
5.3.6 验证
kubectl get node响应内容如下:
[root@master kubeadm]# kubectl get node
NAME     STATUS   ROLES                  AGE     VERSION
master   Ready    control-plane,master   2m41s   v1.22.10
6. 部署node节点
6.1 复制config文件
注意:下文中涉及masterIp,注意变更。所有node节点都需要执行
mkdir /root/.kube && scp root@masterIP:/root/.kube/config /root/.kube/6.2 执行join命令
5.3.4中记录的命令
如果忘记在master执行下述命令重新获取
kubeadm token create --print-join-command6.3 验证
kubectl get node响应如下:
NAME     STATUS     ROLES                  AGE    VERSION
master   Ready      control-plane,master   10m    v1.22.10
node01   Ready      <none>                 2m2s   v1.22.10
node02   Ready      <none>                 67s    v1.22.10
node03   NotReady   <none>                 7s     v1.22.10
7.master节点安装网络插件
注:所有节点都需要执行
7.1 跳转目录
cd /usr/etc/kubeadm7.2 创建文件
vi kube-flannel.yml7.3 填入内容
---
apiVersion: policy/v1beta1
kind: PodSecurityPolicy
metadata:
name: psp.flannel.unprivileged
annotations:
seccomp.security.alpha.kubernetes.io/allowedProfileNames: docker/default
seccomp.security.alpha.kubernetes.io/defaultProfileName: docker/default
apparmor.security.beta.kubernetes.io/allowedProfileNames: runtime/default
apparmor.security.beta.kubernetes.io/defaultProfileName: runtime/default
spec:
privileged: false
volumes:
- configMap
- secret
- emptyDir
- hostPath
allowedHostPaths:
- pathPrefix: "/etc/cni/net.d"
- pathPrefix: "/etc/kube-flannel"
- pathPrefix: "/run/flannel"
readOnlyRootFilesystem: false
# Users and groups
runAsUser:
rule: RunAsAny
supplementalGroups:
rule: RunAsAny
fsGroup:
rule: RunAsAny
# Privilege Escalation
allowPrivilegeEscalation: false
defaultAllowPrivilegeEscalation: false
# Capabilities
allowedCapabilities: ['NET_ADMIN', 'NET_RAW']
defaultAddCapabilities: []
requiredDropCapabilities: []
# Host namespaces
hostPID: false
hostIPC: false
hostNetwork: true
hostPorts:
- min: 0
max: 65535
# SELinux
seLinux:
# SELinux is unused in CaaSP
rule: 'RunAsAny'
---
kind: ClusterRole
apiVersion: rbac.authorization.k8s.io/v1
metadata:
name: flannel
rules:
- apiGroups: ['extensions']
resources: ['podsecuritypolicies']
verbs: ['use']
resourceNames: ['psp.flannel.unprivileged']
- apiGroups:
- ""
resources:
- pods
verbs:
- get
- apiGroups:
- ""
resources:
- nodes
verbs:
- list
- watch
- apiGroups:
- ""
resources:
- nodes/status
verbs:
- patch
---
kind: ClusterRoleBinding
apiVersion: rbac.authorization.k8s.io/v1
metadata:
name: flannel
roleRef:
apiGroup: rbac.authorization.k8s.io
kind: ClusterRole
name: flannel
subjects:
- kind: ServiceAccount
name: flannel
namespace: kube-system
---
apiVersion: v1
kind: ServiceAccount
metadata:
name: flannel
namespace: kube-system
---
kind: ConfigMap
apiVersion: v1
metadata:
name: kube-flannel-cfg
namespace: kube-system
labels:
tier: node
app: flannel
data:
cni-conf.json: |
{
"name": "cbr0",
"cniVersion": "0.3.1",
"plugins": [
{
"type": "flannel",
"delegate": {
"hairpinMode": true,
"isDefaultGateway": true
}
},
{
"type": "portmap",
"capabilities": {
"portMappings": true
}
}
]
}
net-conf.json: |
{
"Network": "10.244.0.0/16",
"Backend": {
"Type": "vxlan"
}
}
---
apiVersion: apps/v1
kind: DaemonSet
metadata:
name: kube-flannel-ds
namespace: kube-system
labels:
tier: node
app: flannel
spec:
selector:
matchLabels:
app: flannel
template:
metadata:
labels:
tier: node
app: flannel
spec:
affinity:
nodeAffinity:
requiredDuringSchedulingIgnoredDuringExecution:
nodeSelectorTerms:
- matchExpressions:
- key: kubernetes.io/os
operator: In
values:
- linux
hostNetwork: true
priorityClassName: system-node-critical
tolerations:
- operator: Exists
effect: NoSchedule
serviceAccountName: flannel
initContainers:
- name: install-cni-plugin
image: rancher/mirrored-flannelcni-flannel-cni-plugin:v1.2
command:
- cp
args:
- -f
- /flannel
- /opt/cni/bin/flannel
volumeMounts:
- name: cni-plugin
mountPath: /opt/cni/bin
- name: install-cni
image: quay.io/coreos/flannel:v0.15.0
command:
- cp
args:
- -f
- /etc/kube-flannel/cni-conf.json
- /etc/cni/net.d/10-flannel.conflist
volumeMounts:
- name: cni
mountPath: /etc/cni/net.d
- name: flannel-cfg
mountPath: /etc/kube-flannel/
containers:
- name: kube-flannel
image: quay.io/coreos/flannel:v0.15.0
command:
- /opt/bin/flanneld
args:
- --ip-masq
- --kube-subnet-mgr
resources:
requests:
cpu: "100m"
memory: "50Mi"
limits:
cpu: "100m"
memory: "50Mi"
securityContext:
privileged: false
capabilities:
add: ["NET_ADMIN", "NET_RAW"]
env:
- name: POD_NAME
valueFrom:
fieldRef:
fieldPath: metadata.name
- name: POD_NAMESPACE
valueFrom:
fieldRef:
fieldPath: metadata.namespace
volumeMounts:
- name: run
mountPath: /run/flannel
- name: flannel-cfg
mountPath: /etc/kube-flannel/
volumes:
- name: run
hostPath:
path: /run/flannel
- name: cni-plugin
hostPath:
path: /opt/cni/bin
- name: cni
hostPath:
path: /etc/cni/net.d
- name: flannel-cfg
configMap:
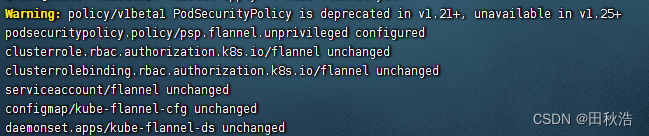
name: kube-flannel-cfg7.4 运行
kubectl apply -f kube-flannel.yml # 安装 flannel 网络插件有warning提示是正常的,响应如下:
 7.5 验证,查看pod状态
kubectl get pod -nkube-system -owide响应如下:
NAME                             READY   STATUS    RESTARTS   AGE   IP                NODE     NOMINATED NODE   READINESS GATES
coredns-7568f67dbd-8ph2v         1/1     Running   0          27m   10.88.0.2         master   <none>           <none>
coredns-7568f67dbd-sg9nm         1/1     Running   0          27m   10.88.0.3         master   <none>           <none>
etcd-master                      1/1     Running   0          27m   192.168.127.131   master   <none>           <none>
kube-apiserver-master            1/1     Running   0          27m   192.168.127.131   master   <none>           <none>
kube-controller-manager-master   1/1     Running   0          27m   192.168.127.131   master   <none>           <none>
kube-flannel-ds-2dnd6            1/1     Running   0          10m   192.168.127.131   master   <none>           <none>
kube-flannel-ds-mtjjw            1/1     Running   0          10m   192.168.127.136   node03   <none>           <none>
kube-flannel-ds-vhxfn            1/1     Running   0          10m   192.168.127.135   node02   <none>           <none>
kube-flannel-ds-x92q6            1/1     Running   0          10m   192.168.127.134   node01   <none>           <none>
kube-proxy-cn8gm                 1/1     Running   0          17m   192.168.127.136   node03   <none>           <none>
kube-proxy-f6px9                 1/1     Running   0          27m   192.168.127.131   master   <none>           <none>
kube-proxy-pr6lj                 1/1     Running   0          18m   192.168.127.135   node02   <none>           <none>
kube-proxy-zv427                 1/1     Running   0          19m   192.168.127.134   node01   <none>           <none>
kube-scheduler-master            1/1     Running   0          27m   192.168.127.131   master   <none>           <none>
备注:注意kube-flannel-ds类pod,这个启动需要时间。
8.node节点安装网络插件
8.1 复制kube-flannel.yml文件
mkdir -p /usr/etc/kubeadm && scp root@masterIP:/usr/etc/kubeadm/kube-flannel.yml /usr/etc/kubeadm8.2 运行
kubectl apply -f kube-flannel.yml有warning提示是正常的,响应如下:
8.3 验证,查看pod状态
kubectl get pod -nkube-system -owide响应如下:
NAME                             READY   STATUS    RESTARTS   AGE   IP                NODE     NOMINATED NODE   READINESS GATES
coredns-7568f67dbd-8ph2v         1/1     Running   0          27m   10.88.0.2         master   <none>           <none>
coredns-7568f67dbd-sg9nm         1/1     Running   0          27m   10.88.0.3         master   <none>           <none>
etcd-master                      1/1     Running   0          27m   192.168.127.131   master   <none>           <none>
kube-apiserver-master            1/1     Running   0          27m   192.168.127.131   master   <none>           <none>
kube-controller-manager-master   1/1     Running   0          27m   192.168.127.131   master   <none>           <none>
kube-flannel-ds-2dnd6            1/1     Running   0          10m   192.168.127.131   master   <none>           <none>
kube-flannel-ds-mtjjw            1/1     Running   0          10m   192.168.127.136   node03   <none>           <none>
kube-flannel-ds-vhxfn            1/1     Running   0          10m   192.168.127.135   node02   <none>           <none>
kube-flannel-ds-x92q6            1/1     Running   0          10m   192.168.127.134   node01   <none>           <none>
kube-proxy-cn8gm                 1/1     Running   0          17m   192.168.127.136   node03   <none>           <none>
kube-proxy-f6px9                 1/1     Running   0          27m   192.168.127.131   master   <none>           <none>
kube-proxy-pr6lj                 1/1     Running   0          18m   192.168.127.135   node02   <none>           <none>
kube-proxy-zv427                 1/1     Running   0          19m   192.168.127.134   node01   <none>           <none>
kube-scheduler-master            1/1     Running   0          27m   192.168.127.131   master   <none>           <none>
9. 配置CNI
9.1 删除containerd配置的CNI
备注,只在node节点执行。
9.1.1 删除配置
mv /etc/cni/net.d/10-containerd-net.conflist{,.bak}9.1.2 删除网络配置
ifconfig cni0 down && ip link delete cni09.1.3 重启daemon
systemctl daemon-reload9.1.4 重启containerd和kubelet
systemctl restart containerd kubelet9.2 重建POD
备注:在master节点执行
9.2.1 重建 coredns
kubectl delete pod coredns-7568f67dbd-t56jc coredns-7568f67dbd-vb889 -nkube-system9.2.2 查看Pod
kubectl get pod -A -o wide


 276
276

 被折叠的 条评论
为什么被折叠?
被折叠的 条评论
为什么被折叠?
 到【灌水乐园】发言


