


一、前言
本人刚学习安卓驱动开发,水平不能说菜,是根本没有水平,在这里把学习过程贴出来,跟大家一起学习交流,还望大家多多指正,转载的请标明出处。http://blog.csdn.net/angle_birds/article/details/16801533
二、android驱动介绍
安卓总体架构是在 Linux内核基础上,增加硬件抽象层(HAL),运行库,java虚拟机,程序框架等组成的,具体如下图。
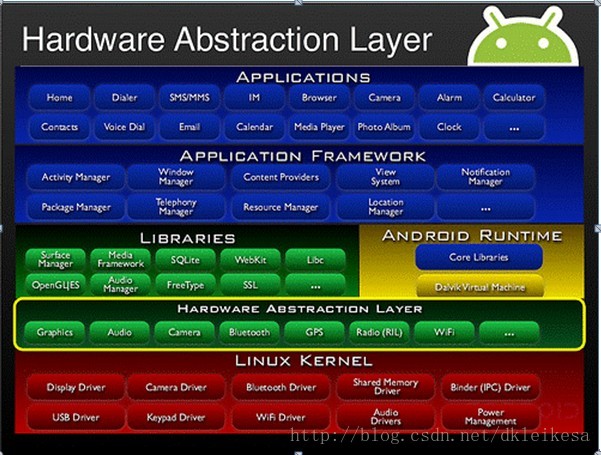
安卓的应用程序是从application framework层架构上建立的。所有APK应用程序都是通过framework层来运行的。application framework是google写好的,除非自己深度定制,一般是不会更改这个层的。对于驱动开发来讲,我们要做的就是让framework层能认识并操作我们的硬件设备就OK了。因此我们关心主要有3个层面:
linux Kernel层
HAL层
JNI层
1. linuxKernel:是google在linux内核基础上,专门为移动设备优化后的内核,增加修改一些东西,担修改的不多,对于内核驱动来讲,基本没有修改,做过linux驱动开发的人应该很容易理解。
2. HAL,硬件抽象层:简单来说,就是对Linux 内核驱动程序的封装,向上提供接口,屏蔽低层的实现细节。也就是说,把对硬件的支持分成了两层,一层放在用户空间(User Space),一层放在内核空间(Kernel Space),其中,硬件抽象层运行在用户空间。用户空间不属于内核不必遵守GPL协议,各个厂商可以把与自己硬件设备相关,具有商业机密的一些代码放在HAL层。
3. JNI层:提供java和底层C、C++的动态链接库的接口。我理解的是JNI就是一个代理,可以把C和C++生成的接口函数翻译成Java可用,提供给framework层。
三、振动系统开发过程
1. 硬件平台
CPU:IMX6Q4核1G
RAM:1G
FLASH:8G板载
这次开发用的代码都是google和飞思卡尔提供的具体的就不再说明了,因为每个平台代码都有所不同,而且买开发板时候都会带相应的资料。
2. 震动系统是android里面比较简单的一个系统, 我采用的是从高层到底层的学习方式。因为我们的驱动最终是给应用程序用的,从application的需求分析JNI,然后分析HAL最后在我们写linux kernel驱动时候,很容易理解为什么要这么写。好了开始正式分析。
3. Application层:通过google我找到关于APK访问震动的如下说明:
A、通过系统服务获得手机震动服务,Vibrator vibrator =(Vibrator)getSystemService(VIBRATOR_SERVICE);
B、得到震动服务后检测vibrator是否存在:
vibrator.hasVibrator();
检测当前硬件是否有vibrator,如果有返回true,如果没有返回false。
C、根据实际需要进行适当的调用,
vibrator.vibrate(longmilliseconds);
开始启动vibrator持续milliseconds毫秒。
vibrator.vibrate(long[]pattern, int repeat);
以pattern方式重复repeat次启动vibrator。
(pattern的形式为new long[]{arg1,arg2,arg3,arg4......},其中以两个一组的如arg1 和arg2为一组、arg3和arg4为一组,每一组的前一个代表等待多少毫 秒启动vibrator,后一个代表vibrator持续多少毫秒停止,之后往复即 可。Repeat表示重复次数,当其为-1时,表示不重复只以pattern的方 式运行一次)。
D、vibrator.cancel();
Vibrator停止。
从上面的说明,可以看出应用程序调用震动系统,是调用一个叫VIBRATOR_SERVICE的服务,这个服务有3个函数,分别是hasVibrator(),r.vibrate,.cancel();当然这个三个函数可能在framework层进行的另一层的封装,我没有去深究。但可以推测出JNI层要做的是与注册VIBRATOR_SERVICE服务和实现这三个函数相关的.
4. HAL层:这一层我找到了具体的代码我们会好分析很多,其代码是:
android\frameworks\base\services\jni\ com_android_server_VibratorService.cpp
- #define LOG_TAG"VibratorService"
- #include"jni.h"
- #include"JNIHelp.h"
- #include"android_runtime/AndroidRuntime.h"
- #include<utils/misc.h>
- #include<utils/Log.h>
- #include<hardware_legacy/vibrator.h>
- #include<stdio.h>
- namespace android
- {
- static jbooleanvibratorExists(JNIEnv *env, jobject clazz) //判断振动器是否存在
- {
- return vibrator_exists() > 0 ? JNI_TRUE: JNI_FALSE;
- }
- static voidvibratorOn(JNIEnv *env, jobject clazz, jlong timeout_ms)//打开振动器
- {
- // LOGI("vibratorOn\n");
- vibrator_on(timeout_ms);
- }
- static voidvibratorOff(JNIEnv *env, jobject clazz)//关闭振动器
- {
- // LOGI("vibratorOff\n");
- vibrator_off();
- }
- staticJNINativeMethod method_table[] = {
- { "vibratorExists","()Z", (void*)vibratorExists },
- { "vibratorOn", "(J)V",(void*)vibratorOn },
- { "vibratorOff", "()V",(void*)vibratorOff }
- };
- intregister_android_server_VibratorService(JNIEnv *env) //注册vibrator服务
- {
- return jniRegisterNativeMethods(env,"com/android/server/VibratorService",
- method_table, NELEM(method_table));
- }
从上面代码可以看出,JNI做了两件事:其一注册vibrator服务,其二,实现了vibratorExists,vibratorOn,vibratorOff三个服务函数。 进而我们可以分析出HAL层主要的就是实现次代码里调用的三个函数vibrator_exists(),vibrator_on(timeout_ms),vibrator_off()。
5. HAL层:经过各种查找我们找到了vibrator的hal层代码:
\android40\hardware\libhardware_legacy\vibrator\vibrator.c
- #include<hardware_legacy/vibrator.h>
- #include"qemu.h"
- #include<stdio.h>
- #include<unistd.h>
- #include<fcntl.h>
- #include<errno.h>
- #define THE_DEVICE"/sys/class/timed_output/vibrator/enable"
- intvibrator_exists() //判断 振动器是否存在
- {
- int fd;
- #ifdefQEMU_HARDWARE //模拟器情况下实现此功能
- if (qemu_check()) {
- return 1;
- }
- #endif
- fd = open(THE_DEVICE, O_RDWR);
- if(fd < 0)
- return 0;
- close(fd);
- return 1;
- }
- static intsendit(int timeout_ms) //打开振动器 timeout_ms 毫秒
- {
- int nwr, ret, fd;
- char value[20];
- #ifdefQEMU_HARDWARE //模拟器情况下实现次功能
- if (qemu_check()) {
- return qemu_control_command("vibrator:%d", timeout_ms );
- }
- #endif
- fd = open(THE_DEVICE, O_RDWR);
- if(fd < 0)
- return errno;
- nwr = sprintf(value, "%d\n",timeout_ms);
- ret = write(fd, value, nwr);
- close(fd);
- return (ret == nwr) ? 0 : -1;
- }
- intvibrator_on(int timeout_ms)
- {
- /* constant on, up to maximum allowed time*/
- return sendit(timeout_ms);
- }
- int vibrator_off() //关闭振动器就是设置振动器打开时间为0
- {
- return sendit(0);
- }
分析上面代码可以看出,HAL访问这个设备是打开/sys/class/timed_output/vibrator/enable,这个设备文件,然后向文件中写入打开时间来完成设备操作的。因此很容易我们可以推断出,linux kernel层是要生成这个设备文件然后,实现相应的函数。
6. Linuxkernel层:通过上面分析我们大概了解了内核驱动所要实现的功能。通过各种参考资料,我查到了这个设备驱动是通过timed_output框架来实现的,有框架在又简单了不少,我们找到timed_output框架实现的函数在:
\kernel\drivers\staging\android\timed_output.c
- #include<linux/module.h>
- #include<linux/types.h>
- #include<linux/device.h>
- #include<linux/fs.h>
- #include<linux/err.h>
- #include"timed_output.h"
- static structclass *timed_output_class;
- static atomic_tdevice_count;
- static ssize_t enable_show(structdevice *dev, struct device_attribute *attr,
- char *buf)
- {
- struct timed_output_dev *tdev =dev_get_drvdata(dev);
- int remaining = tdev->get_time(tdev);
- return sprintf(buf, "%d\n",remaining);
- }
- static ssize_tenable_store(
- struct device *dev, structdevice_attribute *attr,
- const char *buf, size_t size)
- {
- struct timed_output_dev *tdev =dev_get_drvdata(dev);
- int value;
- if (sscanf(buf, "%d", &value)!= 1)
- return -EINVAL;
- tdev->enable(tdev, value);
- return size;
- }
- static DEVICE_ATTR(enable,S_IRUGO | S_IWUSR, enable_show, enable_store);
- static intcreate_timed_output_class(void)
- {
- if (!timed_output_class) {
- timed_output_class =class_create(THIS_MODULE, "timed_output");
- if (IS_ERR(timed_output_class))
- return PTR_ERR(timed_output_class);
- atomic_set(&device_count, 0);
- }
- return 0;
- }
- inttimed_output_dev_register(struct timed_output_dev *tdev)
- {
- int ret;
- if (!tdev || !tdev->name ||!tdev->enable || !tdev->get_time)
- return -EINVAL;
- ret = create_timed_output_class();
- if (ret < 0)
- return ret;
- tdev->index =atomic_inc_return(&device_count);
- tdev->dev =device_create(timed_output_class, NULL,
- MKDEV(0, tdev->index), NULL,tdev->name);
- if (IS_ERR(tdev->dev))
- return PTR_ERR(tdev->dev);
- ret = device_create_file(tdev->dev,&dev_attr_enable);
- if (ret < 0)
- goto err_create_file;
- dev_set_drvdata(tdev->dev, tdev);
- tdev->state = 0;
- return 0;
- err_create_file:
- device_destroy(timed_output_class, MKDEV(0,tdev->index));
- printk(KERN_ERR "timed_output: Failedto register driver %s\n",
- tdev->name);
- return ret;
- }
- EXPORT_SYMBOL_GPL(timed_output_dev_register);
- voidtimed_output_dev_unregister(struct timed_output_dev *tdev)
- {
- device_remove_file(tdev->dev,&dev_attr_enable);
- device_destroy(timed_output_class, MKDEV(0,tdev->index));
- dev_set_drvdata(tdev->dev, NULL);
- }
- EXPORT_SYMBOL_GPL(timed_output_dev_unregister);
- static int __inittimed_output_init(void)
- {
- return create_timed_output_class();
- }
- static void __exittimed_output_exit(void)
- {
- class_destroy(timed_output_class);
- }
- module_init(timed_output_init);
- module_exit(timed_output_exit);
- MODULE_AUTHOR("MikeLockwood <lockwood@android.com>");
- MODULE_DESCRIPTION("timedoutput class driver");
- MODULE_LICENSE("GPL");
\kernel\drivers\staging\android\timed_output.h
- #ifndef _LINUX_TIMED_OUTPUT_H
- #define _LINUX_TIMED_OUTPUT_H
- struct timed_output_dev {
- constchar *name;
- /* enablethe output and set the timer */
- void (*enable)(struct timed_output_dev *sdev, inttimeout);
- /*returns the current number of milliseconds remaining on the timer */
- int (*get_time)(structtimed_output_dev *sdev);
- /*private data */
- structdevice *dev;
- int index;
- int state;
- };
- extern int timed_output_dev_register(struct timed_output_dev*dev);
- extern void timed_output_dev_unregister(structtimed_output_dev *dev);
- #endif
分析上面代码可以看出,我们的驱动是要实现timed_output_dev结构体,然后注册这个结构体就行了。下面我们开始真正动手。由于本人水平有限,参考了samung一个公开kernel的代码里的马达驱动。写出了自己的驱动:
本人硬件的马达通过P4.17脚控制 高打开 低关闭
\kernel_imx\drivers\vibrator\vibrator.c
- #include <linux/hrtimer.h>
- #include <linux/err.h>
- #include <linux/gpio.h>
- #include <linux/wakelock.h>
- #include <linux/mutex.h>
- #include <linux/clk.h>
- #include <linux/workqueue.h>
- #include <asm/mach-types.h>
- #include <linux/kernel.h>
- #include <linux/module.h>
- #include<../drivers/staging/android/timed_output.h>
- #define IMX_GPIO_NR(bank, nr) (((bank) - 1) * 32 + (nr)) //IO定义
- #define SABRESD_VIBRATOR_CTL IMX_GPIO_NR(4, 17) //电机通过P4.17脚控制 高打开 低关闭
- #define MAX_TIMEOUT 10000/* 10s */ //最长可打开10s
- static structvibrator {
- structwake_lock wklock; //wake_lock 防止震动过程中系统休眠,线程不释放此设备,造成不必要错误
- structhrtimer timer; //高精度定时器
- structmutex lock; //互斥锁,防止多线程同时访问这个设备.
- structwork_struct work; //设备操作队列,用于一次操作完成和下一次开始同步用 (三星这么用的,具体为什么不直接用回调函数,我也不懂,还望大神们私信给个说明 感激不尽)
- } vibdata;
- static void mx6_vibrator_off(void)
- {
- gpio_direction_output(SABRESD_VIBRATOR_CTL,0);
- wake_unlock(&vibdata.wklock); //震动关闭就可以释放 wake_lock锁
- }
- void mx6_motor_enable(struct timed_output_dev *sdev,int value)
- {
- mutex_lock(&vibdata.lock); //关键代码段,同一时间只允许一个线程执行
- /* cancelprevious timer and set GPIO according to value */
- hrtimer_cancel(&vibdata.timer); //当先前定时器完成后 关闭这个定时器
- cancel_work_sync(&vibdata.work); //当上次震动完成后 关闭这次动作
- if(value)
- {
- wake_lock(&vibdata.wklock); //开始震动打开wake lock锁不允许休眠
- gpio_direction_output(SABRESD_VIBRATOR_CTL,1);
- if(value > 0)
- {
- if(value > MAX_TIMEOUT)
- value= MAX_TIMEOUT;
- value+= 45; //为了使震动变得明显,固定增加一个时间.跟硬件有关系
- hrtimer_start(&vibdata.timer, //开始定时器
- ns_to_ktime((u64)value* NSEC_PER_MSEC),
- HRTIMER_MODE_REL);
- }
- }
- else
- mx6_vibrator_off();
- mutex_unlock(&vibdata.lock); //关键代码段执行完成,释放互斥锁
- }
- int mx6_get_time(structtimed_output_dev *sdev)
- {
- if(hrtimer_active(&vibdata.timer))
- {
- ktime_tr = hrtimer_get_remaining(&vibdata.timer); //读取剩余时间按并返回
- returnktime_to_ms(r);
- }
- return 0;
- }
- struct timed_output_dev mx6_motot_driver={
- .name ="vibrator", //注意这个名字,由于HAL层里面的设备为//"/sys/class/timed_output/vibrator/enable"
- //因此这个名字必须为"vibrator"
- .enable= mx6_motor_enable,
- .get_time= mx6_get_time,
- };
- static enum hrtimer_restartmx6_vibrator_timer_func(struct hrtimer * timer) //定时器结束时候的回调函数
- {
- schedule_work(&vibdata.work); //定时器完成了 执行work队列回调函数来关闭电机
- returnHRTIMER_NORESTART;
- }
- static void mx6_vibrator_work(struct work_struct *work)//工作队列处理函数,当工作队列执行 当
- //schedule_work时候执行
- {
- mx6_vibrator_off();
- }
- void __init mx6_motor_init()
- {
- int ret =0;
- hrtimer_init(&vibdata.timer,CLOCK_MONOTONIC, HRTIMER_MODE_REL);//初始化定时器
- vibdata.timer.function= mx6_vibrator_timer_func; //设置回调函数
- INIT_WORK(&vibdata.work,mx6_vibrator_work); //初始化工作队列
- ret =gpio_request(SABRESD_VIBRATOR_CTL, "vibrator-en"); //申请IO
- if (ret< 0)
- {
- printk("vibratorrequest IO err!:%d\n",ret);
- returnret;
- }
- wake_lock_init(&vibdata.wklock,WAKE_LOCK_SUSPEND, "vibrator"); //初始化 wake_lock
- mutex_init(&vibdata.lock); //初始化 互斥锁
- ret=timed_output_dev_register(&mx6_motot_driver);//注册timed_output 设备
- if (ret< 0)
- gotoerr_to_dev_reg;
- return 0;
- err_to_dev_reg: //错误了 就释放所有资源
- mutex_destroy(&vibdata.lock);
- wake_lock_destroy(&vibdata.wklock);
- gpio_free(SABRESD_VIBRATOR_CTL);
- printk("vibrator err!:%d\n",ret);
- returnret;
- }
- void mx6_motor_exit()
- {
- mutex_destroy(&vibdata.lock);
- wake_lock_destroy(&vibdata.wklock);
- gpio_free(SABRESD_VIBRATOR_CTL);
- printk("vibrator exit!\n");
- timed_output_dev_register(&mx6_motot_driver);
- }
- module_init(mx6_motor_init);
- module_exit(mx6_motor_exit);
- MODULE_AUTHOR("<lijianzhang>");
- MODULE_DESCRIPTION("Motor Vibrator driver");
- MODULE_LICENSE("GPL");
自此完成了驱动的所有内容,编译,烧写!
有两种方法可以测试是否成功:
其一就是 系统启动后,打开一个带振动的APP看能否实现震动功能。
其二调试口中 向设备文件中写数据.列如:
echo "1000">>/sys/class/timed_output/vibrator/enable //震动1S中
试验成功! 大功告成!
这里补充一下,关于android 应用程序中震动的的调用方法:在别人博客看到了一个写的很好贴出网址,供大家参考
http://blog.csdn.net/czh4869623/article/details/8956370
这里总结一下:通过这个例程学会了安卓驱动开发的一般步骤,对安卓每个层的认识都有深入。是个非常好的开始。这种从上往下的分析方法只适合于简单的系统,和项目时间要求不高的情况下,我在分析上就浪费了不少时间。项目比较紧张的话,直接百度一个历程按照说明改一下就成了,复杂的系统涉及的东西太多,比如视频之类的,一路分析下去的话可能半个月不一定能搞定。这个驱动属于非常简单,但是实际动手时候,还是多参考别人的例程,毕竟水平不高,再简单的驱动也不一定能想的周全。


 4932
4932


 被折叠的 条评论
为什么被折叠?
被折叠的 条评论
为什么被折叠?
 到【灌水乐园】发言


