


文档D:\httpclient-demo
官网:Apache HttpComponents – Apache HttpComponents
常见使用场景:1.爬虫(python相对做爬虫专业,但是java也可以做) 2.与其他应用进行交互时候
注意下,不同的HttpClient的jar包版本,API和包路径有明显不同
先使用JDK原生API请求网页
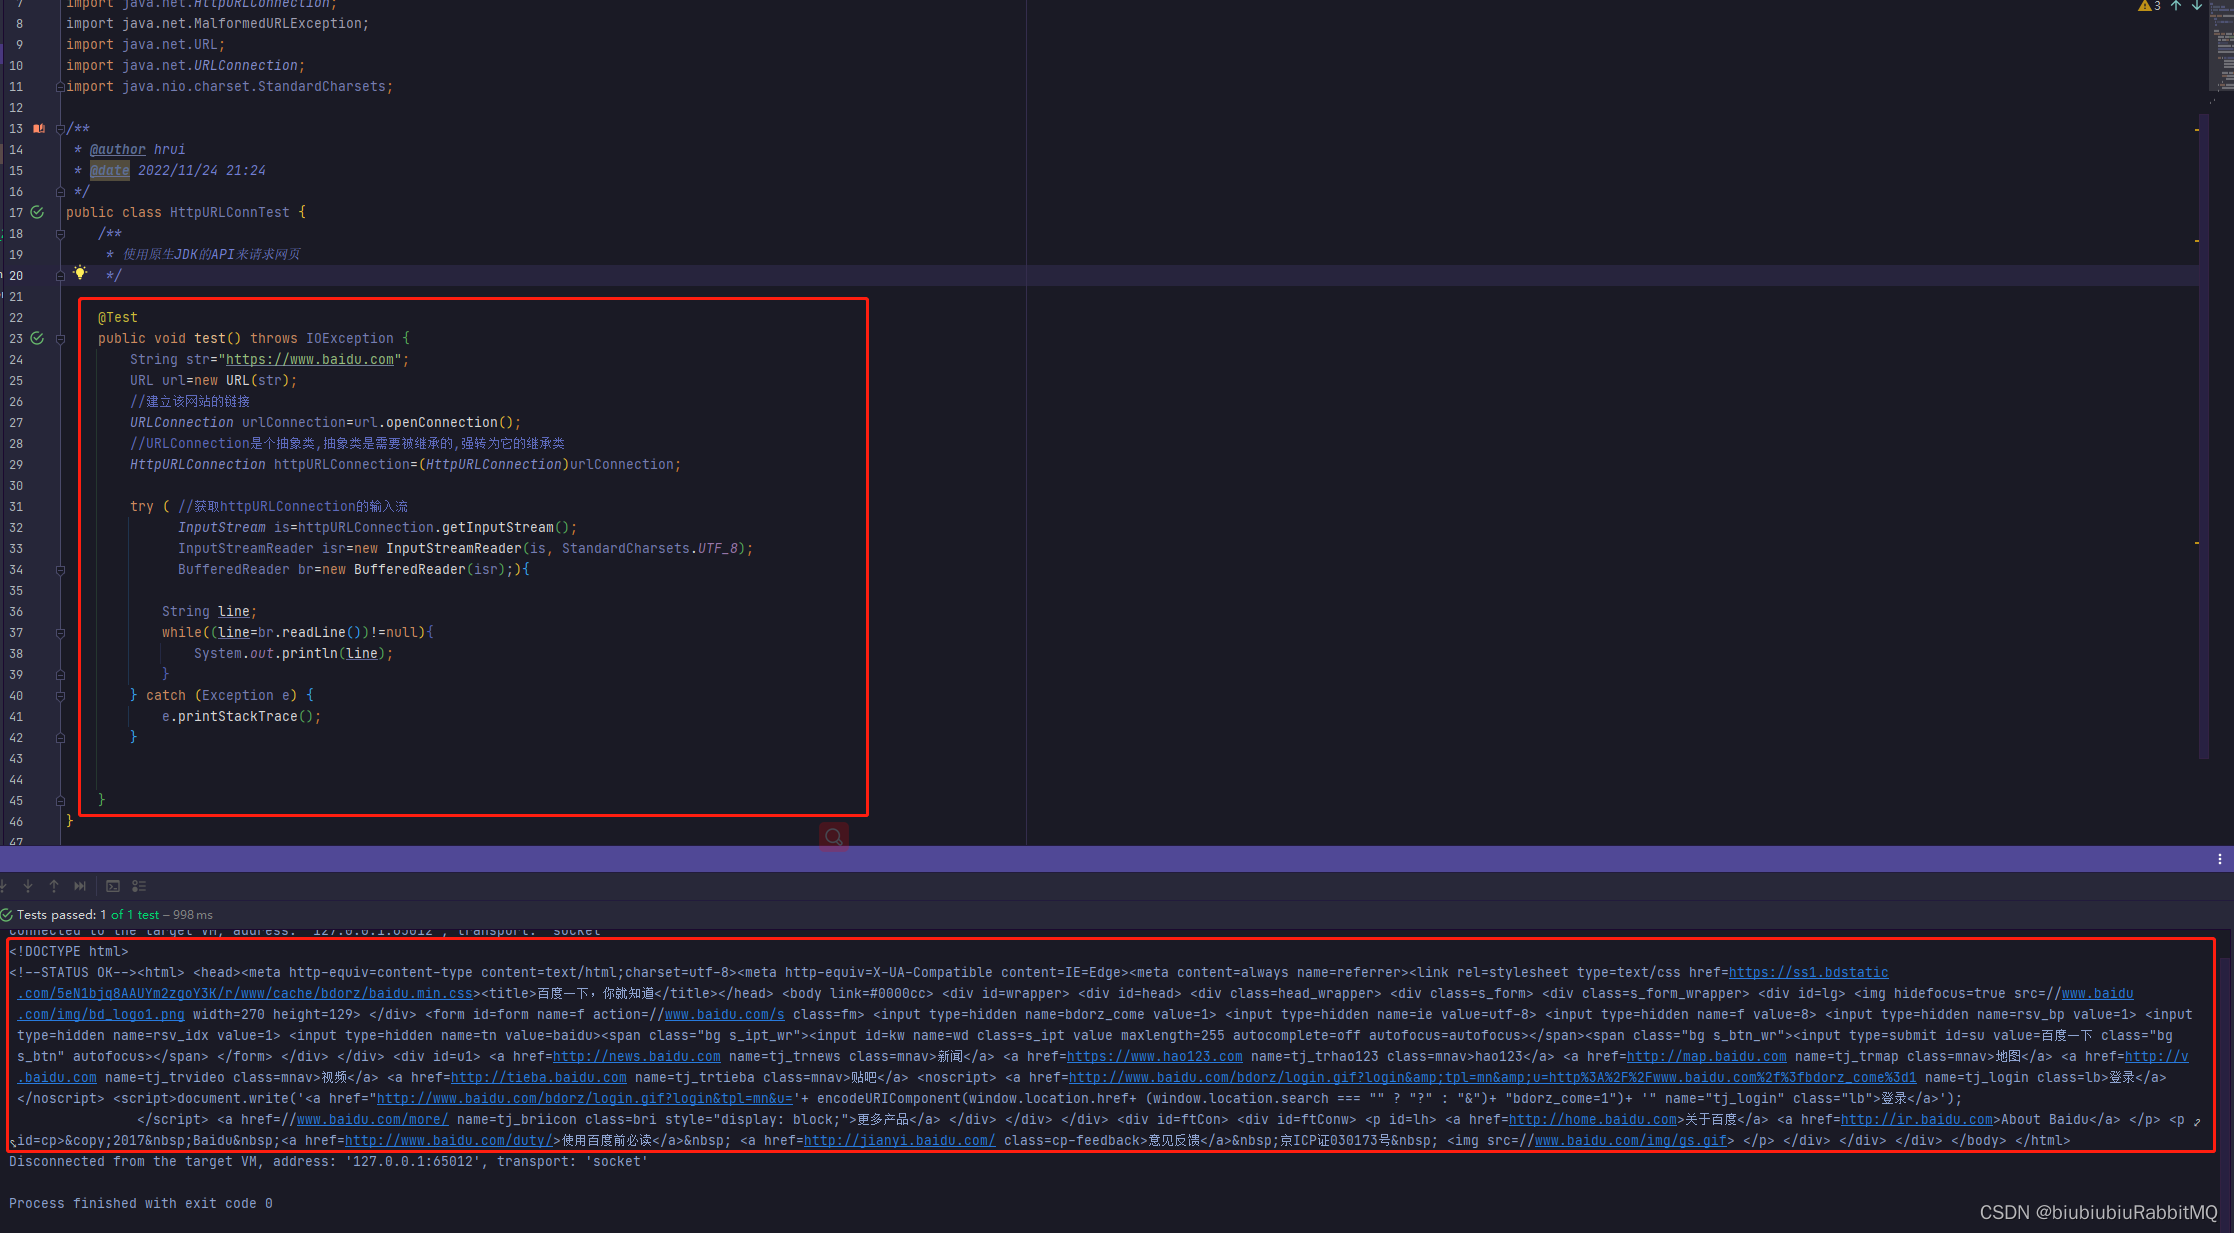
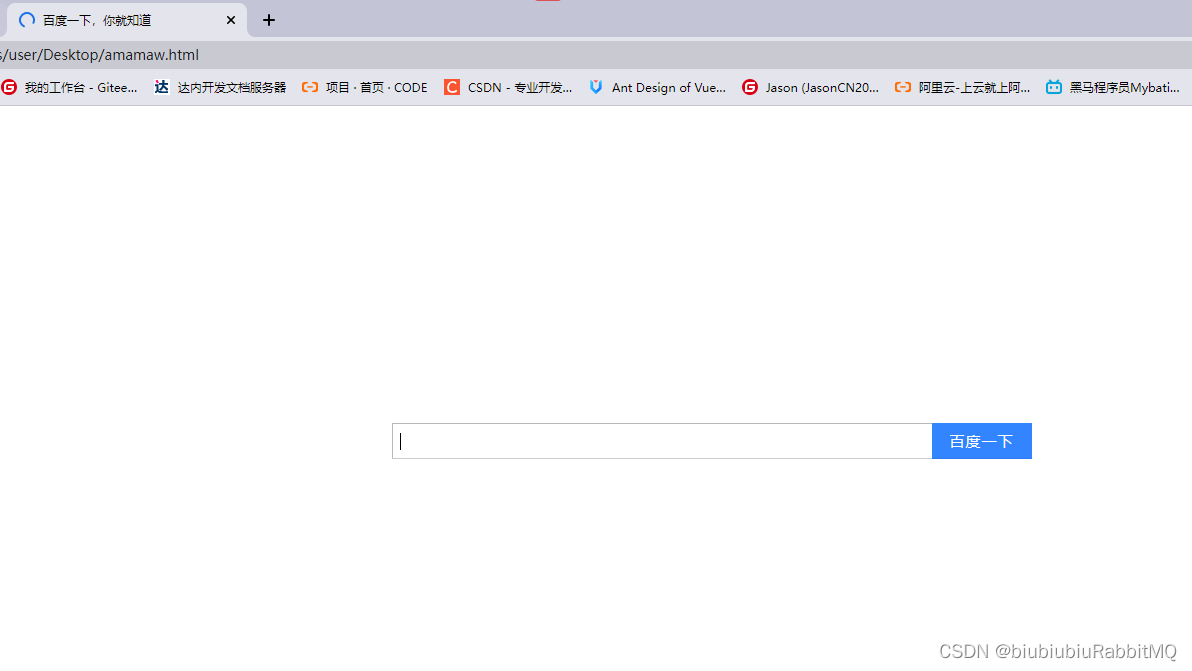
将控制台的复制保存为html文件
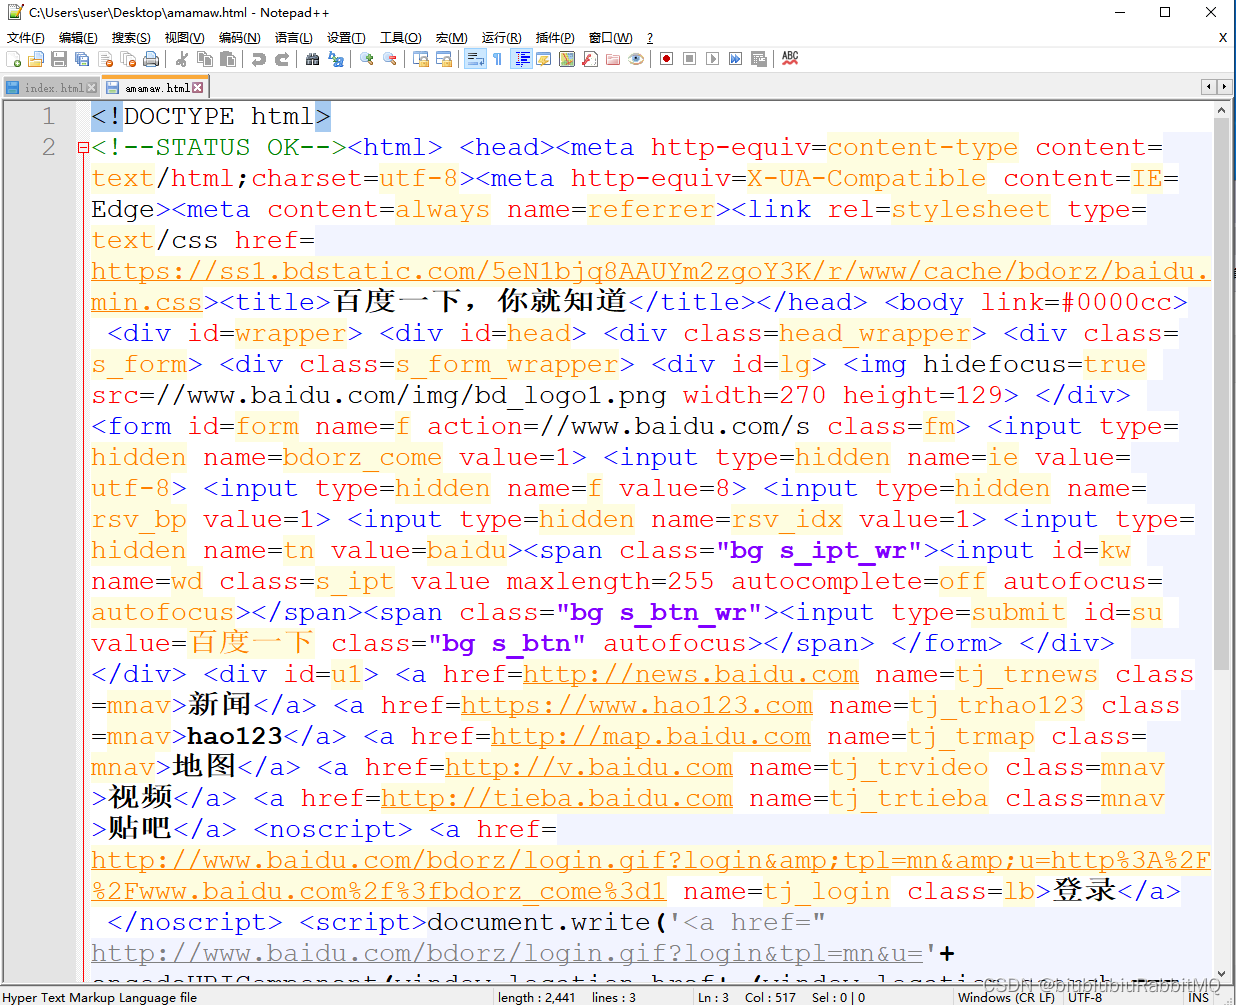

双击打开
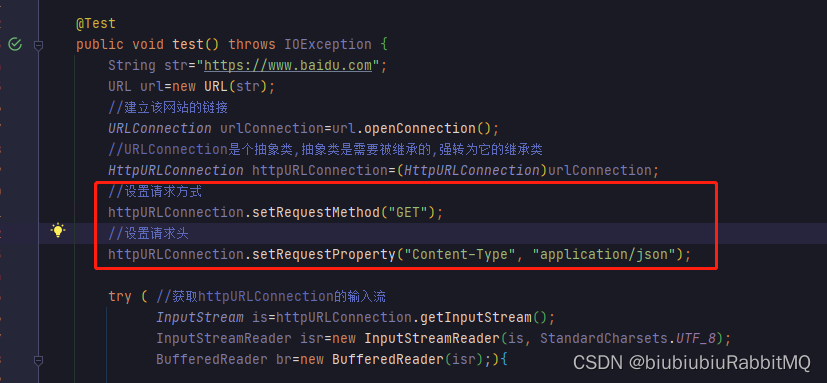
request:请求行,请求头,请求体
可以设置请求方式,请求头,等
依赖
<dependency>
      <groupId>org.apache.httpcomponents</groupId>
      <artifactId>httpclient</artifactId>
      <version>4.5.13</version>
</dependency>
演示使用HttpClient发送get请求,无参
@Test
    public void test1(){
        //可关闭的httpclient客户端,相当于打开一个浏览器
        CloseableHttpClient closeableHttpClient=HttpClients.createDefault();
        String str="https://www.baidu.com";
        //构造HttpGet请求对象
        HttpGet httpGet=new HttpGet(str);
        //声明可关闭响应对象
        CloseableHttpResponse response = null;
        try {
            //可关闭的httpclient客户端对象执行httpGet请求
            response=closeableHttpClient.execute(httpGet);
            //获取响应结果 注意HttpEntity有很多实现类,不仅仅可以作为响应结果,还可以作为请求的参数实体
            //作为响应结果的实现类是DecompressingEntity
            HttpEntity httpEntity=response.getEntity();
            //对HttpEntity操作的工具类
            String toStringResult=EntityUtils.toString(httpEntity, StandardCharsets.UTF_8);
            System.out.println(toStringResult);
            //确保流关闭
            EntityUtils.consume(httpEntity);
        } catch (Exception e) {
            e.printStackTrace();
        }finally {
            if(response!=null){
                try {
                    response.close();
                } catch (IOException e) {
                    e.printStackTrace();
                }
                if(closeableHttpClient!=null){
                    try {
                        closeableHttpClient.close();
                    } catch (IOException e) {
                        e.printStackTrace();
                    }
                }
            }
        }

    }
控制台打印结果和原先一样
关于user-agent和referer:
user-agent意思是用户代理:客户端用的什么浏览器
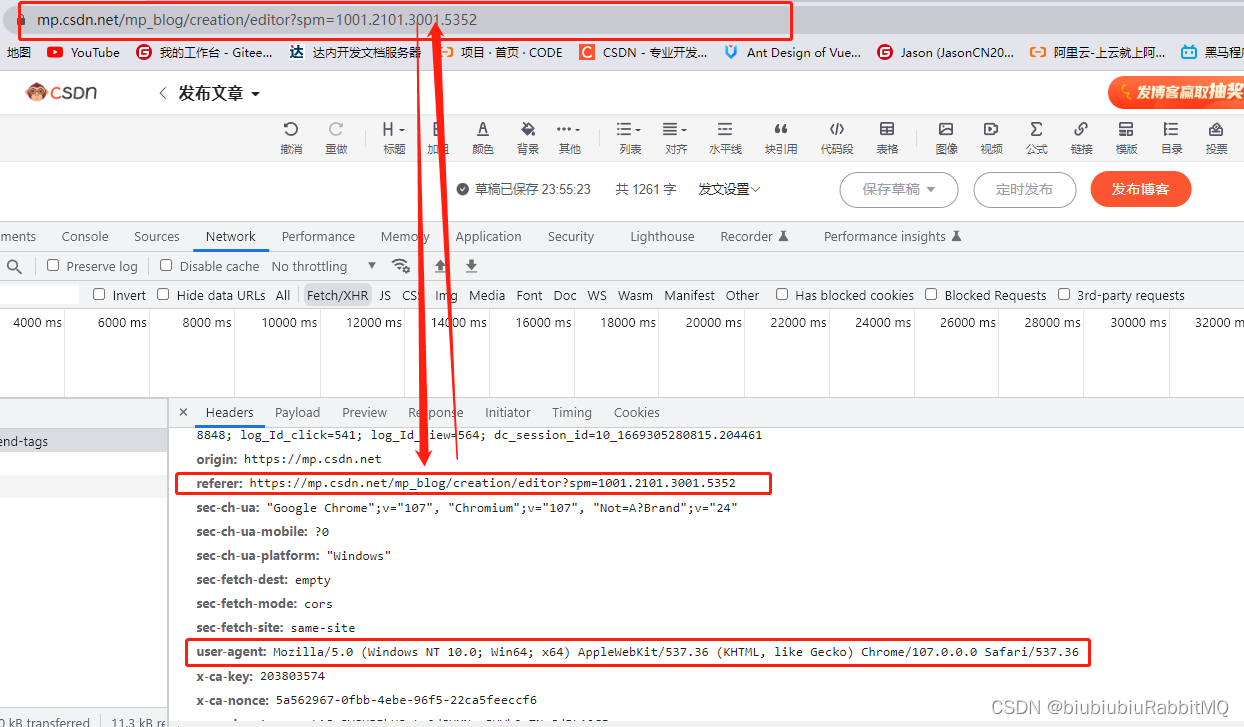
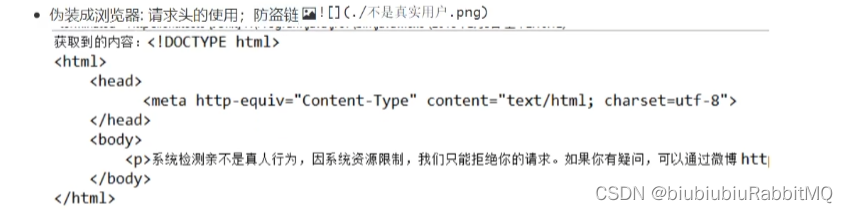
假如一直用Httpclient连接某些网页,如果对方知道你是机器所为
比如下面这样
可以在请求头里设置user-agent
比如在请求对象里设置:
//构造HttpGet请求对象
HttpGet httpGet=new HttpGet(str);
httpGet.addHeader("User-Agent","Mozilla/5.0 (Windows NT 10.0; Win64; x64) AppleWebKit/537.36 (KHTML, like Gecko) Chrome/107.0.0.0 Safari/537.36");
这样一般可以解决httpClient被认为不是真人行为
另外网站为了保护自己,比如爬对方图片,进行防盗链设置
而Referer是用来,解决网站防盗链

每个请求头,都有对应的作用,自己可查看资料
下面演示,一个网站通过浏览器访问后端,后端获取所有请求头,和通过HttpClien发送请求,所得到的请求头有哪些不一样。

该demo一会上传百度云盘
前端就几个表单,做为参数通过get,post,还有文件上传的演示
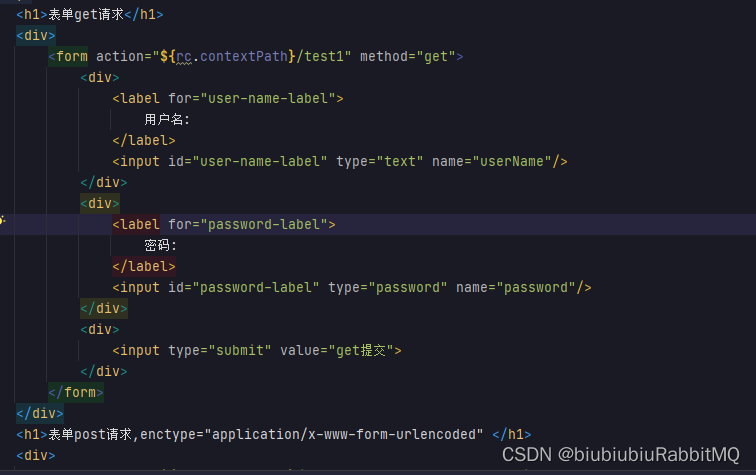
后端接收,并打印所有由浏览器发起请求的所有请求头
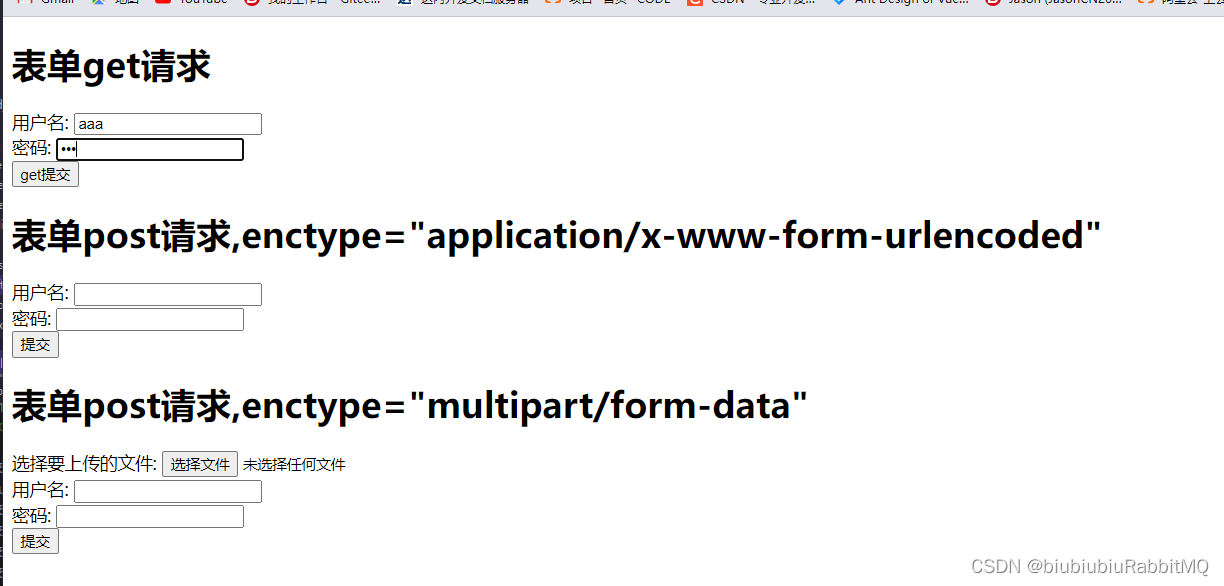
随便用户名,密码,这里输入aaa,密码 bbb 后端得到的所有请求头
且账号密码 都是Okde
然后再实验 账户aaa,密码aaa+bbb

再来看看用HttpClien发送该请求,后端的结果
也用 aaa bbb
HttpClient代码 主要注意一点,就是表单提交时候 比如用户名是aaa+bbb的时候,会自动帮我们编码
而如果用HttpClient直接将用户名aaa+bbb 密码xxx这样进行提交的话,后台收到的+号会变空格,甚至说比如空格等特殊符号,直接给你报错了,就是说不让你用HttpClient提交该请求
比如String str=http://localhost:8899/httpclient-demo/test1?userName=aaa 空格 Bbbb&password=bbb
就直接给你报错
 /**
     * 使用httpclient发送get请求
     */
    @Test
    public void test1(){
        //可关闭的httpclient客户端,相当于打开一个浏览器
        CloseableHttpClient closeableHttpClient=HttpClients.createDefault();
        //String str="http://localhost:8899/httpclient-demo/test1?userName=aaa%2Bbbb&password=bbb";
        String str="http://localhost:8899/httpclient-demo/test1?userName="+"aaa+bbb"+"&password=bbb";
        //构造HttpGet请求对象
        HttpGet httpGet=new HttpGet(str);
        httpGet.addHeader("User-Agent","Mozilla/5.0 (Windows NT 10.0; Win64; x64) AppleWebKit/537.36 (KHTML, like Gecko) Chrome/107.0.0.0 Safari/537.36");

        //httpGet.addHeader("Referer","http://localhost:8899/httpclient-demo/test1?userName=aaa%2Bbbb&password=bbb");
        //声明可关闭响应对象
        CloseableHttpResponse response = null;
        try {
            //可关闭的httpclient客户端对象执行httpGet请求
            response=closeableHttpClient.execute(httpGet);
            //获取响应结果 注意HttpEntity有很多实现类,不仅仅可以作为响应结果,还可以作为请求的参数实体
            //作为响应结果的实现类是DecompressingEntity
            HttpEntity httpEntity=response.getEntity();
            //对HttpEntity操作的工具类
            String toStringResult=EntityUtils.toString(httpEntity, StandardCharsets.UTF_8);
            System.out.println(toStringResult);
            //确保流关闭
            EntityUtils.consume(httpEntity);
        } catch (Exception e) {
            e.printStackTrace();
        }finally {
            if(response!=null){
                try {
                    response.close();
                } catch (IOException e) {
                    e.printStackTrace();
                }
                if(closeableHttpClient!=null){
                    try {
                        closeableHttpClient.close();
                    } catch (IOException e) {
                        e.printStackTrace();
                    }
                }
            }
        }

    }
报错的演示
想说明的一点是,用浏览器提交表单请求时候,浏览器会帮我们自动对中文和特殊符号进行编码,后端会自行解码,但是当使用HttpClient的时候用注意中文和特殊符号
那么就要将到URLEncode 它可以对RUL上的特殊字符进行编码
用浏览器,提交时候会自动完成URLEncode 而当使用HttpClient时候,中文与特殊符号就需要我们自己使用URLEncode进行编码
丫的CSDN不能上传图片了
就是用URLEncode对get请求进行编码即可
String str="http://localhost:8899/httpclient-demo/test1?userName=   "+"aaa+bbb"+"&password=bbb";
try {
    str=URLEncoder.encode(str, StandardCharsets.UTF_8.name());
} catch (UnsupportedEncodingException e) {
    e.printStackTrace();
}
这里注意一点,上面这么做是错的
由于一时没法发图片,这么做的话,会将整个url全部编码,也就是说:// & ?等等全部进行了编码
而我们只需要对我们上传的参数进行编码,因此正确做法是
lic void test1(){
    //可关闭的httpclient客户端,相当于打开一个浏览器
    CloseableHttpClient closeableHttpClient=HttpClients.createDefault();
    //String str="http://localhost:8899/httpclient-demo/test1?userName=aaa%2Bbbb&password=bbb";
    String userName="aaa 哈哈";
    String password="你妹";
    try {
        //对自定义上传的进行编码
        userName=URLEncoder.encode(userName, StandardCharsets.UTF_8.name());
        password=URLEncoder.encode(password, StandardCharsets.UTF_8.name());
    } catch (Exception e) {
        e.printStackTrace();
    }
    String str="http://localhost:8899/httpclient-demo/test1?+userName="+userName+"&password="+password;
对HttpClient做了些改动,没法发图说明,全复制了一遍
/**
     * 使用httpclient发送get请求
     */
    @Test
    public void test1(){
        //可关闭的httpclient客户端,相当于打开一个浏览器
        CloseableHttpClient closeableHttpClient=HttpClients.createDefault();
        String userName="收到 你没";
        String password="阿斯顿)(";
        try {
            userName= URLEncoder.encode(userName, StandardCharsets.UTF_8.name());
            password=URLEncoder.encode(password, StandardCharsets.UTF_8.name());
        } catch (Exception e) {
            e.printStackTrace();
        }

        String str="http://localhost:8899/httpclient-demo/test1?userName="+userName+"&password="+password;
        //构造HttpGet请求对象
        HttpGet httpGet=new HttpGet(str);
        httpGet.addHeader("User-Agent","Mozilla/5.0 (Windows NT 10.0; Win64; x64) AppleWebKit/537.36 (KHTML, like Gecko) Chrome/107.0.0.0 Safari/537.36");
        //httpGet.addHeader("Referer","https://www.amamaw.com");
        //声明可关闭响应对象
        CloseableHttpResponse response = null;
        try {
            //可关闭的httpclient客户端对象执行httpGet请求
            response=closeableHttpClient.execute(httpGet);
            //代表本次请求成功或者失败的状态
            StatusLine statusLine=response.getStatusLine();
            if(HttpStatus.SC_OK==statusLine.getStatusCode()){//HttpStatus里有所有状态码 200 404 302等等
                System.out.println("响应成功");
                //获取所有响应头
                Header[] allHeader=response.getAllHeaders();
                for(Header header:allHeader){
                    System.out.println("响应头:"+header.getName()+":"+header.getValue());
                }

                //成功了再获取响应结果
                //获取响应结果 注意HttpEntity有很多实现类,不仅仅可以作为响应结果,还可以作为请求的参数实体
                //作为响应结果的实现类是DecompressingEntity
                HttpEntity httpEntity=response.getEntity();
                System.out.println("ContentType:"+httpEntity.getContentType());
                //对HttpEntity操作的工具类
                String toStringResult=EntityUtils.toString(httpEntity, StandardCharsets.UTF_8);
                System.out.println(toStringResult);
                //确保流关闭
                EntityUtils.consume(httpEntity);
            }else{
                System.out.println("响应失败,响应码是:"+statusLine.getStatusCode());
            }

        } catch (Exception e) {
            e.printStackTrace();
        }finally {
            if(response!=null){
                try {
                    response.close();
                } catch (IOException e) {
                    e.printStackTrace();
                }
                if(closeableHttpClient!=null){
                    try {
                        closeableHttpClient.close();
                    } catch (IOException e) {
                        e.printStackTrace();
                    }
                }
            }
        }

    }
关于保存网络图片到本地:粗暴点讲就是爬取图片,再写个demo
  @Test
    public void test3(){
        //可关闭的httpclient客户端,相当于打开一个浏览器
        CloseableHttpClient closeableHttpClient=HttpClients.createDefault();
        String userName="收到 你没";
        String password="阿斯顿)(";
        try {
            userName= URLEncoder.encode(userName, StandardCharsets.UTF_8.name());
            password=URLEncoder.encode(password, StandardCharsets.UTF_8.name());
        } catch (Exception e) {
            e.printStackTrace();
        }

        String str="https://img-blog.csdnimg.cn/c2c20ed7275749bba0e43cdf9d66a9d7.png";

        //String str="http://localhost:8899/httpclient-demo/test1?userName="+userName+"&password="+password;
        //构造HttpGet请求对象
        HttpGet httpGet=new HttpGet(str);
        httpGet.addHeader("User-Agent","Mozilla/5.0 (Windows NT 10.0; Win64; x64) AppleWebKit/537.36 (KHTML, like Gecko) Chrome/107.0.0.0 Safari/537.36");
        //httpGet.addHeader("Referer","https://www.amamaw.com");
        //声明可关闭响应对象
        CloseableHttpResponse response = null;
        try {
            //可关闭的httpclient客户端对象执行httpGet请求
            response=closeableHttpClient.execute(httpGet);
            //代表本次请求成功或者失败的状态
            StatusLine statusLine=response.getStatusLine();
            if(HttpStatus.SC_OK==statusLine.getStatusCode()){//HttpStatus里有所有状态码 200 404 302等等
                System.out.println("响应成功");
                //获取所有响应头
                Header[] allHeader=response.getAllHeaders();
                for(Header header:allHeader){
                    System.out.println("响应头:"+header.getName()+":"+header.getValue());
                }

                //成功了再获取响应结果
                //获取响应结果 注意HttpEntity有很多实现类,不仅仅可以作为响应结果,还可以作为请求的参数实体
                //作为响应结果的实现类是DecompressingEntity
                HttpEntity httpEntity=response.getEntity();
                //获取图片,一般图片都有后缀,如何保存为原有的后缀 image/jpg image/png image/jpeg image/图片后缀
                String contenType= httpEntity.getContentType().getValue();
                String suffix=".jpg";
                if(contenType.contains("jpg")||contenType.contains("jpeg")){
                    suffix=".jpg";
                }else if(contenType.contains("bmp")||contenType.contains("bitmap")){
                    suffix=".bmp";
                }else if(contenType.contains("png")){
                    suffix=".png";
                }else if(contenType.contains("gif")){
                    suffix=".gif";
                }
                //图片是二进制,toByteArray()可以以流的形式获取任何 文本也可以  图片  视频都行
                byte[] bytes=EntityUtils.toByteArray(httpEntity);
//                String str1=new String(bytes);
//                System.out.println("str1="+str1);
                //定义个本地保存图片的路径
                String localAbsPath="D:\\pachongimage\\"+new SimpleDateFormat("yyyyHHmmhhmmss").format(new Date())+suffix;
                //写入文件
                FileOutputStream fos=new FileOutputStream(localAbsPath);
                fos.write(bytes);
                fos.close();
                System.out.println("ContentType:"+httpEntity.getContentType());
                //对HttpEntity操作的工具类   注意图片是二进制文件,不能再toString()了  只有文本可以
                //String toStringResult=EntityUtils.toString(httpEntity, StandardCharsets.UTF_8);
                //System.out.println(toStringResult);
                //确保流关闭
                EntityUtils.consume(httpEntity);
            }else{
                System.out.println("响应失败,响应码是:"+statusLine.getStatusCode());
            }

        } catch (Exception e) {
            e.printStackTrace();
        }finally {
            if(response!=null){
                try {
                    response.close();
                } catch (IOException e) {
                    e.printStackTrace();
                }
                if(closeableHttpClient!=null){
                    try {
                        closeableHttpClient.close();
                    } catch (IOException e) {
                        e.printStackTrace();
                    }
                }
            }
        }
    }
这样该目录里就有该图片了
设置访问代理,设置访问代理原因,爬虫写多了,高频率访问网站,对方安全性做的比较好的话,会将你IP封掉.那么做爬虫的应对方式就是设置访问代理,用不同IP去访问,请求,避免被封,让它搞不清楚
设置访问代理,有免费的,但是不太稳定,要稳定加钱......
另外再写个Demo
无论HttpGet或者HttpPost都可以配置 这里用HttpGet演示 代理的IP和端口网上找的
//创建一个代理
String ip="120.26.123.95";
int port=8010;
//构造HttpGet请求对象
HttpGet httpGet=new HttpGet(str);
HttpHost proxy=new HttpHost(ip,port);
//对每一个请求进行配置,会覆盖全局的默认请求配置
RequestConfig requestConfig= RequestConfig.custom().setProxy(proxy).build();
httpGet.setConfig(requestConfig);
 /**
     * 演示设置访问代理
     */
    @Test
    public void test4(){
        //可关闭的httpclient客户端,相当于打开一个浏览器
        CloseableHttpClient closeableHttpClient=HttpClients.createDefault();
        String str="http://www.baidu.com";
        //创建一个代理
        String ip="120.26.123.95";
        int port=8010;
        //构造HttpGet请求对象
        HttpGet httpGet=new HttpGet(str);
        HttpHost proxy=new HttpHost(ip,port);
        //对每一个请求进行配置,会覆盖全局的默认请求配置
        RequestConfig requestConfig= RequestConfig.custom().setProxy(proxy).build();
        httpGet.setConfig(requestConfig);
        //声明可关闭响应对象
        CloseableHttpResponse response = null;
        try {
            //可关闭的httpclient客户端对象执行httpGet请求
            response=closeableHttpClient.execute(httpGet);
            //代表本次请求成功或者失败的状态
            StatusLine statusLine=response.getStatusLine();
            if(HttpStatus.SC_OK==statusLine.getStatusCode()){//HttpStatus里有所有状态码 200 404 302等等
                System.out.println("响应成功");
                //获取所有响应头
                Header[] allHeader=response.getAllHeaders();
                for(Header header:allHeader){
                    System.out.println("响应头:"+header.getName()+":"+header.getValue());
                }

                //成功了再获取响应结果
                //获取响应结果 注意HttpEntity有很多实现类,不仅仅可以作为响应结果,还可以作为请求的参数实体
                //作为响应结果的实现类是DecompressingEntity
                HttpEntity httpEntity=response.getEntity();

                System.out.println("ContentType:"+httpEntity.getContentType());
                //对HttpEntity操作的工具类   注意图片是二进制文件,不能再toString()了  只有文本可以
                String toStringResult=EntityUtils.toString(httpEntity, StandardCharsets.UTF_8);
                System.out.println(toStringResult);
                //确保流关闭
                EntityUtils.consume(httpEntity);
            }else{
                System.out.println("响应失败,响应码是:"+statusLine.getStatusCode());
            }

        } catch (Exception e) {
            e.printStackTrace();
        }finally {
            if(response!=null){
                try {
                    response.close();
                } catch (IOException e) {
                    e.printStackTrace();
                }
                if(closeableHttpClient!=null){
                    try {
                        closeableHttpClient.close();
                    } catch (IOException e) {
                        e.printStackTrace();
                    }
                }
            }
        }
关于连接超时,和读取超时的设置与具体含义
关于连接超时,也是通过RequestConfig来进行设置的,这里先把代理去掉
就是设置HTTP三次握手的时间上限,连接超时就报ConnectTimeoutException
//对每一个请求进行配置,会覆盖全局的默认请求配置
RequestConfig requestConfig= RequestConfig.custom().setConnectTimeout(5000).build();
//对每一个请求进行配置,会覆盖全局的默认请求配置
RequestConfig requestConfig= RequestConfig.custom()
        //设置CTP三次握手的时间上线
        .setConnectTimeout(55555)
        //设置从请求的网址获取响应数据的时间渐渐
        .setSocketTimeout(50000)
        //指从连接池获取connection的超时时间
        .setConnectionRequestTimeout(5000)
        .build();
httpGet.setConfig(requestConfig);
接着演示,用HttpClient发送
Content-Type分别为:
1.application/x-www-form-urlencoded
2.application/json
3multipart/form-data(文件上传时的Content-Type类型)
的Post请求
1.用HttpClient发送content-type为application/x-www-form-urlencoded的post请求
demo送上 注意:content-type为application/x-www-form-urlencoded
他的参数格式是在body体中:KEY1=VALUE1&KEY2=VALUE2的格式
其实下面传送过去的也就是userName=java&password=xxxx的格式
NameValuePair是个接口,BasicNameValuePair是他的一个实现类
/**
     * - 发送application/x-www-form-urlencoded类型的post请求
     *
     * @throws Exception
     */
    @Test
    public void testPost1() throws Exception {
        CloseableHttpClient closeableHttpClient = HttpClients.createDefault();
        String urlStr = "http://localhost:8899/httpclient-demo/test2";
        // 创建httppost对象
        HttpPost httpPost = new HttpPost(urlStr);
        // 设置请求头
        httpPost.addHeader("Content-Type", "application/x-www-form-urlencoded; charset=utf-8");
        // 给post对象设置参数
        /*
         NameValuePair: <input id="user-name-label" type="text" name="userName"/>
         的name(userName)和input标签里面输入的值就构成了一个NameValuePair对象
         */
        List<NameValuePair> list = new ArrayList<>();
        list.add(new BasicNameValuePair("userName", "java"));
        list.add(new BasicNameValuePair("password", "xxxxx"));
        // 把参数集合设置到formEntity
        UrlEncodedFormEntity formEntity = new UrlEncodedFormEntity(list, Consts.UTF_8);
        httpPost.setEntity(formEntity);

        CloseableHttpResponse response = null;
        try {
            response = closeableHttpClient.execute(httpPost);
            HttpEntity entity = response.getEntity();
            String toStringResult = EntityUtils.toString(entity, StandardCharsets.UTF_8);
            System.out.println(toStringResult);
            EntityUtils.consume(entity);
        } catch (Exception e) {
            e.printStackTrace();
        } finally {
            if (closeableHttpClient != null) {
                try {
                    closeableHttpClient.close();
                } catch (IOException e) {
                    e.printStackTrace();
                }
            }
            if (response != null) {
                try {
                    response.close();
                } catch (IOException e) {
                    e.printStackTrace();
                }
            }
        }
    }
2.用HttpClient发送content-type为application/json的post请求
在body体中的格式就是JSON
{
"userName":"java",
"password":"xxxx",
"age":18
}
Demo送上
  /**
     * - 发送application/json类型的post请求
     */
    @Test
    public void testPost2() throws Exception {
        CloseableHttpClient closeableHttpClient = HttpClients.createDefault();
        String urlStr = "http://localhost:8899/httpclient-demo/testJson";
        // 创建httppost对象
        HttpPost httpPost = new HttpPost(urlStr);

        // string:是一个json字符串
        JSONObject jsonObj = new JSONObject();
        jsonObj.put("userName", "java");
        jsonObj.put("password", "不知道写什么");

        StringEntity jsonEntity = new StringEntity(jsonObj.toString(), Consts.UTF_8);
        // 也需要给entity设置一下内容类型
//        jsonEntity.setContentType(new BasicHeader("Content-Type","application/json; charset=utf-8"));
        jsonEntity.setContentType("application/json; charset=utf-8");
        // 设置entity的编码
        jsonEntity.setContentEncoding(Consts.UTF_8.name());
        httpPost.setEntity(jsonEntity);

        CloseableHttpResponse response = null;
        try {
            response = closeableHttpClient.execute(httpPost);
            HttpEntity entity = response.getEntity();
            String toStringResult = EntityUtils.toString(entity, StandardCharsets.UTF_8);
            System.out.println(toStringResult);
            EntityUtils.consume(entity);
        } catch (Exception e) {
            e.printStackTrace();
        } finally {
            if (closeableHttpClient != null) {
                try {
                    closeableHttpClient.close();
                } catch (IOException e) {
                    e.printStackTrace();
                }
            }
            if (response != null) {
                try {
                    response.close();
                } catch (IOException e) {
                    e.printStackTrace();
                }
            }
        }
    }


 1235
1235


 被折叠的 条评论
为什么被折叠?
被折叠的 条评论
为什么被折叠?
 到【灌水乐园】发言


