


基于Indirect Display Driver的虚拟显示器开发
前面我们探讨了在Win7系统下面基于WDDM HOOK的虚拟显示器开发技术;Windows 10 1067版本之后,Windows支持了显卡过滤框架,通过Indirect Display Driver(IDD)可以很简单的就完成虚拟显示器的开发。
关于Win7下面虚拟显示器的实现可以阅读文章:https://blog.csdn.net/tianxilink/article/details/131924769?spm=1001.2014.3001.5501
通过Indirect Display Driver可以生成一个虚拟的显示适配器,针对这个适配器我们模拟一个显示器设备的插入,就可以实现虚拟显示器的功能了。
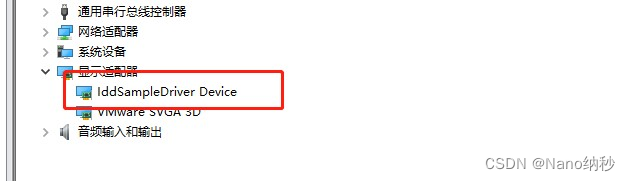
在这一篇文章,我们分析Indirect Display Driver的技术原理和虚拟显示器的开发流程。
1. 技术概述
IDD是一个基于WDF的用户层驱动程序,基本架构如下:
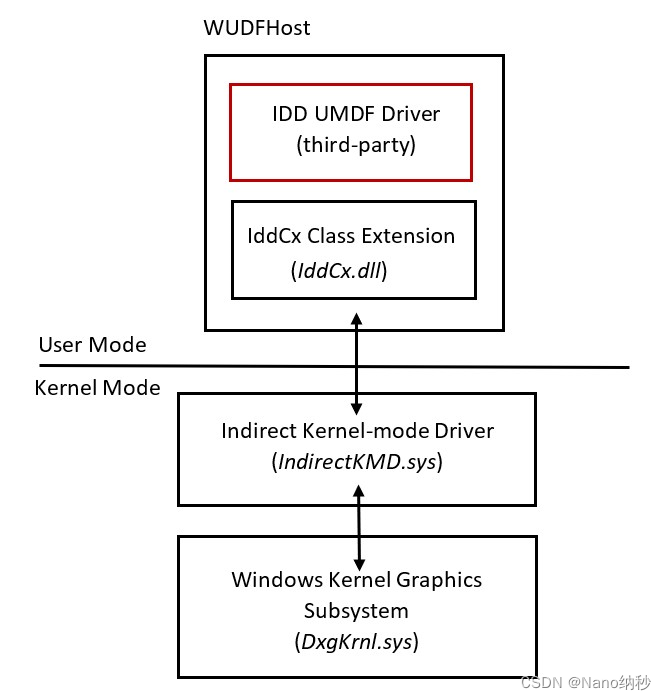
这里依赖几个驱动,分别介绍一下基本原理:
- IndirectKMD.sys这是一个Display Only驱动程序,是虚拟适配器的核心驱动。
- IddCx.dll是用户层接口提供动态库,主要将用户层的IddCx相关函数通过请求发送给驱动进行核心处理。
- third-part是用户实现的IDD驱动程序。
在进行IDD驱动开发之前需要掌握几个核心IddCx的对象:
IDDCX_ADAPTER表示逻辑显示适配器的对象。IDDCX_MONITOR表示连接的显示器的对象。IDDCX_SWAPCHAIN表示桌面图像的交换链。
2. IDD驱动开发
我们看一下IDD驱动开发的框架,这个是一个用户层驱动,在用户层DriverEntry中,我们只需要注册回调函数就行
extern "C" NTSTATUS DriverEntry(
    PDRIVER_OBJECT  pDriverObject,
    PUNICODE_STRING pRegistryPath
)
{
    WDF_DRIVER_CONFIG Config;
    NTSTATUS Status;

    WDF_OBJECT_ATTRIBUTES Attributes;
    WDF_OBJECT_ATTRIBUTES_INIT(&Attributes);

    WDF_DRIVER_CONFIG_INIT(&Config,
        IddSampleDeviceAdd
    );

    Status = WdfDriverCreate(pDriverObject, pRegistryPath, &Attributes, &Config, WDF_NO_HANDLE);
    if (!NT_SUCCESS(Status))
    {
        return Status;
    }

    return Status;
}
这里设置设备加载时候的回调函数IddSampleDeviceAdd,当驱动被加载并且创建设备对象的时候就会被调用,在这个回调函数中,我们通过IddCx初始化IDD驱动即可。
NTSTATUS IddSampleDeviceAdd(WDFDRIVER Driver, PWDFDEVICE_INIT pDeviceInit)
{
    NTSTATUS Status = STATUS_SUCCESS;
    WDF_PNPPOWER_EVENT_CALLBACKS PnpPowerCallbacks;

    UNREFERENCED_PARAMETER(Driver);

    WDF_PNPPOWER_EVENT_CALLBACKS_INIT(&PnpPowerCallbacks);
    PnpPowerCallbacks.EvtDeviceD0Entry = IddSampleDeviceD0Entry;
    WdfDeviceInitSetPnpPowerEventCallbacks(pDeviceInit, &PnpPowerCallbacks);

    IDD_CX_CLIENT_CONFIG IddConfig;
    IDD_CX_CLIENT_CONFIG_INIT(&IddConfig);

    IddConfig.EvtIddCxDeviceIoControl = IddSampleIoDeviceControl;

    IddConfig.EvtIddCxAdapterInitFinished = IddSampleAdapterInitFinished;

    IddConfig.EvtIddCxParseMonitorDescription = IddSampleParseMonitorDescription;
    IddConfig.EvtIddCxMonitorGetDefaultDescriptionModes = IddSampleMonitorGetDefaultModes;
    IddConfig.EvtIddCxMonitorQueryTargetModes = IddSampleMonitorQueryModes;
    IddConfig.EvtIddCxAdapterCommitModes = IddSampleAdapterCommitModes;
    IddConfig.EvtIddCxMonitorAssignSwapChain = IddSampleMonitorAssignSwapChain;
    IddConfig.EvtIddCxMonitorUnassignSwapChain = IddSampleMonitorUnassignSwapChain;

    Status = IddCxDeviceInitConfig(pDeviceInit, &IddConfig);
    if (!NT_SUCCESS(Status))
    {
        return Status;
    }

    WDF_OBJECT_ATTRIBUTES Attr;
    WDF_OBJECT_ATTRIBUTES_INIT_CONTEXT_TYPE(&Attr, IndirectDeviceContextWrapper);
    Attr.EvtCleanupCallback = [](WDFOBJECT Object)
    {
        auto* pContext = WdfObjectGet_IndirectDeviceContextWrapper(Object);
        if (pContext)
        {
            pContext->Cleanup();
        }
    };

    WDFDEVICE Device = nullptr;
    Status = WdfDeviceCreate(&pDeviceInit, &Attr, &Device);
    if (!NT_SUCCESS(Status))
    {
        return Status;
    }

    Status = IddCxDeviceInitialize(Device);

    auto* pContext = WdfObjectGet_IndirectDeviceContextWrapper(Device);
    pContext->pContext = new IndirectDeviceContext(Device);

    return Status;
}
从上面的代码可以发现,IDD驱动主要是通过IDD_CX_CLIENT_CONFIG设置相关回调函数即可;Windows框架已经替我们做好的所有事情。
在这些回调函数中,一般实现如下功能:
IddSampleDeviceD0Entry表示设备进入工作电源状态,在这里我们将会创建IDDCX_ADAPTER适配器对象。IddSampleAdapterInitFinished由于适配器创函数IddCxAdapterInitAsync是一个异步的过程,因此这个函数表示适配器初始化完成的函数。IddSampleParseMonitorDescription,IddSampleMonitorGetDefaultModes和IddSampleMonitorQueryModes是分别对于不同场景下面模式集合的处理。IddSampleMonitorAssignSwapChain桌面图片交换链的创建回调函数。
通过将上面回调函数的实现,我们就可以实现了一个虚拟的显示适配器了;但是怎么样创建一个虚拟的显示器呢?
我们实现IddSampleIoDeviceControl回到函数,接收用户输入命令信息,例如我们可以实现插入和拔出两个功能。
对于显示器的插入,代码流程大致可以实现如下:
void IndirectDeviceContext::Plugin(UINT ConnectorIndex)
{

    WDF_OBJECT_ATTRIBUTES Attr;
    WDF_OBJECT_ATTRIBUTES_INIT_CONTEXT_TYPE(&Attr, IndirectMonitorContextWrapper);

    // In the sample driver, we report a monitor right away but a real driver would do this when a monitor connection event occurs
    IDDCX_MONITOR_INFO MonitorInfo = {};
    MonitorInfo.Size = sizeof(MonitorInfo);
    MonitorInfo.MonitorType = DISPLAYCONFIG_OUTPUT_TECHNOLOGY_HDMI;
    MonitorInfo.ConnectorIndex = ConnectorIndex;

    MonitorInfo.MonitorDescription.Size = sizeof(MonitorInfo.MonitorDescription);
    MonitorInfo.MonitorDescription.Type = IDDCX_MONITOR_DESCRIPTION_TYPE_EDID;
    if (ConnectorIndex >= ARRAYSIZE(s_SampleMonitors))
    {
        MonitorInfo.MonitorDescription.DataSize = 0;
        MonitorInfo.MonitorDescription.pData = nullptr;
    }
    else
    {
        MonitorInfo.MonitorDescription.DataSize = IndirectSampleMonitor::szEdidBlock;
        MonitorInfo.MonitorDescription.pData = const_cast<BYTE*>(s_SampleMonitors[ConnectorIndex].pEdidBlock);
    }

    CoCreateGuid(&MonitorInfo.MonitorContainerId);

    IDARG_IN_MONITORCREATE MonitorCreate = {};
    MonitorCreate.ObjectAttributes = &Attr;
    MonitorCreate.pMonitorInfo = &MonitorInfo;

    // Create a monitor object with the specified monitor descriptor
    IDARG_OUT_MONITORCREATE MonitorCreateOut;
    NTSTATUS Status = IddCxMonitorCreate(m_Adapter, &MonitorCreate, &MonitorCreateOut);
    if (NT_SUCCESS(Status))
    {
        // Create a new monitor context object and attach it to the Idd monitor object
        auto* pMonitorContextWrapper = WdfObjectGet_IndirectMonitorContextWrapper(MonitorCreateOut.MonitorObject);
        pMonitorContextWrapper->pContext = new IndirectMonitorContext(MonitorCreateOut.MonitorObject);

        // Tell the OS that the monitor has been plugged in
        IDARG_OUT_MONITORARRIVAL ArrivalOut;
        Status = IddCxMonitorArrival(MonitorCreateOut.MonitorObject, &ArrivalOut);
    }
}
这里我们可以看的通过IddCxMonitorCreate创建显示器对象,然后通过IddCxMonitorArrival报备系统,显示器已经插入。
此时我们就完成了虚拟显示器的开发。
3. 安装
对于一个硬件型或者虚拟型的驱动来说,肯定是应该工作在内核层的,那么IDD工作在用户层的驱动是怎么运行的呢?
这里IDD的基本运行需要借助WUDFRd.sys,也就是说WUDFRd.sys驱动实现了一个PNP驱动的所有框架功能,并把相关IRP请求通过封装发送给用户层来处理。
我们可以看到INF文件中,指定的驱动文件仍旧是WUDFRd.sys,例如:
[MyDevice_Install.NT.Services]
AddService=WUDFRd,0x000001fa,WUDFRD_ServiceInstall

[WUDFRD_ServiceInstall]
DisplayName = %WudfRdDisplayName%
ServiceType = 1
StartType = 3
ErrorControl = 1
ServiceBinary = %12%\WUDFRd.sys
当然对于WDF用户层驱动,仍旧需要添加相关信息:
[MyDevice_Install.NT.Wdf]
UmdfService=IddSampleDriver,IddSampleDriver_Install
UmdfServiceOrder=IddSampleDriver
UmdfKernelModeClientPolicy = AllowKernelModeClients

[IddSampleDriver_Install]
UmdfLibraryVersion=2.25.0
ServiceBinary=%12%\UMDF\IddSampleDriver.dll
UmdfExtensions = IddCx0102
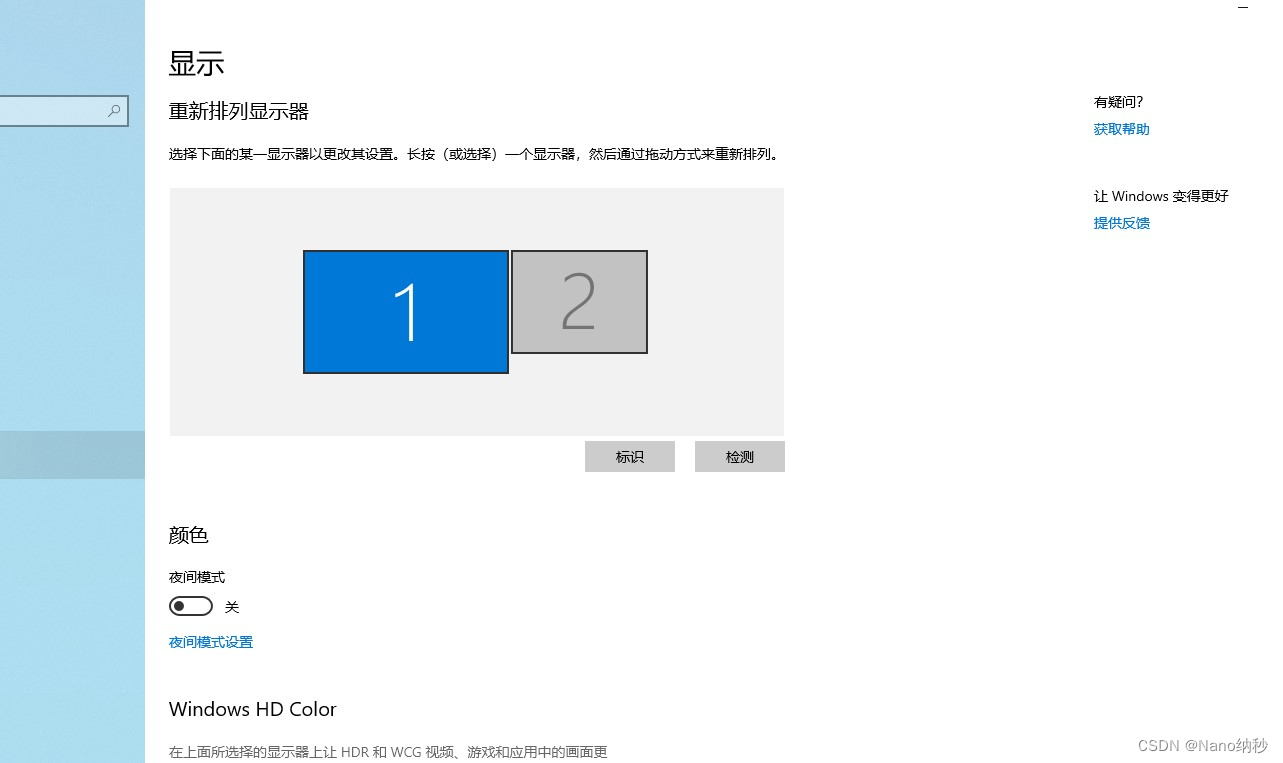
4. 实现效果
我们可以在虚拟机里面插入一个虚拟显示器,这样在虚拟机中我们可以实现扩展/复制屏幕的功能,例如如下图所示:


 2万+
2万+

 被折叠的 条评论
为什么被折叠?
被折叠的 条评论
为什么被折叠?
 到【灌水乐园】发言


