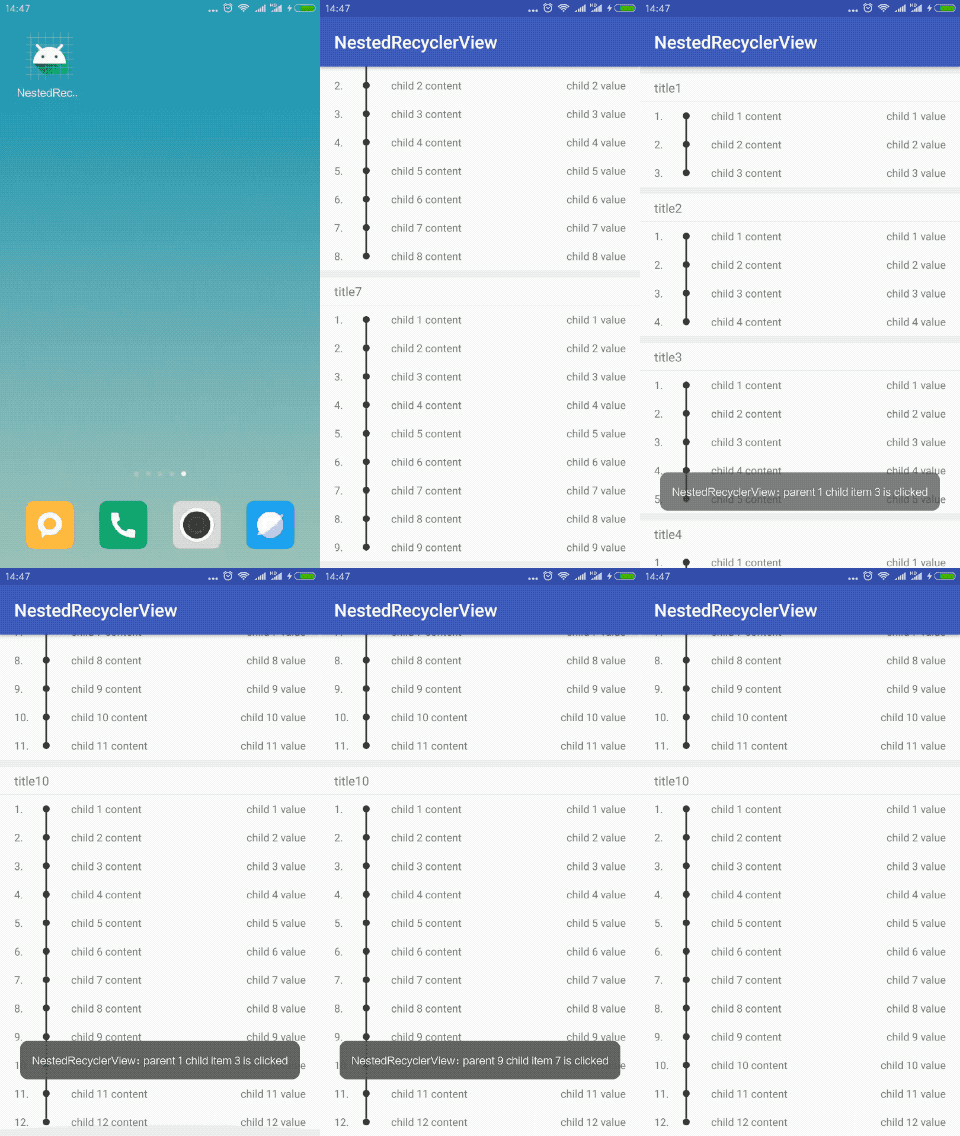
先上效果图:

本文实现了一个带标题的列表,采用嵌套RecyclerView来实现,外层布局的item为标题+RecyclerView,内层布局就是时间线的列表了。适配器代码如下:
public class NestedRcvAdapter extends RecyclerView.Adapter<NestedRcvAdapter.ViewHolder>{
    private List<Data> dataList;
    public Context mContext;

    public NestedRcvAdapter(List<Data> dataList, Context mContext){
        this.dataList = dataList;
        this.mContext = mContext;
    }

    @Override
    public ViewHolder onCreateViewHolder(ViewGroup parent, int viewType) {
        View view = LayoutInflater.from(mContext).inflate(R.layout.item_parent, parent, false);
        return new ViewHolder(view);
    }

    @Override
    public void onBindViewHolder(ViewHolder holder, int position) {
        Data data = dataList.get(position);
        holder.tvTitle.setText(data.getTitle());

        ChildAdapter childAdapter = (ChildAdapter) holder.rcvChild.getAdapter();
        //适配器复用
        if(childAdapter == null){
            RecyclerView.LayoutManager manager = new LinearLayoutManager(mContext);
            manager.setAutoMeasureEnabled(true);
            holder.rcvChild.setLayoutManager(manager);
            holder.rcvChild.setAdapter(new ChildAdapter(data.getChildBeanList(), position));
        }else{
            childAdapter.setData(data.getChildBeanList()); //重新设置数据
            childAdapter.notifyDataSetChanged();
        }
    }

    @Override
    public int getItemCount() {
        return dataList == null ? 0 : dataList.size();
    }

    public static class ViewHolder extends RecyclerView.ViewHolder{
        public TextView tvTitle;
        public RecyclerView rcvChild;

        public ViewHolder(View itemView){
            super(itemView);
            tvTitle = (TextView) itemView.findViewById(R.id.tv_title);
            rcvChild = (RecyclerView) itemView.findViewById(R.id.rcv_child);
        }
    }

    public class ChildAdapter extends RecyclerView.Adapter<ChildAdapter.ChildViewHolder>{
        public List<Data.ChildBean> childList;
        public int parentIndex;

        public ChildAdapter(List<Data.ChildBean> childList, int parentIndex){
            this.childList = childList;
            this.parentIndex = parentIndex;
        }

        @Override
        public ChildViewHolder onCreateViewHolder(ViewGroup parent, int viewType) {
            View view = LayoutInflater.from(mContext).inflate(R.layout.item_child, parent, false);
            return new ChildViewHolder(view);
        }

        @Override
        public void onBindViewHolder(ChildViewHolder holder, final int position) {
            Data.ChildBean childBean = childList.get(position);
            holder.tvContent.setText(childBean.getContent());
            holder.tvIndex.setText((position + 1) + ".");
            holder.tvChildValue.setText(childBean.getChildValue());
            if(position == 0){
                holder.tvTopLine.setVisibility(View.INVISIBLE);
            }else{ //important
                holder.tvTopLine.setVisibility(View.VISIBLE);
            }
            if(position == childList.size() - 1){
                holder.tvBottomLine.setVisibility(View.INVISIBLE);
            }else{ //important
                holder.tvBottomLine.setVisibility(View.VISIBLE);
            }
            holder.mContentView.setOnClickListener(new View.OnClickListener() {
                @Override
                public void onClick(View view) {
                    Toast.makeText(mContext, "parent " + parentIndex + " child item " + position + " is clicked", Toast.LENGTH_SHORT).show();
                }
            });
        }

        @Override
        public int getItemCount() {
            return childList == null ? 0 : childList.size();
        }

        public void setData(List<Data.ChildBean> childList) {
            this.childList = childList;
        }

        public class ChildViewHolder extends RecyclerView.ViewHolder{
            public TextView tvIndex;
            public TextView tvContent;
            public TextView tvChildValue;
            public TextView tvTopLine;
            public TextView tvPoint;
            public TextView tvBottomLine;
            public View mContentView;

            public ChildViewHolder(View itemView) {
                super(itemView);
                tvIndex = (TextView) itemView.findViewById(R.id.tv_index);
                tvContent = (TextView) itemView.findViewById(R.id.tv_content);
                tvChildValue = (TextView) itemView.findViewById(R.id.tv_child_value);
                tvTopLine = (TextView) itemView.findViewById(R.id.tv_top_line);
                tvPoint = (TextView) itemView.findViewById(R.id.tv_point);
                tvBottomLine = (TextView) itemView.findViewById(R.id.tv_bottom_line);
                mContentView = itemView;
            }
        }
    }
}
在Activity中使用代码如下:
    private void initData(){
        dataList = new ArrayList<>();
        for(int i = 0; i < 10; i++){
            Data data = new Data();
            data.setTitle("title" + (i + 1));
            List<Data.ChildBean> childBeanList = new ArrayList<>();
            for(int j = 0; j < i + 3; j++){
                Data.ChildBean childBean = new Data.ChildBean();
                childBean.setContent("child " + (j+1) + " content");
                childBean.setChildValue("child " + (j+1) + " value");
                childBeanList.add(childBean);
            }
            data.setChildBeanList(childBeanList);
            dataList.add(data);
        }
    }

    private void initView(){
        rcvParent = findViewById(R.id.rcv_parent);

        adapter = new NestedRcvAdapter(dataList, MainActivity.this);
        LinearLayoutManager linearLayoutManager = new LinearLayoutManager(MainActivity.this);
        rcvParent.setLayoutManager(linearLayoutManager);
        rcvParent.setAdapter(adapter);
    }
其中时间线在子item中的实现方式为:上半部分的竖线+中间圆点+下半部分的竖线。然后在适配器中进行判断:如果是第一个item的话就隐藏上半部分的竖线,如果是最后一个item就隐藏下半部分的竖线。布局代码如下:
    <LinearLayout
        android:layout_width="wrap_content"
        android:layout_height="match_parent"
        android:gravity="center_horizontal"
        android:orientation="vertical">
        <TextView
            android:id="@+id/tv_top_line"
            android:layout_width="2dp"
            android:layout_height="12dp"
            android:background="#333333"/>
        <TextView
            android:id="@+id/tv_point"
            android:layout_width="8dp"
            android:layout_height="8dp"
            android:background="@drawable/bg_time_line_point"/>
        <TextView
            android:id="@+id/tv_bottom_line"
            android:layout_width="2dp"
            android:layout_height="12dp"
            android:background="#333333"/>
    </LinearLayout>
值得注意的一点是可以在父适配器中的onBindViewHolder()方法中复用子adapter。


 439
439


 被折叠的 条评论
为什么被折叠?


