


目录
1.C++11简介:
2. 统一的列表初始化
2.1 {}初始化
2.2 std::initializer_list
3. 声明
3.1 auto
3.2 decltype
3.3 nullptr
4. 范围for循环
5. 智能指针
6. STL中一些变化
7 .右值引用和移动语义
7.1 左值引用和右值引用
7.2 左值引用与右值引用比较
7.3 右值引用使用场景和意义
7.4 右值引用引用左值及其一些更深入的使用场景分析
7.5 完美转发
9. 可变参数模板
后记:●由于作者水平有限,文章难免存在谬误之处,敬请读者斧正,俚语成篇,恳望指教!
——By 作者:新晓·故知
1.C++11简介:
在2003年C++标准委员会曾经提交了一份技术勘误表(简称TC1),使得C++03这个名字已经取代了 C++98称为C++11之前的最新C++标准名称。不过由于C++03(TC1)主要是对C++98标准中的漏洞 进行修复,语言的核心部分则没有改动,因此人们习惯性的把两个标准合并称为C++98/03标准。
从C++0x到C++11,C++标准10年磨一剑,第二个真正意义上的标准珊珊来迟。相比于
C++98/03,C++11则带来了数量可观的变化,其中包含了约140个新特性,以及对C++03标准中 约600个缺陷的修正,这使得C++11更像是从C++98/03中孕育出的一种新语言。相比较而言, C++11能更好地用于系统开发和库开发、语法更加泛华和简单化、更加稳定和安全,不仅功能更 强大,而且能提升程序员的开发效率,公司实际项目开发中也用得比较多,所以我们要作为一个 重点去学习。C++11增加的语法特性非常篇幅非常多,我们这里没办法一 一讲解,所以本节主要学习实际中比较实用的语法。
文档链接: C++11
小故事:
1998年是C++标准委员会成立的第一年,本来计划以后每5年视实际需要更新一次标准,C++国际 标准委员会在研究C++ 03的下一个版本的时候,一开始计划是2007年发布,所以最初这个标准叫 C++ 07。但是到06年的时候,官方觉得2007年肯定完不成C++ 07,而且官方觉得2008年可能也 完不成。最后干脆叫C++ 0x。x的意思是不知道到底能在07还是08还是09年完成。结果2010年的 时候也没完成,最后在2011年终于完成了C++标准。所以最终定名为C++11。
2. 统一的列表初始化
2.1 {}初始化
在C++98中,标准允许使用花括号{}对数组或者结构体元素进行统一的列表初始值设定。比如:
struct Point
{
int _x;
int _y;
};
int main()
{
int array1[] = { 1, 2, 3, 4, 5 };
int array2[5] = { 0 };
Point p = { 1, 2 };
return 0;
}C++11扩大了用大括号括起的列表(初始化列表)的使用范围,使其可用于所有的内置类型和用户自 定义的类型,使用初始化列表时,可添加等号(=),也可不添加。
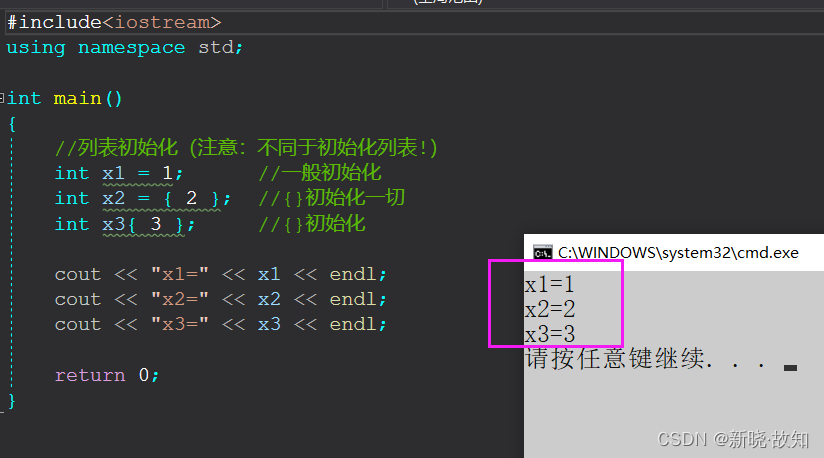
int main()
{
//列表初始化(注意:不同于初始化列表!)
int x1 = 1; //一般初始化
int x2 = { 2 }; //{}初始化一切
int x3{ 3 }; //{}初始化
cout << "x1=" << x1 << endl;
cout << "x2=" << x2 << endl;
cout << "x3=" << x3 << endl;
return 0;
}
struct Point
{
int _x;
int _y;
};
int main()
{
int x1 = 1;
int x2{ 2 };
int array1[]{ 1, 2, 3, 4, 5 };
int array2[5]{ 0 };
Point p{ 1, 2 };
// C++11中列表初始化也可以适用于new表达式中
int* pa = new int[4]{ 0 };
return 0;
}
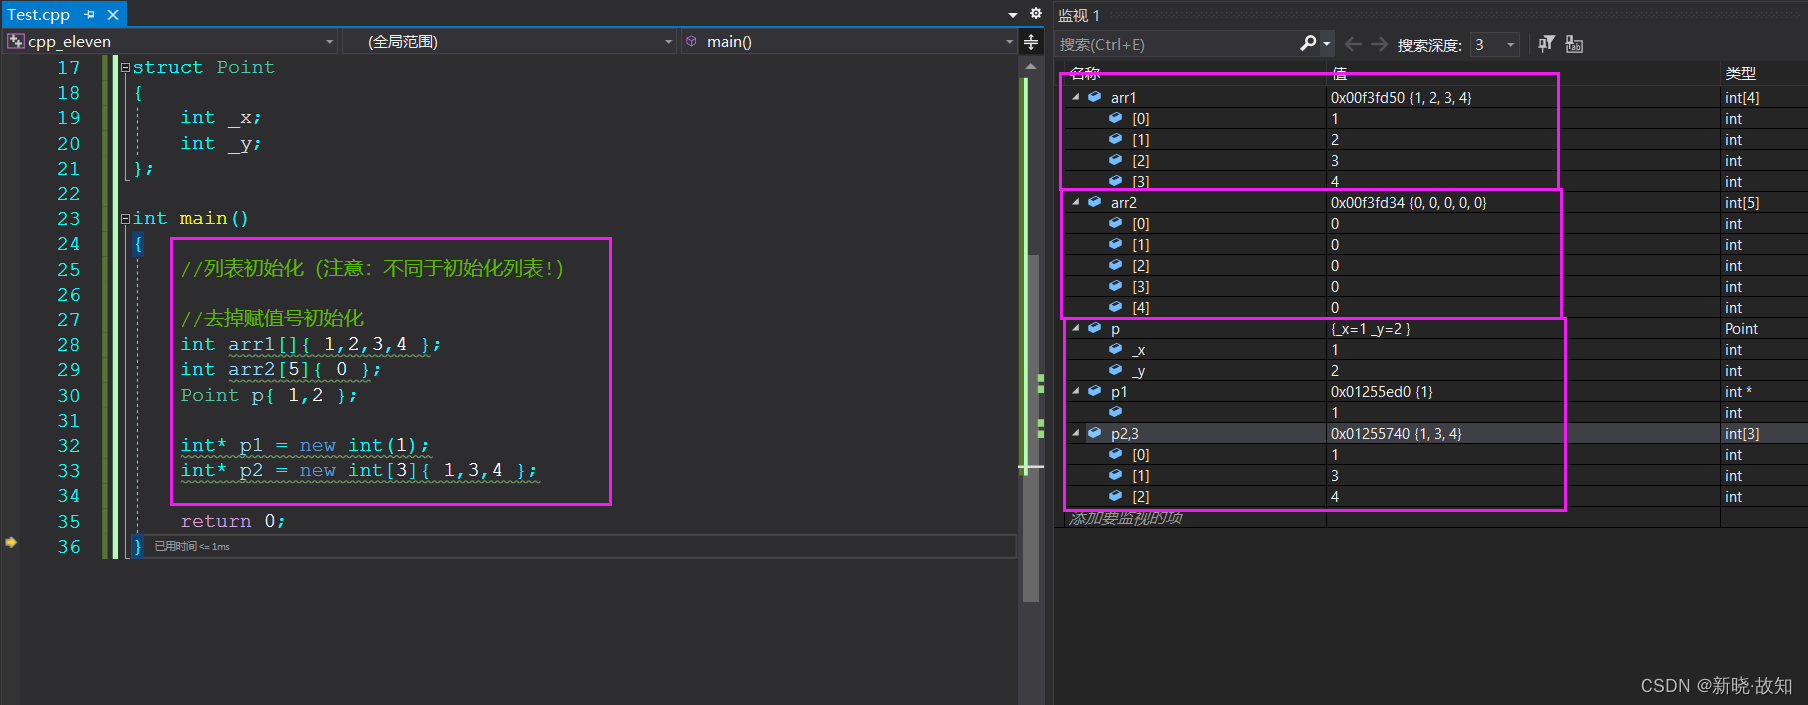
struct Point
{
int _x;
int _y;
};
int main()
{
//列表初始化(注意:不同于初始化列表!)
//去掉赋值号初始化
int arr1[]{ 1,2,3,4 };
int arr2[5]{ 0 };
Point p{ 1,2 };
int* p1 = new int(1);
int* p2 = new int[3]{ 1,3,4 };
return 0;
}创建对象时也可以使用列表初始化方式调用构造函数初始化:
class Date
{
public:
Date(int year, int month, int day)
:_year(year)
, _month(month)
, _day(day)
{
cout << "Date(int year, int month, int day)" << endl;
}
private:
int _year;
int _month;
int _day;
};
int main()
{
Date d1(2022, 1, 1); // old style
// C++11支持的列表初始化,这里会调用构造函数初始化
Date d2{ 2022, 1, 2 };
Date d3 = { 2022, 1, 3 };
return 0;
}
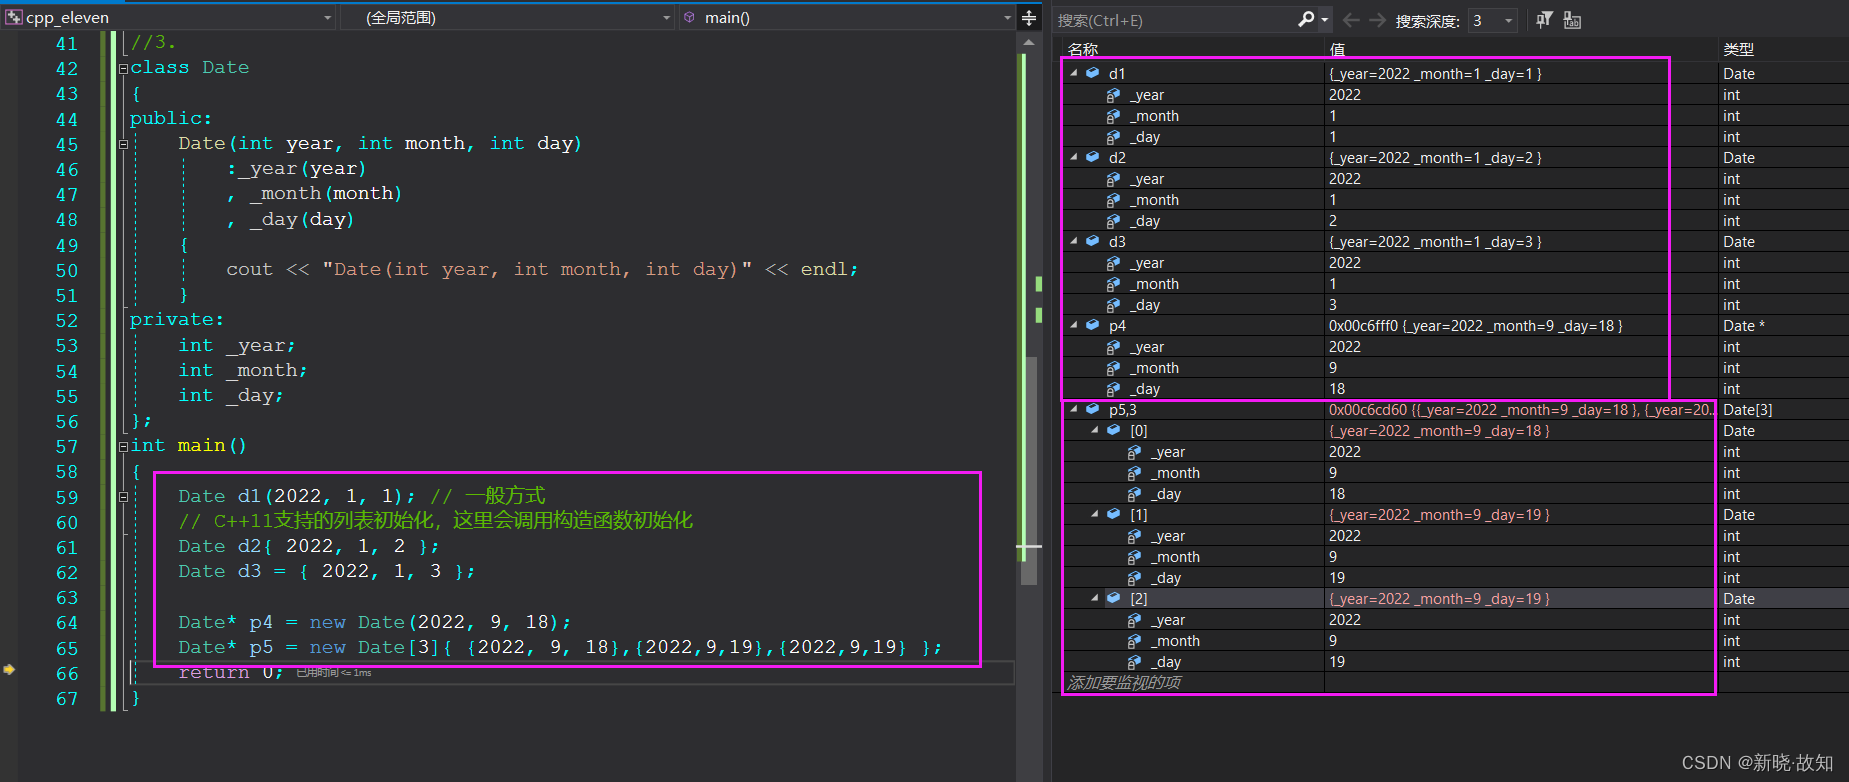
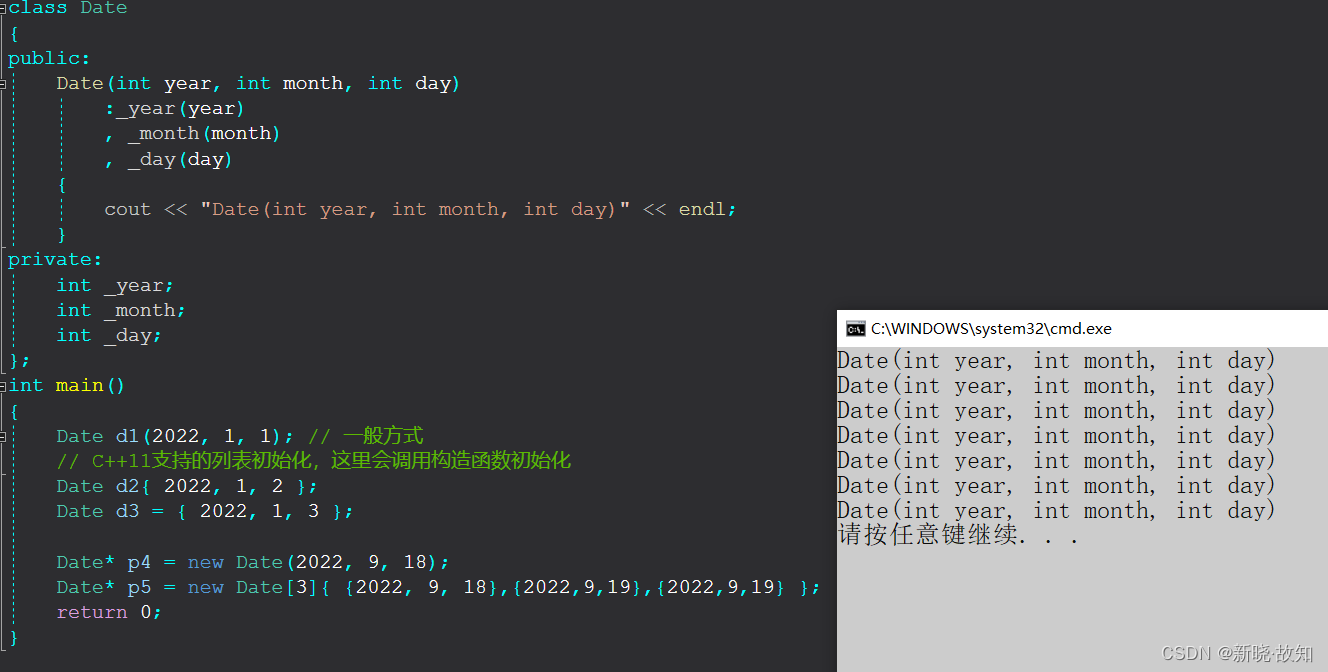
class Date
{
public:
Date(int year, int month, int day)
:_year(year)
, _month(month)
, _day(day)
{
cout << "Date(int year, int month, int day)" << endl;
}
private:
int _year;
int _month;
int _day;
};
int main()
{
Date d1(2022, 1, 1); // 一般方式
// C++11支持的列表初始化,这里会调用构造函数初始化
Date d2{ 2022, 1, 2 };
Date d3 = { 2022, 1, 3 };
Date* p4 = new Date(2022, 9, 18);
Date* p5 = new Date[3]{ {2022, 9, 18},{2022,9,19},{2022,9,19} };
return 0;
}
说明:
尽管有些新特性看起来“别扭”,但那是为了其他而作铺垫(可以不使用,但要认识这种用法),语言怎么用起来顺手得看个人。上面的新特性,在某一方面是为了更好的支持new[ ]的初始化问题。
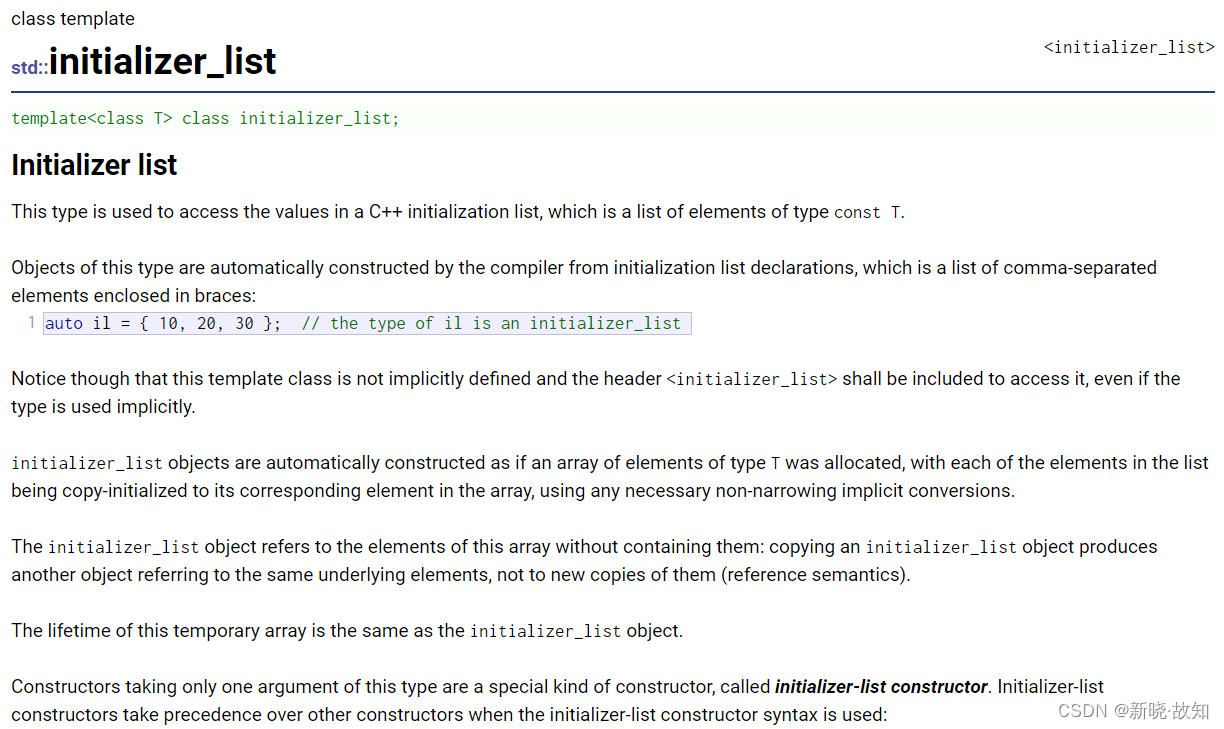
2.2 std::initializer_list
std::initializer_list的介绍文档:https://cplusplus.com/reference/initializer_list/initializer_list/
int main()
{
// the type of il is an initializer_list
auto il = { 10, 20, 30 };
cout << typeid(il).name() << endl;
return 0;
}
std::initializer_list使用场景:
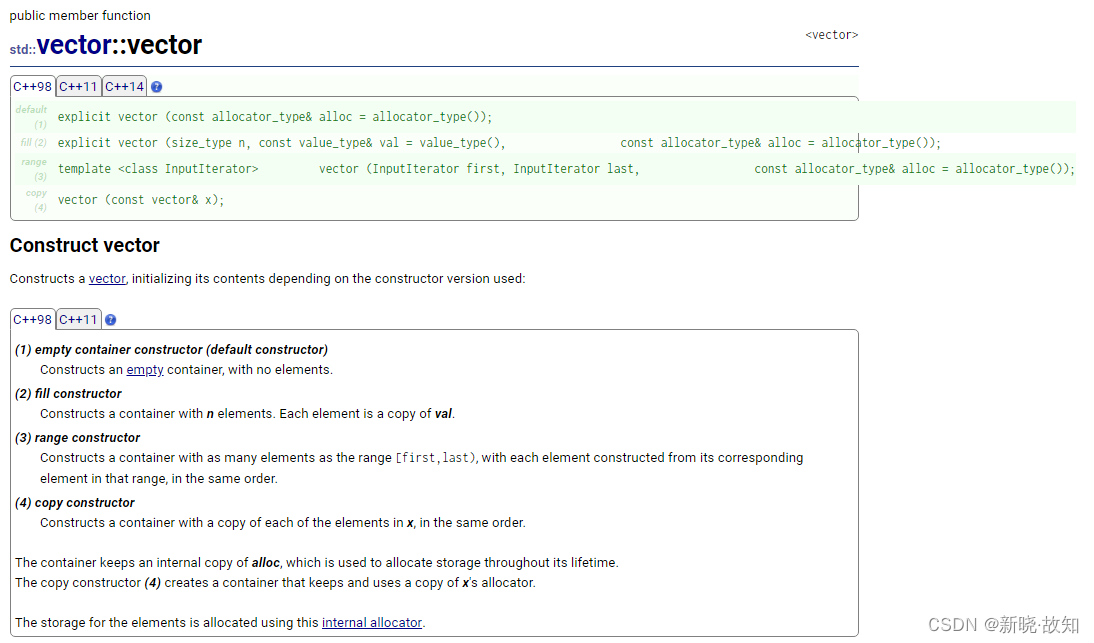
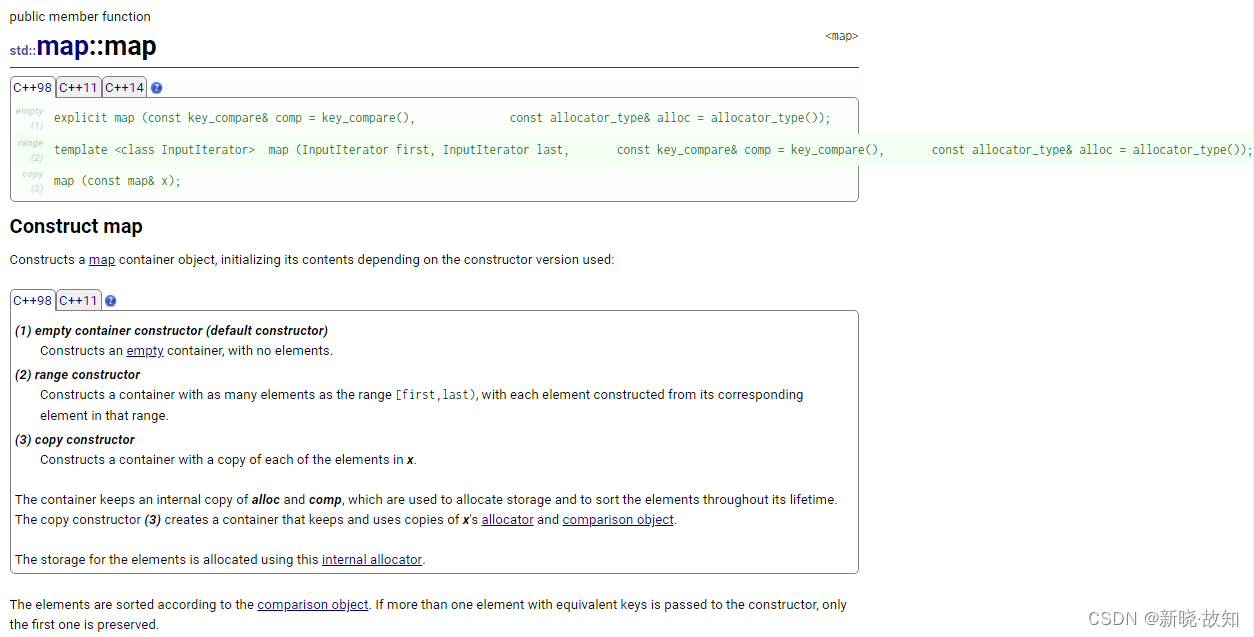
std::initializer_list一般是作为构造函数的参数,C++11对STL中的不少容器就增加
std::initializer_list作为参数的构造函数,这样初始化容器对象就更方便了。也可以作为operator= 的参数,这样就可以用大括号赋值。
链接:
https://cplusplus.com/reference/list/list/list/
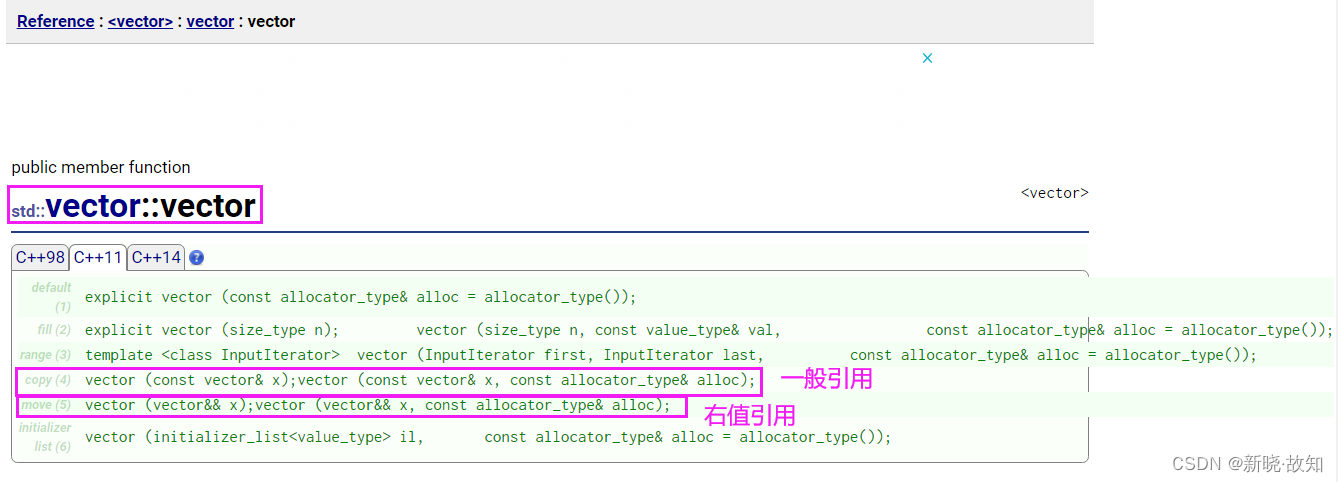
https://cplusplus.com/reference/vector/vector/vector/
https://cplusplus.com/reference/map/map/map/
https://cplusplus.com/reference/vector/vector/operator=/
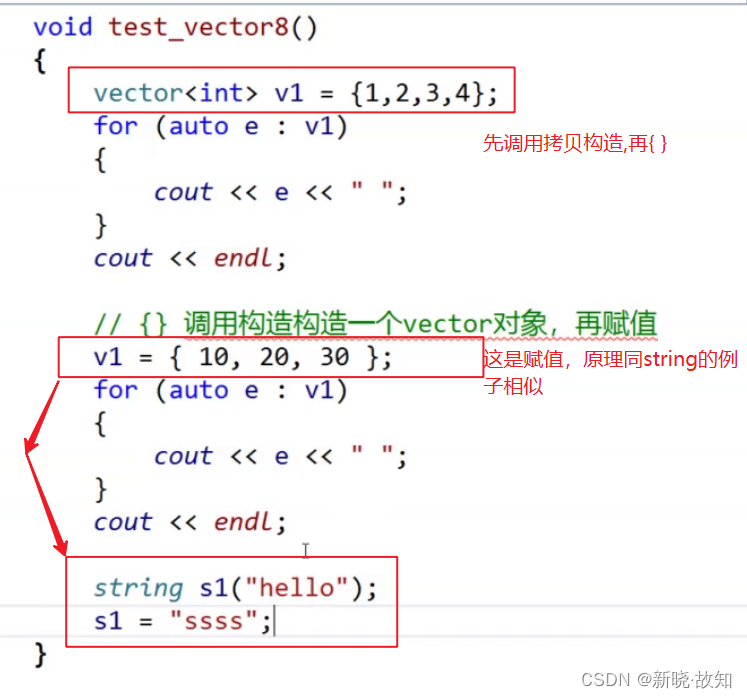
让模拟实现的vector也支持{}初始化和赋值:
int main()
{
vector<int> v = { 1,2,3,4 };
list<int> lt = { 1,2 };
// 这里{"sort", "排序"}会先初始化构造一个pair对象
map<string, string> dict = { {"sort", "排序"}, {"insert", "插入"} };
// 使用大括号对容器赋值
v = {10, 20, 30};
return 0;
}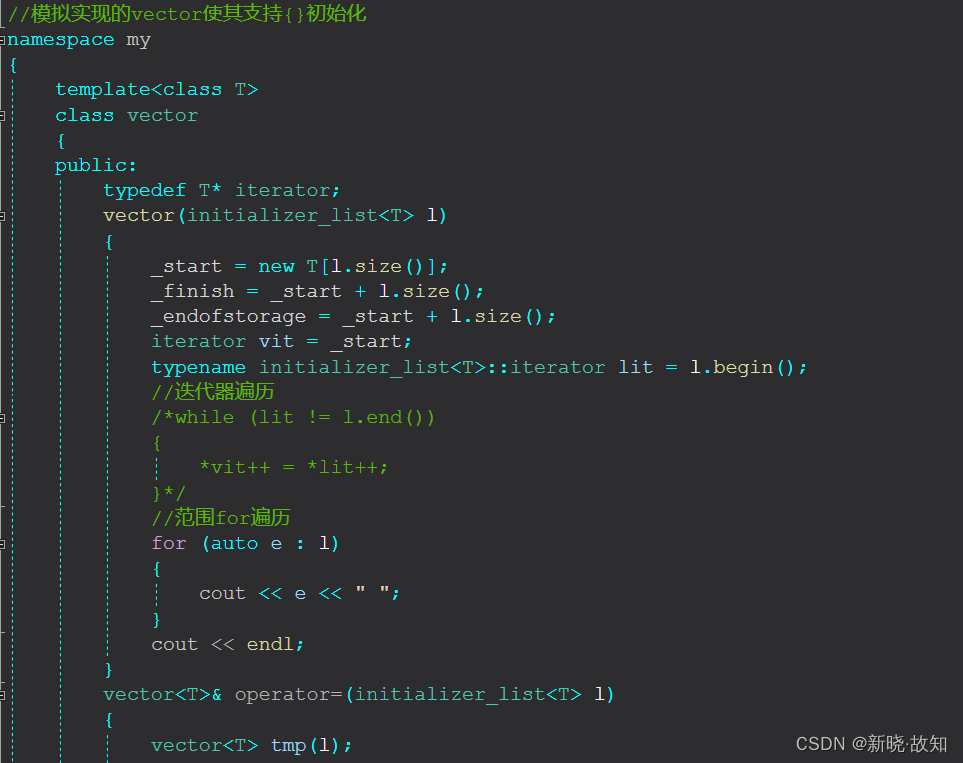
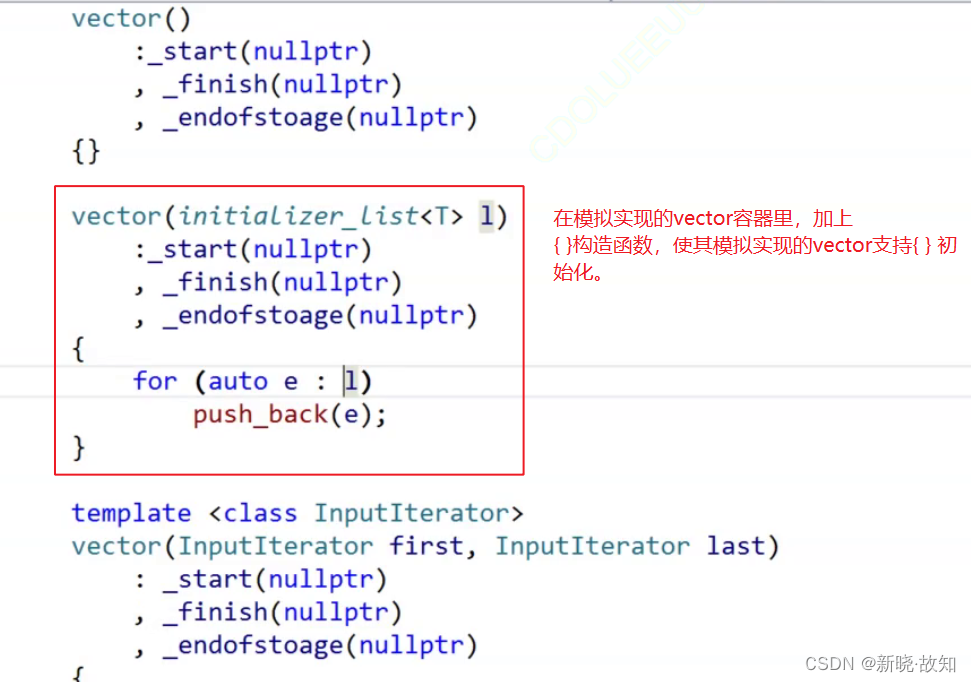
//模拟实现的vector使其支持{}初始化
namespace my
{
template<class T>
class vector
{
public:
typedef T* iterator;
vector(initializer_list<T> l)
{
_start = new T[l.size()];
_finish = _start + l.size();
_endofstorage = _start + l.size();
iterator vit = _start;
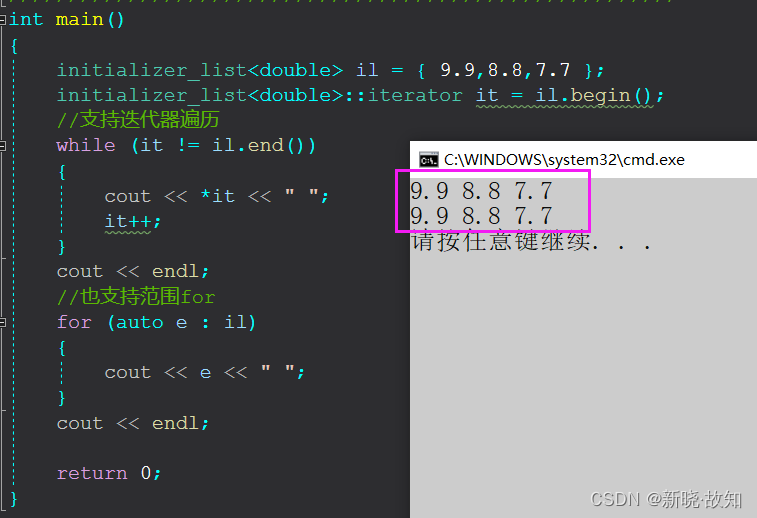
typename initializer_list<T>::iterator lit = l.begin();
//迭代器遍历
/*while (lit != l.end())
{
*vit++ = *lit++;
}*/
//范围for遍历
for (auto e : l)
{
cout << e << " ";
}
cout << endl;
}
vector<T>& operator=(initializer_list<T> l)
{
vector<T> tmp(l);
std::swap(_start, tmp._start);
std::swap(_finish, tmp._finish);
std::swap(_endofstorage, tmp._endofstorage);
return *this;
}
private:
iterator _start;
iterator _finish;
iterator _endofstorage;
};
}
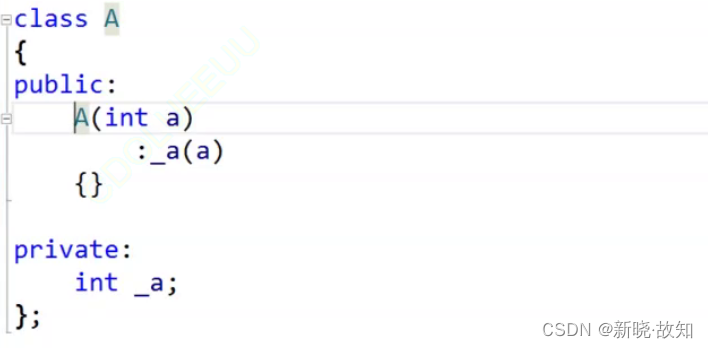
注意:vector等容器支持与Date类支持的原理不同!
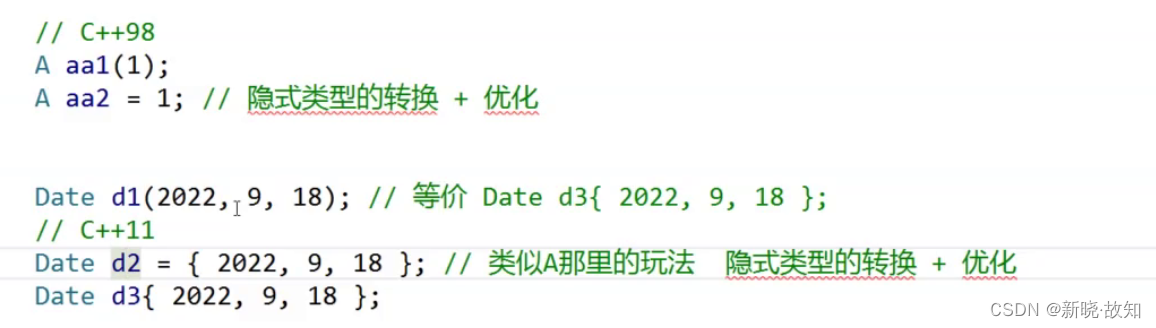
例如Date类A:
{}初始化演示:
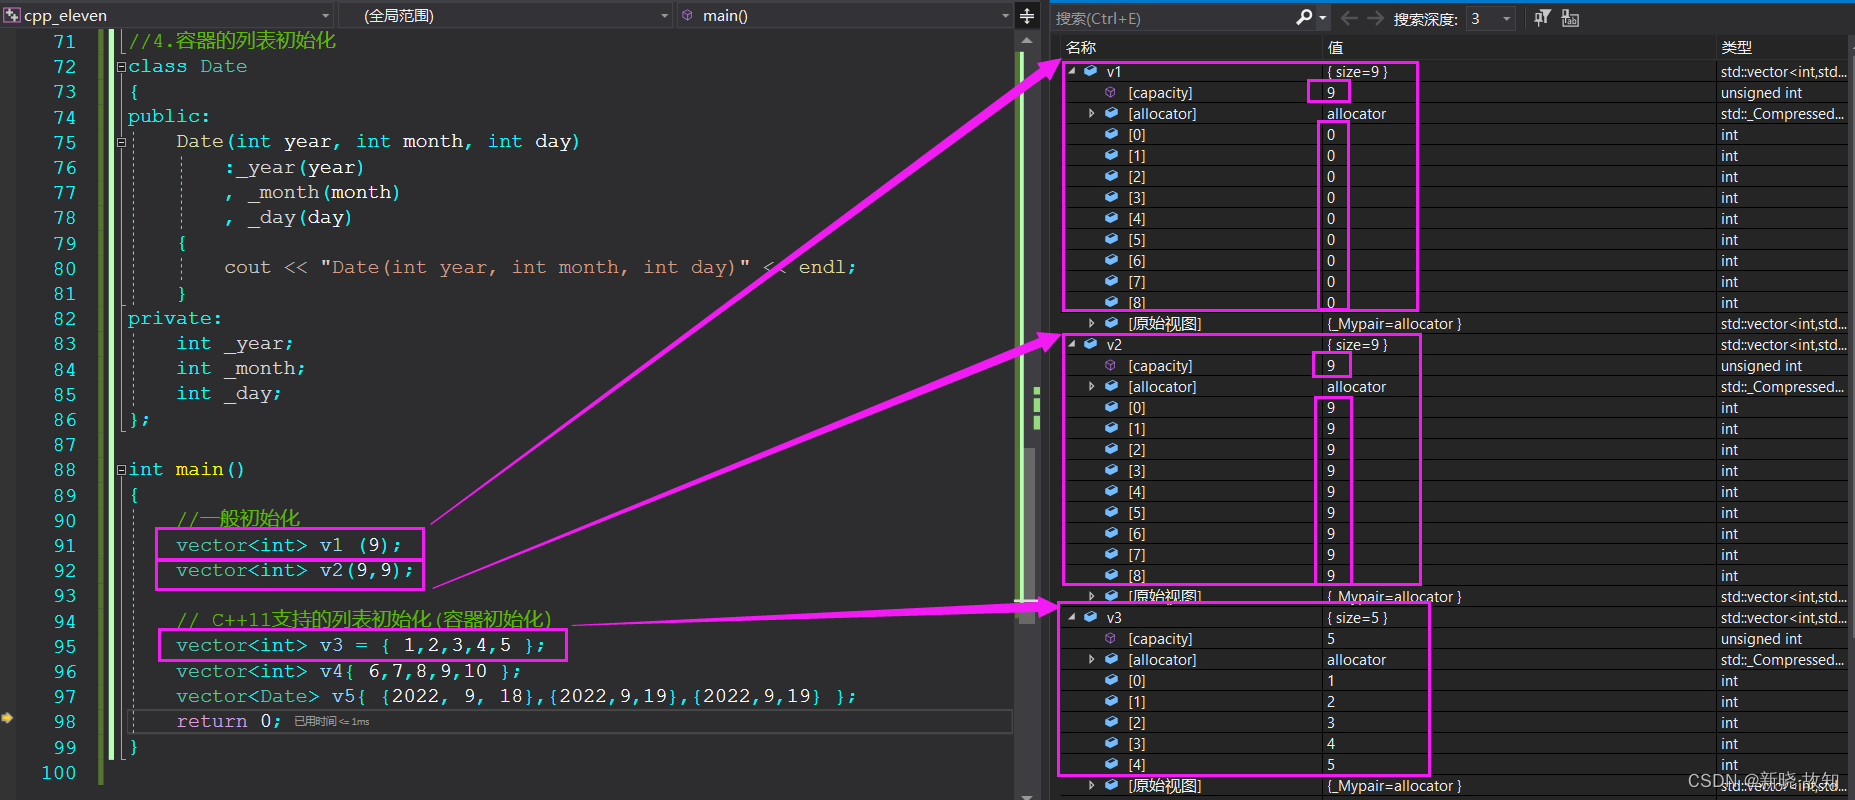
//4.容器的列表初始化
class Date
{
public:
Date(int year, int month, int day)
:_year(year)
, _month(month)
, _day(day)
{
cout << "Date(int year, int month, int day)" << endl;
}
private:
int _year;
int _month;
int _day;
};
int main()
{
//一般初始化
vector<int> v1 (9);
vector<int> v2(9,9);
// C++11支持的列表初始化(容器初始化)
vector<int> v3 = { 1,2,3,4,5 };
vector<int> v4{ 6,7,8,9,10 };
vector<Date> v5{ {2022, 9, 18},{2022,9,19},{2022,9,19} };
return 0;
}
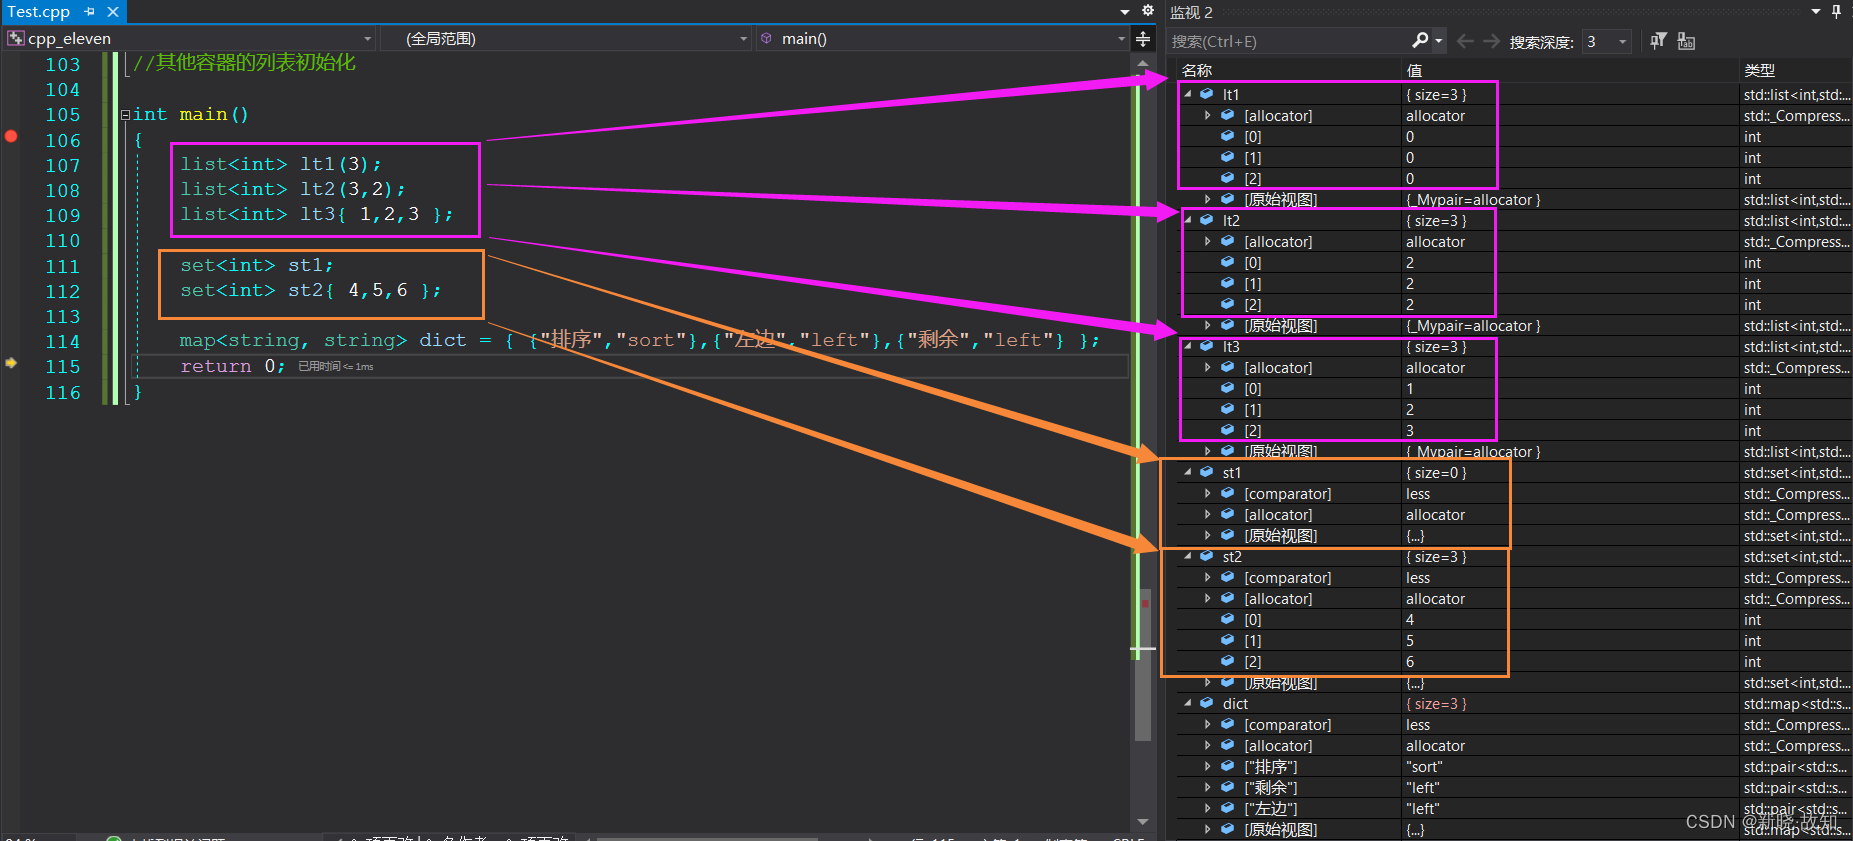
//其他容器的列表初始化
int main()
{
list<int> lt1(3);
list<int> lt2(3,2);
list<int> lt3{ 1,2,3 };
set<int> st1;
set<int> st2{ 4,5,6 };
map<string, string> dict = { {"排序","sort"},{"左边","left"},{"剩余","left"} };
return 0;
}容器的列表初始胡支持原理:C++11创建了一个新类型:


3. 声明
c++11提供了多种简化声明的方式,尤其是在使用模板时。
3.1 auto
在C++98中auto是一个存储类型的说明符,表明变量是局部自动存储类型,但是局部域中定义局 部的变量默认就是自动存储类型,所以auto就没什么价值了。C++11中废弃auto原来的用法,将其用于实现自动类型腿断。这样要求必须进行显示初始化,让编译器将定义对象的类型设置为初始化值的类型。
int main()
{
int i = 10;
auto p = &i;
auto pf = strcpy;
cout << typeid(p).name() << endl;
cout << typeid(pf).name() << endl;
map<string, string> dict = { {"sort", "排序"}, {"insert", "插入"} };
//map<string, string>::iterator it = dict.begin();
auto it = dict.begin();
return 0;
}
3.2 decltype
关键字decltype将变量的类型声明为表达式指定的类型。
// decltype的一些使用使用场景
template<class T1, class T2>
void F(T1 t1, T2 t2)
{
decltype(t1 * t2) ret;
cout << typeid(ret).name() << endl;
}
int main()
{
const int x = 1;
double y = 2.2;
decltype(x * y) ret; // ret的类型是double
decltype(&x) p; // p的类型是int*
cout << typeid(ret).name() << endl;
cout << typeid(p).name() << endl; F(1, 'a');
return 0;
}
3.3 nullptr
由于C++中NULL被定义成字面量0,这样就可能回带来一些问题,因为0既能指针常量,又能表示整形常量。所以出于清晰和安全的角度考虑,C++11中新增了nullptr,用于表示空指针。
#ifndef NULL
#ifdef __cplusplus
#define NULL 0
#else
#define NULL ((void *)0)
#endif
#endif


4. 范围for循环
这里在前面章节已学习,深入学习参见官方文档。
用法举例:

5. 智能指针
这个部分后期会进行专门学习。
6. STL中一些变化
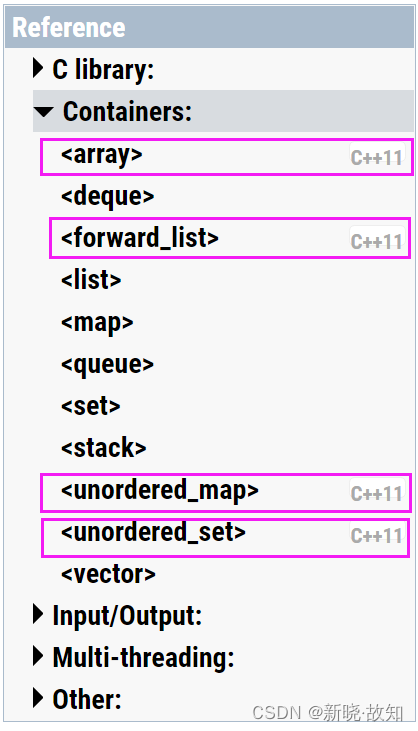
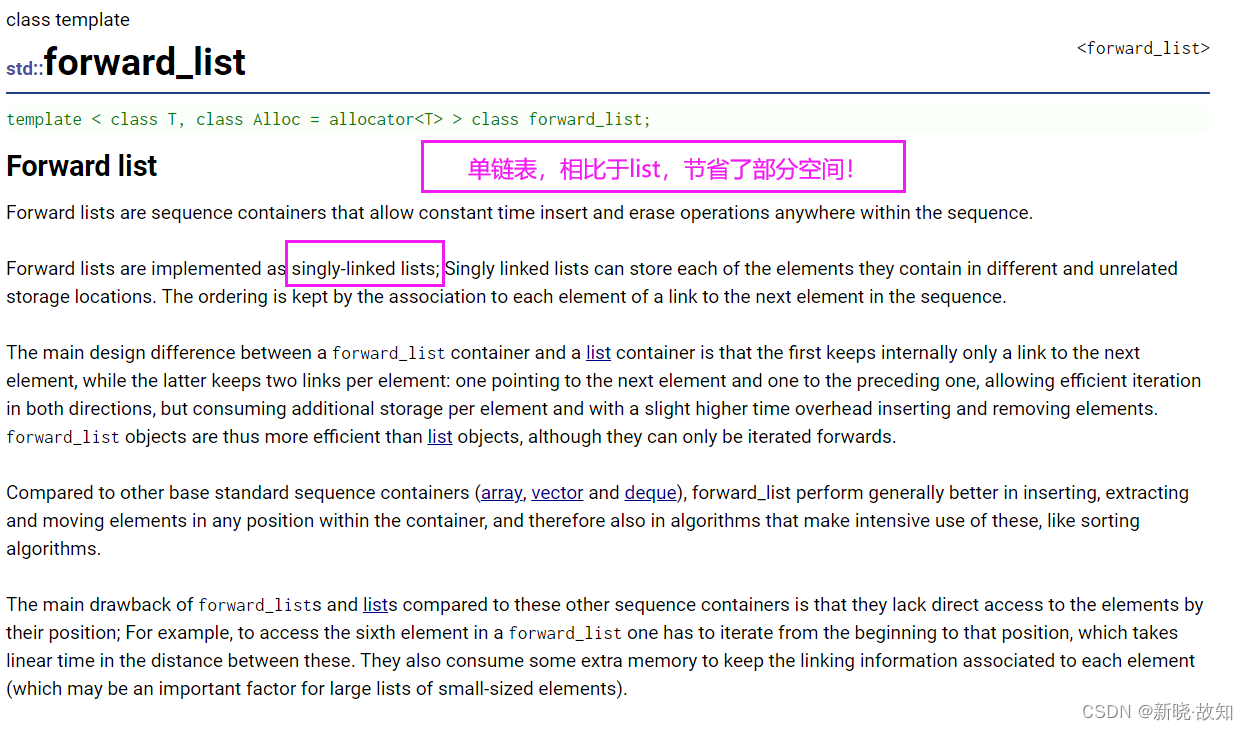
新容器
用橘色圈起来是C++11中的一些几个新容器,但是实际最有用的是unordered_map和
unordered_set。
容器中的一些新方法
如果我们再细细去看会发现基本每个容器中都增加了一些C++11的方法,但是其实很多都是用得 比较少的。
比如提供了cbegin和cend方法返回const迭代器等等,但是实际意义不大,因为begin和end也是 可以返回const迭代器的,这些都是属于锦上添花的操作。
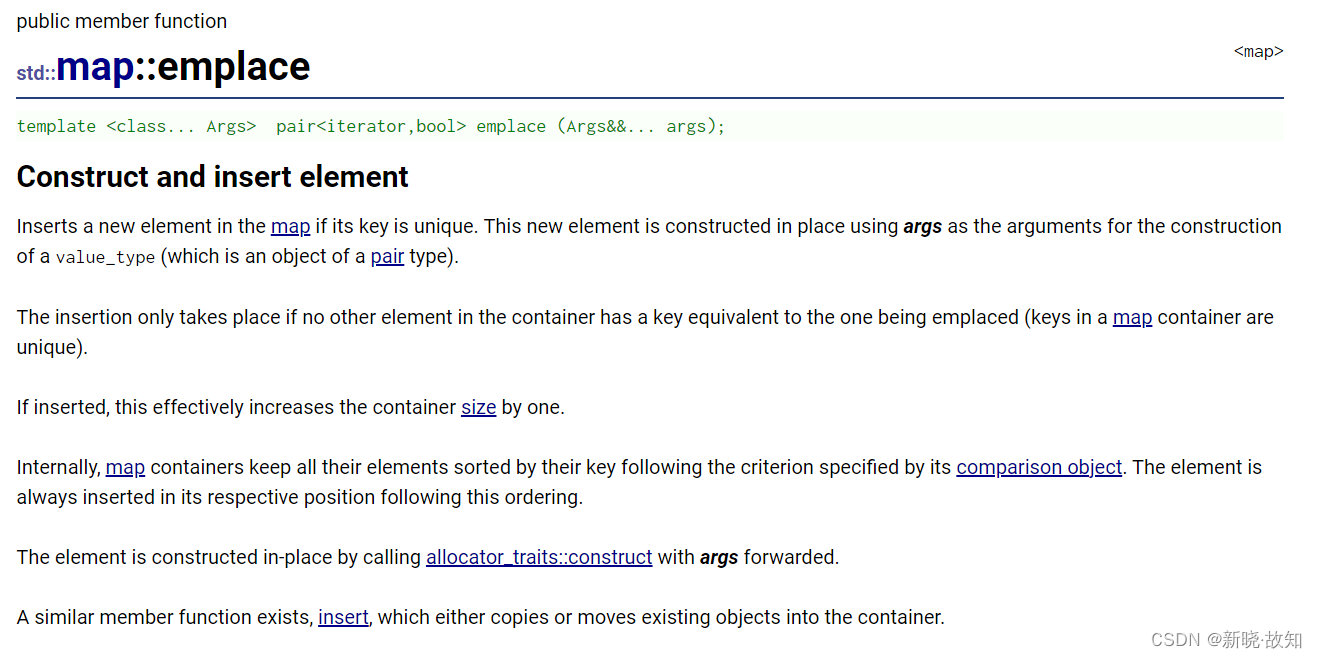
实际上C++11更新后,容器中增加的新方法最后用的插入接口函数的右值引用版本:
https://cplusplus.com/reference/vector/vector/emplace_back/
https://cplusplus.com/reference/map/map/emplace/
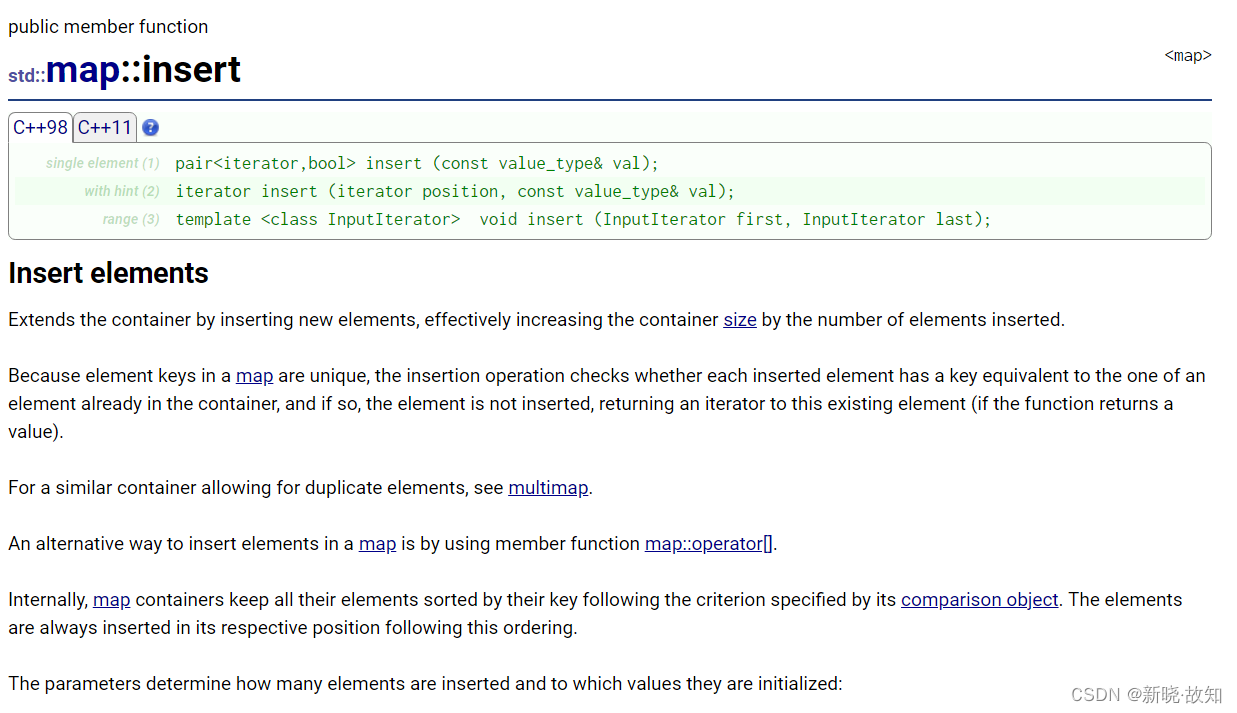
https://cplusplus.com/reference/map/map/insert/
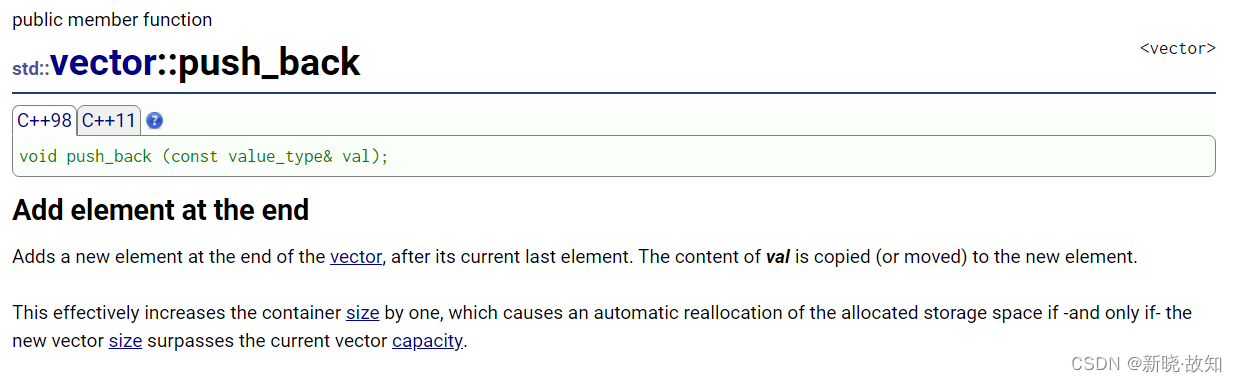
https://cplusplus.com/reference/vector/vector/push_back/
但是这些接口到底意义在哪?网上都说他们能提高效率,他们是如何提高效率的?
请看下面的右值引用和移动语义章节的讲解。另外emplace还涉及模板的可变参数,也需要再继续深入学习后面章节的知识。


7 .右值引用和移动语义
7.1 左值引用和右值引用
传统的C++语法中就有引用的语法,而C++11中新增了的右值引用语法特性,所以从现在开始我们之前学习的引用就叫做左值引用。无论左值引用还是右值引用,都是给对象取别名。
什么是左值?什么是左值引用?
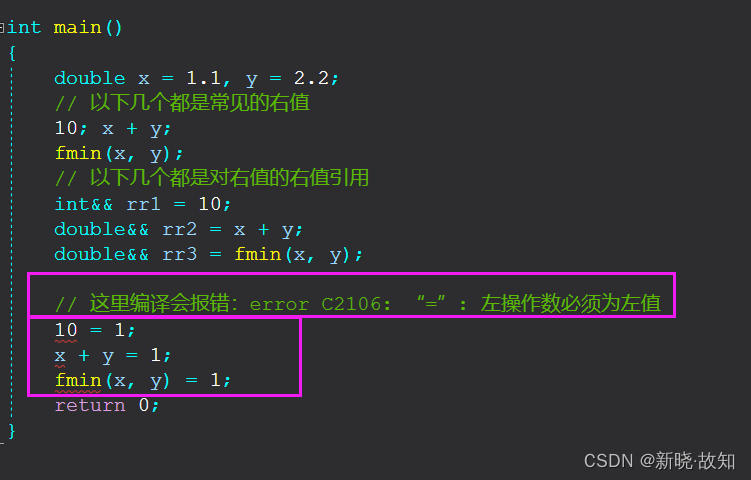
左值是一个表示数据的表达式(如变量名或解引用的指针),我们可以获取它的地址+可以对它赋值,左值可以出现赋值符号的左边,右值不能出现在赋值符号左边。定义时const修饰符后的左值,不能给他赋值,但是可以取它的地址。左值引用就是给左值的引用,给左值取别名。
什么是右值?什么是右值引用?
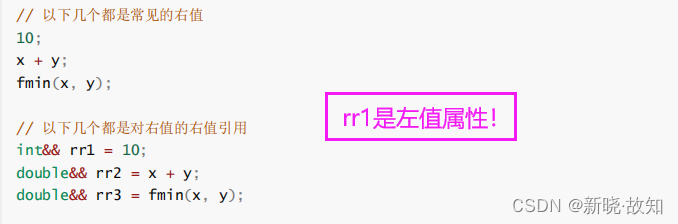
右值也是一个表示数据的表达式,如:字面常量、表达式返回值,函数返回值(这个不能是左值引用返回)等等,右值可以出现在赋值符号的右边,但是不能出现出现在赋值符号的左边,右值不能取地址。右值引用就是对右值的引用,给右值取别名。
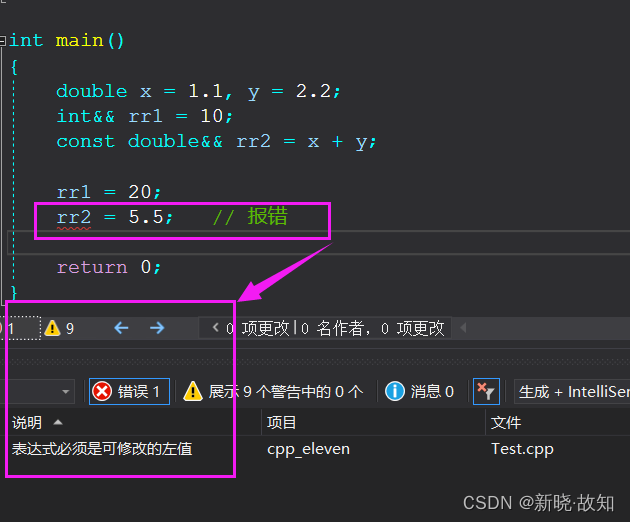
需要注意的是右值是不能取地址的,但是给右值取别名后,会导致右值被存储到特定位置,且可以取到该位置的地址,也就是说例如:不能取字面量10的地址,但是rr1引用后,可以对rr1取地址,也可以修改rr1。如果不想rr1被修改,可以用const int&& rr1 去引用,是不是感觉很神奇, 这个了解一下实际中右值引用的使用场景并不在于此,这个特性也不重要。
测试示例:
7.2 左值引用与右值引用比较
左值引用总结:
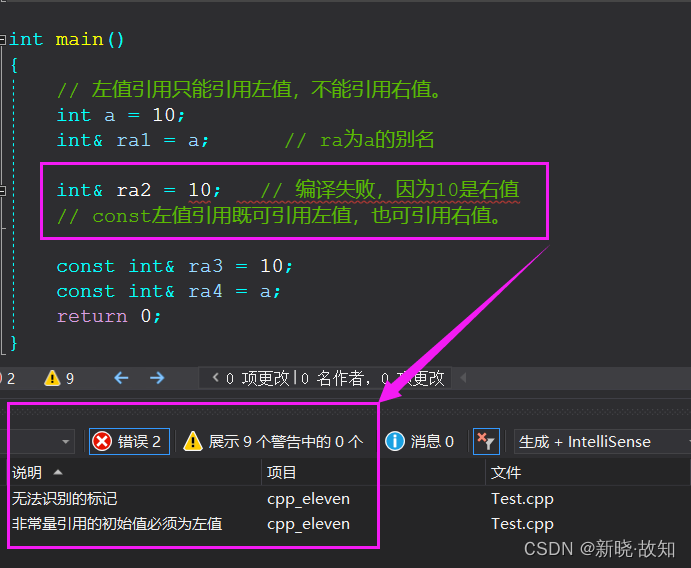
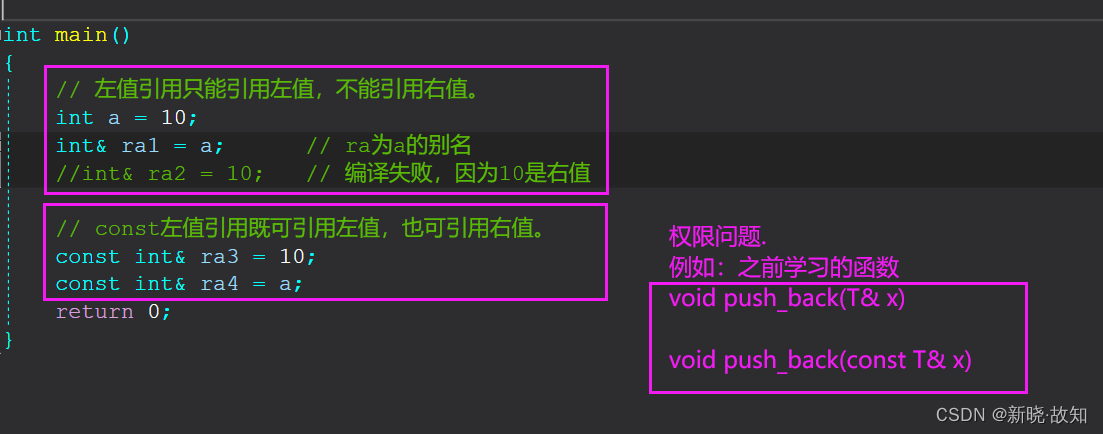
1. 左值引用只能引用左值,不能引用右值。
2. 但是const左值引用既可引用左值,也可引用右值
右值引用总结:
1. 右值引用只能右值,不能引用左值。
2. 但是右值引用可以move以后的左值。
7.3 右值引用使用场景和意义
前面我们可以看到左值引用既可以引用左值和又可以引用右值,那为什么C++11还要提出右值引用呢?是不是化蛇添足呢?下面我们来看看左值引用的短板,右值引用是如何补齐这个短板的!
下面场景遇到的问题,只能传值返回,使用左值引用解决不了:
右值分类:
1.纯右值
2.将亡值
move可以将一个左值属性的元素A转为具有右值属性的元素A",这就使得当别人引用被转后A"时,也可以“掠夺”被引用元素A"的资源。
深拷贝的问题:
传值返回+深拷贝:
编译器优化:
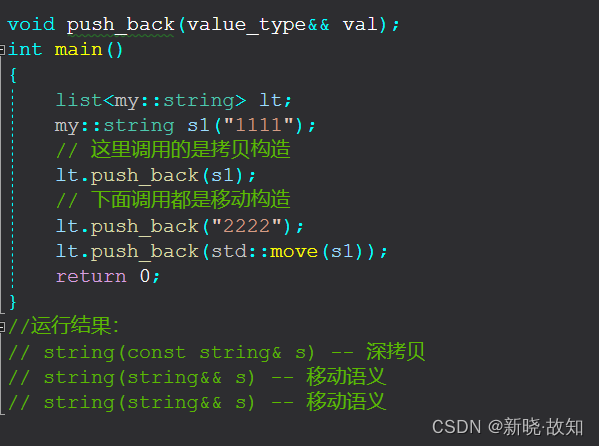
既有拷贝构造也有移动构造:
编译器优化:
深拷贝:左值拷贝是不会被资源转移
右值拷贝:会转移将亡值的资源,但提升了效率!
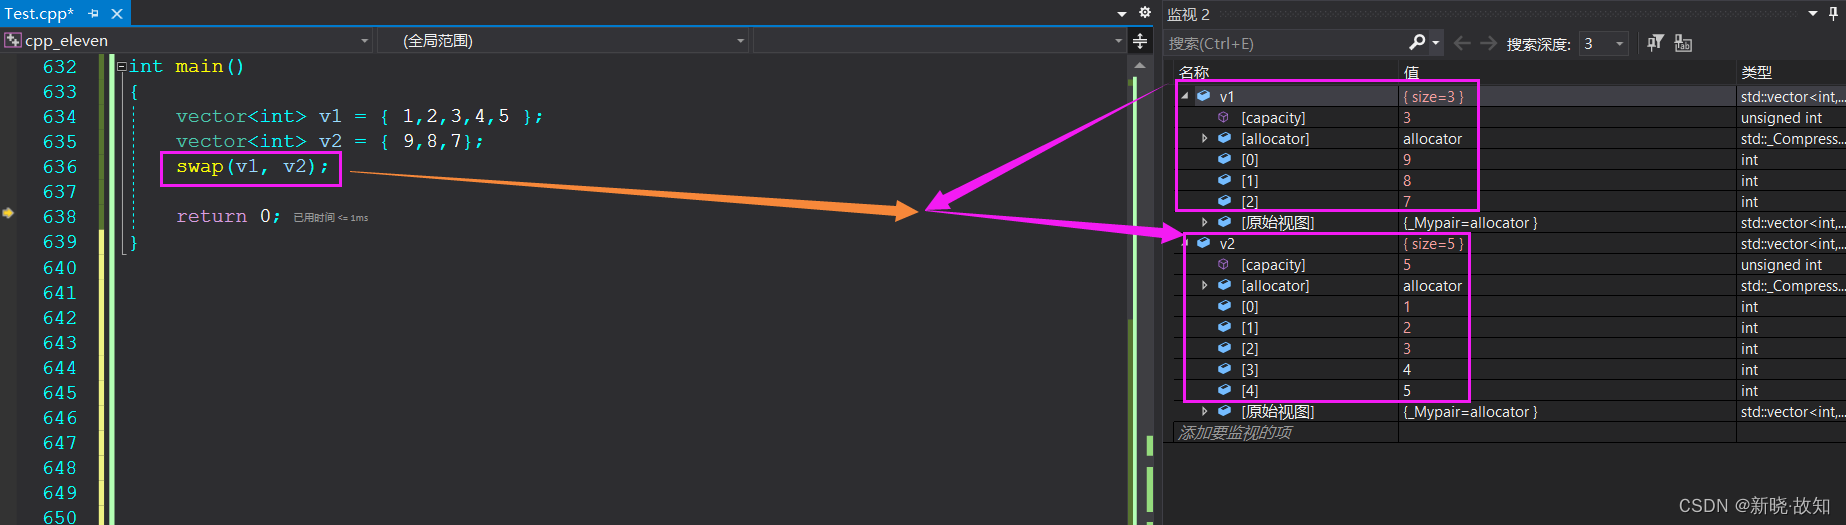
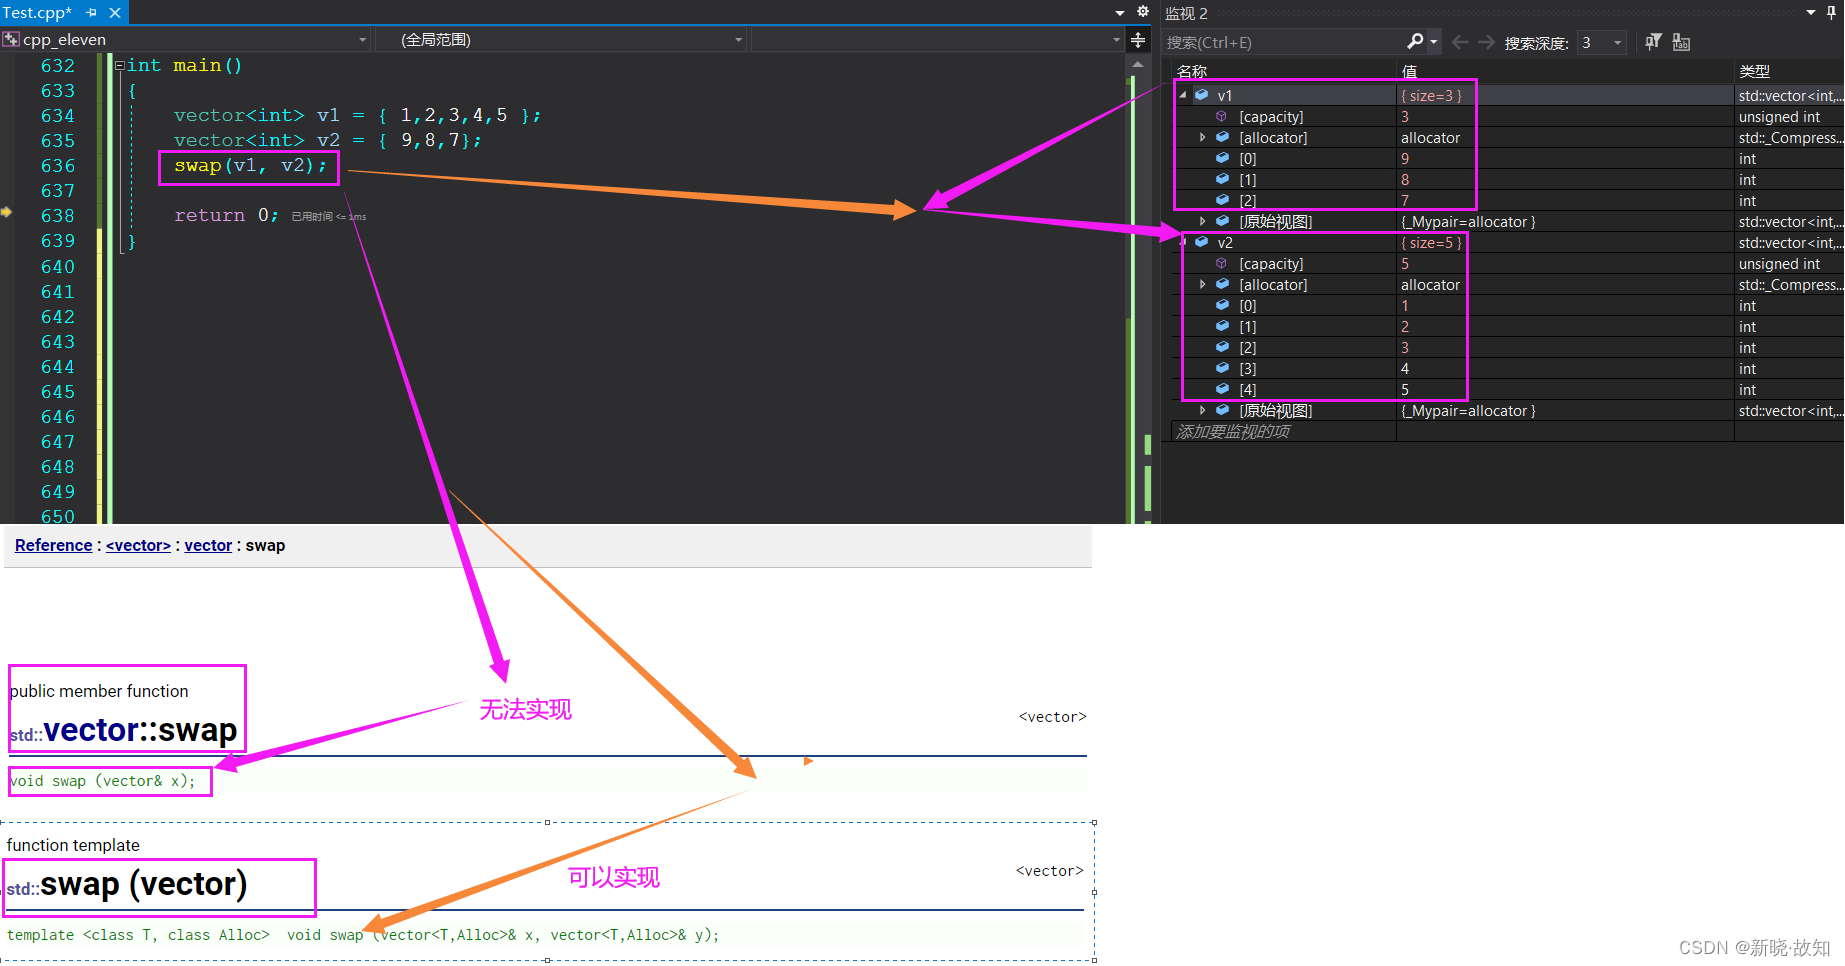
STL容器的移动构造:
值的肯定的是:C++11以后,STL的容器,都只吃了移动构造和移动赋值!这大大提升了开发效率!
例如:
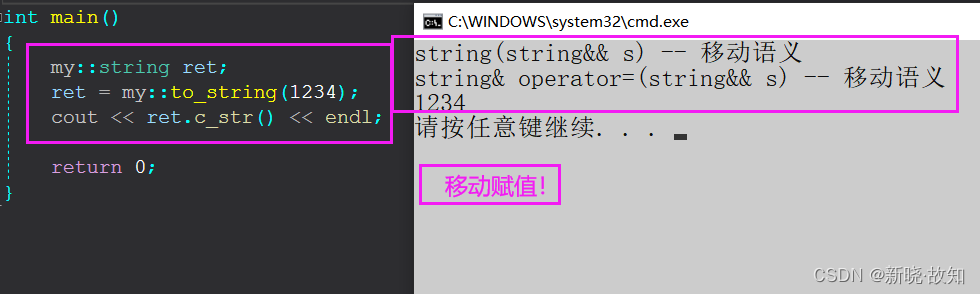
移动赋值:
namespace my
{
class string
{
public:
typedef char* iterator;
iterator begin()
{
return _str;
}
iterator end()
{
return _str + _size;
}
string(const char* str = "")
:_size(strlen(str))
, _capacity(_size)
{
//cout << "string(char* str)" << endl;
_str = new char[_capacity + 1];
strcpy(_str, str);
}
// s1.swap(s2)
void swap(string& s)
{
::swap(_str, s._str);
::swap(_size, s._size);
::swap(_capacity, s._capacity);
}
// 拷贝构造
string(const string& s)
:_str(nullptr)
{
cout << "string(const string& s) -- 深拷贝" << endl;
string tmp(s._str);
swap(tmp);
}
// 赋值重载
string& operator=(const string& s)
{
cout << "string& operator=(string s) -- 深拷贝" << endl;
string tmp(s);
swap(tmp);
return *this;
}
// 移动构造
string(string && s)
:_str(nullptr)
, _size(0)
, _capacity(0)
{
cout << "string(string&& s) -- 移动语义" << endl;
swap(s);
}
// 移动赋值
string& operator=(string && s)
{
cout << "string& operator=(string&& s) -- 移动语义" << endl;
swap(s);
return *this;
}
~string()
{
delete[] _str;
_str = nullptr;
}
char& operator[](size_t pos)
{
assert(pos < _size);
return _str[pos];
}
void reserve(size_t n)
{
if (n > _capacity)
{
char* tmp = new char[n + 1];
strcpy(tmp, _str);
delete[] _str;
_str = tmp;
_capacity = n;
}
}
void push_back(char ch)
{
if (_size >= _capacity)
{
size_t newcapacity = _capacity == 0 ? 4 : _capacity * 2;
reserve(newcapacity);
}
_str[_size] = ch;
++_size;
_str[_size] = '\0';
}
//string operator+=(char ch)
string& operator+=(char ch)
{
push_back(ch);
return *this;
}
const char* c_str() const
{
return _str;
}
private:
char* _str;
size_t _size;
size_t _capacity; // 不包含最后做标识的\0
};
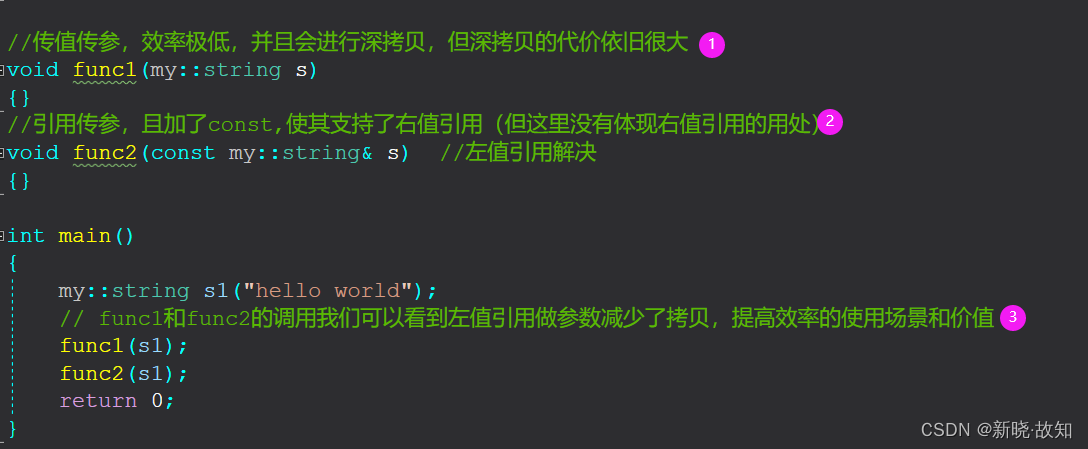
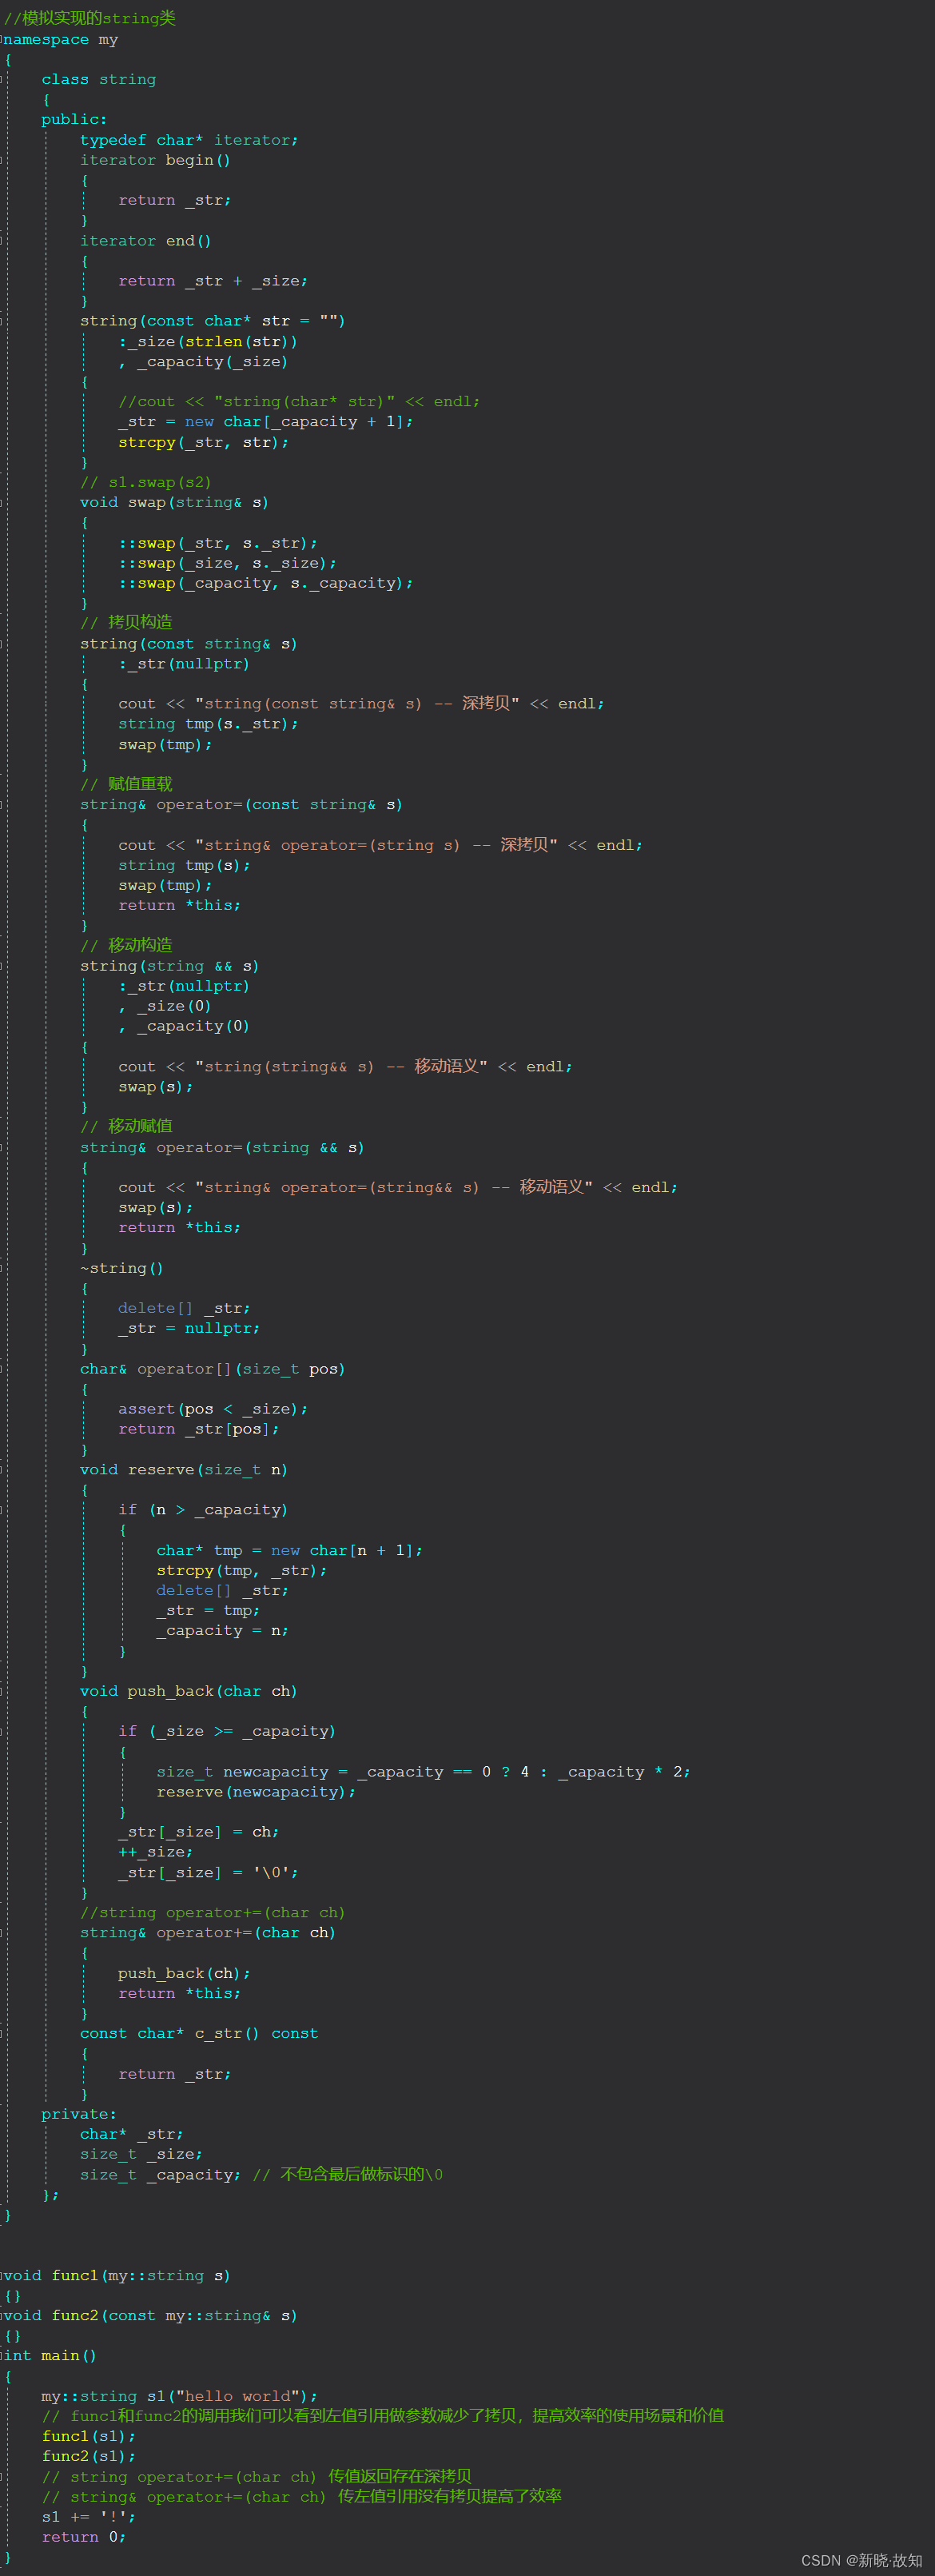
}左值引用的使用场景:
做参数和做返回值都可以提高效率。
void func1(my::string s)
{}
void func2(const my::string& s)
{}
int main()
{
my::string s1("hello world");
// func1和func2的调用我们可以看到左值引用做参数减少了拷贝,提高效率的使用场景和价值
func1(s1);
func2(s1);
// string operator+=(char ch) 传值返回存在深拷贝
// string& operator+=(char ch) 传左值引用没有拷贝提高了效率
s1 += '!';
return 0;
}
左值引用的短板:
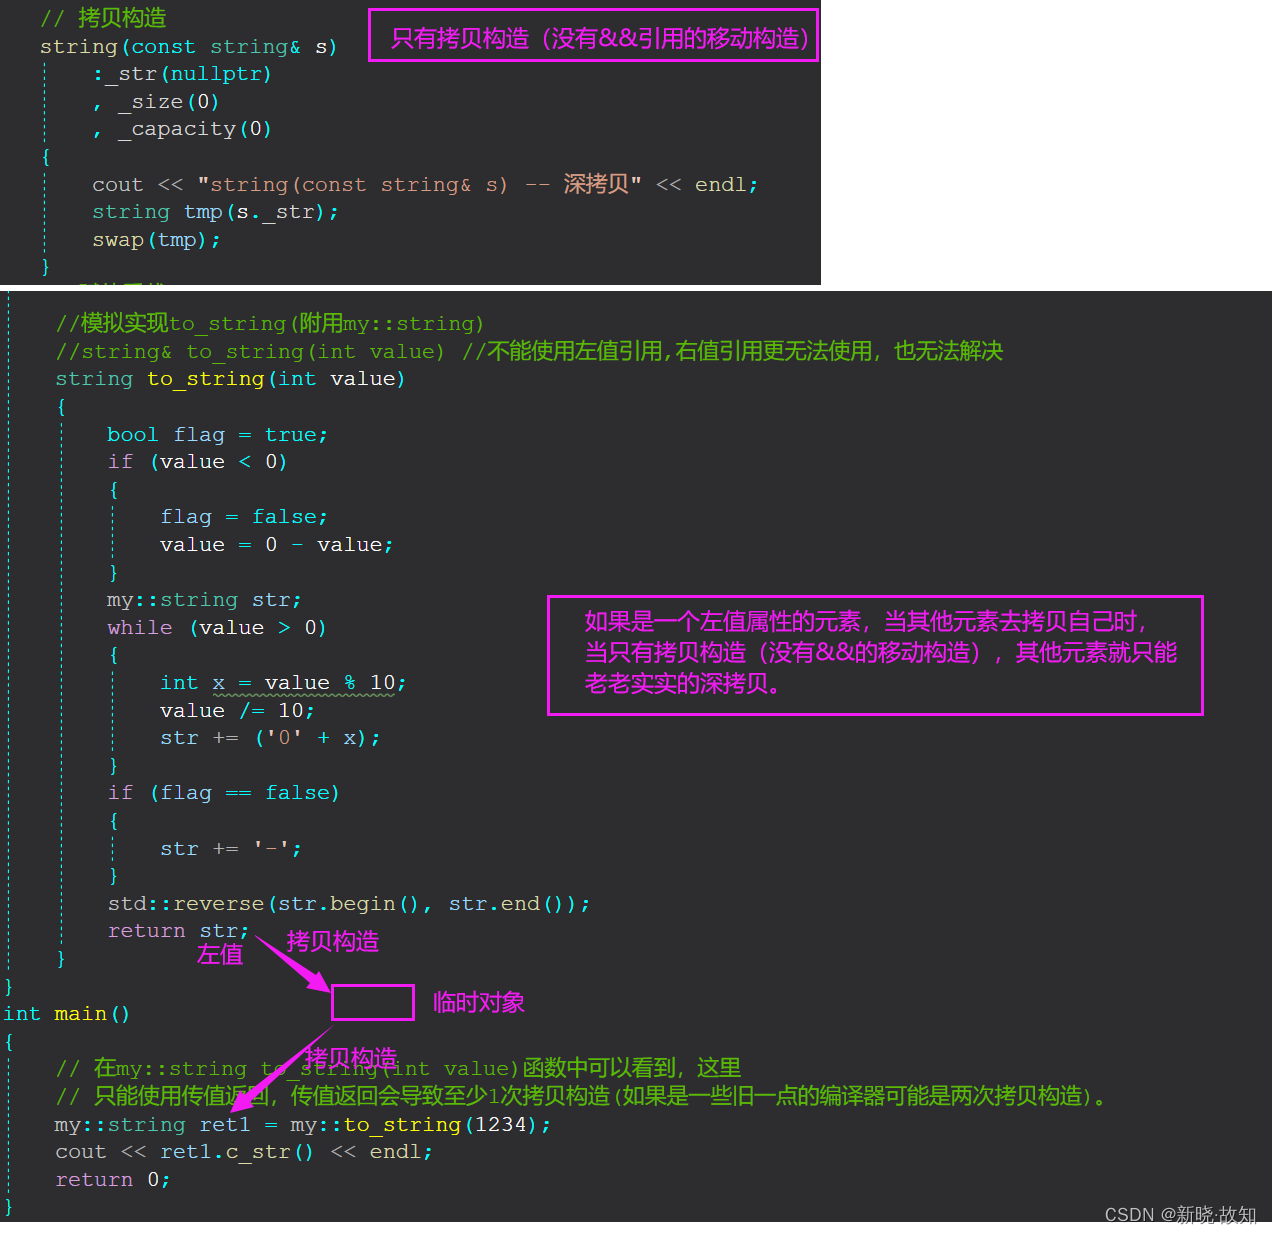
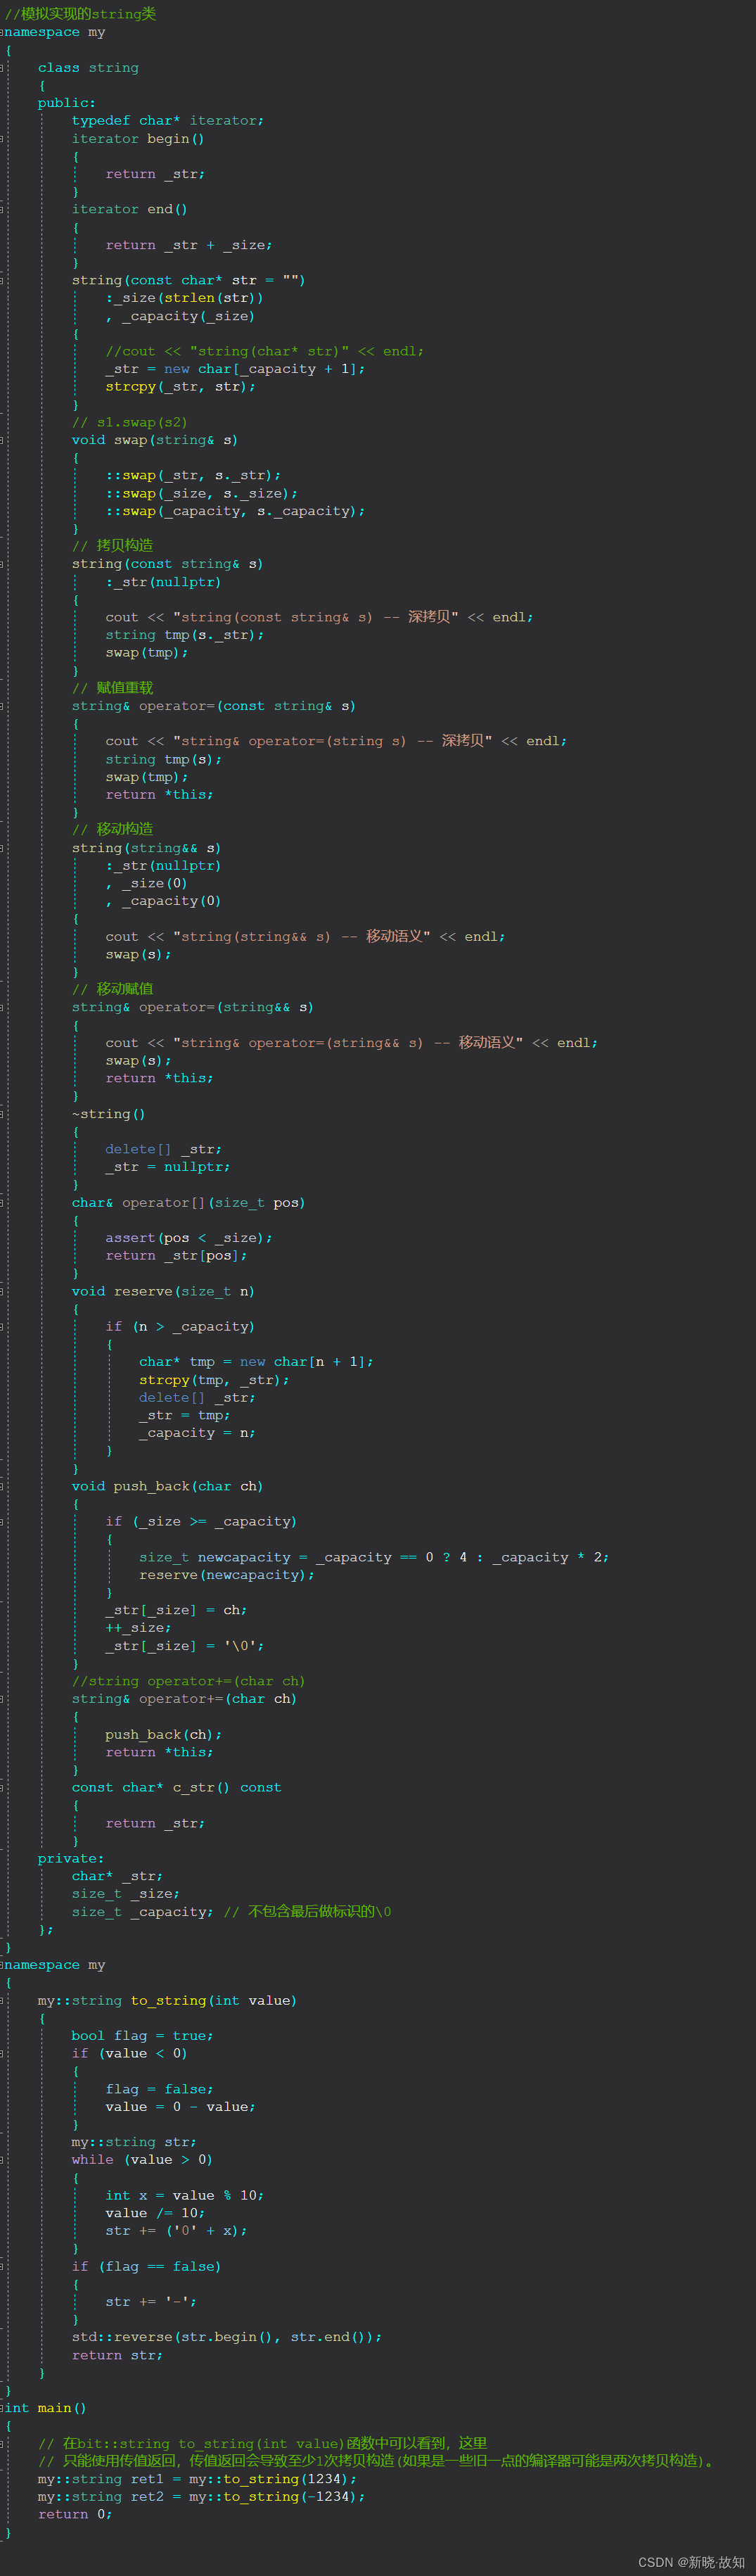
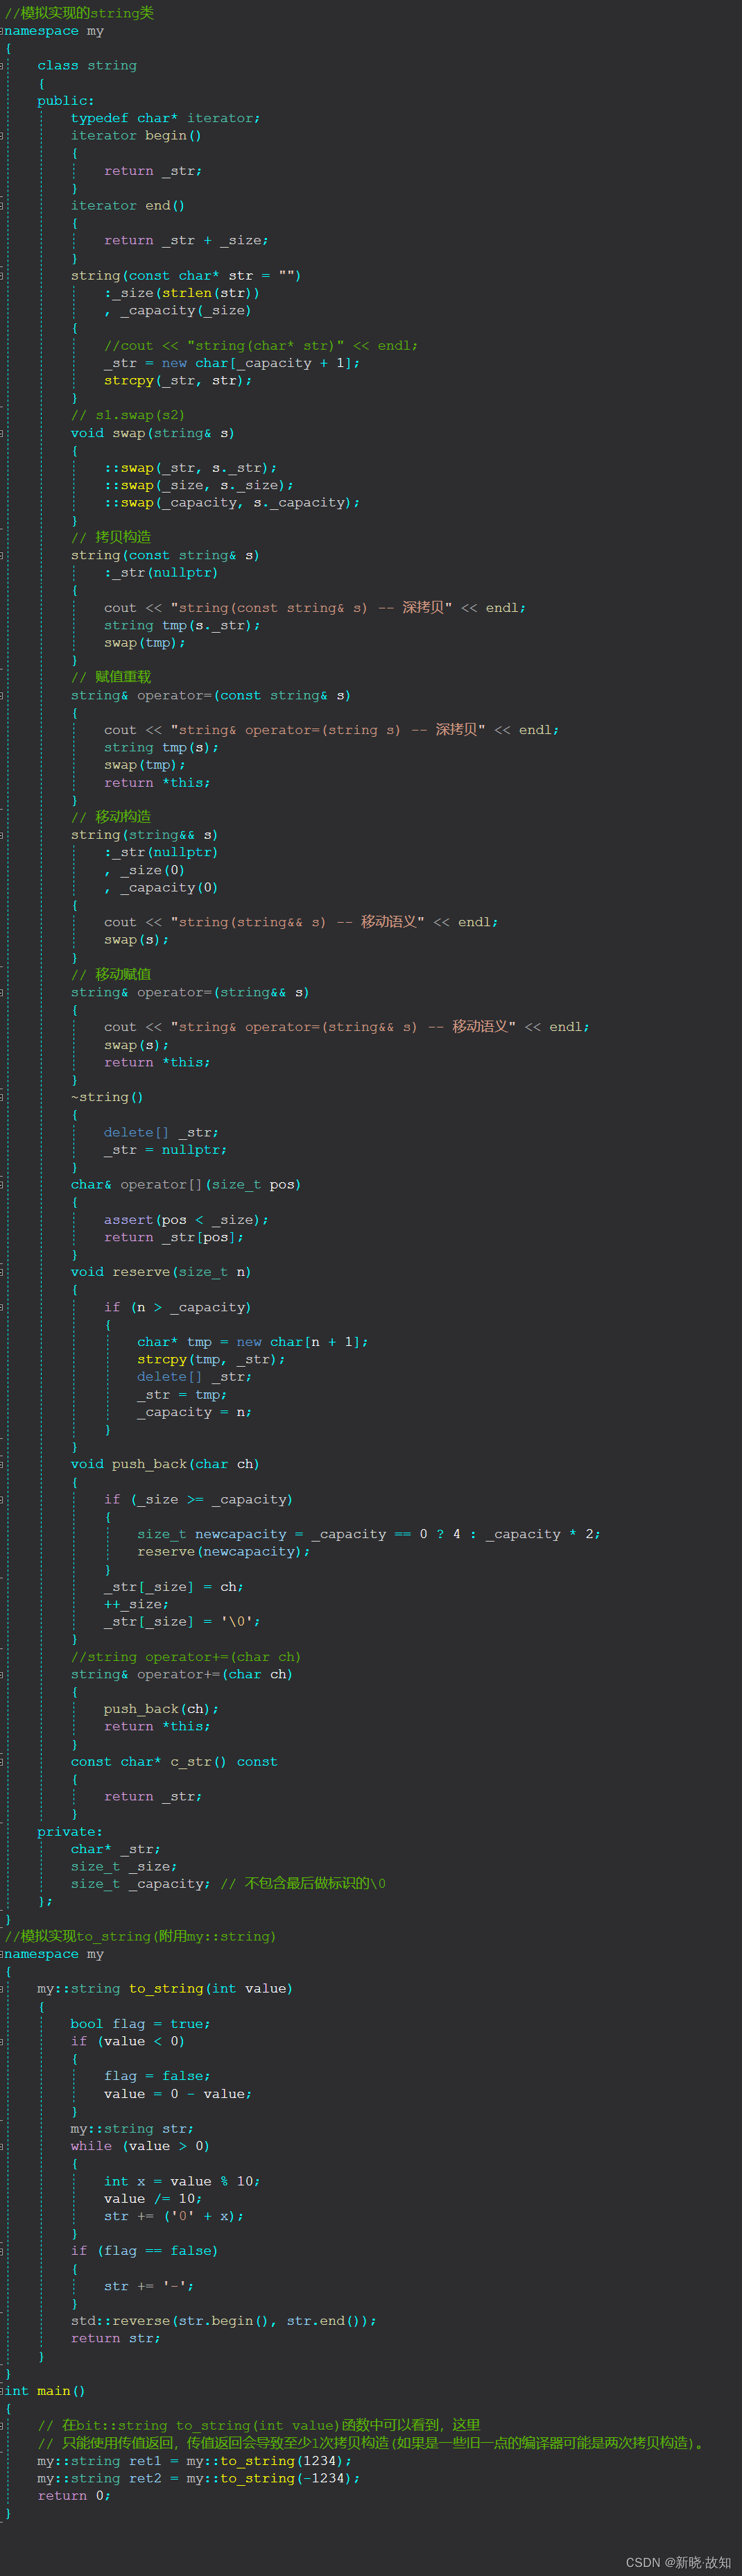
但是当函数返回对象是一个局部变量,出了函数作用域就不存在了,就不能使用左值引用返回,只能传值返回。例如:bit::string to_string(int value)函数中可以看到,这里只能使用传值返回,传值返回会导致至少1次拷贝构造(如果是一些旧一点的编译器可能是两次拷贝构造)。
//模拟实现的string类
namespace my
{
class string
{
public:
typedef char* iterator;
iterator begin()
{
return _str;
}
iterator end()
{
return _str + _size;
}
string(const char* str = "")
:_size(strlen(str))
, _capacity(_size)
{
//cout << "string(char* str)" << endl;
_str = new char[_capacity + 1];
strcpy(_str, str);
}
// s1.swap(s2)
void swap(string& s)
{
::swap(_str, s._str);
::swap(_size, s._size);
::swap(_capacity, s._capacity);
}
// 拷贝构造
string(const string& s)
:_str(nullptr)
{
cout << "string(const string& s) -- 深拷贝" << endl;
string tmp(s._str);
swap(tmp);
}
// 赋值重载
string& operator=(const string& s)
{
cout << "string& operator=(string s) -- 深拷贝" << endl;
string tmp(s);
swap(tmp);
return *this;
}
// 移动构造
string(string&& s)
:_str(nullptr)
, _size(0)
, _capacity(0)
{
cout << "string(string&& s) -- 移动语义" << endl;
swap(s);
}
// 移动赋值
string& operator=(string&& s)
{
cout << "string& operator=(string&& s) -- 移动语义" << endl;
swap(s);
return *this;
}
~string()
{
delete[] _str;
_str = nullptr;
}
char& operator[](size_t pos)
{
assert(pos < _size);
return _str[pos];
}
void reserve(size_t n)
{
if (n > _capacity)
{
char* tmp = new char[n + 1];
strcpy(tmp, _str);
delete[] _str;
_str = tmp;
_capacity = n;
}
}
void push_back(char ch)
{
if (_size >= _capacity)
{
size_t newcapacity = _capacity == 0 ? 4 : _capacity * 2;
reserve(newcapacity);
}
_str[_size] = ch;
++_size;
_str[_size] = '\0';
}
//string operator+=(char ch)
string& operator+=(char ch)
{
push_back(ch);
return *this;
}
const char* c_str() const
{
return _str;
}
private:
char* _str;
size_t _size;
size_t _capacity; // 不包含最后做标识的\0
};
}
//模拟实现to_string(附用my::string)
namespace my
{
my::string to_string(int value)
{
bool flag = true;
if (value < 0)
{
flag = false;
value = 0 - value;
}
my::string str;
while (value > 0)
{
int x = value % 10;
value /= 10;
str += ('0' + x);
}
if (flag == false)
{
str += '-';
}
std::reverse(str.begin(), str.end());
return str;
}
}
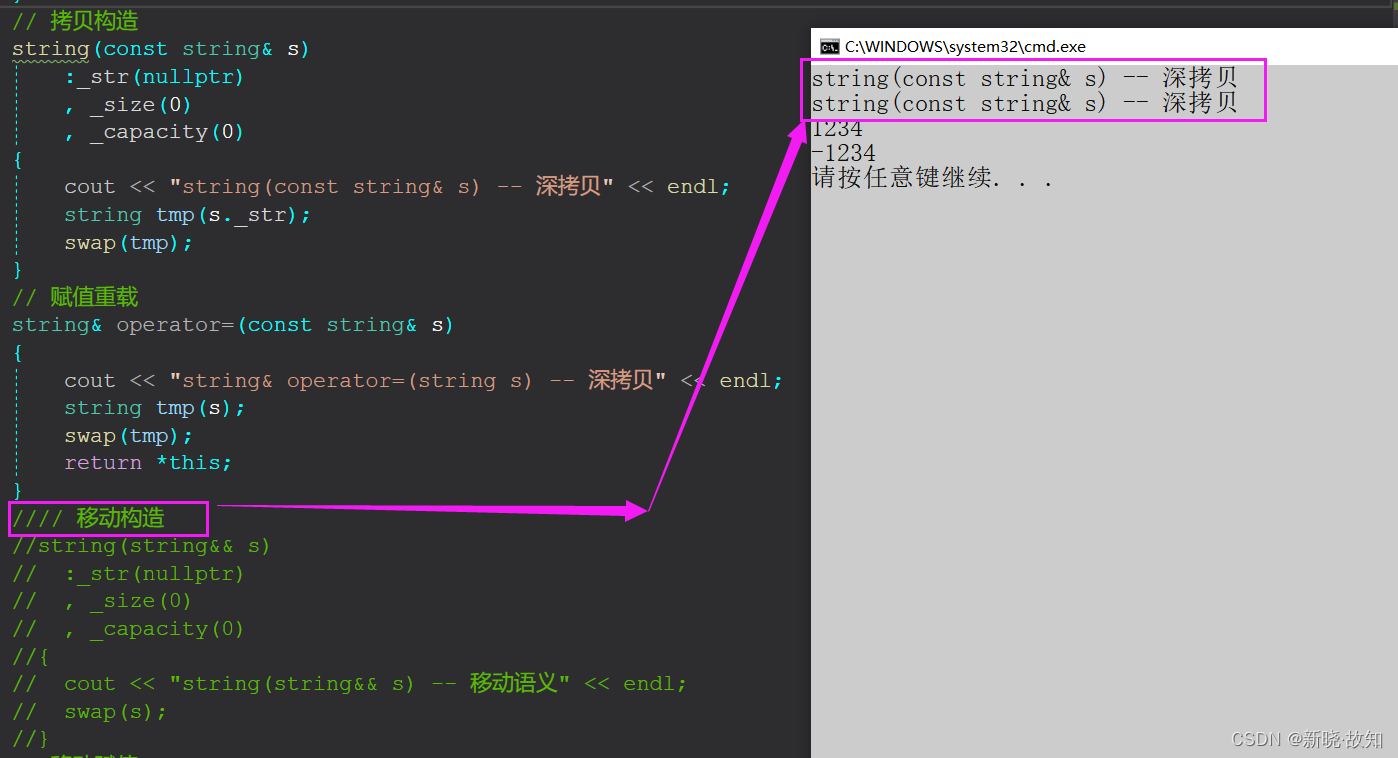
int main()
{
// 在bit::string to_string(int value)函数中可以看到,这里
// 只能使用传值返回,传值返回会导致至少1次拷贝构造(如果是一些旧一点的编译器可能是两次拷贝构造)。
my::string ret1 = my::to_string(1234);
my::string ret2 = my::to_string(-1234);
return 0;
}
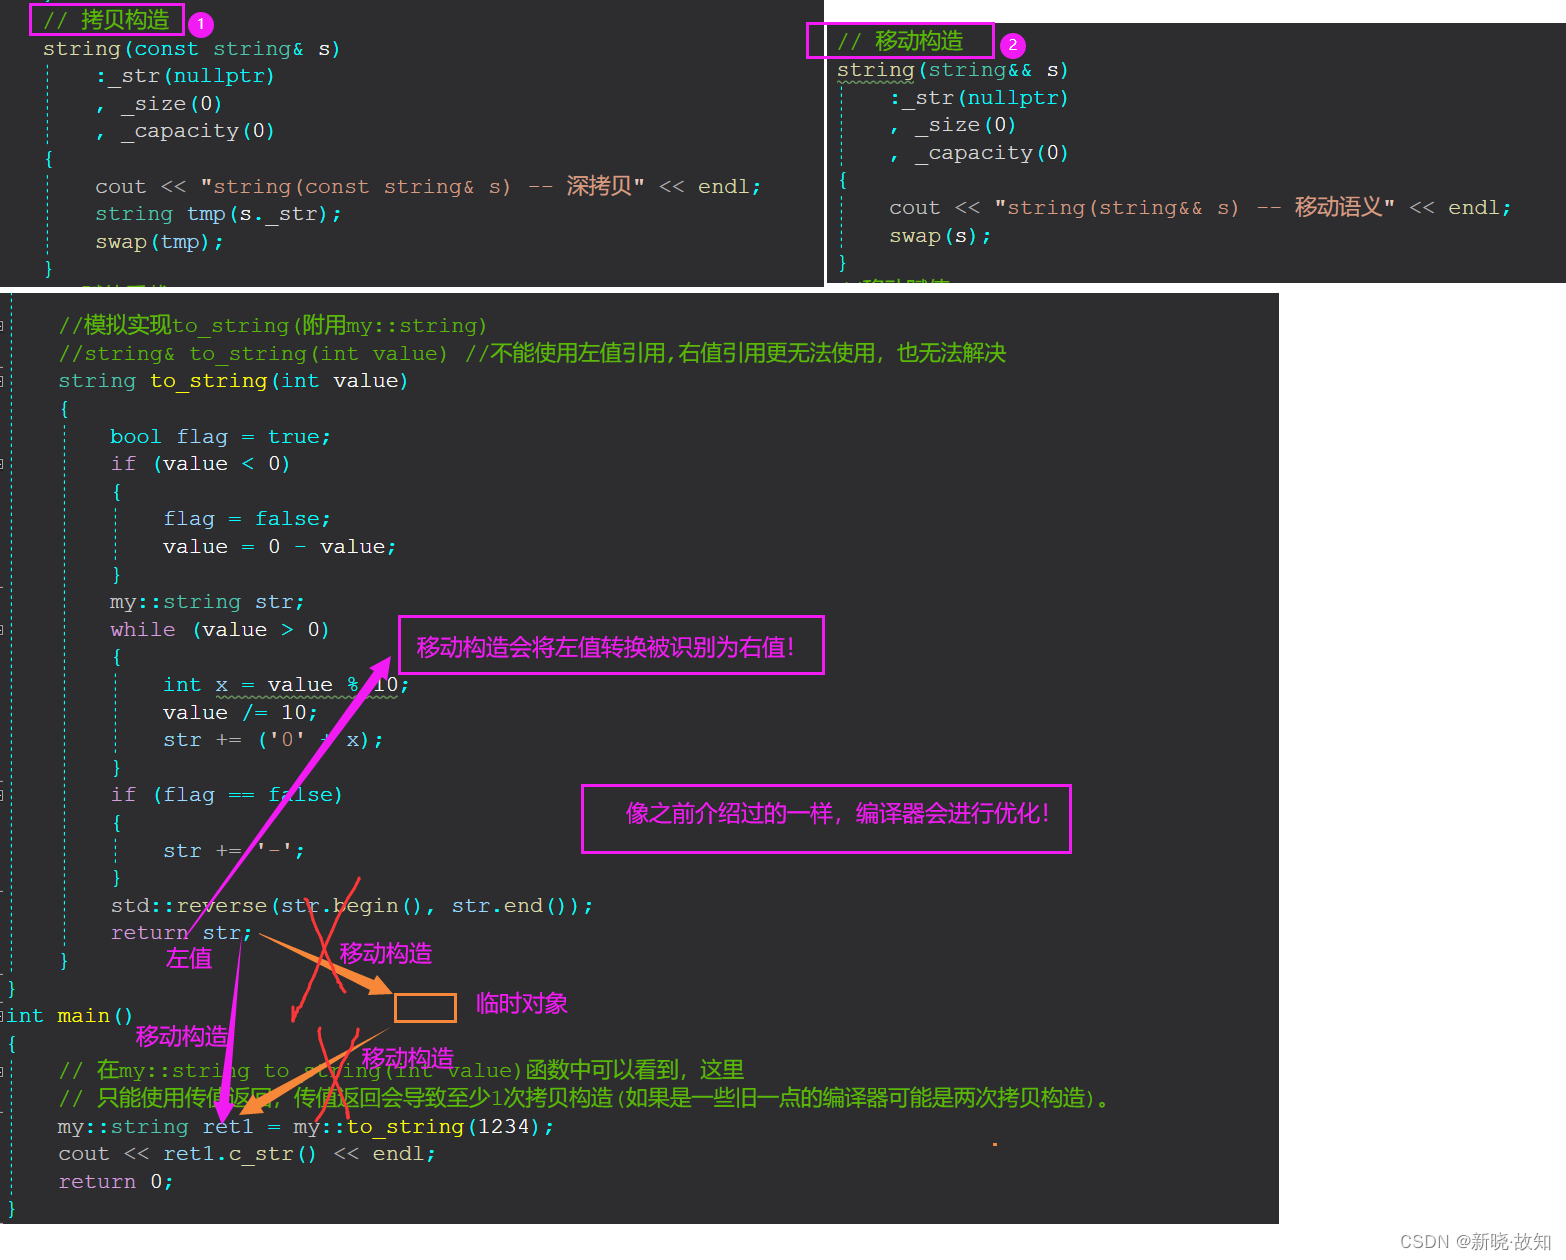
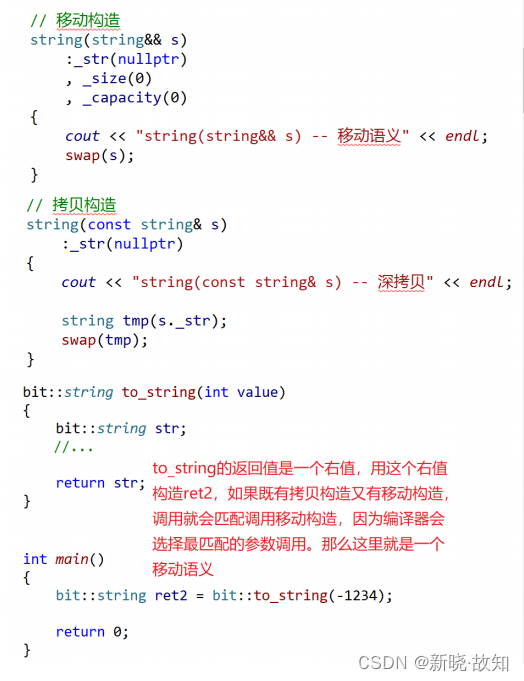
右值引用和移动语义解决上述问题:
在bit::string中增加移动构造,移动构造本质是将参数右值的资源窃取过来,占位已有,那么就不用做深拷贝了,所以它叫做移动构造,就是窃取别人的资源来构造自己。
再运行上面bit::to_string的两个调用,我们会发现,这里没有调用深拷贝的拷贝构造,而是调用 了移动构造,移动构造中没有新开空间,拷贝数据,所以效率提高了。
不仅仅有移动构造,还有移动赋值:
在bit::string类中增加移动赋值函数,再去调用bit::to_string(1234),不过这次是将
bit::to_string(1234)返回的右值对象赋值给ret1对象,这时调用的是移动构造。
这里运行后,我们看到调用了一次移动构造和一次移动赋值。因为如果是用一个已经存在的对象接收,编译器就没办法优化了。bit::to_string函数中会先用str生成构造生成一个临时对象,但是我们可以看到,编译器很聪明的在这里把str识别成了右值,调用了移动构造。然后在把这个临时对象做为bit::to_string函数调用的返回值赋值给ret1,这里调用的移动赋值。
STL中的容器都是增加了移动构造和移动赋值:
https://cplusplus.com/reference/string/string/string/
https://cplusplus.com/reference/vector/vector/vector/
7.4 右值引用引用左值及其一些更深入的使用场景分析
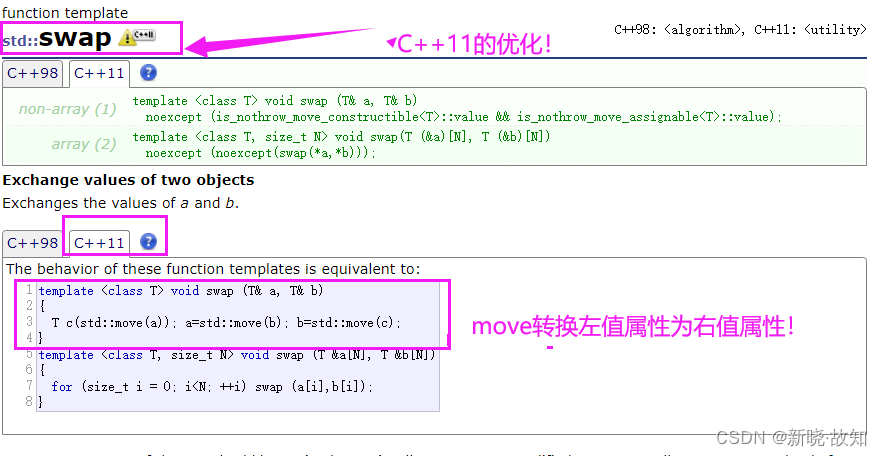
按照语法,右值引用只能引用右值,但右值引用一定不能引用左值吗?因为:有些场景下,可能 真的需要用右值去引用左值实现移动语义。当需要用右值引用引用一个左值时,可以通过move 函数将左值转化为右值。C++11中,std::move()函数位于 头文件中,该函数名字具有迷惑性, 它并不搬移任何东西,唯一的功能就是将一个左值强制转化为右值引用,然后实现移动语义。
总结:
左值引用的深拷贝---->拷贝构造/拷贝赋值
右值引用的深拷贝---->移动构造/移动赋值
1.深拷贝对象,传值返回,调用移动构造,那么效率就提高了。
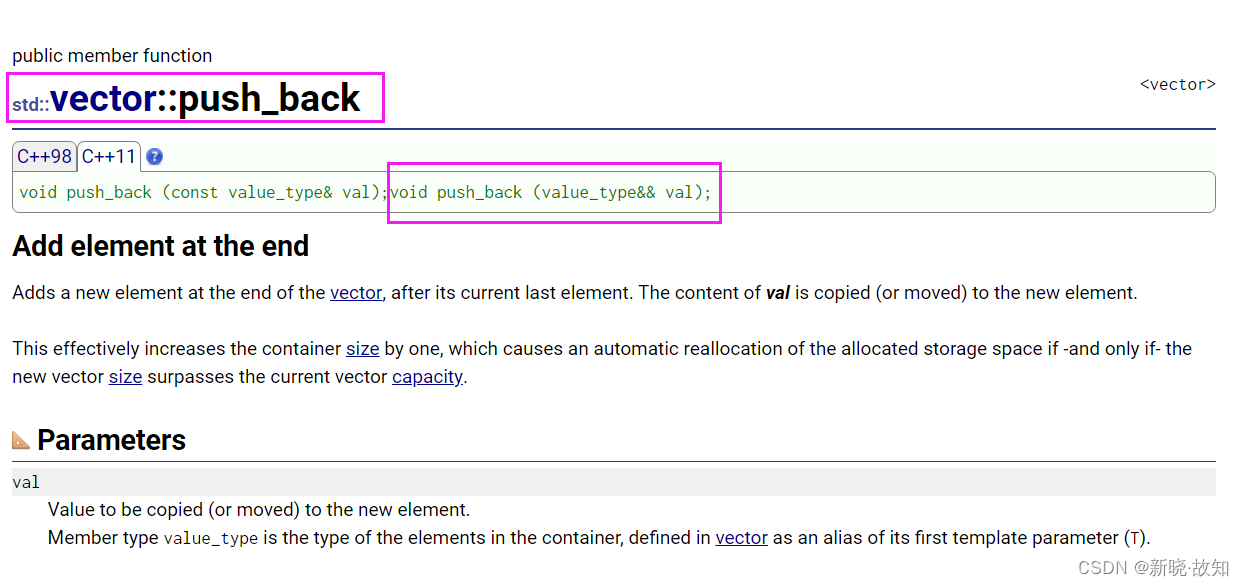
STL容器插入接口函数也增加了右值引用版本:
https://cplusplus.com/reference/vector/vector/push_back/
https://cplusplus.com/reference/list/list/push_back/
https://cplusplus.com/reference/list/list/push_back/
要注意,这里的可打印出“深拷贝、资源转移等”是调用自己模拟实现的STL,若调用库里的无法查看。
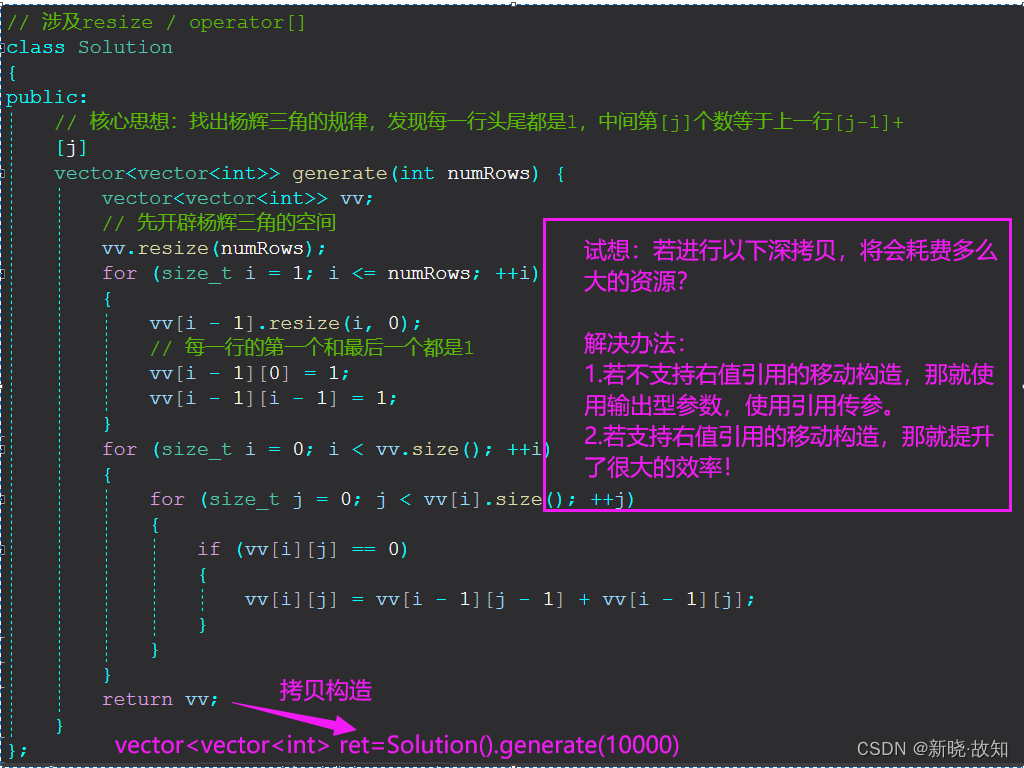
右值引用使得移动构造和移动赋值,实现了资源转移,提升了效率。如果不支持右值引用,那么左值引用进行深拷贝既要创建,又要销毁,降低了效率。但是要注意右值引用的移动操作的使用。右值引用解决了传值返回的一些问题。
7.5 完美转发
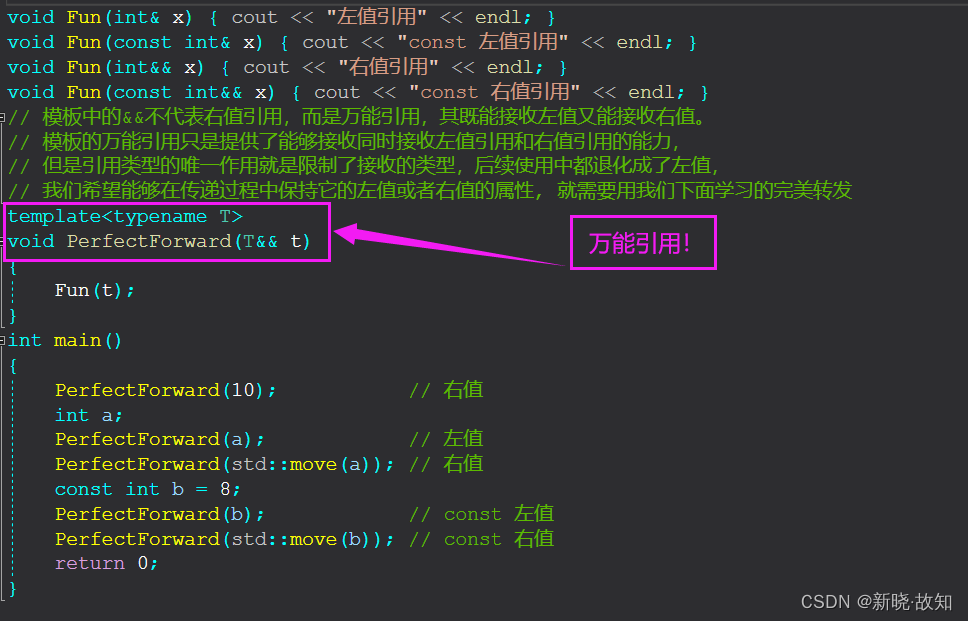
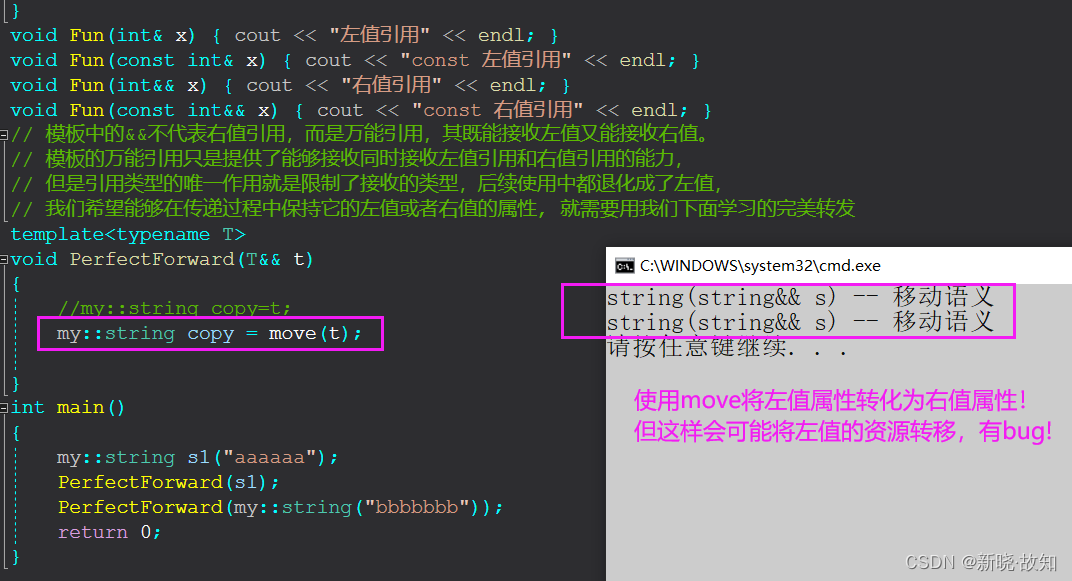
模板中的&& 万能引用
void Fun(int& x) { cout << "左值引用" << endl; }
void Fun(const int& x) { cout << "const 左值引用" << endl; }
void Fun(int&& x) { cout << "右值引用" << endl; }
void Fun(const int&& x) { cout << "const 右值引用" << endl; }
// 模板中的&&不代表右值引用,而是万能引用,其既能接收左值又能接收右值。
// 模板的万能引用只是提供了能够接收同时接收左值引用和右值引用的能力,
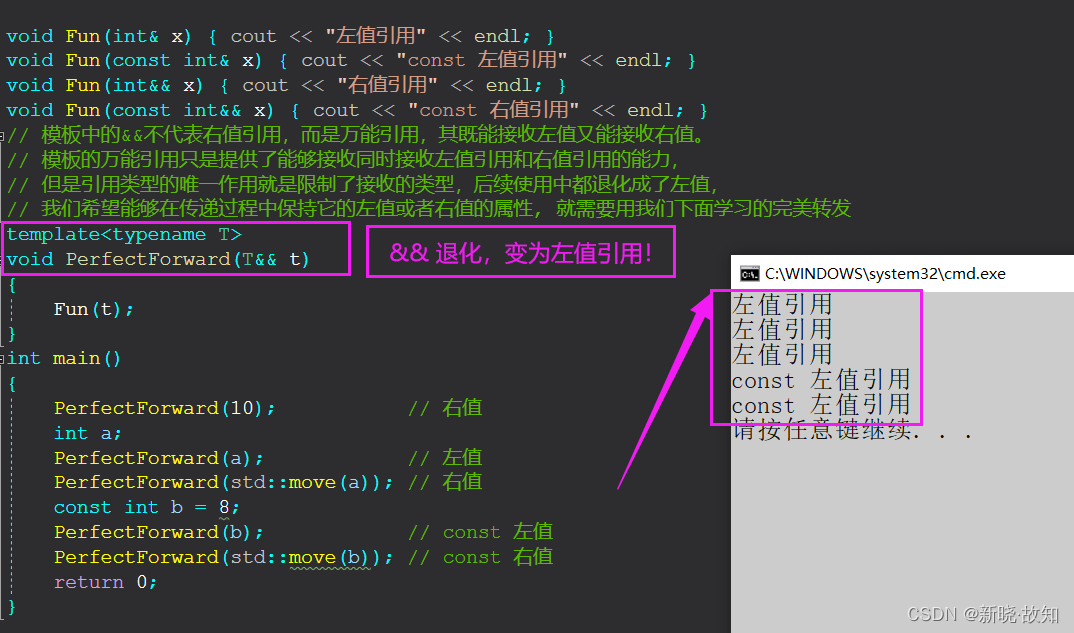
// 但是引用类型的唯一作用就是限制了接收的类型,后续使用中都退化成了左值,
// 我们希望能够在传递过程中保持它的左值或者右值的属性, 就需要用我们下面学习的完美转发
template<typename T>
void PerfectForward(T&& t)
{
Fun(t);
}
int main()
{
PerfectForward(10); // 右值
int a;
PerfectForward(a); // 左值
PerfectForward(std::move(a)); // 右值
const int b = 8;
PerfectForward(b); // const 左值
PerfectForward(std::move(b)); // const 右值
return 0;
}
这里右值引用的接收对象是左值属性的,可以取地址。
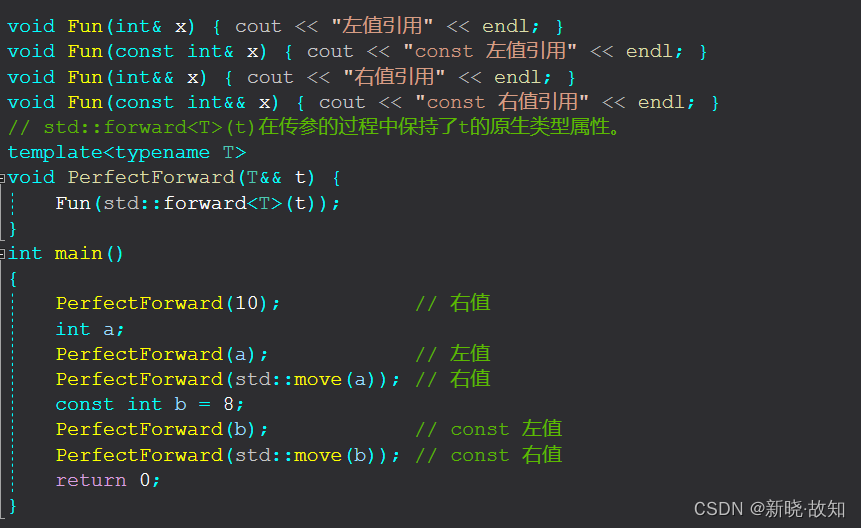
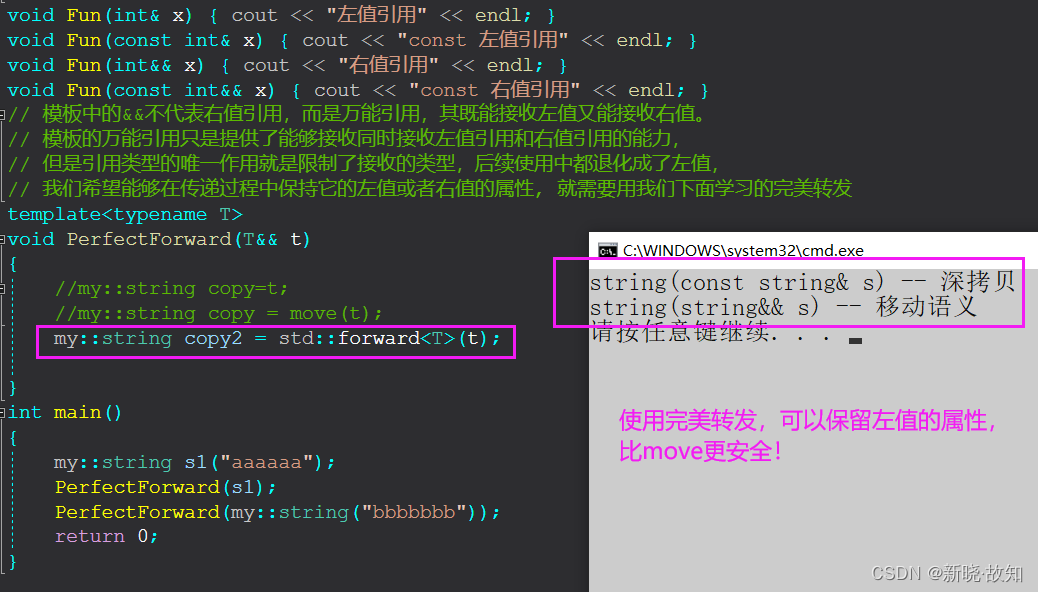
std::forward 完美转发在传参的过程中保留对象原生类型属性
void Fun(int& x) { cout << "左值引用" << endl; }
void Fun(const int& x) { cout << "const 左值引用" << endl; }
void Fun(int&& x) { cout << "右值引用" << endl; }
void Fun(const int&& x) { cout << "const 右值引用" << endl; }
// std::forward<T>(t)在传参的过程中保持了t的原生类型属性。
template<typename T>
void PerfectForward(T&& t) {
Fun(std::forward<T>(t));
}
int main()
{
PerfectForward(10); // 右值
int a;
PerfectForward(a); // 左值
PerfectForward(std::move(a)); // 右值
const int b = 8;
PerfectForward(b); // const 左值
PerfectForward(std::move(b)); // const 右值
return 0;
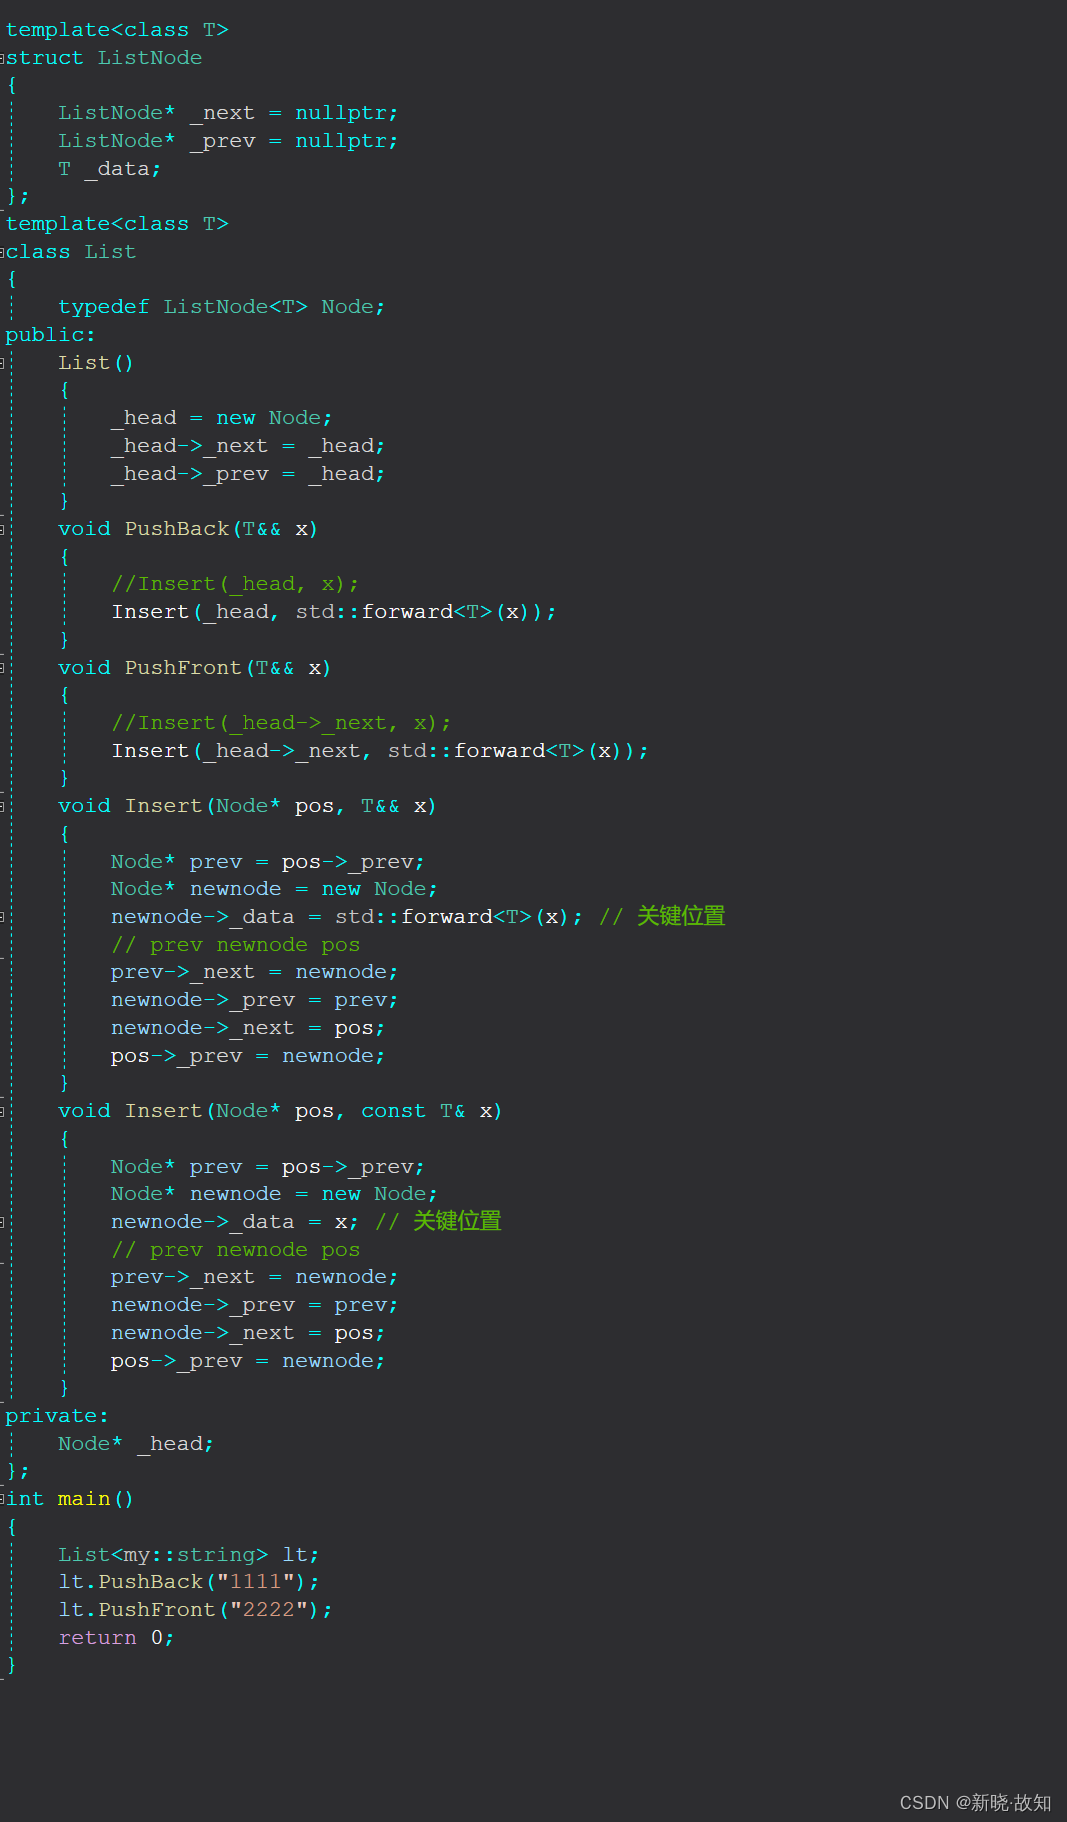
}完美转发实际中的使用场景:


8. 新的类功能
默认成员函数
原来C++类中,有6个默认成员函数:
1. 构造函数
2. 析构函数
3. 拷贝构造函数
4. 拷贝赋值重载
5. 取地址重载
6. const 取地址重载
最后重要的是前4个,后两个用处不大。默认成员函数就是我们不写编译器会生成一个默认的。
C++11 新增了两个:移动构造函数和移动赋值运算符重载。
针对移动构造函数和移动赋值运算符重载有一些需要注意的点如下:
// 以下代码在vs2013中不能体现,在vs2019下才能演示体现上面的特性。
class Person
{
public:
Person(const char* name = "", int age = 0)
:_name(name)
, _age(age)
{}
/*Person(const Person& p)
* :_name(p._name)
,_age(p._age)
{}*/
/*Person& operator=(const Person& p)
{
if(this != &p)
{
_name = p._name;
_age = p._age;
}
return *this;
}*/
/*~Person()
{}*/
private:
my::string _name;
int _age;
};
int main()
{
Person s1;
Person s2 = s1;
Person s3 = std::move(s1);
Person s4;
s4 = std::move(s2);
return 0;
}类成员变量初始化
C++11允许在类定义时给成员变量初始缺省值,默认生成构造函数会使用这些缺省值初始化,这个我们在雷和对象默认就讲了,这里就不再细讲了。
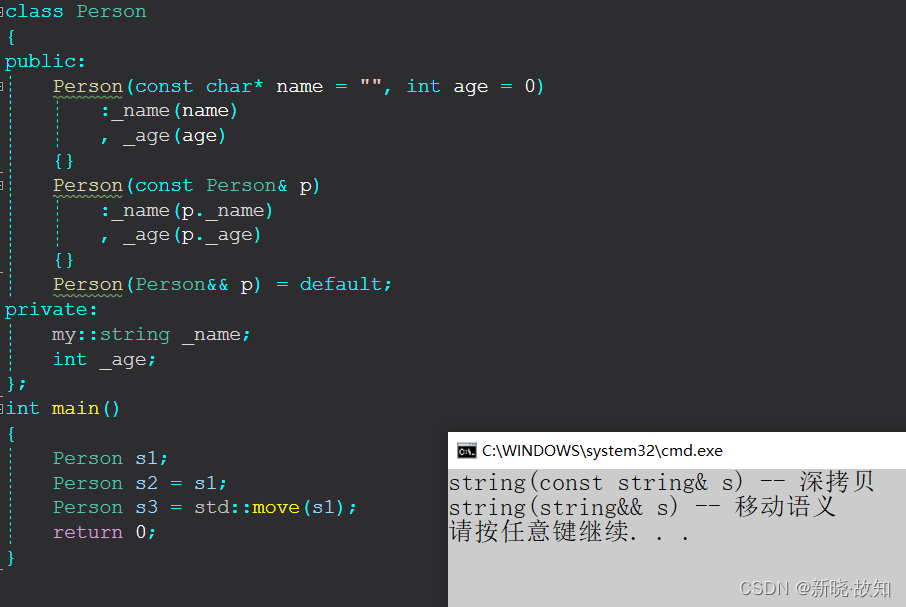
强制生成默认函数的关键字default:
C++11可以让你更好的控制要使用的默认函数。假设你要使用某个默认的函数,但是因为一些原因这个函数没有默认生成。比如:我们提供了拷贝构造,就不会生成移动构造了,那么我们可以使用default关键字显示指定移动构造生成。
class Person
{
public:
Person(const char* name = "", int age = 0)
:_name(name)
, _age(age)
{}
Person(const Person& p)
:_name(p._name)
, _age(p._age)
{}
Person(Person&& p) = default;
private:
my::string _name;
int _age;
};
int main()
{
Person s1;
Person s2 = s1;
Person s3 = std::move(s1);
return 0;
}禁止生成默认函数的关键字delete:
如果能想要限制某些默认函数的生成,在C++98中,是该函数设置成private,并且只声明补丁已,这样只要其他人想要调用就会报错。在C++11中更简单,只需在该函数声明加上=delete即可,该语法指示编译器不生成对应函数的默认版本,称=delete修饰的函数为删除函数。
class Person
{
public:
Person(const char* name = "", int age = 0)
:_name(name)
, _age(age)
{}
Person(const Person& p) = delete;
private:
my::string _name;
int _age;
};
int main()
{
Person s1;
Person s2 = s1;
Person s3 = std::move(s1);
return 0;
}继承和多态中的fifinal与override关键字
这个在之前的学习中已涉及,深入学习可参见官方文档。
9. 可变参数模板
C++11的新特性可变参数模板能够让您创建可以接受可变参数的函数模板和类模板,相比
C++98/03,类模版和函数模版中只能含固定数量的模版参数,可变模版参数无疑是一个巨大的改进。然而由于可变模版参数比较抽象,使用起来需要一定的技巧,所以这块还是比较晦涩的。现 阶段呢,我们掌握一些基础的可变参数模板特性就够我们用了,所以这里我们点到为止,以后大家如果有需要,再可以深入学习。
下面就是一个基本可变参数的函数模板:
// Args是一个模板参数包,args是一个函数形参参数包
// 声明一个参数包Args...args,这个参数包中可以包含0到任意个模板参数。
template <class ...Args>
void ShowList(Args... args)
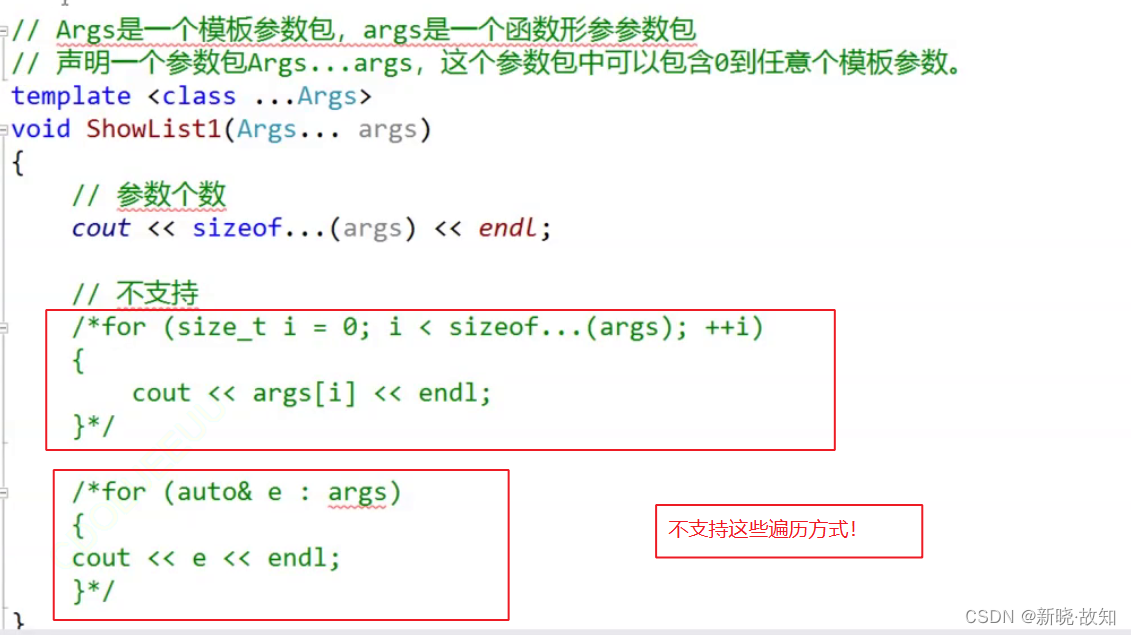
{}上面的参数args前面有省略号,所以它就是一个可变模版参数,我们把带省略号的参数称为“参数包”,它里面包含了0到N(N>=0)个模版参数。我们无法直接获取参数包args中的每个参数的, 只能通过展开参数包的方式来获取参数包中的每个参数,这是使用可变模版参数的一个主要特点,也是最大的难点,即如何展开可变模版参数。由于语法不支持使用args[i]这样方式获取可变 参数,所以我们的用一些奇招来一一获取参数包的值。
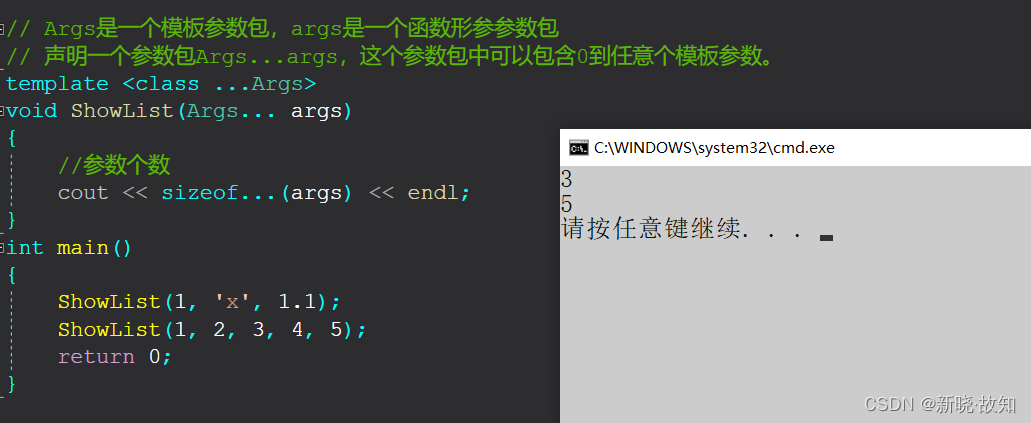
// Args是一个模板参数包,args是一个函数形参参数包
// 声明一个参数包Args...args,这个参数包中可以包含0到任意个模板参数。
template <class ...Args>
void ShowList(Args... args)
{
cout << sizeof...(args) << endl;
}
int main()
{
ShowList(1, 'x', 1.1);
ShowList(1, 2, 3, 4, 5);
return 0;
}递归函数方式展开参数包
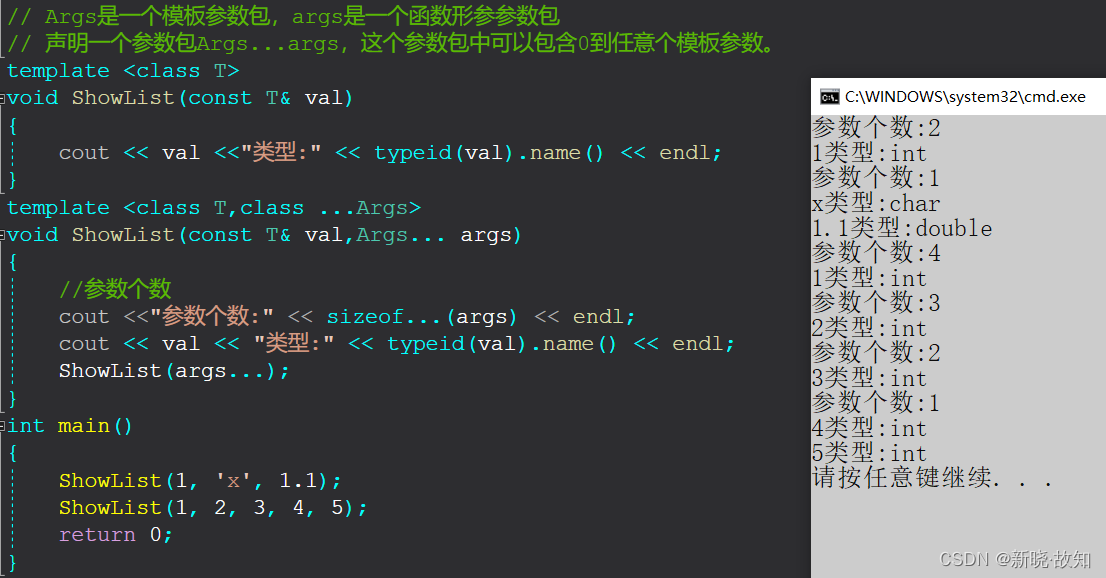
// Args是一个模板参数包,args是一个函数形参参数包
// 声明一个参数包Args...args,这个参数包中可以包含0到任意个模板参数。
template <class T>
void ShowList(const T& val)
{
cout << val <<"类型:" << typeid(val).name() << endl;
}
template <class T,class ...Args>
void ShowList(const T& val,Args... args)
{
//参数个数
cout <<"参数个数:" << sizeof...(args) << endl;
cout << val << "类型:" << typeid(val).name() << endl;
ShowList(args...);
}
int main()
{
ShowList(1, 'x', 1.1);
ShowList(1, 2, 3, 4, 5);
return 0;
}
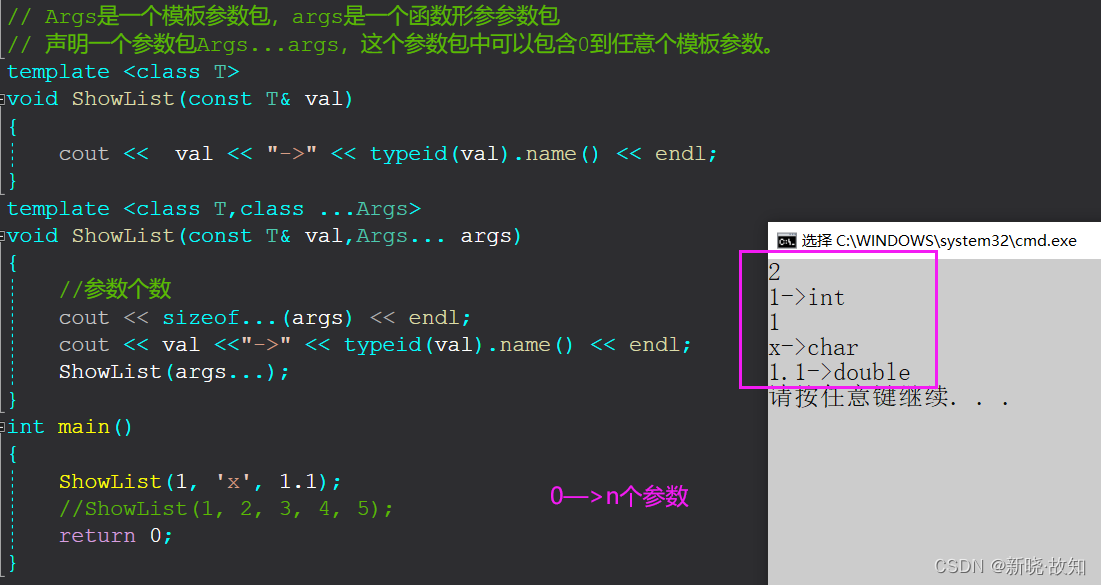
// Args是一个模板参数包,args是一个函数形参参数包
// 声明一个参数包Args...args,这个参数包中可以包含0到任意个模板参数。
template <class T>
void ShowList(const T& val)
{
cout << val << "->" << typeid(val).name() << endl;
}
template <class T,class ...Args>
void ShowList(const T& val,Args... args)
{
//参数个数
cout << sizeof...(args) << endl;
cout << val <<"->" << typeid(val).name() << endl;
ShowList(args...);
}
int main()
{
ShowList(1, 'x', 1.1);
//ShowList(1, 2, 3, 4, 5);
return 0;
}
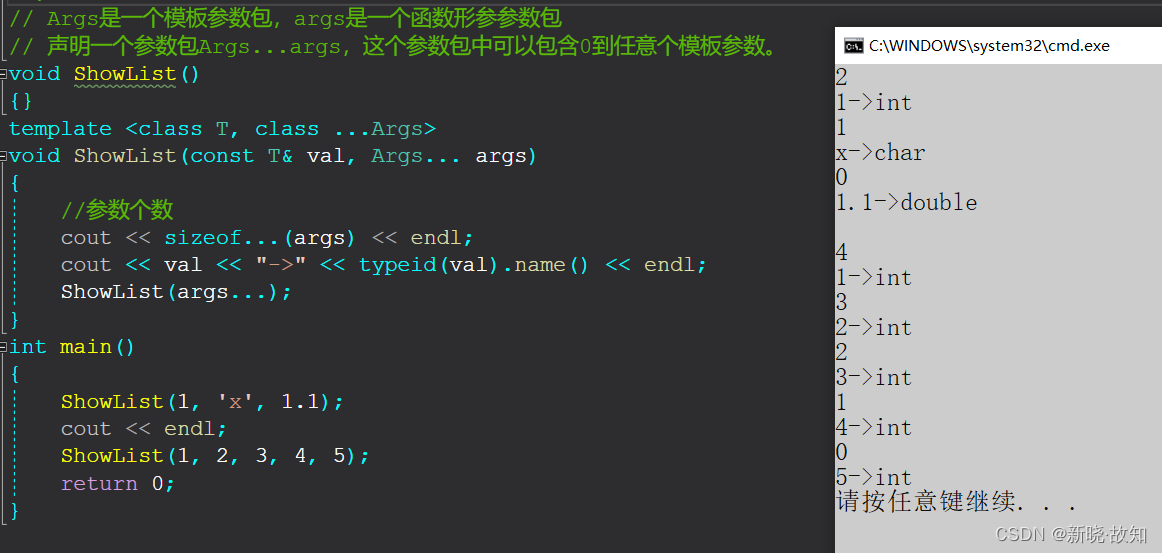
// Args是一个模板参数包,args是一个函数形参参数包
// 声明一个参数包Args...args,这个参数包中可以包含0到任意个模板参数。
void ShowList()
{}
template <class T, class ...Args>
void ShowList(const T& val, Args... args)
{
//参数个数
cout << sizeof...(args) << endl;
cout << val << "->" << typeid(val).name() << endl;
ShowList(args...);
}
int main()
{
ShowList(1, 'x', 1.1);
//ShowList(1, 2, 3, 4, 5);
return 0;
}
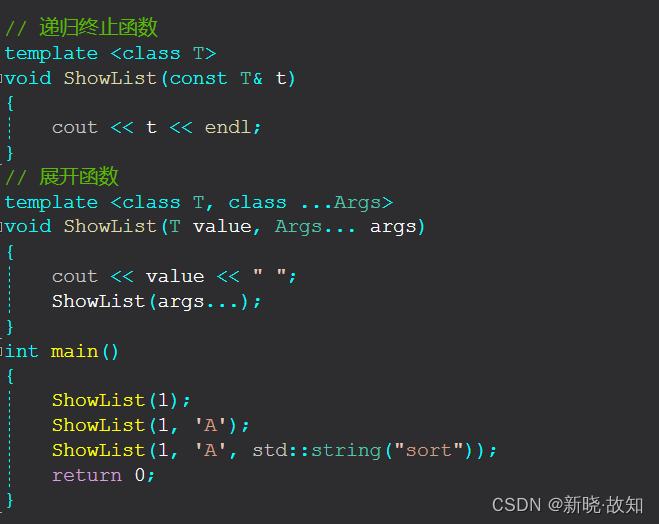
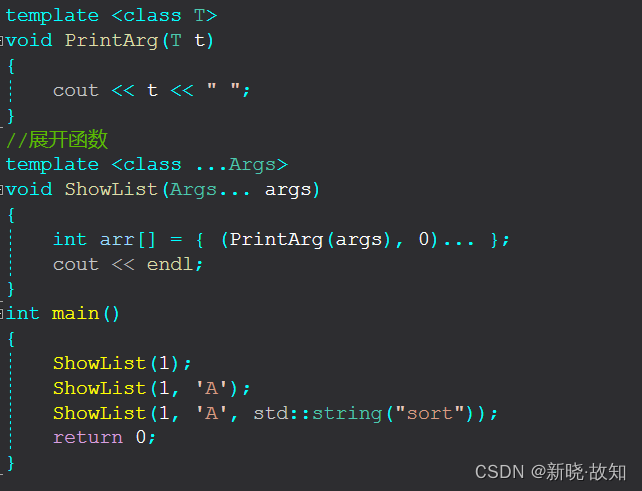
逗号表达式展开参数包
这种展开参数包的方式,不需要通过递归终止函数,是直接在expand函数体中展开的, printarg不是一个递归终止函数,只是一个处理参数包中每一个参数的函数。这种就地展开参数包的方式实现的关键是逗号表达式。我们知道逗号表达式会按顺序执行逗号前面的表达式。
expand函数中的逗号表达式:(printarg(args), 0),也是按照这个执行顺序,先执行
printarg(args),再得到逗号表达式的结果0。同时还用到了C++11的另外一个特性——初始化列表,通过初始化列表来初始化一个变长数组, {(printarg(args), 0)...}将会展开成((printarg(arg1),0),(printarg(arg2),0), (printarg(arg3),0), etc... ),最终会创建一个元素值都为0的数组int arr[sizeof...(Args)]。由于是逗号表达式,在创建数组的过程中会先执行逗号表达式前面的部分printarg(args) 打印出参数,也就是说在构造int数组的过程中就将参数包展开了,这个数组的目的纯粹是为了在 数组构造的过程展开参数包
template <class T>
void PrintArg(T t)
{
cout << t << " ";
}
//展开函数
template <class ...Args>
void ShowList(Args... args)
{
int arr[] = { (PrintArg(args), 0)... };
cout << endl;
}
int main()
{
ShowList(1);
ShowList(1, 'A');
ShowList(1, 'A', std::string("sort"));
return 0;
}
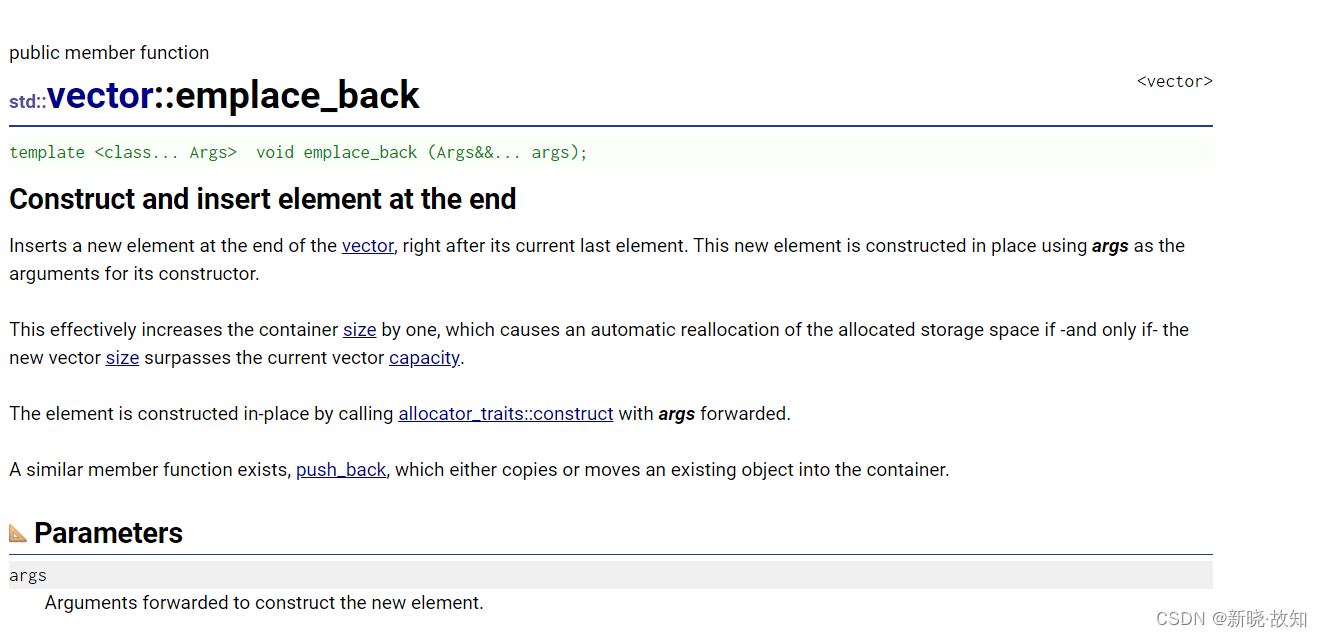
STL容器中的empalce相关接口函数:
https://cplusplus.com/reference/vector/vector/emplace_back/
https://cplusplus.com/reference/list/list/emplace_back/
template <class... Args>
void emplace_back (Args&&... args);首先我们看到的emplace系列的接口,支持模板的可变参数,并且万能引用。那么相对insert和emplace系列接口的优势到底在哪里呢?
int main()
{
std::list< std::pair<int, char> > mylist;
// emplace_back支持可变参数,拿到构建pair对象的参数后自己去创建对象
// 那么在这里我们可以看到除了用法上,和push_back没什么太大的区别
mylist.emplace_back(10, 'a');
mylist.emplace_back(20, 'b');
mylist.emplace_back(make_pair(30, 'c'));
mylist.push_back(make_pair(40, 'd'));
mylist.push_back({ 50, 'e' });
for (auto e : mylist)
cout << e.first << ":" << e.second << endl;
return 0;
}
int main()
{
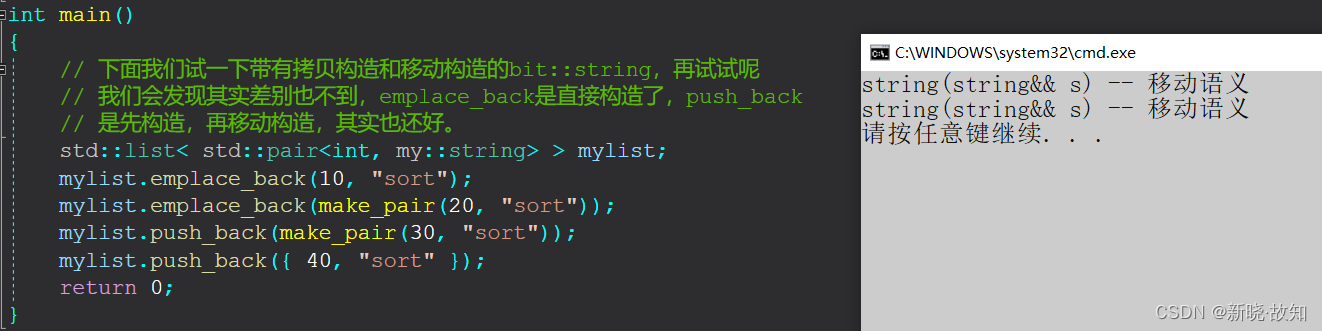
// 下面我们试一下带有拷贝构造和移动构造的bit::string,再试试呢
// 我们会发现其实差别也不到,emplace_back是直接构造了,push_back
// 是先构造,再移动构造,其实也还好。
std::list< std::pair<int, my::string> > mylist;
mylist.emplace_back(10, "sort");
mylist.emplace_back(make_pair(20, "sort"));
mylist.push_back(make_pair(30, "sort"));
mylist.push_back({ 40, "sort" });
return 0;
}


 320
320


 被折叠的 条评论
为什么被折叠?
被折叠的 条评论
为什么被折叠?
 到【灌水乐园】发言


