


今天要实现一个插件化换肤功能,效果如下图:
插件化换肤的前置知识是布局原理与资源加载过程,我们需要先了解它们的原理。
1、布局原理与 xml 解析
我们在创建 Activity 时,需要在 onCreate() 中通过 setContentView(R.layout.xxx) 告知系统要显示的布局,该过程主要涉及两点:
- Activity 的布局原理:了解 Activity 的层级结构
- xml 文件解析:如何将 xml 文件中定义的标签,解析并转化成对应的 View
1.1 Activity 布局原理
Activity 的布局层级结构如下图:
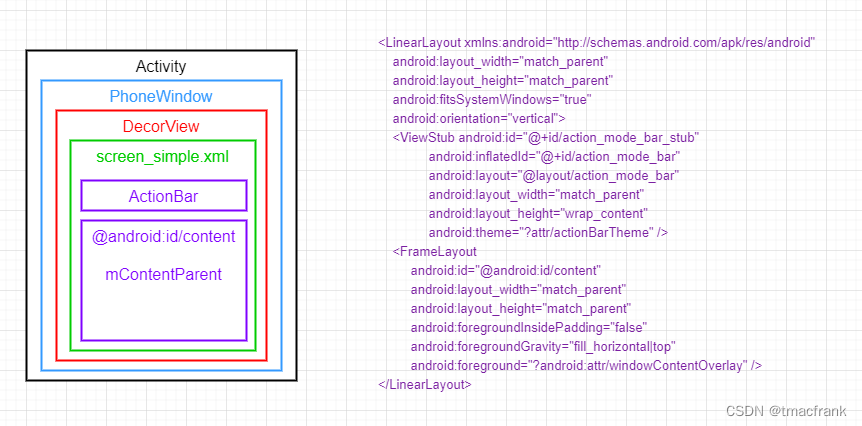
上图右侧代码是 screen_simple.xml 的,需要说明的是,填充 DecorView 的布局 screen_simple.xml 只是默认选项,如果你为 Window 设置了诸如 FEATURE_CUSTOM_TITLE 之类的标记位(类似的标记位有很多,具体参考 Window.java),那么在 PhoneWindow 的 generateLayout() 内选择填充 DecorView 的就是其他布局资源。
下面结合图片看源码。
Activity
Activity 内部持有一个 Window 对象 mWindow,并且在 attach() 内将其实例化为一个 PhoneWindow:
    @UnsupportedAppUsage
    private Window mWindow;

    @UnsupportedAppUsage
    final void attach(Context context, ActivityThread aThread,
            Instrumentation instr, IBinder token, int ident,
            Application application, Intent intent, ActivityInfo info,
            CharSequence title, Activity parent, String id,
            NonConfigurationInstances lastNonConfigurationInstances,
            Configuration config, String referrer, IVoiceInteractor voiceInteractor,
            Window window, ActivityConfigCallback activityConfigCallback, IBinder assistToken) {
        attachBaseContext(context);

        mFragments.attachHost(null /*parent*/);

        // 把 mWindow 实例化为 PhoneWindow 并进行配置
        mWindow = new PhoneWindow(this, window, activityConfigCallback);
        mWindow.setWindowControllerCallback(mWindowControllerCallback);
        mWindow.setCallback(this);
        mWindow.setOnWindowDismissedCallback(this);
        mWindow.getLayoutInflater().setPrivateFactory(this);
        if (info.softInputMode != WindowManager.LayoutParams.SOFT_INPUT_STATE_UNSPECIFIED) {
            mWindow.setSoftInputMode(info.softInputMode);
        }
        if (info.uiOptions != 0) {
            mWindow.setUiOptions(info.uiOptions);
        }

        // ...
    }
我们在 Activity 中调用 setContentView() 时,它实际上会去调用 PhoneWindow 的 setContentView():
    public void setContentView(@LayoutRes int layoutResID) {
        getWindow().setContentView(layoutResID);
        initWindowDecorActionBar();
    }
PhoneWindow
PhoneWindow 是抽象类 Window 的唯一实现类,在它的 setContentView() 中又出现了一个 DecorView:
    // This is the view in which the window contents are placed. It is either
    // mDecor itself, or a child of mDecor where the contents go.
    ViewGroup mContentParent;

    @Override
    public void setContentView(int layoutResID) {
        if (mContentParent == null) {
            // 1.构造 DecorView
            installDecor();
        } else if (!hasFeature(FEATURE_CONTENT_TRANSITIONS)) {
            mContentParent.removeAllViews();
        }

        if (hasFeature(FEATURE_CONTENT_TRANSITIONS)) {
            final Scene newScene = Scene.getSceneForLayout(mContentParent, layoutResID,
                    getContext());
            transitionTo(newScene);
        } else {
            // 2.用我们传递进来的 xml 填充 mContentParent
            mLayoutInflater.inflate(layoutResID, mContentParent);
        }
        mContentParent.requestApplyInsets();
        final Callback cb = getCallback();
        if (cb != null && !isDestroyed()) {
            cb.onContentChanged();
        }
        mContentParentExplicitlySet = true;
    }
setContentView() 中主要做了两件事:
- 构造 DecorView
- 用我们传递进来的 xml 资源填充 mContentParent
installDecor() —— 构造 DecorView
mContentParent(层级图中紫色部分,id 为 @android:id/content 那个 View)唯一被赋值的地方就是在 installDecor() 中,因此按照正常流程,一个 Activity 首次调用 setContentView() 时,mContentParent == null 的条件是成立的,会去执行 installDecor():
    // This is the top-level view of the window, containing the window decor.
    private DecorView mDecor;

    private void installDecor() {
        mForceDecorInstall = false;

        // 1.初始化 DecorView 并与所属 Window 进行关联
        if (mDecor == null) {
            mDecor = generateDecor(-1);
            mDecor.setDescendantFocusability(ViewGroup.FOCUS_AFTER_DESCENDANTS);
            mDecor.setIsRootNamespace(true);
            if (!mInvalidatePanelMenuPosted && mInvalidatePanelMenuFeatures != 0) {
                mDecor.postOnAnimation(mInvalidatePanelMenuRunnable);
            }
        } else {
            mDecor.setWindow(this);
        }

        // 2. 初始化 mContentParent
        if (mContentParent == null) {
            mContentParent = generateLayout(mDecor);
            // ...
        }
    }
installDecor() 对 mDecor 和 mContentParent 进行了初始化,其中 generateDecor() 会生成一个 DecorView 对象:
    protected DecorView generateDecor(int featureId) {
        // 系统进程没有应用程序上下文(application context),这种情况下直接使用我们拥有的 context。
        // 否则,我们需要应用程序上下文,以便我们不会依附于 Activity
        Context context;
        if (mUseDecorContext) {
            Context applicationContext = getContext().getApplicationContext();
            if (applicationContext == null) {
                context = getContext();
            } else {
                context = new DecorContext(applicationContext, this);
                if (mTheme != -1) {
                    context.setTheme(mTheme);
                }
            }
        } else {
            context = getContext();
        }
        // this 指代 PhoneWindow 对象,DecorView 需要与 PhoneWindow 保持关联
        return new DecorView(context, featureId, this, getAttributes());
    }
而 generateLayout() 会根据设置的 Window 属性选择相应的布局资源文件,用其填充 DecorView,并找到 id 为 @android:id/content 的那个 View 作为返回值:
    /**
     * The ID that the main layout in the XML layout file should have.
     */
    public static final int ID_ANDROID_CONTENT = com.android.internal.R.id.content;

    protected ViewGroup generateLayout(DecorView decor) {
        ...
        // Inflate the window decor.
        // 1.根据 features 的值选定系统内部的布局资源 layoutResource(在 AS 创建新项目时选择的项目模板会有对应的 feature)
        int layoutResource;
        int features = getLocalFeatures();
        if ((features & ((1 << FEATURE_LEFT_ICON) | (1 << FEATURE_RIGHT_ICON))) != 0) {
            if (mIsFloating) {
                TypedValue res = new TypedValue();
                getContext().getTheme().resolveAttribute(
                        R.attr.dialogTitleIconsDecorLayout, res, true);
                layoutResource = res.resourceId;
            } else {
                layoutResource = R.layout.screen_title_icons;
            }
            // XXX Remove this once action bar supports these features.
            removeFeature(FEATURE_ACTION_BAR);
        } // 类似的过程,省略一部分...
        else {
            // Embedded, so no decoration is needed.
            layoutResource = R.layout.screen_simple;
        }

        mDecor.startChanging();
        // 2.对选取的 layoutResource 使用 mLayoutInflater 进行填充
        mDecor.onResourcesLoaded(mLayoutInflater, layoutResource);

        // 3.找到在 Activity 中 setContentView() 所设置的那个 ViewGroup 并返回给调用者
        ViewGroup contentParent = (ViewGroup)findViewById(ID_ANDROID_CONTENT);
        ...

        return contentParent;
    }
注释已经标记出,generateLayout() 主要做了三件事:
-
根据不同的 feature 选取对应的 layoutResource 布局资源,倘若没有配置任何 feature,layoutResource 就会取默认值 R.layout.screen_simple
-
布局资源准备完毕后,通过 DecorView 的 onResourcesLoaded() 将 layoutResource 解析成 View 并添加到 DecorView 中:
    void onResourcesLoaded(LayoutInflater inflater, int layoutResource) {
        ...

        mDecorCaptionView = createDecorCaptionView(inflater);
        // 解析 layoutResource 生成 View 对象
        final View root = inflater.inflate(layoutResource, null);
        if (mDecorCaptionView != null) {
            if (mDecorCaptionView.getParent() == null) {
                addView(mDecorCaptionView,
                        new ViewGroup.LayoutParams(MATCH_PARENT, MATCH_PARENT));
            }
            mDecorCaptionView.addView(root,
                    new ViewGroup.MarginLayoutParams(MATCH_PARENT, MATCH_PARENT));
        } else {
            // Put it below the color views.
            // 把 root 添加到当前这个 DecorView 中
            addView(root, 0, new ViewGroup.LayoutParams(MATCH_PARENT, MATCH_PARENT));
        }
        mContentRoot = (ViewGroup) root;
        initializeElevation();
    }
其中有一个重要步骤,是用 LayoutInflater 解析 layoutResource 资源为 View 对象,它的源码解析放在后续的【1.2 xml 布局解析】中。
-
通过 Window 的 findViewById() 找到 id 为 ID_ANDROID_CONTENT 的 View:
	@Nullable
    public <T extends View> T findViewById(@IdRes int id) {
        // 去 DecorView 里找
        return getDecorView().findViewById(id);
    }
DecorView 使用 View 的 findViewById():
    @Nullable
    public final <T extends View> T findViewById(@IdRes int id) {
        if (id == NO_ID) {
            return null;
        }
        return findViewTraversal(id);
    }
结果就是找到了 ID_ANDROID_CONTENT 对应的 View,即 Activity 的 setContentView() 中设置的 View 作为 generateLayout() 的结果返回给 installDecor() 的 mContentParent,正如我们在 Activity 层级结构图中标记的紫色区域那样。
至此,installDecor() 与 Activity 的布局结构分析完毕。
1.2 xml 布局解析
前面分析 onResourcesLoaded() 时我们留了一个坑,就是 LayoutInflater 是如何解析布局文件,将 xml 中通过 Tag 定义的 View 转换成一个 View 对象。
LayoutInflater.inflate()
LayoutInflater 中有 4 个重载的 inflate 方法,最终都会调用到如下这个:
    /**
    * 从指定的 XML 节点填充出一个新的视图层次结构。如果有错误会抛出 InflateException。
    * 由于性能原因,视图填充在很大程度上依赖于构建时对 XML 文件的预处理。因此,目前
    * 不太可能在运行时使用 XmlPullParser 处理一个纯 XML 文件
    * @param parser 包含视图层次结构描述的 XML dom 节点
    * @param root 作为生成层次结构的父级的可选视图(如果 attachToRoot 为 true),否则只是提供一组
    *  			 LayoutParams 值的对象,用于返回的层次结构的根视图(如果 attachToRoot 为 false)
    * @param attachToRoot 表示填充的层次结构是否要附加到 root 中。如果为 false,那么 root 就只是
    * 					用来为 XML 中 root 的根视图创建正确的 LayoutParams 子类
    * @return 填充的视图层级的根视图。如果提供了 root 并且 attachToRoot 是 true,那么就返回 root;
    *         否则就返回被填充的 XML 文件的 root
    */
    public View inflate(XmlPullParser parser, @Nullable ViewGroup root, boolean attachToRoot) {
        synchronized (mConstructorArgs) {

            final Context inflaterContext = mContext;
            // 将结果初始化为 root
            View result = root;

            try {
                // 找到起始标签 START_TAG 作为根节点
                int type;
                while ((type = parser.next()) != XmlPullParser.START_TAG &&
                        type != XmlPullParser.END_DOCUMENT) {
                    // Empty
                }
                ...

                final String name = parser.getName();

                // 检测 <merge> 标签
                if (TAG_MERGE.equals(name)) {
                    if (root == null || !attachToRoot) {
                        throw new InflateException("<merge /> can be used only with a valid "
                                + "ViewGroup root and attachToRoot=true");
                    }
                    // 递归填充
                    rInflate(parser, root, inflaterContext, attrs, false);
                } else {
                    // temp 是从 XML 中解析出的根视图
                    final View temp = createViewFromTag(root, name, inflaterContext, attrs);

                    ViewGroup.LayoutParams params = null;

                    // 1.root 不为空的情况
                    if (root != null) {
                        // Create layout params that match root, if supplied
                        params = root.generateLayoutParams(attrs);
                        // 如果 attachToRoot 为 false,那么就把布局参数 params 赋给 temp
                        if (!attachToRoot) {
                            // Set the layout params for temp if we are not
                            // attaching. (If we are, we use addView, below)
                            temp.setLayoutParams(params);
                        }
                    }

                    // 遍历 temp 下的每一个 View 并用 createViewFromTag() 创建出来
                    rInflateChildren(parser, temp, attrs, true);

                    // We are supposed to attach all the views we found(int temp) to root.
                    // 2.attachToRoot 为 true,那就把 temp 按照 params 规则添加到 root 中
                    if (root != null && attachToRoot) {
                        root.addView(temp, params);
                    }

                    // Decide whether to return the root that was passed in or the
                    // top view found in xml.
                    // 3.如果 root 为空或者 attachToRoot 为 false,那么 temp 就作为结果
                    if (root == null || !attachToRoot) {
                        result = temp;
                    }
                }
            }
            return result;
        }
    }
从方法的返回值 result 上来看,无非是 root(父容器)或 temp(XML 解析的根视图)两个结果,但是根据 root 与 attachToRoot 不同的赋值情况,其实有 3 中可能的结果,已经在注释中标出:
- root 不为空,attachToRoot 为 false:为 temp 生成一个匹配 root 的 LayoutParams,并设置给 temp,最终返回结果为 temp
- root 不为空,attachToRoot 为 true:为 temp 生成一个匹配 root 的 LayoutParams params,并通过 addView() 将 temp 以 params 规格添加到 root 中,最终返回结果为 root
- root 为空或 attachToRoot 为 false:最终返回结果为 temp,无需生成匹配 root 的 LayoutParams
要理解以上结果,而不是死记硬背。temp 表示 XML 解析结果的根视图,而 root 表示 temp 的父容器,那么:
- 当 root 为空时,表示不存在父容器,因此 temp 需要作为一个单独的视图树存在,也就不用生成什么父容器的 LayoutParams 了
- 当 root 不为空时,表示 temp 存在父容器,而 attachToRoot 表示是否要将 temp 添加到 root 的视图层级中:
- 若 attachToRoot 为 false,表示不添加,但是 inflate() 会为 temp 生成匹配父容器的 LayoutParams 并设置给 temp,这样作为返回结果的 temp 是带有 LayoutParams 的,不用后续使用时再设置它
- 若 attachToRoot 为 true,表示添加,那就直接用现有的 addView(View,LayoutParams) 添加 temp 到 root 中,此时 root 是根视图,返回 root 才有意义
LayoutInflater.createViewFromTag()
接下来看如何从 XML 中解析标签生成 View:
    View createViewFromTag(View parent, String name, Context context, AttributeSet attrs,
            boolean ignoreThemeAttr) {
        if (name.equals("view")) {
            name = attrs.getAttributeValue(null, "class");
        }

        // Apply a theme wrapper, if allowed and one is specified.
        if (!ignoreThemeAttr) {
            final TypedArray ta = context.obtainStyledAttributes(attrs, ATTRS_THEME);
            final int themeResId = ta.getResourceId(0, 0);
            if (themeResId != 0) {
                context = new ContextThemeWrapper(context, themeResId);
            }
            ta.recycle();
        }

        try {
            // 1.使用 Factory、Factory2 接口创建 View
            View view = tryCreateView(parent, name, context, attrs);

            if (view == null) {
                final Object lastContext = mConstructorArgs[0];
                mConstructorArgs[0] = context;
                try {
                    // 2.使用反射方式创建 View,if 内处理系统创建的 View,如 TextView、ImageView,
                    // 而 else 内处理的是自定义 View,最终的处理方法是一样的。
                    if (-1 == name.indexOf('.')) {
                        view = onCreateView(context, parent, name, attrs);
                    } else {
                        view = createView(context, name, null, attrs);
                    }
                } finally {
                    mConstructorArgs[0] = lastContext;
                }
            }

            return view;
        } // catch...
    }
可以看到,createViewFromTag() 内部使用了三个方法来处理不同情况下生成 View 的操作:
- 如果设置了 LayoutInflater 的 mFactory、mFactory2 或 mPrivateFactory,则使用对应的工厂对象创建 View
- 如果没有设置工厂,对于系统的 View(具体指 android.view 包下的),使用 onCreateView() 生成
- 如果没有设置工厂,对于自定义的 View,使用 createView() 生成
其中后两个操作,它们最终调用的都是 createView() 的另一个重载方法,通过反射创建 View 对象。
tryCreateView()
按照 mFactory2、mFactory 和 mPrivateFactory 的优先顺序进行检查,哪个不为空就由哪个工厂对象的 onCreateView() 生成 View 对象:
    private Factory mFactory;
    private Factory2 mFactory2;
    private Factory2 mPrivateFactory;

    public final View tryCreateView(@Nullable View parent, @NonNull String name,
        @NonNull Context context, @NonNull AttributeSet attrs) {
        ...
        // 依次检查 mFactory2、mFactory、mPrivateFactory 三个接口实例,先检查的条件如果成立,
        // 就不会做后续检查了,相当于拦截了后续工厂的检查
        View view;
        if (mFactory2 != null) {
            view = mFactory2.onCreateView(parent, name, context, attrs);
        } else if (mFactory != null) {
            view = mFactory.onCreateView(name, context, attrs);
        } else {
            view = null;
        }

        if (view == null && mPrivateFactory != null) {
            view = mPrivateFactory.onCreateView(parent, name, context, attrs);
        }

        return view;
    }

    public interface Factory {
        View onCreateView(@NonNull String name, @NonNull Context context,
                @NonNull AttributeSet attrs);
    }

    public interface Factory2 extends Factory {
        // 参数中带有父容器 parent
        View onCreateView(@Nullable View parent, @NonNull String name,
                @NonNull Context context, @NonNull AttributeSet attrs);
    }
对于 mFactory2、mFactory 和 mPrivateFactory 三个工厂对象,LayoutInflater 内提供了 set 方法对它们进行设置,内容大同小异,因此以 Factory2 接口为例:
	public void setFactory2(Factory2 factory) {
        // LayoutInflater 只能设置一个 Factory 对象
        if (mFactorySet) {
            throw new IllegalStateException("A factory has already been set on this LayoutInflater");
        }
        if (factory == null) {
            throw new NullPointerException("Given factory can not be null");
        }
        mFactorySet = true;
        if (mFactory == null) {
            mFactory = mFactory2 = factory;
        } else {
            mFactory = mFactory2 = new FactoryMerger(factory, factory, mFactory, mFactory2);
        }
    }
需要注意的是,只有 setFactory2() 和 setFactory() 是供开发者使用的,而 setPrivateFactory() 被加了 @UnsupportedAppUsage,是专门给 Framework 用的。
插件化换肤方案正是通过实现 Factory2 接口并设置给 LayoutInflater 实现换肤操作
onCreateView() 与 createView()
如果没有为 LayoutInflater 设置工厂对象,那么就要通过反射创建 View 对象。源码中对系统 View 与自定义 View 做了一个区分:
- 系统定义的 View,严格讲是 android.view 包下的 View,在 XML 的标签中使用的是 SimpleName,如 TextView、ImageView,调用 onCreateView()
- 使用者自定义的 View,在 XML 标签中会使用全类名,调用 createView()
实际上 onCreateView() 只是补全了类名,最终还是调用 createView():
    protected View onCreateView(String name, AttributeSet attrs)
            throws ClassNotFoundException {
        return createView(name, "android.view.", attrs);
    }

    public final View createView(String name, String prefix, AttributeSet attrs)
            throws ClassNotFoundException, InflateException {
        Context context = (Context) mConstructorArgs[0];
        if (context == null) {
            context = mContext;
        }
        return createView(context, name, prefix, attrs);
    }

    @UnsupportedAppUsage(maxTargetSdk = Build.VERSION_CODES.P, trackingBug = 123769490)
    private static final HashMap<String, Constructor<? extends View>> sConstructorMap =
            new HashMap<String, Constructor<? extends View>>();

    static final Class<?>[] mConstructorSignature = new Class[] {
            Context.class, AttributeSet.class};

    public final View createView(@NonNull Context viewContext, @NonNull String name,
            @Nullable String prefix, @Nullable AttributeSet attrs)
            throws ClassNotFoundException, InflateException {
        Objects.requireNonNull(viewContext);
        Objects.requireNonNull(name);
        // 1.先通过 View 的全类名去 Map 中找,是否有缓存的构造器
        // 如果能找到构造器但是验证该构造器的 ClassLoader 失败的话,就从缓存中移除该构造器
        Constructor<? extends View> constructor = sConstructorMap.get(name);
        if (constructor != null && !verifyClassLoader(constructor)) {
            constructor = null;
            sConstructorMap.remove(name);
        }
        Class<? extends View> clazz = null;

        try {
            if (constructor == null) {
                // 2.如果缓存中没能找到这个 View 的构造器,就通过反射的方式先拿到 View 的
                // Class 对象,再拿到它的构造器对象并加入缓存中。
                clazz = Class.forName(prefix != null ? (prefix + name) : name, false,
                        mContext.getClassLoader()).asSubclass(View.class);

                if (mFilter != null && clazz != null) {
                    boolean allowed = mFilter.onLoadClass(clazz);
                    if (!allowed) {
                        failNotAllowed(name, prefix, viewContext, attrs);
                    }
                }
                // mConstructorSignature 是构造器的参数类类型数组,放的是 Context 和 AttributeSet 的 Class 对象
                constructor = clazz.getConstructor(mConstructorSignature);
                constructor.setAccessible(true);
                sConstructorMap.put(name, constructor);
            } else {
                // If we have a filter, apply it to cached constructor
                if (mFilter != null) {
                    // Have we seen this name before?
                    Boolean allowedState = mFilterMap.get(name);
                    if (allowedState == null) {
                        // New class -- remember whether it is allowed
                        clazz = Class.forName(prefix != null ? (prefix + name) : name, false,
                                mContext.getClassLoader()).asSubclass(View.class);

                        boolean allowed = clazz != null && mFilter.onLoadClass(clazz);
                        mFilterMap.put(name, allowed);
                        if (!allowed) {
                            failNotAllowed(name, prefix, viewContext, attrs);
                        }
                    } else if (allowedState.equals(Boolean.FALSE)) {
                        failNotAllowed(name, prefix, viewContext, attrs);
                    }
                }
            }

            Object lastContext = mConstructorArgs[0];
            mConstructorArgs[0] = viewContext;
            Object[] args = mConstructorArgs;
            args[1] = attrs;

            try {
                // 3.通过构造器对象创建 View 对象,使用的是参数为(Context,AttributeSet)的构造器
                final View view = constructor.newInstance(args);
                if (view instanceof ViewStub) {
                    // Use the same context when inflating ViewStub later.
                    final ViewStub viewStub = (ViewStub) view;
                    viewStub.setLayoutInflater(cloneInContext((Context) args[0]));
                }
                return view;
            } finally {
                mConstructorArgs[0] = lastContext;
            }
        } // catch ...
    }
createView 方法实际上就是通过反射的方式得到 View 的构造器对象,该构造器有两个形参,类型为 Context 和 AttributeSet,对应 View 的四个构造函数的第二个(有两个参数的)。这也解释了,为什么在自定义 View 时一定要实现四个构造方法中的第二个,因为源码正是用该构造方法,反射创建出 View 对象。
总结
LayoutInflater 的 inflate() 通过反射创建 XML 标签中的 View 对象。对于该方法的使用,有几个需要注意的情形:
-
在 Fragment 的 onCreateView() 中,通常不会把 inflate() 结果的 View 添加到 container 中:
    @Nullable
    @Override
    public View onCreateView(LayoutInflater inflater, @Nullable ViewGroup container, @Nullable Bundle savedInstanceState) {
        // 第三个参数填 false,否则会引发异常。
        return inflater.inflate(layoutId,container,false);
    }
这是因为 FragmentManager 会把 onCreateView 的 View 添加到父布局当中:
    void moveToState(Fragment f, int newState, int transit, int transitionStyle,
            boolean keepActive) {
            switch (f.mState) {
                ……
                case Fragment.CREATED:
                    ……
                    if (newState > Fragment.CREATED) {
                        ……
                        if (f.mView != null) {
                            f.mInnerView = f.mView;
                            f.mView.setSaveFromParentEnabled(false);
                            if (container != null) {
                                container.addView(f.mView);
                            }
                            ……
                        }
                        ……
                    }
                ……
            }
在 addView() 内会调用到 addViewInner(),检查 View 是否已经有了父节点,如果在已经存在父节点的情况下仍调用了 addView(),就会抛出异常:
    private void addViewInner(View child, int index, LayoutParams params,
            boolean preventRequestLayout) {
        // ......
        if (child.getParent() != null) {
            throw new IllegalStateException("The specified child already has a parent. " +
                    "You must call removeView() on the child's parent first.");
        }
    }
总结一下,就是说 ViewGroup.addView(childView) 在执行时会检查 childView 是否已经有父节点,以保证每个 View 只有一个父节点。由于 FragmentManager 会将 onCreateView() 的结果添加到 container 中,因此 inflate() 不应该将其填充的 View 添加到 container 中,故 inflate() 第三个参数应该填 false。
2、资源加载
动态换肤的另一个前置知识是资源加载过程,入口代码在 ActivityThread 中。
2.1 ActivityThread
在 handleBindApplication() 中,我们会留意两件事:
- 获取或创建 Instrumentation 对象,后续会用到
- 初始化 Application 时,在 LoaedApk 的 makeApplication() 内创建 Application 的 Context
    private void handleBindApplication(AppBindData data) {
        ...
        final InstrumentationInfo ii;
        if (data.instrumentationName != null) {
            ii = prepareInstrumentation(data);
        } else {
            ii = null;
        }
        ...
        // 1.创建/获取 Instrumentation 对象
        if (ii != null) {
            ApplicationInfo instrApp;
            try {
                instrApp = getPackageManager().getApplicationInfo(ii.packageName, 0,
                        UserHandle.myUserId());
            } catch (RemoteException e) {
                instrApp = null;
            }
            if (instrApp == null) {
                instrApp = new ApplicationInfo();
            }
            ii.copyTo(instrApp);
            instrApp.initForUser(UserHandle.myUserId());
            final LoadedApk pi = getPackageInfo(instrApp, data.compatInfo,
                    appContext.getClassLoader(), false, true, false);
            final ContextImpl instrContext = ContextImpl.createAppContext(this, pi);

            try {
                // 通过 ClassLoader 获取 Instrumentation 对象
                final ClassLoader cl = instrContext.getClassLoader();
                mInstrumentation = (Instrumentation)
                    cl.loadClass(data.instrumentationName.getClassName()).newInstance();
            }

            final ComponentName component = new ComponentName(ii.packageName, ii.name);
            mInstrumentation.init(this, instrContext, appContext, component,
                    data.instrumentationWatcher, data.instrumentationUiAutomationConnection);

            if (mProfiler.profileFile != null && !ii.handleProfiling
                    && mProfiler.profileFd == null) {
                mProfiler.handlingProfiling = true;
                final File file = new File(mProfiler.profileFile);
                file.getParentFile().mkdirs();
                Debug.startMethodTracing(file.toString(), 8 * 1024 * 1024);
            }
        } else {
            // 创建 Instrumentation 对象
            mInstrumentation = new Instrumentation();
            mInstrumentation.basicInit(this);
        }
        ...
        Application app;
        ...
        try {
            // 2.初始化 Application
            app = data.info.makeApplication(data.restrictedBackupMode, null);
            ...
            mInitialApplication = app;
            ...
            try {
                ...
                mInstrumentation.onCreate(data.instrumentationArgs);
                ...
            }
            ...
            try {
                ...
                mInstrumentation.callApplicationOnCreate(app);
                ...
            }
        }
    }
下面看 LoaedApk 的 makeApplication() 如何做 Application 初始化。
2.2 LoaedApk
    public Application makeApplication(boolean forceDefaultAppClass, Instrumentation instrumentation) {
        if (mApplication != null) {
            return mApplication;
        }

        Application app = null;

        String appClass = mApplicationInfo.className;
        if (forceDefaultAppClass || (appClass == null)) {
            appClass = "android.app.Application";
        }

        try {
            java.lang.ClassLoader cl = getClassLoader();
            if (!mPackageName.equals("android")) {
                initializeJavaContextClassLoader();
            }
            // 创建 appContext
            ContextImpl appContext = ContextImpl.createAppContext(mActivityThread, this);
            app = mActivityThread.mInstrumentation.newApplication(
                    cl, appClass, appContext);
            appContext.setOuterContext(app);
        }
        mActivityThread.mAllApplications.add(app);
        mApplication = app;

        if (instrumentation != null) {
            try {
                instrumentation.callApplicationOnCreate(app);
            }
        }

        return app;
    }
在创建 appContext 时会把 Resources 对象设置给它:
    static ContextImpl createAppContext(ActivityThread mainThread, LoadedApk packageInfo) {
        ContextImpl context = new ContextImpl(null, mainThread, packageInfo, null, null, null, 0,
                null);
        context.setResources(packageInfo.getResources());
        return context;
    }
这个 Resources 对象是通过 LoadedApk 的 getResources() 获取的:
    public Resources getResources() {
        if (mResources == null) {
            final String[] splitPaths;
            try {
                splitPaths = getSplitPaths(null);
            } catch ...

            mResources = ResourcesManager.getInstance().getResources(null, mResDir,
                    splitPaths, mOverlayDirs, mApplicationInfo.sharedLibraryFiles,
                    Display.DEFAULT_DISPLAY, null, getCompatibilityInfo(),
                    getClassLoader());
        }
        return mResources;
    }
最终还是要通过 ResourcesManager 拿到这个 Resources 对象。
2.3 ResourcesManager
    public @Nullable Resources getResources(@Nullable IBinder activityToken,
            @Nullable String resDir,
            @Nullable String[] splitResDirs,
            @Nullable String[] overlayDirs,
            @Nullable String[] libDirs,
            int displayId,
            @Nullable Configuration overrideConfig,
            @NonNull CompatibilityInfo compatInfo,
            @Nullable ClassLoader classLoader) {
        try {
            Trace.traceBegin(Trace.TRACE_TAG_RESOURCES, "ResourcesManager#getResources");
            final ResourcesKey key = new ResourcesKey(
                    resDir,
                    splitResDirs,
                    overlayDirs,
                    libDirs,
                    displayId,
                    overrideConfig != null ? new Configuration(overrideConfig) : null, // Copy
                    compatInfo);
            classLoader = classLoader != null ? classLoader : ClassLoader.getSystemClassLoader();
            return getOrCreateResources(activityToken, key, classLoader);
        } finally {
            Trace.traceEnd(Trace.TRACE_TAG_RESOURCES);
        }
    }
注意给 getOrCreateResources() 传的 3 个参数:activityToken 传入的是 null,key 当中包含资源路径,classLoader 是系统使用的 PathClassLoader:
    private @Nullable Resources getOrCreateResources(@Nullable IBinder activityToken,
            @NonNull ResourcesKey key, @NonNull ClassLoader classLoader) {
        synchronized (this) {
            if (activityToken != null) {
                // 前面的代码流程给 activityToken 传了 null,因此这里我们就省略了...
            } else {
                // Not tied to an Activity, find a shared Resources that has the right ResourcesImpl
                ResourcesImpl resourcesImpl = findResourcesImplForKeyLocked(key);
                if (resourcesImpl != null) {
                    return getOrCreateResourcesLocked(classLoader, resourcesImpl, key.mCompatInfo);
                }
            }

            // If we're here, we didn't find a suitable ResourcesImpl to use, so create one now.
            // 如果前面没在缓存中找到合适的 ResourcesImpl 对象,那就创建它
            ResourcesImpl resourcesImpl = createResourcesImpl(key);
            if (resourcesImpl == null) {
                return null;
            }

            // 将 ResourcesImpl 加入缓存中
            mResourceImpls.put(key, new WeakReference<>(resourcesImpl));

            final Resources resources;
            if (activityToken != null) {
                resources = getOrCreateResourcesForActivityLocked(activityToken, classLoader,
                        resourcesImpl, key.mCompatInfo);
            } else {
                resources = getOrCreateResourcesLocked(classLoader, resourcesImpl, key.mCompatInfo);
            }
            return resources;
        }
    }
我们重点关注 Resources 对象的创建。
Resources 对象的创建
	private @Nullable ResourcesImpl createResourcesImpl(@NonNull ResourcesKey key) {
        final DisplayAdjustments daj = new DisplayAdjustments(key.mOverrideConfiguration);
        daj.setCompatibilityInfo(key.mCompatInfo);

        // 1.创建 AssetManager
        final AssetManager assets = createAssetManager(key);
        if (assets == null) {
            return null;
        }

        final DisplayMetrics dm = getDisplayMetrics(key.mDisplayId, daj);
        final Configuration config = generateConfig(key, dm);
        // 2.创建 ResourcesImpl 并返回
        final ResourcesImpl impl = new ResourcesImpl(assets, dm, config, daj);

        return impl;
    }
先根据 ResourcesKey 创建一个 AssetManager,并用后者创建 ResourcesImpl。
创建 AssetManager
将多个路径添加到 AssetManager.Builder 中,我们关注的是资源路径 key.mResDir:
    protected @Nullable AssetManager createAssetManager(@NonNull final ResourcesKey key) {
        final AssetManager.Builder builder = new AssetManager.Builder();

        // 如果 android 包正在创建新的 Resources 对象,则 resDir 可以为 null,因为每个
        // AssetManager 已经自动加载了 android 包
        if (key.mResDir != null) {
            try {
                builder.addApkAssets(loadApkAssets(key.mResDir, false /*sharedLib*/,
                        false /*overlay*/));
            } catch (IOException e) {
                Log.e(TAG, "failed to add asset path " + key.mResDir);
                return null;
            }
        }

        if (key.mSplitResDirs != null) {
            for (final String splitResDir : key.mSplitResDirs) {
                try {
                    builder.addApkAssets(loadApkAssets(splitResDir, false /*sharedLib*/,
                            false /*overlay*/));
                } catch ...
            }
        }

        if (key.mOverlayDirs != null) {
            for (final String idmapPath : key.mOverlayDirs) {
                try {
                    builder.addApkAssets(loadApkAssets(idmapPath, false /*sharedLib*/,
                            true /*overlay*/));
                } catch ...
            }
        }

        if (key.mLibDirs != null) {
            for (final String libDir : key.mLibDirs) {
                if (libDir.endsWith(".apk")) {
                    // 避免打开我们知道没有资源的文件,比如仅包含代码的 .jar 文件
                    try {
                        builder.addApkAssets(loadApkAssets(libDir, true /*sharedLib*/,
                                false /*overlay*/));
                    } catch ...
                }
            }
        }

        return builder.build();
    }
添加资源路径时,先调用 loadApkAssets(),以指定的路径构建出一个 ApkAssets 对象:
ResourceManager.java:

	// ApkAssets 的强引用缓存
    private final LruCache<ApkKey, ApkAssets> mLoadedApkAssets = new LruCache<>(3);

	// ApkAssets 的二级缓存,缓存的是那些不在 LruCache 中的 ApkAssets
    private final ArrayMap<ApkKey, WeakReference<ApkAssets>> mCachedApkAssets = new ArrayMap<>();

    private @NonNull ApkAssets loadApkAssets(String path, boolean sharedLib, boolean overlay)
            throws IOException {
        // ApkKey 是 ResourceManager 的静态内部类,记录 path, sharedLib, overlay
        // 信息用来生成 hashCode() 的返回值以作为缓存的 key
        final ApkKey newKey = new ApkKey(path, sharedLib, overlay);
        // 先找 LruCache
        ApkAssets apkAssets = mLoadedApkAssets.get(newKey);
        if (apkAssets != null) {
            return apkAssets;
        }

        // LruCache 没找到,再从二级缓存中找
        final WeakReference<ApkAssets> apkAssetsRef = mCachedApkAssets.get(newKey);
        if (apkAssetsRef != null) {
            apkAssets = apkAssetsRef.get();
            if (apkAssets != null) {
                mLoadedApkAssets.put(newKey, apkAssets);
                return apkAssets;
            } else {
                // Clean up the reference.
                mCachedApkAssets.remove(newKey);
            }
        }

        // 如果缓存中没有,就必须从硬盘加载,创建新的 ApkAssets 对象。
        if (overlay) {
            apkAssets = ApkAssets.loadOverlayFromPath(overlayPathToIdmapPath(path),
                    false /*system*/);
        } else {
            apkAssets = ApkAssets.loadFromPath(path, false /*system*/, sharedLib);
        }
        mLoadedApkAssets.put(newKey, apkAssets);
        mCachedApkAssets.put(newKey, new WeakReference<>(apkAssets));
        return apkAssets;
    }
ApkAssets 内部有多个方法创建 ApkAssets 对象,这里用到的是如下两个:
    public static @NonNull ApkAssets loadFromPath(@NonNull String path, boolean system)
            throws IOException {
        return new ApkAssets(path, system, false /*forceSharedLib*/, false /*overlay*/);
    }

    public static @NonNull ApkAssets loadOverlayFromPath(@NonNull String idmapPath, boolean system)
            throws IOException {
        return new ApkAssets(idmapPath, system, false /*forceSharedLibrary*/, true /*overlay*/);
    }
回到 ResourceManager 的 createAssetManager 方法中,拿到 ApkAssets 对象后,会接着调用 AssetManager.Builder 的 addApkAssets() 将 ApkAssets 添加到 mUserApkAssets 中:
    public static class Builder {
        private ArrayList<ApkAssets> mUserApkAssets = new ArrayList<>();

        public Builder addApkAssets(ApkAssets apkAssets) {
            mUserApkAssets.add(apkAssets);
            return this;
        }

        public AssetManager build() {
            // Retrieving the system ApkAssets forces their creation as well.
            final ApkAssets[] systemApkAssets = getSystem().getApkAssets();

            final int totalApkAssetCount = systemApkAssets.length + mUserApkAssets.size();
            final ApkAssets[] apkAssets = new ApkAssets[totalApkAssetCount];

            // 把 systemApkAssets 中的元素 copy 到 apkAssets 中。
            System.arraycopy(systemApkAssets, 0, apkAssets, 0, systemApkAssets.length);

            // 把 mUserApkAssets 中的元素 copy 到 apkAssets 从 systemApkAssets.length 开始的位置。
            final int userApkAssetCount = mUserApkAssets.size();
            for (int i = 0; i < userApkAssetCount; i++) {
                apkAssets[i + systemApkAssets.length] = mUserApkAssets.get(i);
            }

            // 将 apkAssets 中的元素赋值给 AssetManager 的 mApkAssets,再调用 native 方法设置 ApkAssets。
            final AssetManager assetManager = new AssetManager(false /*sentinel*/);
            assetManager.mApkAssets = apkAssets;
            AssetManager.nativeSetApkAssets(assetManager.mObject, apkAssets,
                    false /*invalidateCaches*/);
            return assetManager;
        }
    }
最后调用 build() 把系统的 ApkAssets systemApkAssets 和用户的 ApkAssets mUserApkAssets 合并后设置给 AssetManager。
看到这里对于换肤方案就有一个初步的设想,就是通过 addApkAssets() 将皮肤 apk 添加到 AssetManager 的资源路径中,这样我们就能加载到皮肤包中的资源,使得换肤成为可能。
此外还能看出 Resources、ResourcesImpl 和 AssetManager 是有一个包含关系的,即 Resources 持有 ResourcesImpl,而 ResourcesImpl 持有 AssetManager,并且进行资源加载的其实是 AssetManager,Resources 只是加了一层包装。比如通常会使用 getResources().getXXX() 来获取某种资源(例如颜色、字符串等),其实最终都是通过 AssetManager 去获取的:
    @Override
    protected void onCreate(Bundle savedInstanceState) {
        super.onCreate(savedInstanceState);
        setContentView(R.layout.activity_main);

        getResources().getColor(R.color.colorAccent, getTheme());
    }
Resources 会调用 ResourcesImpl 的 getValue():
    @ColorInt
    public int getColor(@ColorRes int id, @Nullable Theme theme) throws NotFoundException {
        final TypedValue value = obtainTempTypedValue();
        try {
            // 通过 ResourcesImpl 的 getValue() 获取中间结果
            final ResourcesImpl impl = mResourcesImpl;
            impl.getValue(id, value, true);
            if (value.type >= TypedValue.TYPE_FIRST_INT
                    && value.type <= TypedValue.TYPE_LAST_INT) {
                return value.data;
            } else if (value.type != TypedValue.TYPE_STRING) {
                throw new NotFoundException("Resource ID #0x" + Integer.toHexString(id)
                        + " type #0x" + Integer.toHexString(value.type) + " is not valid");
            }

            final ColorStateList csl = impl.loadColorStateList(this, value, id, theme);
            return csl.getDefaultColor();
        } finally {
            releaseTempTypedValue(value);
        }
    }
而 ResourcesImpl.getValue() 通过 AssetManager.getResourceValue() 获取资源值:
    final AssetManager mAssets;

    @UnsupportedAppUsage
    void getValue(@AnyRes int id, TypedValue outValue, boolean resolveRefs)
            throws NotFoundException {
        boolean found = mAssets.getResourceValue(id, 0, outValue, resolveRefs);
        if (found) {
            return;
        }
        throw new NotFoundException("Resource ID #0x" + Integer.toHexString(id));
    }
AssetManager.getResourceValue() 会调用 native 方法获取资源值:
    boolean getResourceValue(@AnyRes int resId, int densityDpi, @NonNull TypedValue outValue,
            boolean resolveRefs) {
        Objects.requireNonNull(outValue, "outValue");
        synchronized (this) {
            ensureValidLocked();
            final int cookie = nativeGetResourceValue(
                    mObject, resId, (short) densityDpi, outValue, resolveRefs);
            if (cookie <= 0) {
                return false;
            }

            // Convert the changing configurations flags populated by native code.
            outValue.changingConfigurations = ActivityInfo.activityInfoConfigNativeToJava(
                    outValue.changingConfigurations);

            if (outValue.type == TypedValue.TYPE_STRING) {
                outValue.string = getPooledStringForCookie(cookie, outValue.data);
            }
            return true;
        }
    }
还需清楚的一点是,AssetManager 加载的资源信息可以通过 resources.arsc 文件查看:
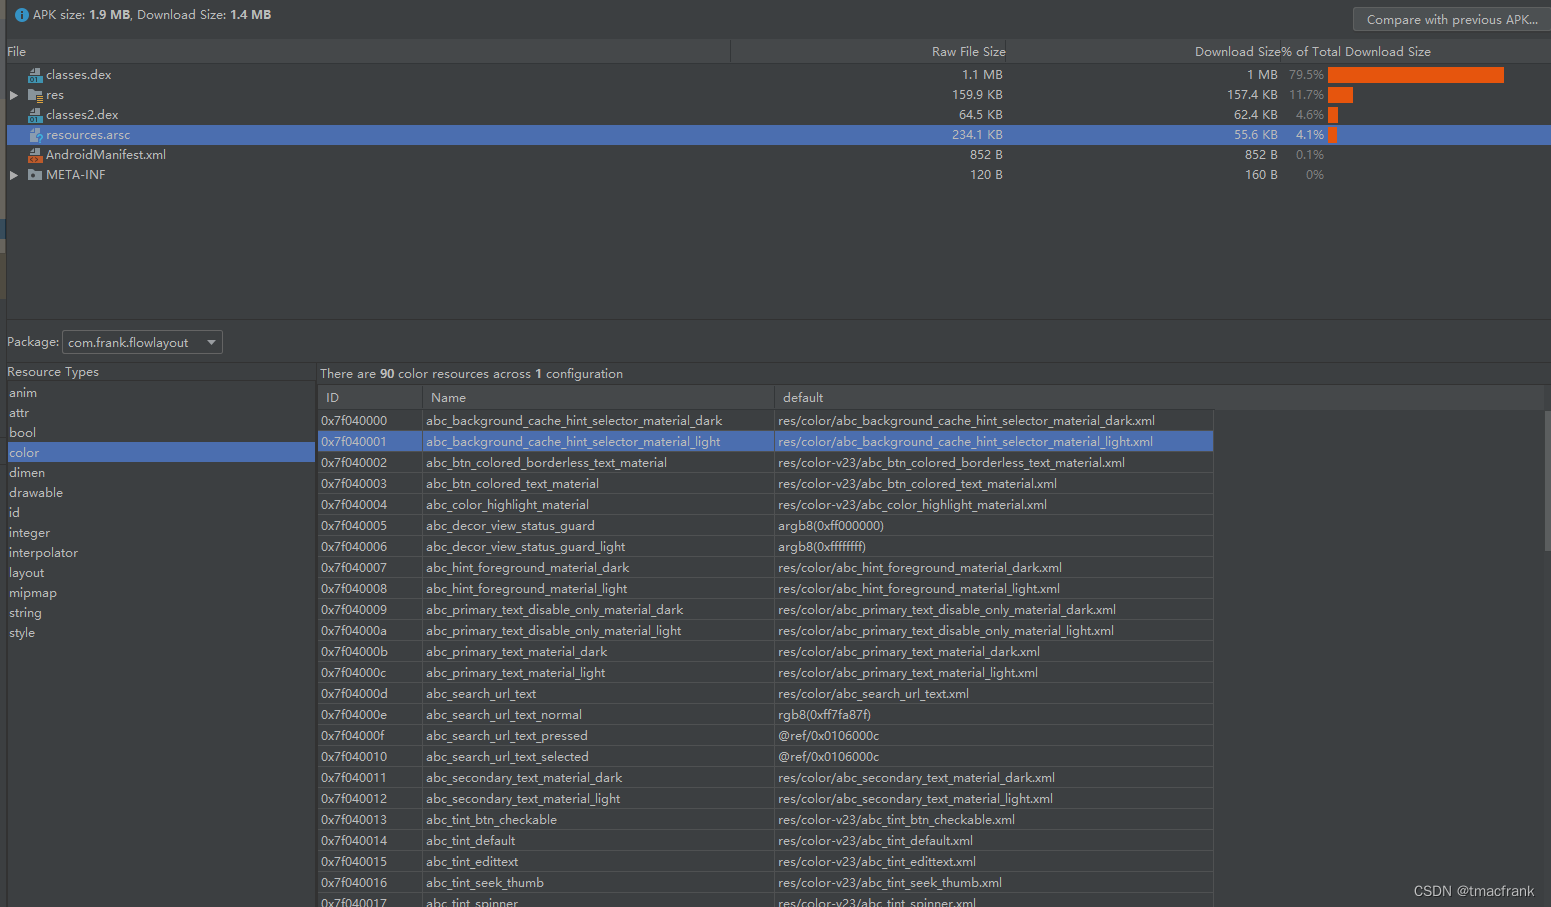
以颜色资源为例,可以看到资源 ID、名称和默认值。在换肤的时候使用相应皮肤的资源值去替换默认值即可。
3、换肤流程
回顾前面两节的内容:
- 布局原理与 xml 解析帮助我们了解 View 的创建过程以及我们如何接管这个过程,去自己创建 View,并在创建过程中记录所需信息
- 资源加载过程则让我们知道了,如何去加载其他 apk 中的资源
知晓以上两点就可以完成换肤功能了。在开始介绍功能实现之前,先了解一下皮肤包的相关内容。
皮肤包实际上是一个不包含逻辑代码和布局文件的 apk,仅包含换肤时所需的资源。比如说,宿主 app 布局文件中有一个 Button 指定了文字颜色:
    <Button
        android:layout_width="match_parent"
        android:layout_height="wrap_content"
        android:text="选择皮肤"
        android:textColor="@color/colorPrimary" />
在宿主 app 的 colors.xml 文件中会指定 colorPrimary 颜色的值。如果换肤时需要更换该 Button 的字体颜色,那么在皮肤包的 colors.xml 中,将 colorPrimary 这个颜色换成所需的颜色值即可,只需让资源的名字和类型与宿主 app 保持一致即可(不用包含布局文件),这样编译生成的 apk 其实就是皮肤包了。
皮肤包的本质是 apk 文件,但是其名字与后缀可以随意更改,比如一般会将皮肤包文件后缀改为 .skin。但无论怎样更改后缀名,在皮肤包文件中至少要包含 AndroidManifest.xml、resources.arsc、res 资源文件夹这三样,才满足换肤条件。原因是:
- 负责加载资源的 AssetManager 会通过 JNI 调用到 AssetManager.cpp,在其内部检测是否有 AndroidManifest.xml 文件,如果有就获取包名信息,如果没有就直接 return
- resources.arsc 是资源映射表,保存了所有类型资源的 ID,name,default 值等信息,AssetManager 加载资源时需要用到这个映射表
- res 文件夹下包含了皮肤包中所有资源的值,换肤时需要获取这些资源值
3.1 总体思路与步骤
由于宿主 app 与皮肤包资源的类型和名称是相同的,你就可以凭借该信息从皮肤包的资源映射表中,确定该资源在皮肤包中的 ID,进而拿到这个 ID 使用的资源值,再设置给对应的 View,这就是换肤的大致思路。
具体步骤,可以分为如下几步:
- 实现并注册 Application.ActivityLifecycleCallbacks 接口
- 实现 LayoutInflater.Factory2 接口,在创建 View 的过程中记录可以换肤的属性,并实现观察者 Observer 的 update()
- 接收用户操作,点击按钮换肤
- 调用被观察者 Observable 的 setChanged()、notifyObservers()
- 遍历两层(所有 View 控件以及每个 View 控件的所有属性),匹配可换肤属性
- 有皮肤包的属性加载皮肤包资源,否则加载原始内置资源,更改控件属性值
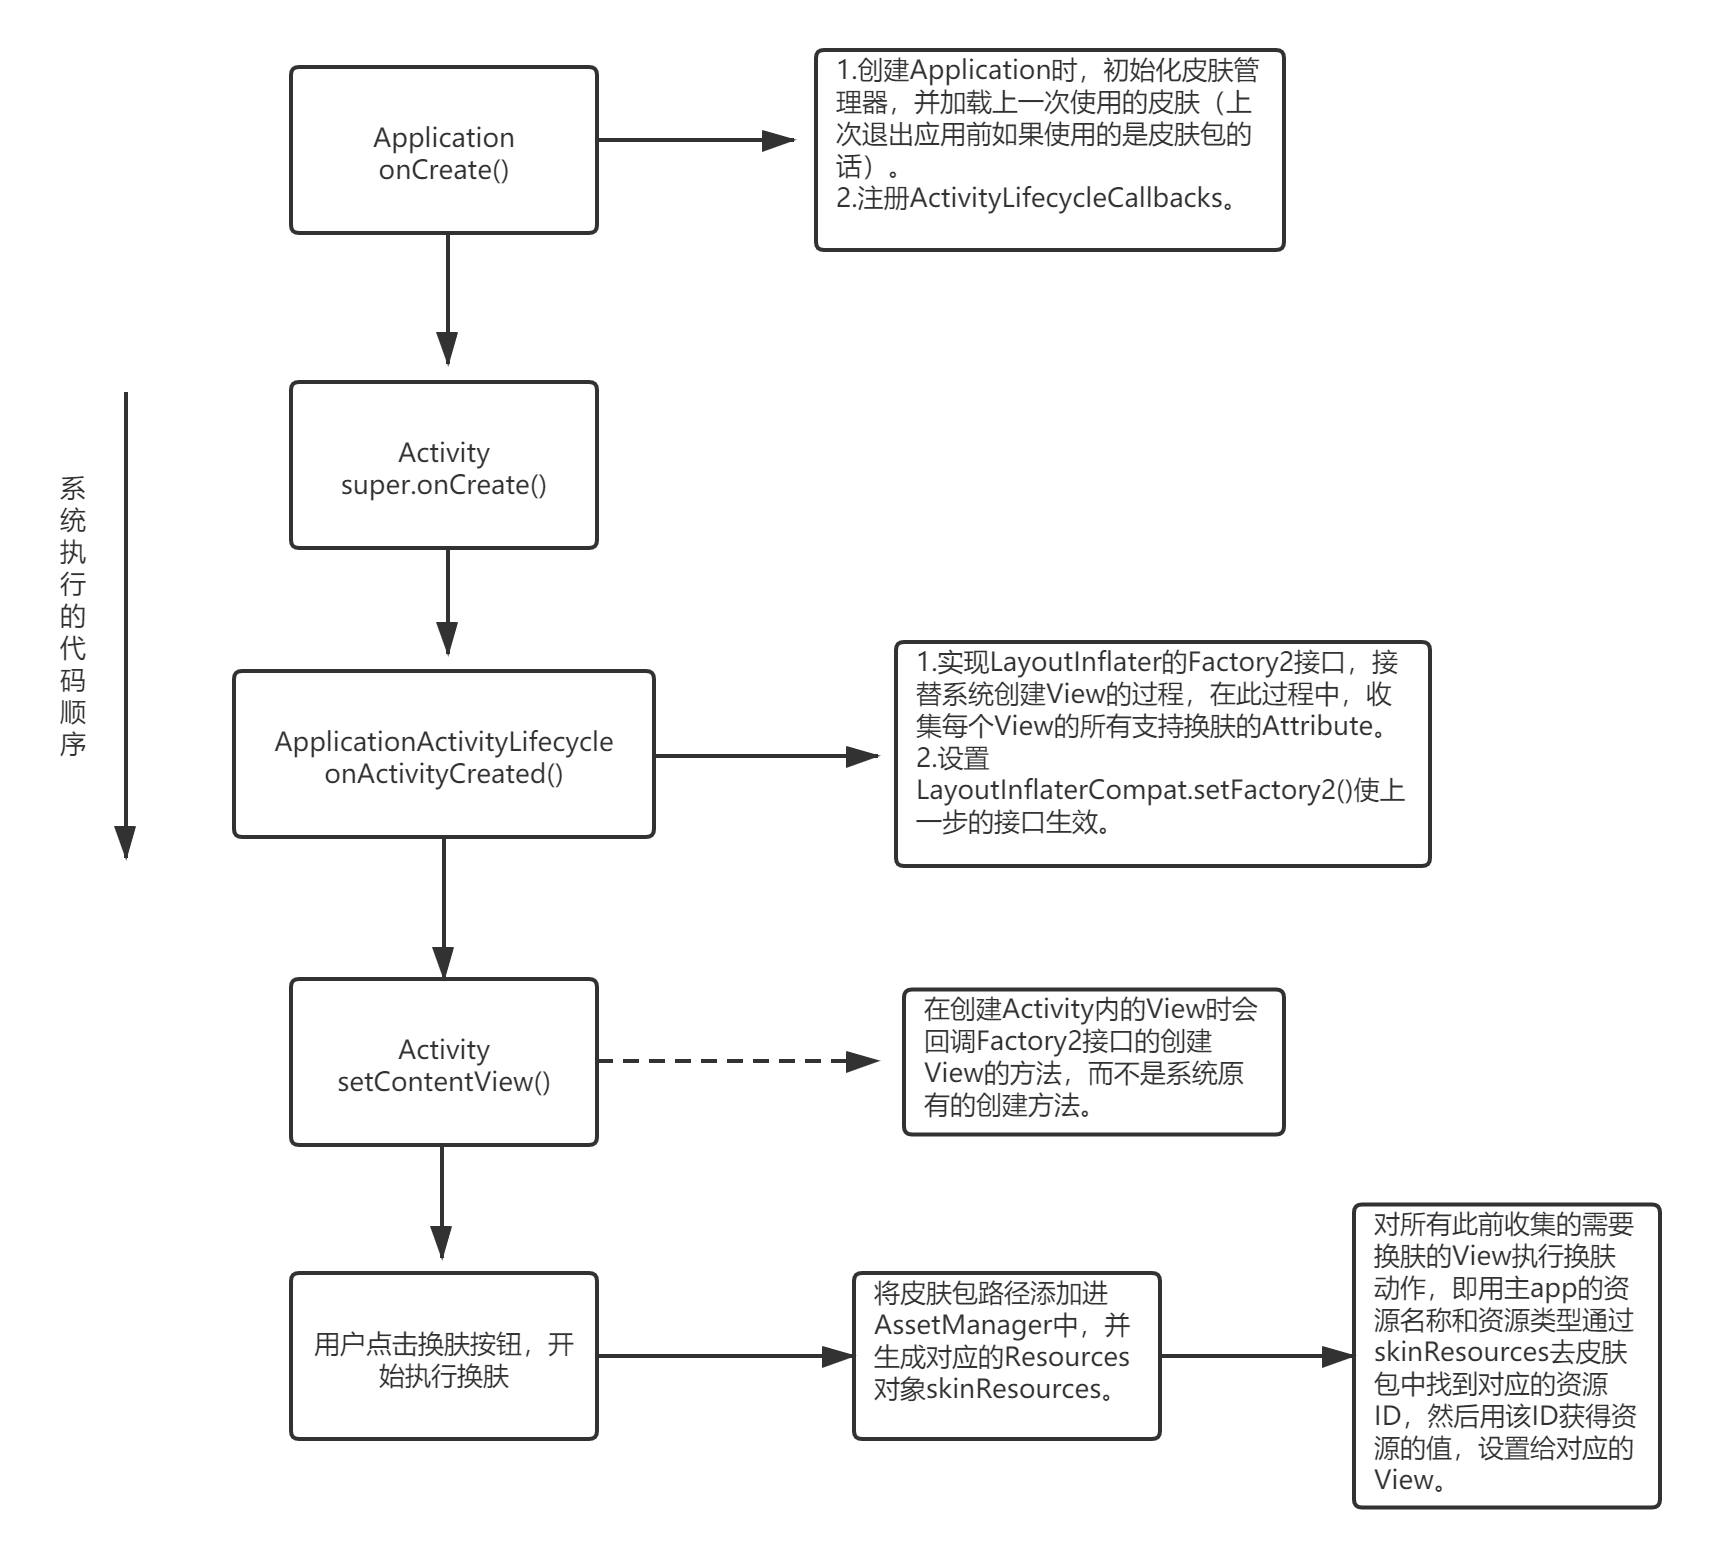
换肤流程图大致如下:
3.2 监听 Activity 生命周期
监听 Activity 的创建,给每个 Activity 的 LayoutInflater 都设置 Factory2 接口,以接管创建 View 的过程,在成功创建一个 View 之后,记录下 View 的所有属性,保存在 SkinAttribute 类中。
生命周期监听
实现 Application.ActivityLifecycleCallbacks 以监听所有 Activity 的创建:
class ActivityLifecycleObserver : Application.ActivityLifecycleCallbacks {

    companion object {
        private val TAG = this::class.simpleName
    }

    override fun onActivityCreated(activity: Activity, savedInstanceState: Bundle?) {
        Log.d(TAG, "onActivityCreated: ${activity.componentName}")
        activity.layoutInflater.factory2 = SkinLayoutInflaterFactory()
    }
    ...
}
注册 ActivityLifecycleObserver 的工作放在 SkinManager 中:
object SkinManager {
    fun init(application: Application) {
        val activityLifecycleObserver = ActivityLifecycleObserver()
        application.registerActivityLifecycleCallbacks(activityLifecycleObserver)
    }
}
在宿主 app 的 Application 中初始化 SkinManager:
class MyApplication : Application() {

    override fun onCreate() {
        super.onCreate()
        SkinManager.init(this)
    }
}
使用生命周期
在创建 Activity 时就要设置其 LayoutInflater 的 Factory,由 SkinLayoutInflaterFactory 来完成 View 的创建:
class SkinLayoutInflaterFactory : LayoutInflater.Factory2 {
    companion object {
        private val TAG = this::class.simpleName
        private val sConstructorMap: SimpleArrayMap<String, Constructor<out View>> = SimpleArrayMap()
        private val sConstructorSignature = arrayOf(Context::class.java, AttributeSet::class.java)
        private val sClassPrefixList = arrayOf("android.widget.", "android.view.", "android.app.", "android.webkit.")
    }

    override fun onCreateView(parent: View?, name: String, context: Context, attrs: AttributeSet): View? {
        // 1.创建 View 实例
        var view = createSDKView(name, context, attrs)
        if (view == null) {
            view = createView(name, context, attrs)
        }
        Log.d(TAG, "onCreateView: ${view?.javaClass?.name}")

        return view
    }

    override fun onCreateView(name: String, context: Context, attrs: AttributeSet): View? {
        return onCreateView(null, name, context, attrs)
    }

    /**
     * 当作 SDK 提供的 View 进行创建,如 ImageView、TextView 这些,传入的 name 都是没有包名的,
     * 需要用 sClassPrefixList 里面的包名前缀拼接出全类名,再通过反射创建 View
     */
    private fun createSDKView(name: String, context: Context, attrs: AttributeSet): View? {
        var view: View? = null

        if (!name.contains(".")) {
            for (prefix in sClassPrefixList) {
                view = createView("$prefix$name", context, attrs)
                if (view != null) {
                    break
                }
            }
        }
        return view
    }

    /**
     * 根据全类名 name 通过反射的方式创建 View 的实例
     */
    private fun createView(name: String, context: Context, attrs: AttributeSet): View? {
        return try {
            var constructor = sConstructorMap.get(name)
            // 缓存中没有找到对应 name 的 constructor 就反射获取
            if (constructor == null) {
                val clazz = Class.forName(name, false, context.classLoader).asSubclass(View::class.java)
                constructor = clazz.getDeclaredConstructor(*sConstructorSignature)
                constructor.isAccessible = true
                sConstructorMap.put(name, constructor)
            }
            constructor?.newInstance(context, attrs)
        } catch (exception: ClassNotFoundException) {
            null
        }
    }
}
运行程序,直接崩溃,log 显示 MainActivity 的 LayoutInflater 已经被设置了 factory:
java.lang.RuntimeException: Unable to start activity ComponentInfo{com.frank.skin/com.frank.skin.MainActivity}:
java.lang.IllegalStateException: A factory has already been set on this LayoutInflater
原因是 LayoutInflater 只允许其内部的工厂被赋值一次,因此 setFactory2() 会先检查 mFactorySet 标记位:
	public void setFactory2(Factory2 factory) {
		// 检查不通过,抛出异常
        if (mFactorySet) {
            throw new IllegalStateException("A factory has already been set on this LayoutInflater");
        }
        if (factory == null) {
            throw new NullPointerException("Given factory can not be null");
        }
        mFactorySet = true;
        if (mFactory == null) {
            mFactory = mFactory2 = factory;
        } else {
            mFactory = mFactory2 = new FactoryMerger(factory, factory, mFactory, mFactory2);
        }
    }
由于我们继承的是 AppCompatActivity,在我们“动手”之前,AppCompatActivity 已经先设置了 Factory2:
AppCompatActivity.java:

    @Override
    protected void onCreate(@Nullable Bundle savedInstanceState) {
        final AppCompatDelegate delegate = getDelegate();
        delegate.installViewFactory();
        delegate.onCreate(savedInstanceState);
        super.onCreate(savedInstanceState);
    }

AppCompatDelegateImpl.java:

    @Override
    public void installViewFactory() {
        LayoutInflater layoutInflater = LayoutInflater.from(mContext);
        if (layoutInflater.getFactory() == null) {
            LayoutInflaterCompat.setFactory2(layoutInflater, this);
        } else {
            if (!(layoutInflater.getFactory2() instanceof AppCompatDelegateImpl)) {
                Log.i(TAG, "The Activity's LayoutInflater already has a Factory installed"
                        + " so we can not install AppCompat's");
            }
        }
    }
所以我们在 ActivityLifecycleObserver 的 onActivityCreated() 中还需要通过反射修改 mFactorySet 为 false 才能顺利地对 Factory2 赋值:
	override fun onActivityCreated(activity: Activity, savedInstanceState: Bundle?) {
        Log.d(TAG, "onActivityCreated: ${activity.componentName}")
        changeFactorySetFlag(activity.layoutInflater)
        activity.layoutInflater.factory2 = SkinLayoutInflaterFactory()
    }

    private fun changeFactorySetFlag(layoutInflater: LayoutInflater) {
        val classInflater = Class.forName("android.view.LayoutInflater")
        val fieldFactorySet = classInflater.getDeclaredField("mFactorySet")
        fieldFactorySet.isAccessible = true
        fieldFactorySet.set(layoutInflater, false)
    }
查看 log 确实创建了 MainActivity 布局文件中的控件:
20169-20169 Companion               com.frank.skin                       D  onActivityCreated: ComponentInfo{com.frank.skin/com.frank.skin.MainActivity}
20169-20169 Companion               com.frank.skin                       D  onCreateView: android.widget.LinearLayout
20169-20169 Companion               com.frank.skin                       D  onCreateView: android.widget.ImageView
20169-20169 Companion               com.frank.skin                       D  onCreateView: android.widget.Button
20169-20169 Companion               com.frank.skin                       D  onCreateView: com.frank.skin.widget.MyTabLayout
20169-20169 Companion               com.frank.skin                       D  onCreateView: androidx.viewpager.widget.ViewPager
...
3.3 创建 View 并收集其属性信息
接下来要完成 View 信息的收集工作,这个信息是指 View 中支持换肤的属性名以及使用的资源 id,我们用 SkinPair 表示这些信息:
data class SkinPair(private val name: String, private val id: Int)
此外还需要封装一个 SkinView 表示 View 及其所有支持换肤的属性:
class SkinView(private val view: View, private val skinPairs: List<SkinPair>)
我们在 View 被创建时就进行信息收集:
class SkinLayoutInflaterFactory : LayoutInflater.Factory2 {

	override fun onCreateView(parent: View?, name: String, context: Context, attrs: AttributeSet): View? {
        // 1.创建 View 实例
        var view = createSDKView(name, context, attrs)
        if (view == null) {
            view = createView(name, context, attrs)
        }
        Log.d(TAG, "onCreateView: ${view?.javaClass?.name}")

        // 2.收集 View 的信息
        view?.let { mSkinAttribute.look(view, attrs) }

        return view
    }
}
在 SkinAttribute 中执行属性信息收集:
class SkinAttribute {

    companion object {
        private val TAG = this::class.simpleName

        /**
         * 支持换肤的属性名称的集合
         */
        private val sSupportAttributes = mutableListOf<String>()

        /**
         * SkinView 的集合,SkinView 封装着 View 及其属性中可以被换肤的属性列表
         */
        private val sSkinViews = mutableListOf<SkinView>()

        init {
            sSupportAttributes.add("background")
            sSupportAttributes.add("src")
            sSupportAttributes.add("textColor")
            sSupportAttributes.add("drawableLeft")
            sSupportAttributes.add("drawableTop")
            sSupportAttributes.add("drawableRight")
            sSupportAttributes.add("drawableBottom")
        }
    }

    /**
     * 找到 View 中支持换肤的属性,将 View 与这些属性封装到 SkinView 中,并保存到 sSkinViews。
     * 注意处理属性值时有多种情况,可能是写成 @style/xxx、?attr/xxx 或者直接写成颜色值,如 #F00。
     * 对应的 attributeValue 返回的结果值形式为 @2131165331、?2130903223 等
     */
    fun look(view: View, attrs: AttributeSet) {
        // 从 view 的属性中找出所有支持换肤的属性及其 id 存入 skinPairs 中
        val skinPairs = mutableListOf<SkinPair>()
        Log.d(TAG, "Analyzing view: $view")
        for (i in 0 until attrs.attributeCount) {
            val attributeName = attrs.getAttributeName(i)
            if (!sSupportAttributes.contains(attributeName)) {
                continue
            }

            val attributeValue = attrs.getAttributeValue(i)
            val resId = if (attributeValue.startsWith("#")) {
                // 被写死的颜色值不能换肤,直接跳过
                continue
            } else if (attributeValue.startsWith("@")) {
                // 以 @ 开头的属性值,截取资源 id
                attributeValue.substring(1).toInt()
            } else {
                // 以 ? 开头的属性值,attributeValue 表示的是属性资源的值,
                // 需要借助 TypedArray 从属性资源值中再去获取属性使用的资源 id
                val attrId = attributeValue.substring(1).toInt()
                SkinThemeUtils.getResId(view.context, intArrayOf(attrId))[0]
            }

            Log.d(TAG, "Attribute: $attributeName, id: $resId")
            skinPairs.add(SkinPair(attributeName, resId))
        }

        // 若 skinPairs 有可以换肤的属性,则将 view 与 skinPairs 封装到 SkinView 并保存
        if (skinPairs.isNotEmpty()) {
            val skinView = SkinView(view, skinPairs)
            sSkinViews.add(skinView)
        }
    }
}
3.4 执行换肤
创建资源对象
为了不影响系统,我们单独创建一个可以加载皮肤包资源的 Resources 对象,并且为了让使用时无需区分宿主 Resources 和皮肤包 Resources,我们可以创建一个 SkinResources,在内部确定使用哪个 Resources 对象,并提供资源值:
object SkinResources {

    private val TAG = this::class.simpleName

    /**
     * 宿主 app 的资源对象
     */
    private lateinit var mAppResource: Resources

    /**
     * 皮肤包资源对象
     */
    private var mSkinResource: Resources? = null

    /**
     * 皮肤包包名
     */
    private lateinit var mSkinPkgName: String

    /**
     * 是否是默认皮肤
     */
    private var mIsDefaultSkin = true

    fun init(context: Context) {
        mAppResource = context.resources
    }

    fun applySkin(resources: Resources, packageName: String) {
        mSkinPkgName = packageName
        mSkinResource = resources
        mIsDefaultSkin = TextUtils.isEmpty(mSkinPkgName) || mSkinResource == null
    }

    fun resetSkin() {
        mSkinPkgName = ""
        mSkinResource = null
        mIsDefaultSkin = true
    }

    /**
     * @param resId 默认皮肤的资源 id,如果使用的不是默认皮肤,就要找到
     * resId 在皮肤包中相同资源的 id 并返回
     * @return 返回 0 表示没有找到相关 id
     */
    private fun getIdentifier(resId: Int): Int {
        if (mIsDefaultSkin) {
            return resId
        }

		/*
        对于 android:background="@color/colorPrimary" 来说,方法获取的信息如下:
        1.getResourceName() 拿到 com.frank.skin:color/colorPrimary
        2.getResourceEntryName() 拿到 colorPrimary
        3.getResourceTypeName() 拿到 color
         */
        val resourceName = mAppResource.getResourceEntryName(resId)
        val resourceTypeName = mAppResource.getResourceTypeName(resId)
        Log.d(TAG, "resourceName: $resourceName, resourceTypeName: $resourceTypeName")
        return mSkinResource?.getIdentifier(resourceName, resourceTypeName, mSkinPkgName) ?: 0
    }

    private fun getColor(resId: Int, context: Context): Int? {
        // 默认皮肤就用获取宿主资源
        if (mIsDefaultSkin) {
            return mAppResource.getColor(resId, context.theme)
        }
        // 如果换肤了,就要找到 resId 在皮肤包中对应的资源 id
        val skinId = getIdentifier(resId)
        return if (skinId == 0) {
            // 皮肤包 id 获取失败了,那就返回原皮资源
            mAppResource.getColor(resId, context.theme)
        } else {
            // 皮肤包 id 获取成功,获取皮肤包资源
            mSkinResource?.getColor(skinId, context.theme)
        }
    }

    fun getDrawable(resId: Int, context: Context): Drawable? {
        if (mIsDefaultSkin) {
            return ResourcesCompat.getDrawable(mAppResource, resId, context.theme)
        }
        val skinId = getIdentifier(resId)
        return if (skinId == 0) {
            ResourcesCompat.getDrawable(mAppResource, resId, context.theme)
        } else {
            ResourcesCompat.getDrawable(mSkinResource ?: mAppResource, skinId, context.theme)
        }
    }

    fun getBackground(resId: Int, context: Context): Any? {
        // 背景可能是 Color 也可能是 Drawable,需要通过资源类型判断
        val typeName = mAppResource.getResourceTypeName(resId)

        return if ("color" == typeName) {
            getColor(resId, context)
        } else {
            getDrawable(resId, context)
        }
    }

    fun getColorStateList(resId: Int, context: Context): ColorStateList? {
        if (mIsDefaultSkin) {
            return mAppResource.getColorStateList(resId, context.theme)
        }
        val skinId = getIdentifier(resId)
        return if (skinId == 0) {
            mAppResource.getColorStateList(resId, context.theme)
        } else {
            mSkinResource?.getColorStateList(skinId, context.theme)
        }
    }
}
mSkinResource 会在执行换肤时被赋值,接下来就看换肤过程。
应用换肤
在 SkinManager 中启动换肤操作:
object SkinManager : Observable() {

    private lateinit var mApplication: Application
    fun init(application: Application) {
        mApplication = application
        val activityLifecycleObserver = ActivityLifecycleObserver(this)
        application.registerActivityLifecycleCallbacks(activityLifecycleObserver)

        SkinResources.init(mApplication)
    }

    /**
     * 加载皮肤并应用
     * @param skinPath 皮肤包路径,如果为空则使用默认皮肤
     */
    fun applySkin(skinPath: String?) {
        if (TextUtils.isEmpty(skinPath)) {
            SkinResources.resetSkin()
        } else {
            val skinResources = getSkinResources(skinPath)
            val skinPackageName = getSkinPackageName(skinPath)
            if (skinResources != null && skinPackageName != null) {
                SkinResources.applySkin(skinResources, skinPackageName)
            }
        }
        // 通知所有观察者,加载的皮肤发生了变化
        setChanged()
        notifyObservers(null)
    }

    /**
     * 获取一个将 skinPath 添加到 AssetManager 资源路径的 Resources 对象
     * @param skinPath 皮肤包文件路径
     */
    private fun getSkinResources(skinPath: String?): Resources? {
        if (skinPath == null || TextUtils.isEmpty(skinPath)) {
            return null
        }
        val assetManager = AssetManager::class.java.newInstance()
        val methodAddAssetPath = assetManager::class.java.getMethod("addAssetPath", String::class.java)
        methodAddAssetPath(assetManager, skinPath)

        val appResources = mApplication.resources
        return Resources(assetManager, appResources.displayMetrics, appResources.configuration)
    }

    /**
     * 获取 skinPath 文件的包名
     * @param skinPath 皮肤包文件路径
     */
    private fun getSkinPackageName(skinPath: String?): String? {
        if (skinPath == null || TextUtils.isEmpty(skinPath)) {
            return null
        }
        val packageManager = mApplication.packageManager
        val packageArchiveInfo = packageManager.getPackageArchiveInfo(skinPath, PackageManager.GET_ACTIVITIES)
        return packageArchiveInfo?.packageName
    }
}
在 applySkin() 中用 notifyObservers(null) 通知所有观察者执行换肤,这个观察者应该是每个 Activity 的 SkinLayoutInflaterFactory,因为所有能换肤的 View 及其属性都保存在其持有的 mSkinAttribute 中:
class SkinLayoutInflaterFactory : LayoutInflater.Factory2, Observer {
	override fun update(o: Observable?, arg: Any?) {
        mSkinAttribute.applySkin()
    }
}
SkinAttribute 控制 SkinView 进行换肤,其实就是更新属性值:
class SkinAttribute {
	fun applySkin() {
        sSkinViews.forEach {
            it.applySkin()
        }
    }
}

class SkinView(private val view: View, private val skinPairs: List<SkinPair>) {
    fun applySkin() {
        val context = view.context
        var left: Drawable? = null
        var top: Drawable? = null
        var right: Drawable? = null
        var bottom: Drawable? = null

        skinPairs.forEach {
            when (it.name) {
                "background" -> {
                    val background = SkinResources.getBackground(it.id, context)
                    if (background is Int) {
                        view.setBackgroundColor(background)
                    } else if (background is Drawable) {
                        view.background = background
                    }
                }

                "src" -> {
                    if (view is ImageView) {
                        val background = SkinResources.getBackground(it.id, context)
                        if (background is Int) {
                            view.setImageDrawable(ColorDrawable(background))
                        } else {
                            view.setImageDrawable(background as Drawable)
                        }
                    }
                }

                "textColor" -> {
                    if (view is TextView) {
                        view.setTextColor(SkinResources.getColorStateList(it.id, context))
                    }
                }

                "drawableLeft" -> {
                    left = SkinResources.getDrawable(it.id, context)
                }

                "drawableTop" -> {
                    top = SkinResources.getDrawable(it.id, context)
                }

                "drawableRight" -> {
                    right = SkinResources.getDrawable(it.id, context)
                }

                "drawableBottom" -> {
                    bottom = SkinResources.getDrawable(it.id, context)
                }
            }
            if (null != left || null != top || null != right || null != bottom) {
                (view as TextView).setCompoundDrawablesWithIntrinsicBounds(left, top, right, bottom)
            }
        }
    }
}
3.5 功能补全与优化
重启应用仍能加载退出前使用的皮肤
现在虽然能换肤,但是退出应用后重新进入,又会回到原皮。因此需要用 SharedPreferences 保存已经加载的皮肤信息,并在初始化时就加载皮肤:
object SkinPreference {

    private const val SKIN_SHARED = "skins"
    private const val KEY_SKIN_PATH = "skin-path"

    private lateinit var mPreferences: SharedPreferences

    fun init(context: Context) {
        mPreferences = context.getSharedPreferences(SKIN_SHARED, Context.MODE_PRIVATE)
    }

    fun setSkin(skinPath: String) {
        mPreferences.edit().putString(KEY_SKIN_PATH, skinPath).apply()
    }

    fun getSkin(): String? {
        return mPreferences.getString(KEY_SKIN_PATH, null)
    }

    fun reset() {
        mPreferences.edit().remove(KEY_SKIN_PATH).apply()
    }
}
SkinManager 初始化和操作 SkinPreference:
	fun init(application: Application) {
        ...
        SkinPreference.init(mApplication)
        // 加载上次使用保存的皮肤
        applySkin(SkinPreference.getSkin())
    }

	fun applySkin(skinPath: String?) {
        if (TextUtils.isEmpty(skinPath)) {
            SkinResources.resetSkin()
            SkinPreference.reset()
        } else {
            val skinResources = getSkinResources(skinPath)
            val skinPackageName = getSkinPackageName(skinPath)
            if (skinResources != null && skinPackageName != null) {
                SkinResources.applySkin(skinResources, skinPackageName)
            }
            // 保存加载的皮肤路径
            skinPath?.let { SkinPreference.setSkin(skinPath) }
        }
        setChanged()
        notifyObservers(null)
    }
以上是针对冷启动的皮肤加载方案,热启动时由于不会在走 Application 的 onCreate(),因此不会对 SkinManager 初始化,也就不会走从 SkinPreference 加载皮肤的逻辑。为了避免热启动时只加载默认皮肤,需要在创建皮肤时就执行一次皮肤加载:
	fun look(view: View, attrs: AttributeSet) {
        ...

        // 若 skinPairs 有可以换肤的属性,则将 view 与 skinPairs 封装到 SkinView 并保存
        if (skinPairs.isNotEmpty()) {
            val skinView = SkinView(view, skinPairs)
            // 执行一次皮肤加载
            skinView.applySkin()
            sSkinViews.add(skinView)
        }
    }
状态栏与导航栏换肤
首先创建一个更新 StatusBar 和 NavigationBar 的方法:
object SkinThemeUtils {

    private val TAG = SkinThemeUtils::class.simpleName

    private val ATTRS_COLOR_PRIMARY_DARK = intArrayOf(android.R.attr.colorPrimaryDark)
    private val ATTRS_STATUS_BAR_COLOR = intArrayOf(android.R.attr.statusBarColor, android.R.attr.navigationBarColor)

	fun updateStatusAndNavigationBarColor(activity: Activity) {
        // 5.0 以上才能修改
        if (Build.VERSION.SDK_INT < Build.VERSION_CODES.LOLLIPOP) {
            return
        }

        // 获取 statusBarColor 与 navigationBarColor
        val resIds = getResId(activity, ATTRS_STATUS_BAR_COLOR)
        val statusBarColorResId = resIds[0]
        val navigationBarColorId = resIds[1]

        // 当与 colorPrimaryDark 不同时,以 statusBarColor 为准
        if (statusBarColorResId != 0) {
            val color: Int = SkinResources.getColor(statusBarColorResId, activity)
            activity.window.statusBarColor = color
        } else {
            // 获取 colorPrimaryDark
            val colorPrimaryDarkResId = getResId(activity, ATTRS_COLOR_PRIMARY_DARK)[0]
            if (colorPrimaryDarkResId != 0) {
                val color: Int = SkinResources.getColor(colorPrimaryDarkResId, activity)
                activity.window.statusBarColor = color
            }
        }
        if (navigationBarColorId != 0) {
            val color: Int = SkinResources.getColor(navigationBarColorId, activity)
            activity.window.navigationBarColor = color
        }
    }
}
然后在执行换肤请求时调用它:
class SkinLayoutInflaterFactory(private val activity: Activity) : LayoutInflater.Factory2, Observer {
	override fun update(o: Observable?, arg: Any?) {
        mSkinAttribute.applySkin()
        // 更新状态栏和导航栏
        SkinThemeUtils.updateStatusAndNavigationBarColor(activity)
    }
}
此外在创建一个 Activity 的 View 时也应该调用它们:
	override fun onActivityCreated(activity: Activity, savedInstanceState: Bundle?) {
        SkinThemeUtils.updateStatusAndNavigationBarColor(activity)
        ...
	}
自定义 View 的换肤
我们的布局中有一个 MyTabLayout 是一个自定义 View,目前它还没有实现换肤。我们定义一个接口,让需要换肤的自定义 View 实现该接口:
interface ISkinView {

    fun applySkin()
}

class MyTabLayout(private val context: Context, attributeSet: AttributeSet?, defStyleAttr: Int) :
    TabLayout(context, attributeSet, defStyleAttr), ISkinView {

    // 自定义 View 的换肤内容由其自己决定
	override fun applySkin() {
        if (mTabIndicatorColorResId != 0) {
            val color = SkinResources.getColor(mTabIndicatorColorResId, context)
            setSelectedTabIndicatorColor(color)
        }

        if (mTabTextColorResId != 0) {
            val color = SkinResources.getColorStateList(mTabTextColorResId, context)
            tabTextColors = color
        }
    }
}
在收集 View 的信息时,将实现了 ISkinView 的自定义 View 也加入到集合中:
	fun look(view: View, attrs: AttributeSet) {
        // 从 view 的属性中找出所有支持换肤的属性及其 id 存入 skinPairs 中
        ...

        // 将 ISkinView 也加入 sSkinViews
        if (skinPairs.isNotEmpty() || view is ISkinView) {
            val skinView = SkinView(view, skinPairs)
            skinView.applySkin()
            sSkinViews.add(skinView)
        }
    }
然后在 SkinView 应用皮肤时增加自定义 View 的换肤逻辑:
class SkinView(private val view: View, private val skinPairs: List<SkinPair>) {
    fun applySkin() {
        // 自定义 View 换肤
        applyCustomViewSkin()
        ...
	}

	// 回调自定义 View 中实现的 applySkin()
	private fun applyCustomViewSkin() {
        if (view is ISkinView) {
            view.applySkin()
        }
    }
}
Demo 的完整代码可参考 GitHub。
这种换肤方式的弊端:
- 置换 setContentView(),容易不兼容
- 控件信息收集:临时集合 + 所有控件
- 换肤时,双层遍历 + 改变控件
4、另一种换肤方案
我们在 3.2 节的使用生命周期一节中提到,设置 LayoutInflater.Factory2 接口时抛了一个异常,原因是父类已经先设置了 mFactory2 并且它只能被赋值一次:
AppCompatActivity.java:

	@Override
    protected void onCreate(@Nullable Bundle savedInstanceState) {
        final AppCompatDelegate delegate = getDelegate();
        delegate.installViewFactory();
        delegate.onCreate(savedInstanceState);
        super.onCreate(savedInstanceState);
    }
由于上一种换肤方案是在 AppCompatActivity 的 onCreate() 之后设置 Factory2 接口的,因此还需要通过反射去修改 mFactorySet 标记位为 false 才能对 mFactory2 赋值。
那新的方案是,我在 AppCompatActivity 的 onCreate() 之前设置 mFactory2,这样我至少能省去反射修改 mFactorySet 标记位的步骤。那依照这个想法,再继续看看源码。
需要说明一下,在较新的 androidx.appcompat:appcompat 版本中,AppCompatActivity 设置 Factory2 的方式可能有所变化,比如在 1.4.1 版本中:
	public AppCompatActivity() {
        super();
        initDelegate();
    }

    private void initDelegate() {
        ...
        addOnContextAvailableListener(new OnContextAvailableListener() {
            @Override
            public void onContextAvailable(@NonNull Context context) {
                final AppCompatDelegate delegate = getDelegate();
                delegate.installViewFactory();
                delegate.onCreate(getSavedStateRegistry()
                        .consumeRestoredStateForKey(DELEGATE_TAG));
            }
        });
    }
但是对于我们的实现方案是无影响的。
4.1 源码分析
AppCompatDelegateImpl 实现了 LayoutInflater.Factory2 接口,因此 installViewFactory() 中它将自己赋值给 mFactory2:
    @Override
    public void installViewFactory() {
        LayoutInflater layoutInflater = LayoutInflater.from(mContext);
        if (layoutInflater.getFactory() == null) {
            // this 指代当前的 AppCompatDelegateImpl 对象,该类实现了 Factory2 接口,
            // setFactory2() 让 this 作为 layoutInflater 的 Factory2 接口实例
            LayoutInflaterCompat.setFactory2(layoutInflater, this);
        } else {
            if (!(layoutInflater.getFactory2() instanceof AppCompatDelegateImpl)) {
                Log.i(TAG, "The Activity's LayoutInflater already has a Factory installed"
                        + " so we can not install AppCompat's");
            }
        }
    }
AppCompatDelegateImpl 创建 View 的方式:
	private AppCompatViewInflater mAppCompatViewInflater;

	@Override
    public final View onCreateView(View parent, String name, Context context, AttributeSet attrs) {
        return createView(parent, name, context, attrs);
    }

    @Override
    public View createView(View parent, final String name, @NonNull Context context,
            @NonNull AttributeSet attrs) {
        if (mAppCompatViewInflater == null) {
            TypedArray a = mContext.obtainStyledAttributes(R.styleable.AppCompatTheme);
            String viewInflaterClassName =
                    a.getString(R.styleable.AppCompatTheme_viewInflaterClass);
            // 1.先拿到 AppCompatViewInflater 对象
            if (viewInflaterClassName == null) {
                mAppCompatViewInflater = new AppCompatViewInflater();
            } else {
                try {
                    Class<?> viewInflaterClass = Class.forName(viewInflaterClassName);
                    mAppCompatViewInflater =
                            (AppCompatViewInflater) viewInflaterClass.getDeclaredConstructor()
                                    .newInstance();
                } catch (Throwable t) {
                    mAppCompatViewInflater = new AppCompatViewInflater();
                }
            }
        }
        ...

        // 2.创建 View 的工作交给 AppCompatViewInflater 的 createView()
        return mAppCompatViewInflater.createView(parent, name, context, attrs, inheritContext,
                IS_PRE_LOLLIPOP, /* Only read android:theme pre-L (L+ handles this anyway) */
                true, /* Read read app:theme as a fallback at all times for legacy reasons */
                VectorEnabledTintResources.shouldBeUsed() /* Only tint wrap the context if enabled */
        );
    }
AppCompatViewInflater 的 createView() 创建具体的控件对象:
    final View createView(View parent, final String name, @NonNull Context context,
            @NonNull AttributeSet attrs, boolean inheritContext,
            boolean readAndroidTheme, boolean readAppTheme, boolean wrapContext) {
        ...

        View view = null;

        // 1.创建 View 时使用兼容模式的 View 来代替标准的 Framework 版本的 View
        // 例如创建 TextView 时,createTextView() 返回的是一个 AppCompatTextView
        switch (name) {
            case "TextView":
                view = createTextView(context, attrs);
                verifyNotNull(view, name);
                break;
            case "ImageView":
                view = createImageView(context, attrs);
                verifyNotNull(view, name);
                break;
            case "Button":
                view = createButton(context, attrs);
                verifyNotNull(view, name);
                break;
            // EditText、Spinner、ImageButton、CheckBox、RadioButton、CheckedTextView、
            // AutoCompleteTextView、MultiAutoCompleteTextView、RatingBar、SeekBar 类似...
            case "ToggleButton":
                view = createToggleButton(context, attrs);
                verifyNotNull(view, name);
                break;
            default:
                // 默认返回 null,需要让子类重写这个方法实现其他控件的创建
                view = createView(context, name, attrs);
        }

        if (view == null && originalContext != context) {
            // 如果 name 没落到 switch 中,则通过解析 xml 布局创建 View 对象
            view = createViewFromTag(context, name, attrs);
        }

        if (view != null) {
            // If we have created a view, check its android:onClick
            checkOnClickListener(view, attrs);
        }

        return view;
    }
createView() 创建 View 的方式与之前看过的 LayoutInflater 使用的方式类似,都是使用类名进行反射,拿到类的构造方法对象后通过 newInstance() 创建:
    private View createViewFromTag(Context context, String name, AttributeSet attrs) {
        if (name.equals("view")) {
            name = attrs.getAttributeValue(null, "class");
        }

        try {
            mConstructorArgs[0] = context;
            mConstructorArgs[1] = attrs;

            if (-1 == name.indexOf('.')) {
                for (int i = 0; i < sClassPrefixList.length; i++) {
                    final View view = createViewByPrefix(context, name, sClassPrefixList[i]);
                    if (view != null) {
                        return view;
                    }
                }
                return null;
            } else {
                return createViewByPrefix(context, name, null);
            }
        } catch (Exception e) {
            return null;
        } finally {
            // Don't retain references on context.
            mConstructorArgs[0] = null;
            mConstructorArgs[1] = null;
        }
    }

    private View createViewByPrefix(Context context, String name, String prefix)
            throws ClassNotFoundException, InflateException {
        Constructor<? extends View> constructor = sConstructorMap.get(name);

        try {
            if (constructor == null) {
                // Class not found in the cache, see if it's real, and try to add it
                Class<? extends View> clazz = Class.forName(
                        prefix != null ? (prefix + name) : name,
                        false,
                        context.getClassLoader()).asSubclass(View.class);

                constructor = clazz.getConstructor(sConstructorSignature);
                sConstructorMap.put(name, constructor);
            }
            constructor.setAccessible(true);
            return constructor.newInstance(mConstructorArgs);
        } catch (Exception e) {
            return null;
        }
    }
实际上,创建 View 的工作是 AppCompatViewInflater 完成的,我们可以创建它的一个子类,添加换肤所需的逻辑。
此外,还有一个很重要的事实,就是 AppCompatActivity 实际上也是 Factory2 的实现类。因为 AppCompatActivity 继承自 Activity,而后者直接实现了 Factory2:
public class Activity extends ContextThemeWrapper
        implements LayoutInflater.Factory2...
这种换肤方案的核心思想也还是要接管系统创建 View 的过程,但是实现方式与第一个方案不同。源码中很明显给我们留出了 AppCompatViewInflater 的 createView() 供子类实现创建 View。我们就顺着这个思路,构造 AppCompatViewInflater 的子类,并在 createView() 中创建所有 View。这样就不能让 switch 语句落到 default 以外的条件中,所以传入的 View 的类型名就不能是 TextView、ImageView 这种,而是需要自定义它们的子类,如 SkinnableTextView extends AppCompatTextView。
看到这里,大致思路也就出来了:
- 创建一个换肤的基类 SkinActivity,在 onCreate() 调用 super.onCreate() 之前将自己设置给 Factory2,实现 Factory2 的 onCreateView() 时,使用自定义的 AppCompatViewInflater 的子类执行 View 的创建
- 需要换肤的 Activity 继承 SkinActivity,在换肤时还是先加载皮肤包资源(这一点与第一种换肤方案类似),然后从 Activity 的 DecorView 开始,按照视图层级递归向下执行每个 View 的换肤
4.2 具体过程
首先是 SkinActivity,作为 LayoutInflater.Factory2 接口的实现类,将自己设置给 mFactory2:
open class SkinActivity : AppCompatActivity() {

    companion object {
        /**
         * 记录存活的 Activity,换肤时需要让所有 Activity 更新 View
         */
        private val observers = mutableListOf<Activity>()
    }

    private var mSkinCompatViewInflater: SkinCompatViewInflater? = null

    /**
     * 是否开启换肤功能
     */
    private var loadSkinPackage = true

    override fun onCreate(savedInstanceState: Bundle?) {
        if (loadSkinPackage) {
            LayoutInflaterCompat.setFactory2(layoutInflater, this)
        }
        super.onCreate(savedInstanceState)
        observers.add(this)
    }

    override fun onCreateView(parent: View?, name: String, context: Context, attrs: AttributeSet): View? {
        // 开启换肤功能时由 SkinCompatViewInflater 创建 View
        if (loadSkinPackage) {
            if (mSkinCompatViewInflater == null) {
                mSkinCompatViewInflater = SkinCompatViewInflater(this)
            }
            return mSkinCompatViewInflater?.autoMatch(parent, name, context, attrs)
        }
        return super.onCreateView(parent, name, context, attrs)
    }
    ...
}
SkinCompatViewInflater 会创建具体的控件对象:
class SkinCompatViewInflater(private val context: Context) : AppCompatViewInflater() {

    /**
     * 匹配参数的类型,并创建对应的 View/ViewGroup 对象
     */
    fun autoMatch(parent: View?, name: String, context: Context, attrs: AttributeSet): View? {
        Log.d(TAG, "autoMatch: $name")
        var view: View? = null
        when (name) {
            "LinearLayout" -> {
                view = SkinnableLinearLayout(context, attrs)
                verifyNotNull(view, name)
            }

            "RelativeLayout" -> {
                view = SkinnableRelativeLayout(context, attrs)
                verifyNotNull(view, name)
            }

            "TextView" -> {
                view = SkinnableTextView(context, attrs)
                verifyNotNull(view, name)
            }

            "ImageView" -> {
                view = SkinnableImageView(context, attrs)
                verifyNotNull(view, name)
            }

            "Button" -> {
                view = SkinnableButton(context, attrs)
                verifyNotNull(view, name)
            }
        }
        return view
    }

    private fun verifyNotNull(view: View?, name: String) {
        if (view == null) {
            throw IllegalStateException("${this.javaClass.name} asked to inflate view for <$name>, but returned null")
        }
    }
}
创建 View 时,每种 SkinnableXXX 都是我们自定义的 AppCompatXXX 的子类,以 SkinnableImageView 为例:
class SkinnableImageView(context: Context, attributeSet: AttributeSet?, defStyleAttr: Int) :
    AppCompatImageView(context, attributeSet, defStyleAttr), ISkinView {
	// 构造函数省略...
    private val attrBean = AttrBean()

    init {
        val typedArray = context.obtainStyledAttributes(attributeSet, R.styleable.SkinnableImageView, defStyleAttr, 0)
        // 将属性和对应值先存起来
        attrBean.save(typedArray, R.styleable.SkinnableImageView)
        typedArray.recycle()
    }

    override fun applySkin() {
        var key: Int
        // 获取对应属性的值
        var resId: Int

        for (i in 0 until attrBean.getAttributeCount()) {
            // 获取自定义属性数组 SkinnableImageView 中的某个属性的键,如 SkinnableImageView_android_src
            key = R.styleable.SkinnableImageView[i]
            // 获取对应属性的值
            resId = attrBean.getViewResource(key)
            // 如果资源 id 不合法则跳过该属性,不做处理
            if (resId <= 0) continue

            when (key) {
                R.styleable.SkinnableImageView[R.styleable.SkinnableImageView_android_src] -> {
                    if (SkinManager.isDefaultSkin()) {
                        // 兼容包转换
                        val drawable = ContextCompat.getDrawable(context, resId)
                        setImageDrawable(drawable)
                    } else {
                        // 获取皮肤包资源
                        val background = SkinManager.getBackgroundOrSrc(resId)
                        if (background is Drawable) {
                            setImageDrawable(background)
                        } else if (background is Int) {
                            setImageResource(background)
                        }
                    }
                }

                R.styleable.SkinnableImageView[R.styleable.SkinnableImageView_android_background] -> {
                    val background = SkinManager.getBackgroundOrSrc(resId)
                    if (background is Drawable) {
                        setBackground(background)
                    } else if (background is Int) {
                        setBackgroundColor(background)
                    }
                }
            }
        }
    }
}
applySkin() 是 ISkinView 定义的接口方法,意在对每种控件实现换肤操作,方法内部会对在 attrs.xml 中定义的支持换肤的属性进行检查:
<?xml version="1.0" encoding="utf-8"?>
<resources>
    <declare-styleable name="SkinnableTextView">
        <attr name="android:background" />
        <attr name="android:textColor" />
        <!-- 字体属性 -->
        <attr name="custom_typeface" format="string" />
        <attr name="android:drawableLeft" />
    </declare-styleable>

    <declare-styleable name="SkinnableButton">
        <attr name="android:background" />
        <attr name="android:textColor" />
        <!-- 字体属性 -->
        <attr name="custom_typeface" />
    </declare-styleable>

    <declare-styleable name="SkinnableImageView">
        <attr name="android:src" />
        <attr name="android:background" />
    </declare-styleable>

    <declare-styleable name="SkinnableLinearLayout">
        <attr name="android:background" />
    </declare-styleable>

    <declare-styleable name="SkinnableRelativeLayout">
        <attr name="android:background" />
    </declare-styleable>
</resources>
初始化 SkinnableImageView 时,先在构造方法中获取到这个 View 支持的换肤属性,并将属性与对应值保存在 attrsBean 中。换肤调用 skinnableView() 时,从 attrsBean 中取出属性 ID 进而拿到资源值,最后设置给对应的属性。
具体来说,每个自定义 View 支持换肤的属性定义在 attrs.xml 中:在 AttrsBean 中,用 SparseIntArray 保存属性及其资源 ID 值:
class AttrBean {

    companion object {
        private const val DEFAULT_VALUE = -1
    }

    /**
     * 以 R.styleable.xxx 数组的地址为 key,ResourceId 为 value
     */
    private val resourceMap = SparseIntArray()

    /**
     * @param typedArray 控件属性类型集合,如:background、textColor
     * @param styleable  自定义属性,即 value/attrs.xml 中定义的 declared-styleable
     *                   中每个 attrs 的地址的数组
     */
    fun save(typedArray: TypedArray, styleable: IntArray?) {
        if (styleable == null) return
        for (i in styleable.indices) {
            val key = styleable[i]
            val resourceId = typedArray.getResourceId(i, DEFAULT_VALUE)
            resourceMap.put(key, resourceId)
        }
    }

    fun getViewResource(key: Int): Int {
        return resourceMap[key]
    }

    fun getAttributeCount() = resourceMap.size()
}
换肤时需要通过资源 ID 获取对应的资源,这些工作由 SkinManager 完成,与第一种换肤方案几乎一致,因此只贴部分代码了:
object SkinManager {
    fun loadSkin(skinPath: String?) {
        if (TextUtils.isEmpty(skinPath)) {
            mIsDefaultSkin = true
            PreferenceUtils.reset()
            return
        }

        try {
            // 1.反射将皮肤包路径添加到 AssetManager 中
            val assetManager = AssetManager::class.java.newInstance()
            val methodAddAssetPath = AssetManager::class.java.getMethod(METHOD_ADD_ASSET_PATH, String::class.java)
            methodAddAssetPath.invoke(assetManager, skinPath)

            // 2.创建皮肤包资源对象并判断是否是加载成功了
            mAppResources = mApplication.resources
            mSkinResources = Resources(assetManager, mAppResources.displayMetrics, mAppResources.configuration)
            val packageInfo =
                mApplication.packageManager.getPackageArchiveInfo(skinPath as String, PackageManager.GET_ACTIVITIES)
            packageInfo?.let {
                mSkinPackageName = packageInfo.packageName
                mIsDefaultSkin = false
                Log.d(TAG, "mSkinPackageName: $mSkinPackageName")
                PreferenceUtils.setSkin(skinPath)
            }
        } catch (e: Exception) {
            e.printStackTrace()
            // 发生异常有可能是第 1 步造成的,意味着 mSkinResources 一定是构造失败了
            mIsDefaultSkin = true
        }
    }

    /**
     * 如果加载了皮肤包并且能拿到皮肤包中的资源 ID,就返回皮肤包中的资源,否则就返回主 app 的资源
     * @param resId 主 app 中的资源 ID
     */
    fun getResourceId(resId: Int): Int {
        if (mIsDefaultSkin) {
            return resId
        }
        val resourceEntryName = mAppResources.getResourceEntryName(resId)
        val resourceTypeName = mAppResources.getResourceTypeName(resId)
        val id = mSkinResources?.getIdentifier(resourceEntryName, resourceTypeName, mSkinPackageName)
        Log.d(TAG, "resourceEntryName: $resourceEntryName, resourceTypeName: $resourceTypeName, id :$id")
        return if (id == null || id == 0) resId else id
    }

    fun getColorState(resId: Int, context: Context): ColorStateList? {
        if (mIsDefaultSkin) {
            return ContextCompat.getColorStateList(context, resId)
        }
        val id = getResourceId(resId)
        return if (id != 0) {
            mSkinResources?.getColorStateList(id)
        } else {
            ContextCompat.getColorStateList(context, resId)
        }
    }
}
最后点击按钮执行换肤时,会调用 SkinActivity 的 changeSkin(),由 DecorView 开始递归换肤:
open class SkinActivity : AppCompatActivity() {

	protected fun changeSkin(skinPath: String?, themeColorId: Int) {
        SkinManager.loadSkin(skinPath)

        observers.forEach {
            applyViews(it.window.decorView)

            // 更改 ActionBar、StatusBar、NavigationBar 的颜色
            if (themeColorId != 0) {
                ActionBarUtils.forActionBar(it, themeColorId)
                NavigationBarUtils.forNavigationBar(it, themeColorId)
                StatusBarUtils.forStatusBar(it, themeColorId)
            }
        }
    }

    private fun applyViews(view: View) {
        // 支持换肤的 View 都需要实现 ISkinView 接口
        if (view is ISkinView) {
            view.applySkin()
        }

        if (view is ViewGroup) {
            for (i in 0 until view.childCount) {
                applyViews(view.getChildAt(i))
            }
        }
    }
}
以上是第二种换肤方案的主要代码,完整代码可参考GitHub。


 122
122

 被折叠的 条评论
为什么被折叠?
被折叠的 条评论
为什么被折叠?
 到【灌水乐园】发言


