


1、如何绘制文字居中
1.1 纵向居中——计算基准线
调用 Canvas.drawText() 可以在给定的 x、y 坐标使用给定的 Paint 对象绘制出给定的文字。其中 x 就是文字在 x 轴的起始坐标,而 y 则是文字基准线 baseline 的 y 轴坐标。
Android 的 Paint 提供了内部类 FontMetrics 用于描述文字高度范畴内的各种线的位置:
	/**
     * Class that describes the various metrics for a font at a given text size.
     * Remember, Y values increase going down, so those values will be positive,
     * and values that measure distances going up will be negative. This class
     * is returned by getFontMetrics().
     */
	public static class FontMetrics {
        /**
         * The maximum distance above the baseline for the tallest glyph in
         * the font at a given text size.
         */
        public float   top;
        /**
         * The recommended distance above the baseline for singled spaced text.
         */
        public float   ascent;
        /**
         * The recommended distance below the baseline for singled spaced text.
         */
        public float   descent;
        /**
         * The maximum distance below the baseline for the lowest glyph in
         * the font at a given text size.
         */
        public float   bottom;
        /**
         * The recommended additional space to add between lines of text.
         */
        public float   leading;
    }
可以从注释中提取出下图信息:
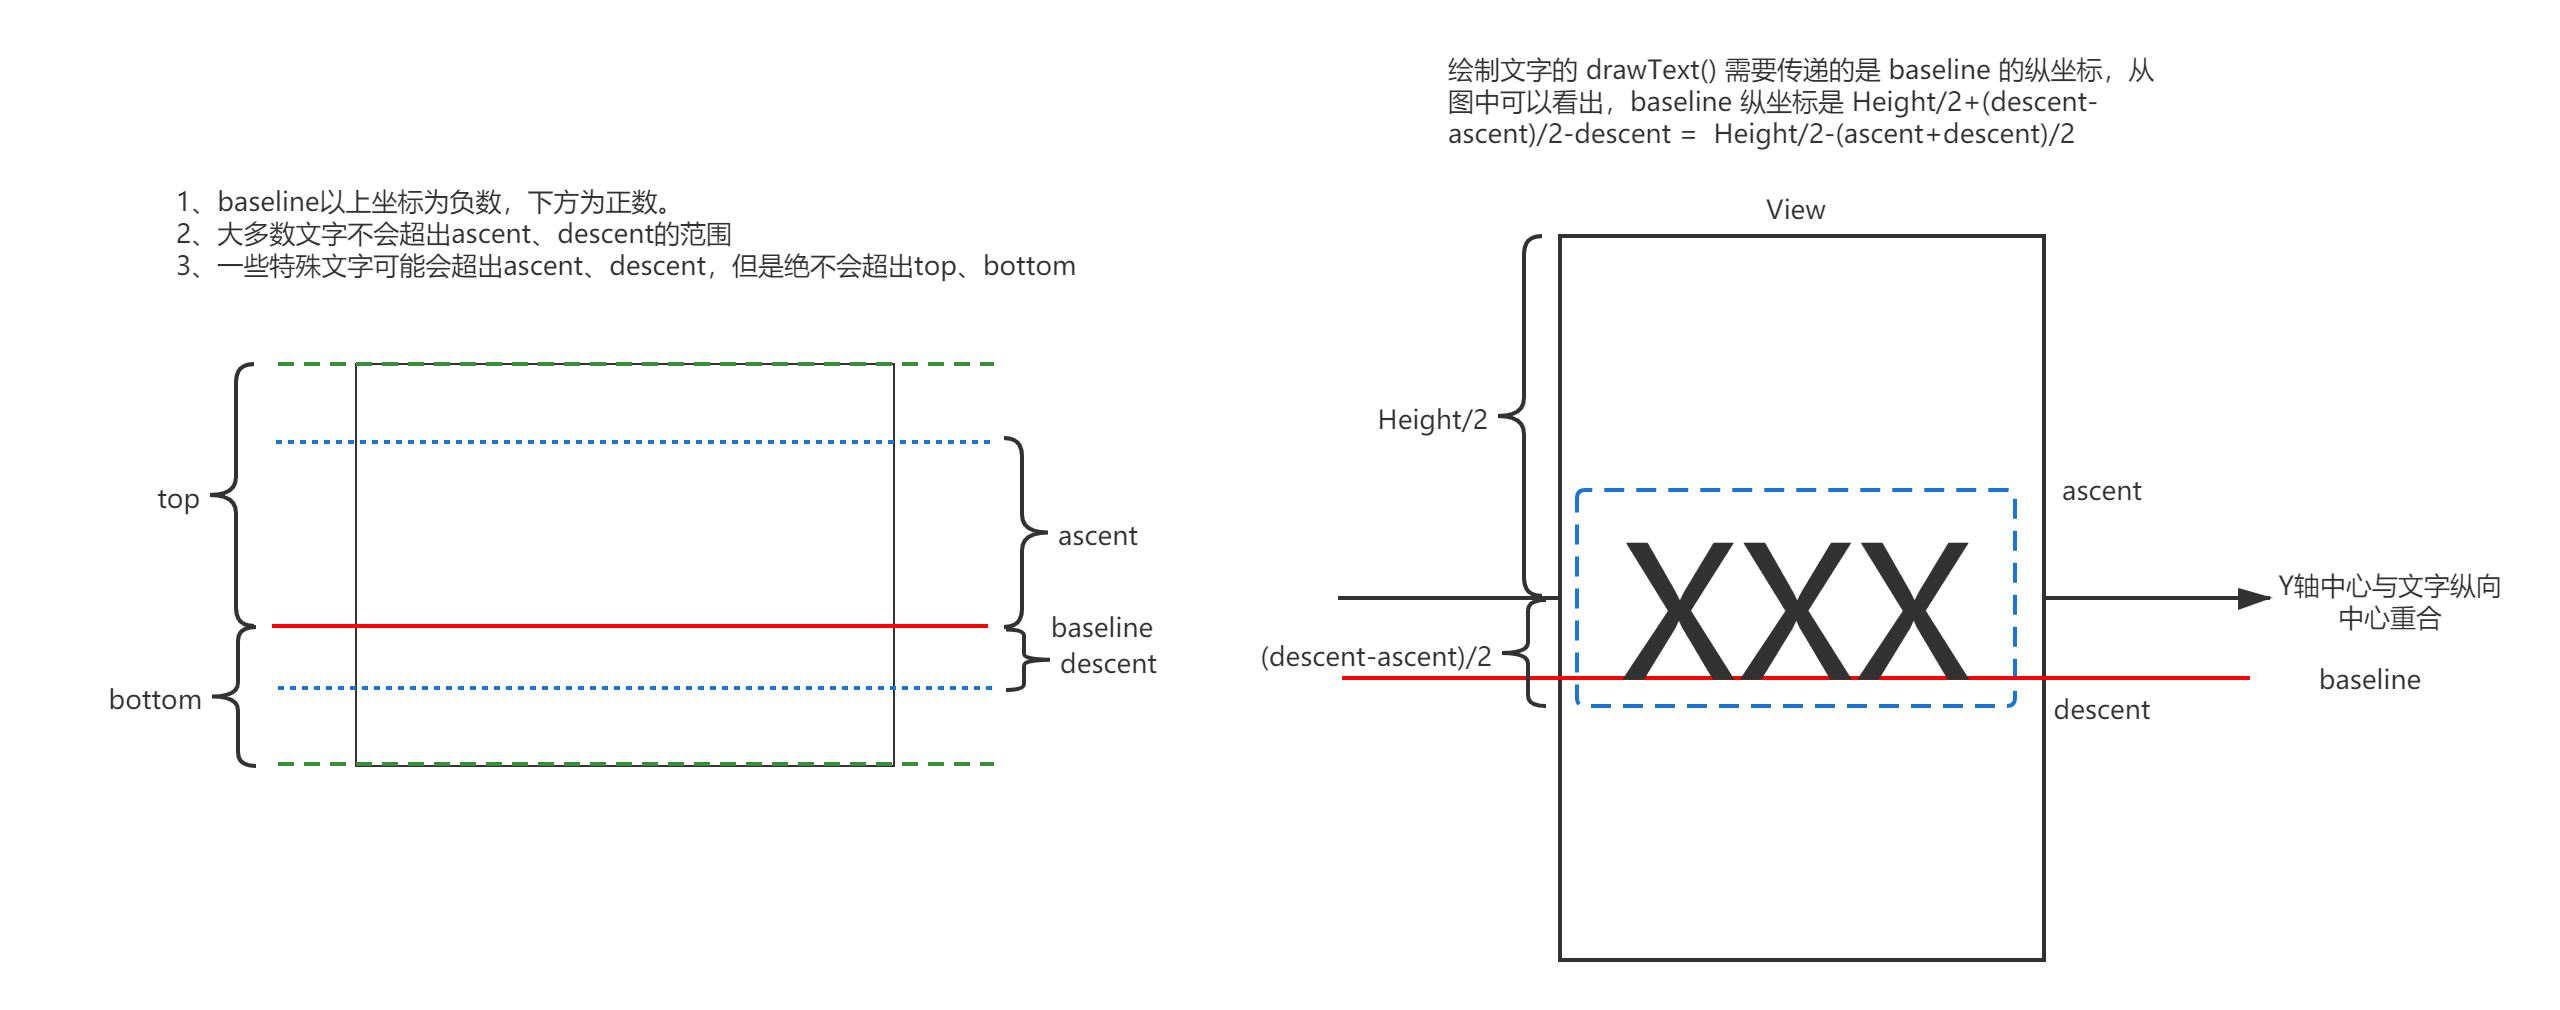
如果想让文字显示在一个 View 的中间位置,可以参考上图右侧的推导公式,示例代码:
	private fun calculateBaseline(paint: Paint): Float {
        return height / 2 - (paint.fontMetrics.ascent + paint.fontMetrics.descent) / 2
    }
需要注意的是,用 decent - accent 求出的是正常文字高度,而 bottom - top 求出的是最大文字高度。
1.2 横向居中——两种方式
两种方式都需要通过 Paint 设置:
-
通过 drawText() 设置 x 轴的绘制起点为 View 的横向中点,同时设置 Paint 的对齐方式为 Paint.Align.CENTER:
private val mPaint = Paint() private val mText = "居中字体" // onDraw() 调用频繁,尽量不要在该方法内创建新的对象,会频繁 GC 导致卡顿 override fun onDraw(canvas: Canvas?) { super.onDraw(canvas) // 以中间对齐的方式,以 width / 2f 为 x 轴起点绘制文字 mPaint.textAlign = Paint.Align.CENTER mPaint.textSize = 80f val baseline = calculateBaseline(paint) canvas?.drawText(mText, width / 2f, baseline, mPaint) } -
通过 drawText() 设置 x 轴的绘制起点为 ViewWidth / 2 - TextWidth / 2,其中 TextWidth 可以通过 Paint.measureText() 测量出来:
	private val mPaint = Paint()
 	private val mText = "居中字体"

	override fun onDraw(canvas: Canvas?) {
        super.onDraw(canvas)

        mPaint.textSize = 80f

        val baseline = calculateBaseline(paint)
        val xOrigin = (width - calculateTextWidth(mPaint, mText)) / 2
        canvas?.drawText(mText, xOrigin, baseline, mPaint)
    }

	private fun calculateBaseline(paint: Paint): Float {
        return height / 2 - (paint.fontMetrics.ascent + paint.fontMetrics.descent) / 2
    }
2、实现文字渐变效果
在开始实现文字渐变效果前,有一些 Canvas 的基础知识需要了解一下。
2.1 Canvas 相关知识
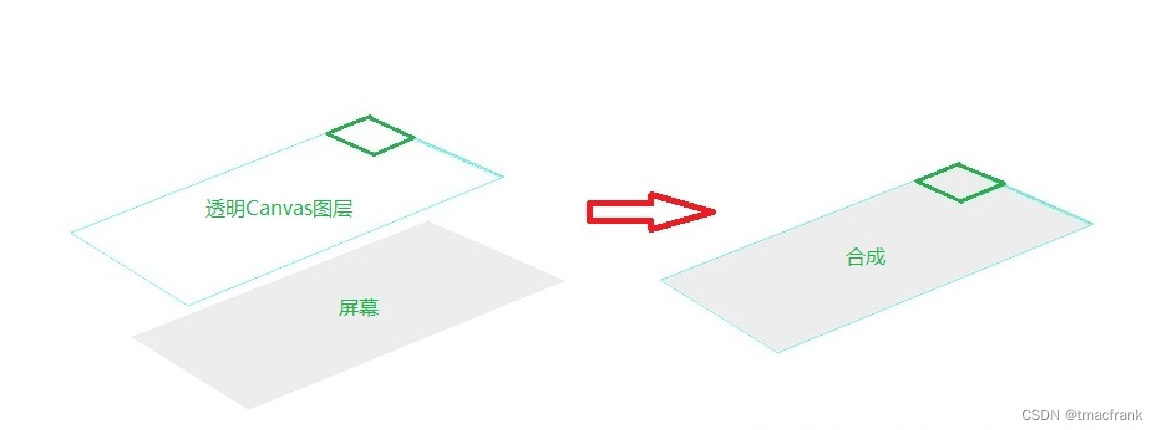
屏幕显示与 Canvas 的关系
Canvas 相当于一个透明层,每次 Canvas 通过 onDraw() 画图时都会产生一个透明层,在这个透明层上画图然后覆盖在屏幕上显示。例如 canvas.drawRect(rect1, paint_green):
Canvas 的保存与回滚
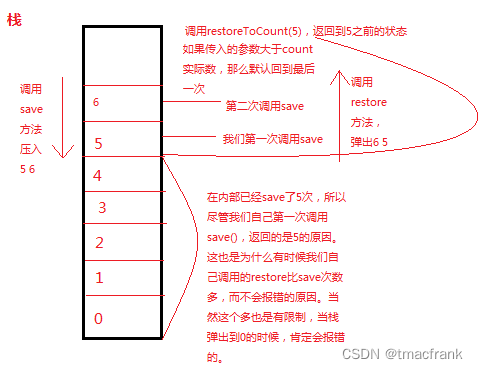
Canvas 还提供了保存和回滚属性的方法 save 和 restore,比如你可以用 save() 先保存目前画纸的位置,然后旋转 90 度,向下移动 100 像素后画一些图形,画完后调用 restore() 返回到刚才保存的位置。
save() 和 restore() 操作于栈内,如图:
Canvas 画布剪裁
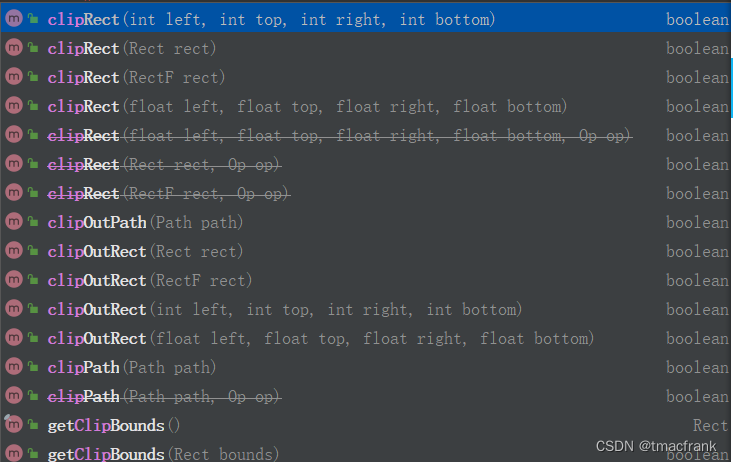
Canvas 类提供了 clipRect() 用于对画布进行矩形剪裁,它会剪裁我们想要的绘制区域,我们要实现的文字渐变效果主要依赖于该方法:
2.2 具体实现
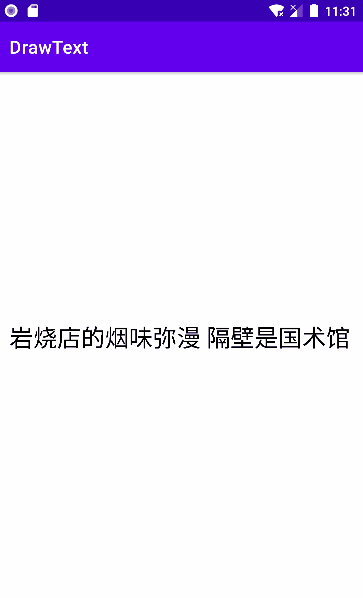
先来看一下实现效果:
基本的实现思路是,黑色字体作为背景字体,红色字体作为前景字体,绘制前后两层,红色字体在绘制时要通过 Canvas.clipRect() 剪裁 Canvas,通过动画不断增大右边界使得 Canvas 不断向右侧延长,这样在该 Canvas 上绘制出的红色字体也就会向右延伸。参考代码:
class MyTextView(context: Context, attrs: AttributeSet?, defStyleAttr: Int) :
    AppCompatTextView(context, attrs, defStyleAttr) {

    private val mBackgroundPaint: Paint
    private val mForegroundPaint: Paint
    private val mText = "岩烧店的烟味弥漫 隔壁是国术馆"

    // 要绘制的文字的基准线 y 轴坐标
    private var mBaseline = 0f

    // 要绘制的文字的起点 x 轴坐标
    private var mXOrigin = 0f

    // 文字宽度
    private var mTextWidth = 0f

    // 前景文字宽度展示比例
    private var textWidthPercent = 0f

    constructor(context: Context, attrs: AttributeSet?) : this(context, attrs, 0)

    init {
        mBackgroundPaint = Paint()
        mBackgroundPaint.textSize = 70f

        mForegroundPaint = Paint(mBackgroundPaint)
        mForegroundPaint.color = Color.RED

        mTextWidth = calculateTextWidth(mForegroundPaint, mText)
    }

    override fun onDraw(canvas: Canvas?) {
        super.onDraw(canvas)

        mBaseline = calculateBaseline(paint)
        mXOrigin = (width - mTextWidth) / 2
        drawBackgroundText(canvas)
        drawForegroundText(canvas)
    }

    /**
     * 画背景字体
     */
    private fun drawBackgroundText(canvas: Canvas?) {
        canvas?.drawText(mText, mXOrigin, mBaseline, mBackgroundPaint)
    }

    /**
     * 画前景字体
     */
    private fun drawForegroundText(canvas: Canvas?) {
        canvas?.save()
        val top = mBaseline + mForegroundPaint.fontMetrics.ascent
        val bottom = mBaseline + mForegroundPaint.fontMetrics.descent
        var right = mXOrigin + textWidthPercent * mTextWidth

        // 将 canvas 按照四个方向边界截出一个矩形,将前景字画在该矩形上
        canvas?.clipRect(mXOrigin, top, right, bottom)
        canvas?.drawText(mText, mXOrigin, mBaseline, mForegroundPaint)
        canvas?.restore()
    }

    /**
     * 计算文字基准线纵坐标
     */
    private fun calculateBaseline(paint: Paint): Float {
        return height / 2 - (paint.fontMetrics.ascent + paint.fontMetrics.descent) / 2
    }

    /**
     * 计算文字宽度
     */
    private fun calculateTextWidth(paint: Paint, text: String): Float {
        return paint.measureText(text)
    }

    /**
     * textWidthPercent 属性的 getter 与 setter,供属性动画使用
     */
    fun setTextWidthPercent(percent: Float) {
        textWidthPercent = percent
        invalidate()
    }

    fun getTextWidthPercent() = textWidthPercent
}
然后可以在 Activity 中启动属性动画,让前景文字展示的宽度比例递增:
class MainActivity : AppCompatActivity() {
    override fun onCreate(savedInstanceState: Bundle?) {
        super.onCreate(savedInstanceState)
        setContentView(R.layout.activity_main)

        val handler = Handler(Looper.getMainLooper())
        handler.postDelayed({ startTextAnimator() }, 2000)
    }

    private fun startTextAnimator() {
        val textView = findViewById<TextView>(R.id.text_view)
        val animator = ObjectAnimator.ofFloat(textView, "textWidthPercent", 0f, 1f)
        animator.setDuration(3000)
        animator.start()
    }
}
以上代码就能完成这个功能,最后我们做一点优化,就是文字实际上用一层就能实现,当前用前景和背景绘制了两层,属于过度绘制了。因此我们需要调整一下背景文字绘制的起始点坐标:
	override fun onDraw(canvas: Canvas?) {
        super.onDraw(canvas)

        mBaseline = calculateBaseline(paint)
        mXOrigin = (width - mTextWidth) / 2
        mTop = mBaseline + mForegroundPaint.fontMetrics.ascent
        mBottom = mBaseline + mForegroundPaint.fontMetrics.descent
        mForegroundRight = mXOrigin + textWidthPercent * mTextWidth

        drawBackgroundText(canvas)
        drawForegroundText(canvas)
    }

    /**
     * 画背景字体
     */
    private fun drawBackgroundText(canvas: Canvas?) {
        canvas?.save()
        // 截取一个左边界不断右移的矩形作为背景字体的画布
        canvas?.clipRect(mForegroundRight, mTop, mXOrigin + mTextWidth, mBottom)
        canvas?.drawText(mText, mXOrigin, mBaseline, mBackgroundPaint)
        canvas?.restore()
    }
Demo 代码可参考GitHub


 2万+
2万+


 被折叠的 条评论
为什么被折叠?
被折叠的 条评论
为什么被折叠?
 到【灌水乐园】发言


