


狭义讲,这两种方式的区别就是:以何种方式"携带"数据.
get提交,通过url后跟一对或多对键|值的方式传递给请求的页面.
post提交,通过将数据夹带在body区域传递给请求的页面.
表单提交方式(HttpMethod)分为"Get"和"Post".
设置为Get方式,在所请求的url后面附加一串键|值,在服务器端代码可以通过Request.QueryString[]访问.
设置为Post方式,则在服务器端代码可以通过Request.Form[]访问.
直接在IE地址栏中敲url,如http://localhost:9966/WebForm2.aspx"或"http://localhost:9966/WebForm2.aspx?lll=2" 均属于Get方式访问.
注意,Get是Form的默认方法,Get提交字符数量有限,就是因为url长度的限制,2048字节(2KB).
下面的例子演示如何将数据从一个页面提交至另一个页面
[请求页面]
<%@ Page Language="C#" AutoEventWireup="true" Codebehind="WebForm1.aspx.cs"
Inherits="WebDiary.WebForm1" %>
<!DOCTYPE html PUBLIC "-//W3C//DTD XHTML 1.0 Transitional//EN"
"http://www.w3.org/TR/xhtml1/DTD/xhtml1-transitional.dtd">
<html xmlns="http://www.w3.org/1999/xhtml">
<head id="Head1" runat="server">
<title>无标题页</title>
<script type="text/javascript">
function RegisterAccount()
{
if (!document.getElementById('agree').checked)
{
alert('You can register after you agree with terms!');
window.event.returnValue=false;
return false;
}
else if(document.getElementById('agree').checked)
{
document.forms('register_member_form').submit();
}
else
{
alert('Unknown Error!');
}
}
</script>
</head>
<body ms_positioning="GridLayout">
<form id="register_member_form" method="post" action="WebForm2.aspx" target="_blank">
<input type="text" name="text" value="text_value">
<input type="checkbox" id="agree" name="checkbox" value="checkbox_value">
<input type="hidden" name="hidden" value="hidden_value"/>
<input type="image" name="image" value="image_value" />
<input type="reset" name="reset" value="reset_value"/>
<input type="submit" name="sub" value="submit_value" />
<input type="radio" name="radio" checked/>
<input type="password" name="password" value="password_value"/>
<input type="file" name="file" value="file_value"/>
<input type="button" name="button" class="formSubmit" value="submit"
οnclick="RegisterAccount()" />
</form>
</body>
--后台代码WebForm1.aspx.cs为默认.
[接收页面]
namespace WebDiary
{
public partial class WebForm2 : System.Web.UI.Page
{
private static int i = 0;
protected void Page_Load(object sender, EventArgs e)
{
if (!IsPostBack)
{
i++;
Response.Write(i.ToString());
}
}
}
}
--前台页面WebForm2.aspx为默认.
注意,在WebForm1.aspx中必须指定<input type="checkbox" id="agree" name="checkbox" value="checkbox_value">中的name属性,仅有id不行,否则在WebForm2.aspx.cs后台代码中Request.querystring[](对应get) 或 Request.Form[](对应post)无法访问.
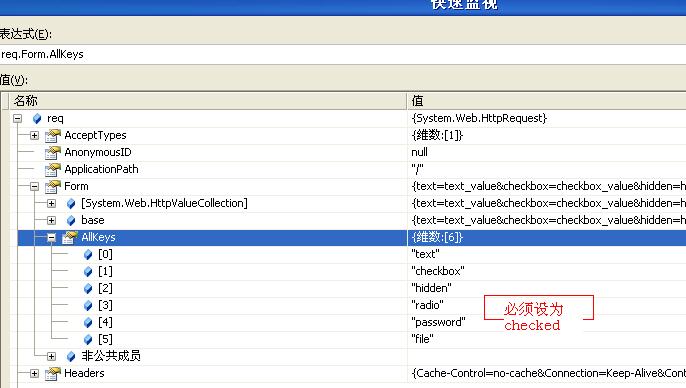
同为input元素,只有type为file、text、radio、checkbox、hidden、password的能读出键值,而submit、
button、Reset、image无法读出键值。并且radio和checkbox必须为checked才可以读出键值.
补充,submit的name若等于"submit"无法提交表单,所以上例设为了"sub"(原因不清楚).


 1106
1106

 被折叠的 条评论
为什么被折叠?
被折叠的 条评论
为什么被折叠?
 到【灌水乐园】发言


