


Apache POI是Apache软件基金会的开源项目 POI提供API给Java程序对Microsoft Office格式档案读和写的功能
Apache POI 代码实现复杂,学习成本较高。
Easypoi 功能如同名字easy 主打的功能就是容易
让一个没见接触过poi的人员就可以方便的写出Excel导出,Excel模板导出,Excel导入,Word模板导出,通过简单的注解和模板 语言(熟悉的表达式语法),完成以前复杂的写法
EasyPOI官网:[https://easypoi.mydoc.io/]
3.4.2 环境搭建
1)搭建springboot项目
2)导入依赖
<?xml version="1.0" encoding="UTF-8"?>
<project xmlns="http://maven.apache.org/POM/4.0.0"
         xmlns:xsi="http://www.w3.org/2001/XMLSchema-instance"
         xsi:schemaLocation="http://maven.apache.org/POM/4.0.0 http://maven.apache.org/xsd/maven-4.0.0.xsd">
    <modelVersion>4.0.0</modelVersion>

    <parent>
        <groupId>org.springframework.boot</groupId>
        <artifactId>spring-boot-starter-parent</artifactId>
        <version>2.7.8</version>
        <relativePath/> <!-- lookup parent from repository -->
    </parent>

    <groupId>com.rio</groupId>
    <artifactId>easy_poi</artifactId>
    <version>1.0-SNAPSHOT</version>
    <properties>
        <java.version>1.8</java.version>
    </properties>

    <dependencies>
        <dependency>
            <groupId>org.springframework.boot</groupId>
            <artifactId>spring-boot-starter-web</artifactId>
        </dependency>

        <dependency>
            <groupId>org.springframework.boot</groupId>
            <artifactId>spring-boot-devtools</artifactId>
            <scope>runtime</scope>
            <optional>true</optional>
        </dependency>
        <dependency>
            <groupId>org.projectlombok</groupId>
            <artifactId>lombok</artifactId>
            <optional>true</optional>
        </dependency>
        <dependency>
            <groupId>org.springframework.boot</groupId>
            <artifactId>spring-boot-starter-test</artifactId>
            <scope>test</scope>
            <exclusions>
                <exclusion>
                    <groupId>org.junit.vintage</groupId>
                    <artifactId>junit-vintage-engine</artifactId>
                </exclusion>
            </exclusions>
        </dependency>


        <!--引入mybatis-->
        <dependency>
            <groupId>org.mybatis.spring.boot</groupId>
            <artifactId>mybatis-spring-boot-starter</artifactId>
            <version>2.1.3</version>
        </dependency>
        <!--引入mysql-->
        <!-- Mysql驱动包 -->
        <dependency>
            <groupId>mysql</groupId>
            <artifactId>mysql-connector-java</artifactId>
            <version>8.0.32</version>
        </dependency>

        <!--引入druid-->
        <dependency>
            <groupId>com.alibaba</groupId>
            <artifactId>druid</artifactId>
            <version>1.1.19</version>
        </dependency>
        <!--引入thymelaf-->
        <dependency>
            <groupId>org.springframework.boot</groupId>
            <artifactId>spring-boot-starter-thymeleaf</artifactId>
        </dependency>
        <!--引入easypoi-->
        <dependency>
            <groupId>cn.afterturn</groupId>
            <artifactId>easypoi-base</artifactId>
            <version>3.2.0</version>
        </dependency>
        <dependency>
            <groupId>cn.afterturn</groupId>
            <artifactId>easypoi-web</artifactId>
            <version>3.2.0</version>
        </dependency>
        <dependency>
            <groupId>cn.afterturn</groupId>
            <artifactId>easypoi-annotation</artifactId>
            <version>3.2.0</version>
        </dependency>
    </dependencies>

    <build>
        <plugins>
            <plugin>
                <groupId>org.springframework.boot</groupId>
                <artifactId>spring-boot-maven-plugin</artifactId>
            </plugin>
        </plugins>
    </build>
</project>
3.4.3 EasyPOI相关注解
easypoi 起因就是Excel的导入导出,最初的模板是实体和Excel的对应,model–row,filed–col 这样利用注解我们可以和容易做到excel到导入导出 经过一段时间发展,现在注解有5个类分别是
- @Excel 作用到filed上面,是对Excel一列的一个描述
- @ExcelCollection 表示一个集合,主要针对一对多的导出,比如一个老师对应多个科目,科目就可以用集合表示
- @ExcelEntity 表示一个继续深入导出的实体,但他没有太多的实际意义,只是告诉系统这个对象里面同样有导出的字段
- @ExcelIgnore 和名字一样表示这个字段被忽略跳过这个导导出
- @ExcelTarget 这个是作用于最外层的对象,描述这个对象的id,以便支持一个对象可以针对不同导出做出不同处理
@ExcelTarget
1.说明
- 用在实体类上标识是一个可以通过EasyPOI导入导出的实体类
- 相关属性:
value:  [String][定义id唯一标识,不能重复]    `常用`
height: [Double][定义单元格高度]
fontSize:[short ][定义单元格字体大小]
2.使用
@ExcelTarget("users")
public class User implements Serializable {
 //..... 省略属性 相关GET,SET方法
}
@Excel
# 1.说明
- 用在filed(属性)上面,是对Excel一列的一个描述
- 常用属性:
name :  [String][生成Excel表格中列名]
needMerge: [boolean][是否需要纵向合并单元格(用于含有list中,单个的单元格,合并list创建的多个row)]
orderNum :       [String][指定生成Excel中列的顺序,按照数字自然顺序排序]
savePath :       [String][指定导入Excel中图片的保存路径]
type :       [String][导出类型 1 是文本 2 是图片,3 是函数,10 是数字 默认是文本]
width    : [Double][指定导出Excel时列的宽度]
isImportField:   [boolean][是否是导入字段,如果没有说明是错误的Excel]
exportFormat:    [String][导出Excel的时间格式]
importFormat:    [String][导入Excel的时间格式]
format :       [String][相当于同时设置了exportFormat和importFormat]
imageType:   [int   ][导出类型 1 从file读取 2 是从数据库中读取 默认是文件 同样导入也是一样的]
suffix :       [String][文字后缀,如% 90 变成90%]
2.使用
public class User implements Serializable {

    @Excel(name="编号",orderNum="1",replace = {"xxx_1","nnn_2"})
    private String id;

    @Excel(name="姓名",orderNum="2")
    private String name;

    @Excel(name="年龄",orderNum="4",suffix = " $")
    private Integer age;

    @Excel(name="生日",orderNum = "3",width = 20.0,exportFormat = "yyyy年MM月dd日")
    private Date bir;
  //...省略GET、SET方法
}
@ExcelEntity
1.说明
- 标记是不是导出excel 标记为实体类,一遍是一个内部属性类,标记是否继续穿透
- 常用属性:
name: [String][定义唯一标识]
2.使用
@ExcelTarget("users")
public class User implements Serializable {
//... 省略GET SET和其他属性
    @ExcelEntity(name="身份信息")
    private Card card;
}

@ExcelTarget("card")
public class Card  implements Serializable {
    @Excel(name="身份证号",orderNum = "6")
    private String id;
    @Excel(name="家庭住址",orderNum = "7")
    private String address;
}
@ExcelCollection
1.说明
- 一对多的集合注解,用以标记集合是否被数据以及集合的整体排序
- 常用属性:
name: [String][定义集合列名]
orderNum:[int][用来指定导出excel集合内列的顺序]
type:     [Class\<?>][用来指定导出是创建对象类型]
2.使用
@ExcelTarget("users")
public class User implements Serializable {
  //....省略GET SET其他属性
@ExcelCollection(name="订单",orderNum = "5")
    private List<Order> orders;
}

@ExcelTarget("orders")
public class Order implements Serializable {
//....省略GET SET方法
    @Excel(name = "订单编号")
    private String id;
    @Excel(name = "订单名称")
    private String name;
}
@ExcelIgnore
1.说明
- 用在属性上,导出Excel时忽略这个属性
3.4.4 导出Excel
3.4.4.1 导出基本数据
注意:导出Excel的对象必须实现对象序列化接口
1)定义对象
@Data
@ExcelTarget("users")
public class User implements Serializable {

    @ExcelIgnore
    @Excel(name="编号",orderNum="1")
    private String id;

    @Excel(name="姓名",orderNum="2")
    private String name;

    @Excel(name="年龄",orderNum="3",suffix = " &")
    private Integer age;

    @Excel(name="生日",orderNum="4",width = 35.0,format = "yyyy-MM-dd HH:mm:ss")
    private Date birthday;

    @Excel(name ="状态" ,orderNum="5",replace = {"激活_1","未激活_0"})
    private String status;
}
2)定义测试数据
    public List<User> getUsers(){

        List<User> users = new ArrayList<>();

        for (int i = 0; i < 10; i++) {
            User user = new User();
            user.setId(String.valueOf(i));
            user.setName("向阳");
            user.setAge(16+i);
            user.setBirthday(new Date());
            user.setStatus(String.valueOf(i%2));
            users.add(user);
        }

        return users;
    }
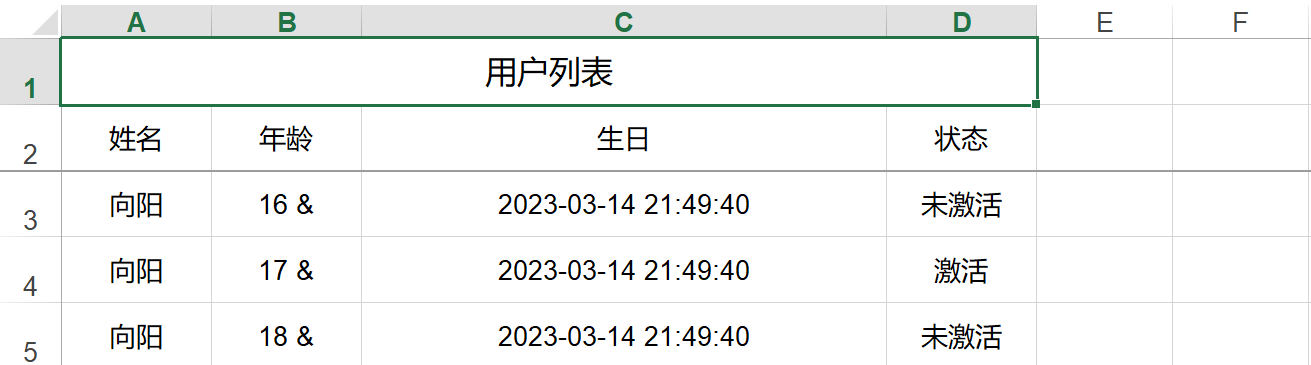
3)导出Excel
    @Test
    public void testExport() throws Exception {

        //1.配置对象 2.导出类型 3.导出数据集合
        Workbook workbook = ExcelExportUtil.exportExcel(new ExportParams("用户列表", "测试"), User.class, getUsers());

        FileOutputStream outputStream = new FileOutputStream("C:\\Users\\86187\\Desktop\\user.xls");
        workbook.write(outputStream);

        outputStream.close();
        workbook.close();
    }
4)查看Excel
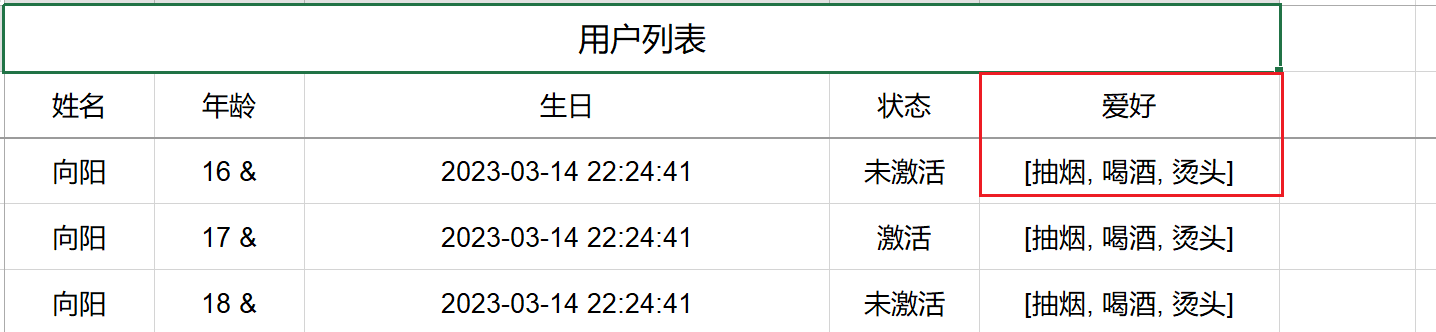
3.4.4.2 导出List集合
1)说明
- 往往有时候导出的对象中含有数组或者集合,需要导出这样的数据可以直接使用@Excel进行导出
2)使用
@Data
@ExcelTarget("users")
public class User implements Serializable {

    @Excel(name = "爱好",width=20.0,orderNum = "6")
    private List<String> hobby;
}
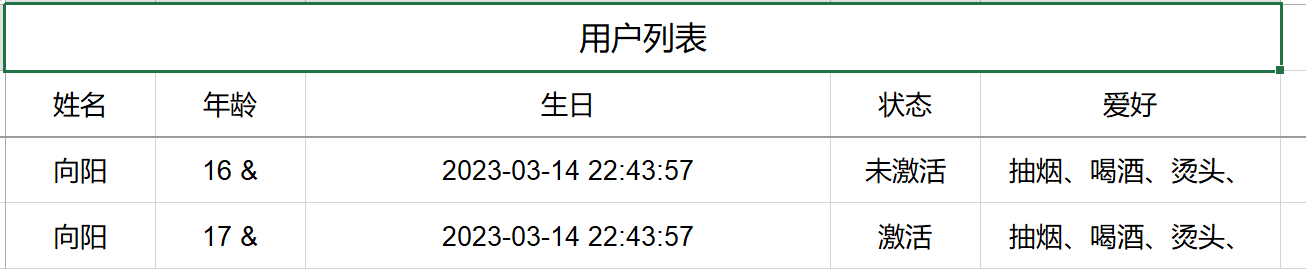
2) 改换格式
//    @Excel(name = "爱好",width=20.0,orderNum = "6")
    @ExcelIgnore
    private List<String> hobby;

    @Excel(name = "爱好",width=20.0,orderNum = "6")
    private String hobbystr;

    //自定义格式
    public String getHobbystr() {

        StringBuilder sb = new StringBuilder();
        this.hobby.forEach(s -> sb.append(s).append("、") );

        return sb.toString();
    }
3.4.4.3 导出对象中含有的对象
1) 说明
- 导出对象中含有对象的Excel
@Data
@ExcelTarget("users")
public class User implements Serializable {

    //定义对象
    @ExcelEntity(name="card")
    private Card card;
}

@ExcelTarget("card")
public class Card  implements Serializable {
    @Excel(name="身份证号",orderNum = "6")
    private String id;
    @Excel(name="家庭住址",orderNum = "7")
    private String address;
}
2) 为导出对象赋值
public List<User> getUsers(){
    List<User> users = new ArrayList<>();
    for (int i = 0; i < 10; i++) {
        User user = new User();
        user.setId(String.valueOf(i));
        user.setName("向阳");
        user.setAge(16+i);
        user.setBirthday(new Date());
        user.setStatus(String.valueOf(i%2));
        user.setHobby(Arrays.asList("抽烟","喝酒","烫头"));
        user.setCard(new Card("11000103422323212342","北京市朝阳区"));
        users.add(user);
    }
    return users;
}
3) 导出Excel
//1.配置对象 2.导出类型 3.导出数据集合
Workbook workbook = ExcelExportUtil.exportExcel(new ExportParams("用户列表", "测试"), User.class, getUsers());
FileOutputStream outputStream = new FileOutputStream("C:\\Users\\86187\\Desktop\\user.xls");
workbook.write(outputStream);
outputStream.close();
workbook.close();

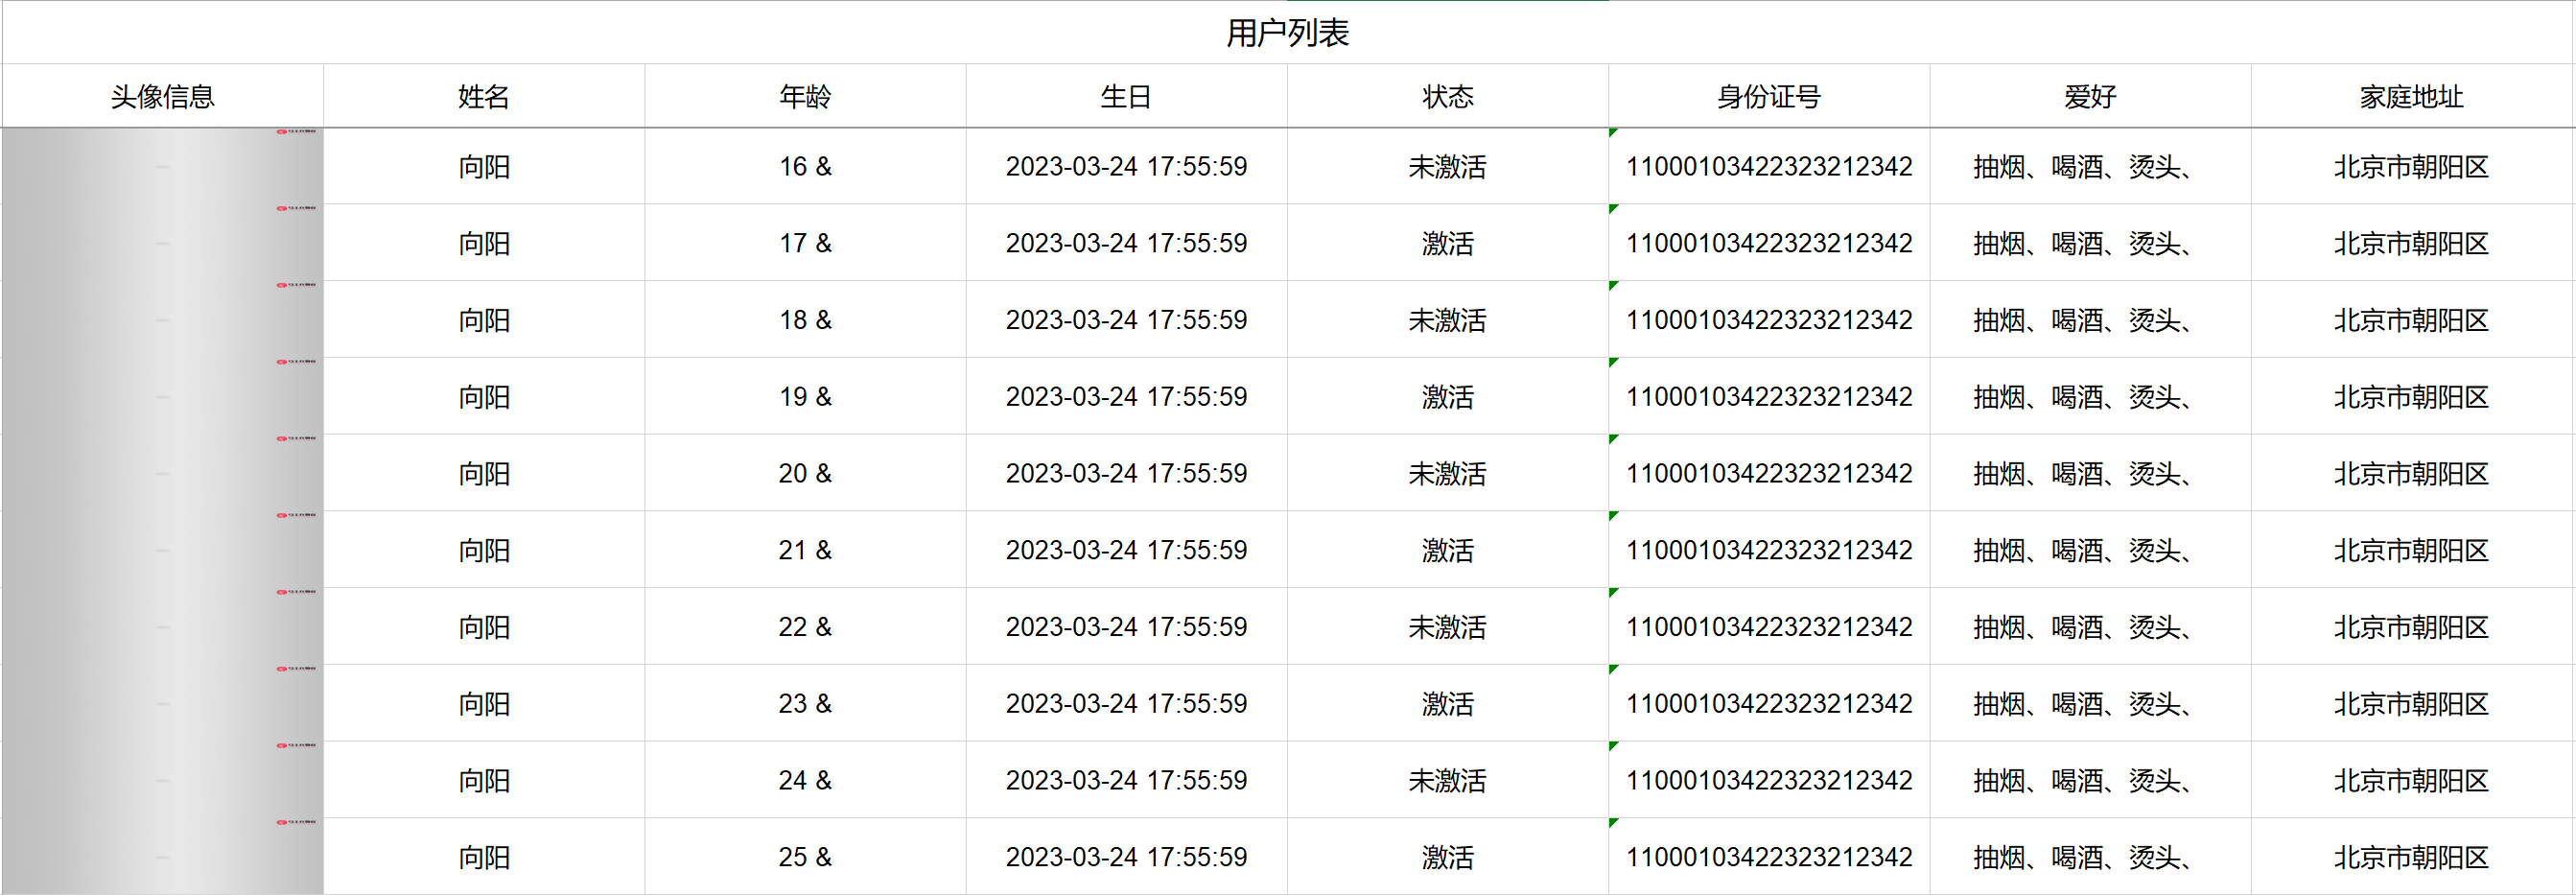
3.4.4.4 导出图片
1) 说明
- 往往随着业务不断变化,可能需要在导出excel时将图片信息也一并导出,如商品图标,用户头像信息等数据,这个时候easypoi该如何处理呢?
@ExcelTarget("users")
public class User implements Serializable {

    @Excel(name = "头像信息",type = 2,orderNum = "0",width = 12,height = 12)
    private String photo;//定义头像 直接写指定图片路径
}
2) 准备图片放入指定路径中,并在测试数据中进行赋值
public List<User> getUsers(){
    List<User> users = new ArrayList<>();
    for (int i = 0; i < 10; i++) {
        User user = new User();
        user.setId(String.valueOf(i));
        user.setName("向阳");
        user.setAge(16+i);
        user.setBirthday(new Date());
        user.setStatus(String.valueOf(i%2));
        user.setHobby(Arrays.asList("抽烟","喝酒","烫头"));
        user.setCard(new Card("11000103422323212342","北京市朝阳区"));
        user.setPhoto("C:\\Users\\86187\\Desktop\\桌面.png");
        users.add(user);
    }
    return users;
}
3) 导出Excel查看结果
3.4.5 导入Excel
3.4.5.1 导入基本数据
1) 准备导入的目标Excel
2) 定义导出数据基本对象
@Data
@ExcelTarget("emps")
public class Emp  implements Serializable {

    @Excel(name="编号")
    private String id;
    @Excel(name="姓名")
    private  String  name;
    @Excel(name="年龄")
    private Integer age;
    @Excel(name="生日",format = "yyyy-MM-dd HH:mm:ss")
    private Date bir;
    @Excel(name="状态",replace = {"激活_1","未激活_0"})
    private String status;

    @Excel(name="头像",type = 2,savePath = "I:\\MSB\\msb_hejiayun_lk\\easy_poi\\src\\main\\resources\\static")
    private String photo;
}
3) 导入excel中数据
     @Test
    public void testImportExcel()throws Exception{

        ImportParams params = new ImportParams();
        params.setTitleRows(1); //标题列占几行
        params.setHeadRows(1); //列名占几行
        params.setNeedSave(true);
        params.setSaveUrl("I:\\msb_hejiayun\\easypoi_boot\\src\\main\\resources\\static");

        List<Emp> list = ExcelImportUtil.importExcel(new FileInputStream("C:\\Users\\86187\\Desktop\\emp.xls"), Emp.class, params);
        list.forEach(System.out::println);
    }
3.4.6 多Sheet页导入导出
3.4.6.1 技巧说明
- 读取指定的sheet
比如要读取上传得第二个sheet 那么需要把startSheetIndex = 1 就可以了

- 读取几个sheet
比如读取前2个sheet,那么 sheetNum=2 就可以了

- 读取第二个到第五个sheet
设置 startSheetIndex = 1 然后sheetNum = 4

- 读取全部的sheet
sheetNum  设置大点就可以了

- 判断一个Excel是不是合法的Excel
importFields 设置下值,就是表示表头必须至少包含的字段,如果缺一个就是不合法的excel,不导入
3.4.6.2 准备表格,创建对应实体
- sheet
- sheet2
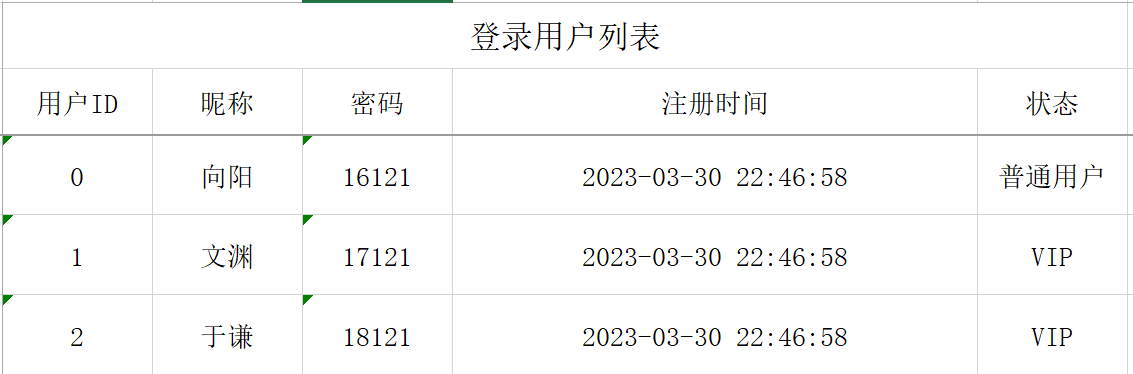
- ** LoginUser**
@Data
@ExcelTarget("loginUser")
public class LoginUser implements Serializable {

    @Excel(name = "用户ID",orderNum = "1")
    private String id;

    @Excel(name = "昵称",orderNum = "2")
    private String nickname;

    @Excel(name = "密码",orderNum = "3")
    private String password;

    @Excel(name="注册时间",orderNum="4",format = "yyyy-MM-dd HH:mm:ss")
    private Date createTime;

    @Excel(name ="状态" ,orderNum="5",replace = {"VIP_1","普通用户_0"})
    private String status;

}
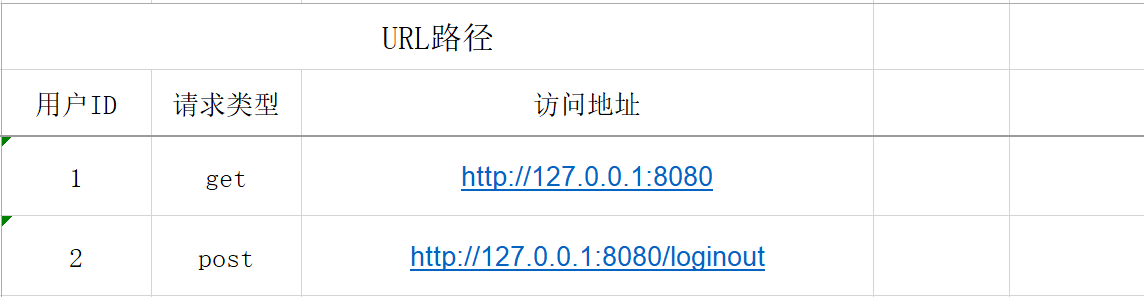
- LoginUrl
@Data
@ExcelTarget("loginUrl")
public class LoginUrl implements Serializable {

    @Excel(name = "用户ID",orderNum = "1")
    private String userId;

    @Excel(name = "请求类型",orderNum = "2")
    private String type;

    @Excel(name = "访问地址",orderNum = "3")
    private String url;
}
3.4.6.3 多sheet导入方法
    /**
     * 功能描述:根据接收的Excel文件来导入多个sheet,根据索引可返回一个集合
     * @param filePath   导入文件路径
     * @param sheetIndex  导入sheet索引
     * @param titleRows  表标题的行数
     * @param headerRows 表头行数
     * @param pojoClass  Excel实体类
     * @return
     */
    public static <T> List<T> importMultiSheet(String filePath,int sheetIndex,Integer titleRows, Integer headerRows, Class<T> pojoClass) {

        // 根据file得到Workbook,主要是要根据这个对象获取,传过来的excel有几个sheet页
        ImportParams params = new ImportParams();

        // 第几个sheet页
        params.setStartSheetIndex(sheetIndex);
        params.setTitleRows(titleRows);
        params.setHeadRows(headerRows);

        //是否保存本次上传的excel
        params.setNeedSave(false);

        //表示表头必须包含的字段,不包含 就报错.
        params.setImportFields(new String[]{"用户ID"});

        List<T> list = null;

        try {
            list = ExcelImportUtil.importExcel(new FileInputStream(filePath), pojoClass, params);
        } catch (Exception e) {
            e.printStackTrace();
        }

        return list;
    }
    //测试多sheet导入
    @Test
    public void testImportMultiSheet() throws Exception {

        String excelPath = "C:\\Users\\86187\\Desktop\\login.xls";

        List<LoginUser> loginUserList = this.importMultiSheet(excelPath, 0, 1, 1, LoginUser.class);
        loginUserList.forEach(System.out::println);

        List<LoginUrl> loginUrlList = this.importMultiSheet(excelPath, 1, 1, 1, LoginUrl.class);
        loginUrlList.forEach(System.out::println);

    }
3.4.6.4 多sheet导出方法
   public void exportMultiSheet(Object... objects) throws Exception {

        //创建参数对象,用于设定Excel的sheet页内容等信息
        ExportParams loginUserExportParams = new ExportParams();
        //设置sheet的名称
        loginUserExportParams.setSheetName("登录用户");
        loginUserExportParams.setTitle("登录用户列表");

        //使用map创建sheet1
        HashMap<String, Object> sheet1Map = new HashMap<>();
        //设置title
        sheet1Map.put("title",loginUserExportParams);
        //设置导出的实体类型
        sheet1Map.put("entity",LoginUser.class);
        //sheet中要填充的数据
        sheet1Map.put("data",objects[0]);

        ///==================================

        //创建参数对象,用于设定Excel的sheet页内容等信息
        ExportParams loginUrlExportParams = new ExportParams();
        //设置sheet的名称
        loginUrlExportParams.setSheetName("URL路径");
        loginUrlExportParams.setTitle("URL路径");

        //使用map创建sheet2
        HashMap<String, Object> sheet2Map = new HashMap<>();
        //设置title
        sheet2Map.put("title",loginUrlExportParams);
        //设置导出的实体类型
        sheet2Map.put("entity",LoginUrl.class);
        //sheet中要填充的数据
        sheet2Map.put("data",objects[1]);

        //将sheet1和sheet2 进行包装
        List<Map<String,Object>> sheetList = new ArrayList<>();
        sheetList.add(sheet1Map);
        sheetList.add(sheet2Map);

        //执行方法
        Workbook workbook = ExcelExportUtil.exportExcel(sheetList, ExcelType.HSSF);

        FileOutputStream outputStream =
                new FileOutputStream("C:\\Users\\86187\\Desktop\\exportLogin.xls");
        workbook.write(outputStream);
        outputStream.close();
        workbook.close();
    }
    //测试多sheet导入
    @Test
    public void testExportMultiSheet() throws Exception {


        List<LoginUser> sheet1 = new ArrayList<>();
        sheet1.add(new LoginUser("1001", "向阳", "123456", new Date(), "0"));
        sheet1.add(new LoginUser("1002", "文渊", "123456", new Date(), "1"));
        sheet1.add(new LoginUser("1003", "小李", "123456", new Date(), "0"));

        List<LoginUrl> sheet2 = new ArrayList<>();
        sheet2.add(new LoginUrl("1001", "get", "http://127.0.0.1:8080"));
        sheet2.add(new LoginUrl("1001", "post", "http://127.0.0.1:8080/logingout"));


        exportMultiSheet(sheet1,sheet2);
    }
3.4.6 集成web实现导入导出
3.4.6.1 环境搭建
1) 引入依赖
2) 创建包结构
3) 启动类
@SpringBootApplication
public class EasypoiApplication {

    public static void main(String[] args) {
        SpringApplication.run(EasypoiApplication.class,args);
    }
}
4) 编写配置文件
server.port=8088
spring.application.name=easypoi

spring.thymeleaf.cache=false

spring.datasource.type=com.alibaba.druid.pool.DruidDataSource
spring.datasource.driver-class-name=com.mysql.cj.jdbc.Driver
spring.datasource.url= jdbc:mysql://127.0.0.1:3306/easypoi?useUnicode=true&characterEncoding=utf8&zeroDateTimeBehor=convertToNull&useSSL=true&serverTimezone=GMT%2B8
spring.datasource.username=root
spring.datasource.password=123456

mybatis.mapper-locations=classpath:com/rio/mapper/*.xml
mybatis.type-aliases-package=com.rio.entity
5) html页面
<!DOCTYPE html>
<html lang="en" xmlns:th="http://www.thymeleaf.org">
<head>
    <meta charset="UTF-8">
    <title>导入excel的主页面</title>
    <link rel="stylesheet" href="https://cdn.jsdelivr.net/npm/bootstrap@3.3.7/dist/css/bootstrap.min.css" integrity="sha384-BVYiiSIFeK1dGmJRAkycuHAHRg32OmUcww7on3RYdg4Va+PmSTsz/K68vbdEjh4u" crossorigin="anonymous">
</head>
<body>
<div class="container-fluid">
    <div class="row">
        <div class="col-md-12">
            <h1>选择Excel文件导入到数据中</h1>
            <form th:action="@{/course/importExcel}" method="post" enctype="multipart/form-data" class="form-inline">
                <div class="form-group">
                    <input class="form-control" type="file" name="excelFile">
                    <input type="submit" class="btn btn-danger" value="导入数据">
                </div>
            </form>
        </div>
        <div class="col-md-12">
            <h1>显示导入数据列表</h1>
            <table class="table table-bordered" >
                <tr>
                    <th>ID编号</th>
                    <th>订单编号</th>
                    <th>课程名称</th>
                    <th>课程简介</th>
                    <th>课程价格</th>
                </tr>
                <tr th:each="course : ${courses}">
                    <td th:text="${course.cid}"></td>
                    <td th:text="${course.orderno}"></td>
                    <td th:text="${course.cname}"></td>
                    <td th:text="${course.brief}"></td>
                    <td th:text="${course.price}"></td>
                </tr>
            </table>

            <hr>
            <a th:href="@{/course/exportExcel}" class="btn btn-info" >导出excel</a>

        </div>

    </div>
</div>
</body>
</html>
3.4.6.2 查询所有
1)准备数据Excel
CREATE TABLE `course` (
  `cid` bigint(20) NOT NULL AUTO_INCREMENT,
  `orderno` bigint(20) DEFAULT NULL,
  `cname` varchar(50) DEFAULT NULL,
  `brief` varchar(50) DEFAULT NULL,
  `price` double DEFAULT NULL,
  PRIMARY KEY (`cid`)
) ENGINE=InnoDB AUTO_INCREMENT=22 DEFAULT CHARSET=utf8
2) 创建实体类
@Data
@ExcelTarget("courses")
public class Course implements Serializable {

    @Excel(name = "编号")
    private String cid;

    @Excel(name = "订单编号")
    private String orderno;

    @Excel(name = "课程名称")
    private String cname;

    @Excel(name = "简介")
    private String brief;

    @Excel(name = "价格")
    private double price;
}
2) 创建Dao接口
@Mapper
public interface CourseDao {

    //查询所有
    List<Course> findAll();
}
<!DOCTYPE mapper PUBLIC "-//mybatis.org//DTD Mapper 3.0//EN" "http://mybatis.org/dtd/mybatis-3-mapper.dtd">
<mapper namespace="com.rio.mapper.CourseDao">
    <!--查询所有-->
    <select id="findAll" resultType="Course">
        SELECT cid,orderno,cname,brief,price FROM course;
    </select>
</mapper>
3) 创建Service
public interface CourseService  {

    //查询所有
    List<Course> findAll();
}


@Service
public class CourseServiceImpl implements CourseService {

    @Autowired
    private CourseDao courseDao;

    @Override
    public List<Course> findAll() {
        return courseDao.findAll();
    }
}
4) 创建Controller
@Controller
@RequestMapping("/course")
public class CourseController {

    @Autowired
    private CourseService courseService;

    @RequestMapping("/findAll")
    public String findAll(Model model){
        List<Course> courses = courseService.findAll();
        System.out.println(courses);
        model.addAttribute("courses",courses);
        return "index";
    }
}
5) 访问: http://localhost:8088/course/findAll

向数据库添加一条数据,测试一下 即可.
3.4.6.3 导入数据
1) Dao接口
@Mapper
public interface CourseDao {

    //查询所有
    List<Course> findAll();

    //插入记录
    void save(Course course);
}
<!DOCTYPE mapper PUBLIC "-//mybatis.org//DTD Mapper 3.0//EN" "http://mybatis.org/dtd/mybatis-3-mapper.dtd">
<mapper namespace="com.rio.mapper.CourseDao">
    <!--查询所有-->
    <select id="findAll" resultType="Course">
        SELECT cid,orderno,cname,brief,price FROM course;
    </select>

    <!-- 插入记录 -->
    <insert id="save" parameterType="Course" >
        INSERT INTO course VALUES (#{cid},#{orderno},#{cname},#{brief},#{price})
    </insert>
</mapper>
2) 创建Service
public interface CourseService  {

    //查询所有
    List<Course> findAll();

    //插入记录
    void save(List<Course> courses);
}

@Service
public class CourseServiceImpl implements CourseService {

    @Autowired
    private CourseDao courseDao;

    @Override
    public List<Course> findAll() {
        return courseDao.findAll();
    }

    @Override
    public void save(List<Course> courses) {
        courses.forEach(course -> {
            course.setCid(null); //自动生成ID 不使用Excel中的编号
            courseDao.save(course);
        });
    }
}
3) 创建Controller
@Controller
@RequestMapping("/course")
public class CourseController {

    @Autowired
    private CourseService courseService;

    @RequestMapping("/findAll")
    public String findAll(Model model){
        List<Course> courses = courseService.findAll();
        System.out.println(courses);
        model.addAttribute("courses",courses);
        return "index";
    }


    @RequestMapping("/importExcel")
    public String importExcel(MultipartFile excelFile) throws Exception {
        ImportParams params = new ImportParams();
        params.setTitleRows(1); //设置1级标题行为一行
        params.setHeadRows(1); //设置header标题行为一行

        List<Course> courseList = ExcelImportUtil.importExcel(excelFile.getInputStream(), Course.class, params);
        courseService.save(courseList);
        return "redirect:/course/findAll";
    }

}
4) html页面
<div class="col-md-12">
    <h1>选择Excel文件导入到数据中</h1>
    <form th:action="@{/course/importExcel}" method="post" enctype="multipart/form-data" class="form-inline">
        <div class="form-group">
            <input class="form-control" type="file" name="excelFile">
            <input type="submit" class="btn btn-danger" value="导入数据">
        </div>
    </form>
</div>
5) 启动项目导入Excel数据

3.4.6.3 导出数据
1) Controller开发
    //导出Excel
    @RequestMapping("/exportExcel")
    public void exportExcel(HttpServletResponse response)throws Exception{
        //查询数据库的所有数据
        List<Course> courseList = courseService.findAll();

        //生成Excel
        Workbook workbook = ExcelExportUtil.exportExcel(new ExportParams("课程信息列表", "课程信息"),
                Course.class, courseList);
        response.setHeader("content-disposition","attachment;fileName="+ URLEncoder.encode("课程信息列表.xls","UTF-8"));
        ServletOutputStream outputStream = response.getOutputStream();
        workbook.write(outputStream);

        outputStream.close();
        workbook.close();
    }
2) HTML页面
<a th:href="@{/course/exportExcel}" class="btn btn-info" >导出excel</a>
3) 启动项目测试


 22万+
22万+


 被折叠的 条评论
为什么被折叠?
被折叠的 条评论
为什么被折叠?
 到【灌水乐园】发言


