


最简单就是直接安装
pacman -S mingw-w64-x86_64-opencv脚本中最好使用环境变量 ${MINGW_PACKAGE_PREFIX} 适配
pacman -S --needed ${MINGW_PACKAGE_PREFIX}-opencv以下记录一下编译的过程
一)安装编译工具及第三方库
注意:一定要安装 mingw-w64-x86_64-cmake 而不是 cmake,即不要执行 “pacman -S cmake”
否则会产生 “System is unknown to cmake, create 。。。” 报错信息
pacman -S --needed base-devel vim tar wget unzip protobuf

pacman -S --needed \
			${MINGW_PACKAGE_PREFIX}-cmake \
			${MINGW_PACKAGE_PREFIX}-gcc \
			${MINGW_PACKAGE_PREFIX}-toolchain \
			${MINGW_PACKAGE_PREFIX}-boost \
			${MINGW_PACKAGE_PREFIX}-ccache \
			${MINGW_PACKAGE_PREFIX}-eigen3 \
			${MINGW_PACKAGE_PREFIX}-gcc-libgfortran \
			${MINGW_PACKAGE_PREFIX}-gtk3 \
			${MINGW_PACKAGE_PREFIX}-julia \
			${MINGW_PACKAGE_PREFIX}-ogre3d \
			${MINGW_PACKAGE_PREFIX}-python \
			${MINGW_PACKAGE_PREFIX}-python2 \
			${MINGW_PACKAGE_PREFIX}-python-pip \
			${MINGW_PACKAGE_PREFIX}-python-numpy \
			${MINGW_PACKAGE_PREFIX}-vtk
pacman -S --needed \
			${MINGW_PACKAGE_PREFIX}-libpng \
			${MINGW_PACKAGE_PREFIX}-libjpeg \
			${MINGW_PACKAGE_PREFIX}-libtiff \
			${MINGW_PACKAGE_PREFIX}-libwebp
pacman -S --needed \
			${MINGW_PACKAGE_PREFIX}-dlib \
			${MINGW_PACKAGE_PREFIX}-ffmpeg \
			${MINGW_PACKAGE_PREFIX}-harfbuzz \
			${MINGW_PACKAGE_PREFIX}-lapack \
			${MINGW_PACKAGE_PREFIX}-openblas \
			${MINGW_PACKAGE_PREFIX}-opencl-clhpp \
			${MINGW_PACKAGE_PREFIX}-opencl-headers \
			${MINGW_PACKAGE_PREFIX}-opencl-icd \
			${MINGW_PACKAGE_PREFIX}-openmp

# optional
pacman -S  --needed \
			${MINGW_PACKAGE_PREFIX}-tesseract-ocr \
			${MINGW_PACKAGE_PREFIX}-tesseract-data-chi_sim \
			${MINGW_PACKAGE_PREFIX}-tesseract-data-chi_tra
下载 opencv4 源码并解压
	wget -O opencv.zip https://github.com/opencv/opencv/archive/4.x.zip
	wget -O opencv_contrib.zip https://github.com/opencv/opencv_contrib/archive/4.x.zip
	unzip opencv.zip
	unzip opencv_contrib.zip
编写脚本 build-ocv.sh
#!/bin/bash

BUILD_DIR=${1:-build}
export OpenBLAS_HOME=/mingw64
export  PATH=/mingw64/lib:/mingw64/bin:/mingw64/include:$PATH

[ -e ${BUILD_DIR} ] && rm -r ${BUILD_DIR}/* || mkdir ${BUILD_DIR}

cmake  -B${BUILD_DIR} \
	-DOPENCV_EXTRA_MODULES_PATH=opencv_contrib-4.x/modules \
	-DCMAKE_CXX_EXTENSIONS=ON -DCMAKE_CXX_STANDARD=14 \
	-DWITH_OBSENSOR=OFF \
	-DWITH_OPENGL=ON \
	-DWITH_QT=OFF \
	-DWITH_GSTREAMER=ON \
	-DWITH_OPENCL=ON \
	-DOPENCV_ENABLE_NONFREE=ON \
	opencv-4.x

# Build
[ $? -eq 0 ] &&  cmake --build ${BUILD_DIR} -j 8
由于网络速度慢,有几个文件下载超时,我通过迅雷下载好后
https://raw.githubusercontent.com/opencv/opencv_3rdparty/1224f78da6684df04397ac0f40c961ed37f79ccb/ippicv/ippicv_2021.8_lnx_intel64_20230330_general.tgz
https://raw.githubusercontent.com/opencv/opencv_3rdparty/1224f78da6684df04397ac0f40c961ed37f79ccb/ippicv/ippicv_2021.8_win_intel64_20230330_general.zip
https://github.com/opencv/ade/archive/v0.1.2b.zip
https://raw.githubusercontent.com/opencv/opencv_3rdparty/8afa57abc8229d611c4937165d20e2a2d9fc5a12/face_landmark_model.dat
我通过迅雷下载后,复制到相应目录
cp ippicv_2021.8_lnx_intel64_20230330_general.tgz  opencv-4.x/3rdparty/ippicv/
cp ippicv_2021.8_win_intel64_20230330_general.zip  opencv-4.x/3rdparty/ippicv/
cp  -f ade-0.1.2b.zip  opencv-4.x/.cache/ade/4f93a0844dfc463c617d83b09011819a-v0.1.2b.zip
cp face_landmark_model.dat opencv-4.x/.cache/data/7505c44ca4eb54b4ab1e4777cb96ac05-face_landmark_model.dat
二)错误修复:
1. 在 msys2环境中执行 python 及 python2 失败。
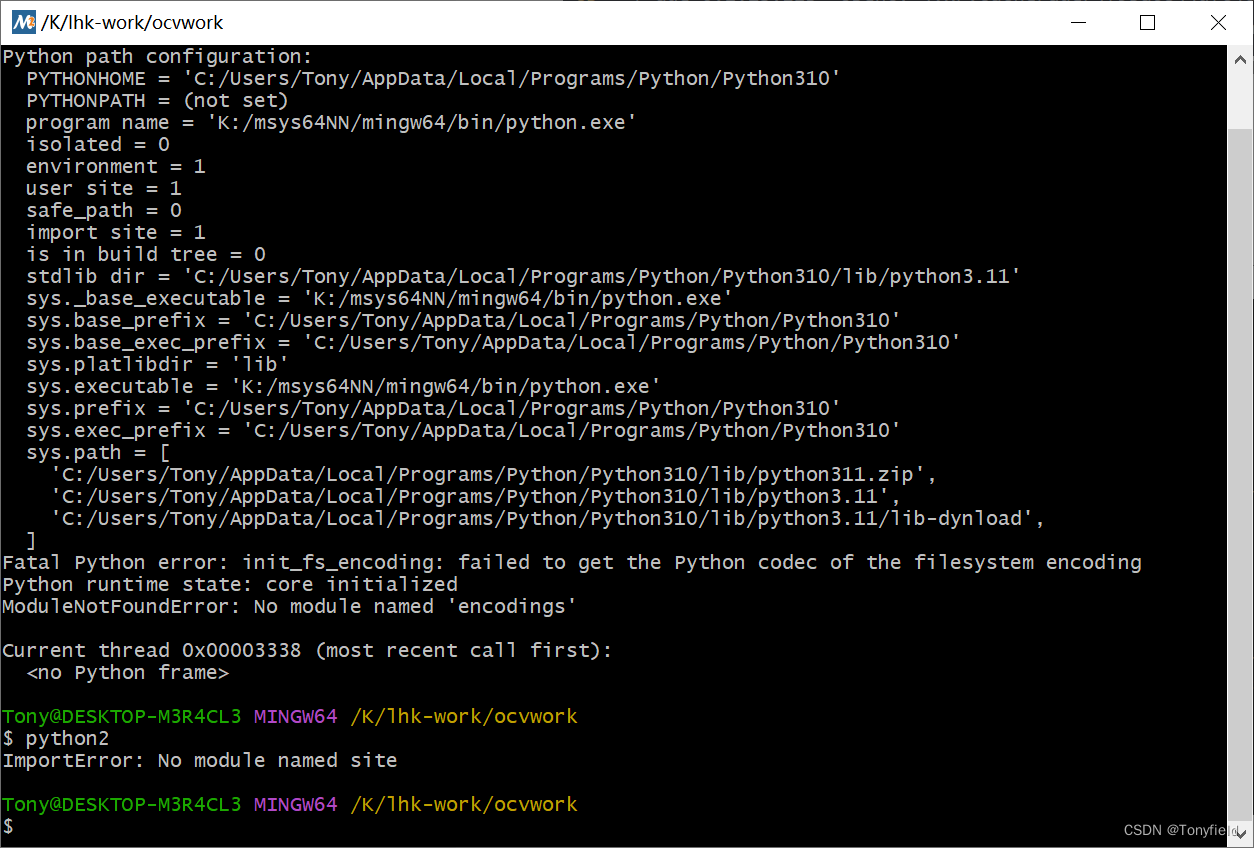
原因:msys2中的 python启动受到系统环境变量 PYTHONHOME 影响,这个环境变量一般是安装python windows 版本时被自动设置的。

解决方法: 执行 unset PYTHONHOME,如果不想每次启动msys都执行一次,可以写进 /etc/.bashrc 脚本中。
2. 编译 obsensor 失败
C:/workspace/libs/opencv/modules/videoio/src/cap_obsensor/obsensor_stream_channel_msmf.hpp:106:27: error: could not convert template argument 'cv::obsensor::ComPtr<IKsControl>::__T_IID_getter' from 'const IID& (cv::obsensor::ComPtr<IKsControl>::)()' {aka 'const GUID& (cv::obsensor::ComPtr<IKsControl>::)()'} to 'const IID& (*)()' {aka 'const GUID& (*)()'}
(参考 :Build with Ninja (MSYS2 UCRT64) on Windows 11 fails · Issue #23070 )
原因: obsensor backend seems not to be supported on gcc.
解决方案 :在cmake命令后增加 “ -DWITH_OBSENSOR=OFF ” 配置项
3. 编译 homography.cc 出错
编译 opencv_contrib-4.x/modules/sfm/src/libmv_light/libmv/multiview/homography.cc 是报错:
mingw64/include/ceres/jet.h:834:10: error: 'j0' was not declared in this scope; did you mean 'V0'?
参考 :j0 , j1, jn was not declared in this scope, …… · Issue #3013
解决方案: cmake 配置参数增加 -DCMAKE_CXX_EXTENSIONS=ON 和 -DCMAKE_CXX_STANDARD=14
4. OPENBLAS 检测失败
-- Could not find OpenBLAS include. Turning OpenBLAS_FOUND off
解决方案 :增加 OpenBLAS_HOME 定义
export OpenBLAS_HOME=/mingw645. glog/gflags 组件检测失败
(安装 mingw-w64-x86_64-cmake 而不是 cmake,以下是坚持使用 cmake的解决方法,我是杠精。)
查看 CMakeFile/CMakeError.log 内容
Run Build Command(s): /usr/bin/cmake.exe -E env VERBOSE=1 /usr/bin/make.exe -f Makefile cmTC_32ed8/fast
/usr/bin/make -f CMakeFiles/cmTC_32ed8.dir/build.make CMakeFiles/cmTC_32ed8.dir/build
make[1]: Entering directory '/home/rd/opencv/build/CMakeFiles/CMakeTmp'
Building CXX object CMakeFiles/cmTC_32ed8.dir/check_glog_gflags.cpp.o
/mingw64/bin/c++.exe -DGFLAGS_IS_A_DLL=1 -DGLOG_CUSTOM_PREFIX_SUPPORT -DGLOG_NO_ABBREVIATED_SEVERITIES -isystem/mingw64/include -fsigned-char -W -Wall -Wreturn-type -Wnon-virtual-dtor -Waddress -Wsequence-point -Wformat -Wformat-security -Wmissing-declarations -Wundef -Winit-self -Wpointer-arith -Wshadow -Wsign-promo -Wuninitialized -Wsuggest-override -Wno-delete-non-virtual-dtor -Wno-comment -Wimplicit-fallthrough=3 -Wno-strict-overflow -fdiagnostics-show-option -Wno-long-long -pthread -fomit-frame-pointer -ffunction-sections -fdata-sections -msse -msse2 -msse3 -fvisibility=hidden -fvisibility-inlines-hidden -O3 -DNDEBUG -DNDEBUG -std=c++11 -o CMakeFiles/cmTC_32ed8.dir/check_glog_gflags.cpp.o -c /home/rd/opencv/opencv_contrib-4.x/modules/sfm/cmake/checks/check_glog_gflags.cpp
In file included from D:/msys64/mingw64/include/glog/logging.h:45,
from D:/msys64/home/rd/opencv/opencv_contrib-4.x/modules/sfm/cmake/checks/check_glog_gflags.cpp:1:
D:/msys64/mingw64/include/c++/13.2.0/cstdlib:79:15: fatal error: stdlib.h: No such file or directory
79 | #include_next <stdlib.h>
| ^~~~~~~~~~
compilation terminated.
make[1]: *** [CMakeFiles/cmTC_32ed8.dir/build.make:78: CMakeFiles/cmTC_32ed8.dir/check_glog_gflags.cpp.o] Error 1
make[1]: Leaving directory '/home/rd/opencv/build/CMakeFiles/CMakeTmp'
make: *** [Makefile:127: cmTC_32ed8/fast] Error 2, SFM_GLOG_GFLAGS_TEST FALSE
解决方案 :
增加编译宏定义 ENABLE_PRECOMPILED_HEADERS=OFF
(参考C++编译时cstdlib中的#include_next <stdlib.h>报错、解决与思考_#include_next <stdlib.h>_彩虹能场的博客-CSDN博客)
手动测试编译指令如下,发现没有解决
/mingw64/bin/c++.exe -DENABLE_PRECOMPILED_HEADERS=OFF -DGFLAGS_IS_A_DLL=1 -DGLOG_CUSTOM_PREFIX_SUPPORT -DGLOG_NO_ABBREVIATED_SEVERITIES -isystem /mingw64/include -fsigned-char -W -Wall -Wreturn-type -Wnon-virtual-dtor -Waddress -Wsequence-point -Wformat -Wformat-security -Wmissing-declarations -Wundef -Winit-self -Wpointer-arith -Wshadow -Wsign-promo -Wuninitialized -Wsuggest-override -Wno-delete-non-virtual-dtor -Wno-comment -Wimplicit-fallthrough=3 -Wno-strict-overflow -fdiagnostics-show-option -Wno-long-long -pthread -fomit-frame-pointer -ffunction-sections -fdata-sections -msse -msse2 -msse3 -fvisibility=hidden -fvisibility-inlines-hidden -O3 -DNDEBUG -DNDEBUG -std=c++11 -o CMakeFiles/cmTC_32ed8.dir/check_glog_gflags.cpp.o -c /home/rd/opencv/opencv_contrib-4.x/modules/sfm/cmake/checks/check_glog_gflags.cpp
Use of -isystem - Development - CMake Discourse解决方案2 :
删除 -isystem /mingw64/include
或改为 -isystem/mingw64/include (去除isystem后空格)
或改为 -I /mingw64/include (参考 Use of -isystem - Development - CMake Discourse )
手动测试编译指令如下,可以生成
/mingw64/bin/c++.exe -DGFLAGS_IS_A_DLL=1 -DGLOG_CUSTOM_PREFIX_SUPPORT -DGLOG_NO_ABBREVIATED_SEVERITIES -I /mingw64/include -fsigned-char -W -Wall -Wreturn-type -Wnon-virtual-dtor -Waddress -Wsequence-point -Wformat -Wformat-security -Wmissing-declarations -Wundef -Winit-self -Wpointer-arith -Wshadow -Wsign-promo -Wuninitialized -Wsuggest-override -Wno-delete-non-virtual-dtor -Wno-comment -Wimplicit-fallthrough=3 -Wno-strict-overflow -fdiagnostics-show-option -Wno-long-long -pthread -fomit-frame-pointer -ffunction-sections -fdata-sections -msse -msse2 -msse3 -fvisibility=hidden -fvisibility-inlines-hidden -O3 -DNDEBUG -DNDEBUG -std=c++11 -o CMakeFiles/cmTC_32ed8.dir/check_glog_gflags.cpp.o -c /home/rd/opencv/opencv_contrib-4.x/modules/sfm/cmake/checks/check_glog_gflags.cpp
修改 /opencv_contrib-4.x/modules/sfm/CMakeLists.txt 文件中 try_compile() 语句,增加 set(CMAKE_INCLUDE_SYSTEM_FLAG_CXX "-I"), 不好使。
  if(NOT DEFINED SFM_GLOG_GFLAGS_TEST_CACHE_KEY OR NOT (SFM_GLOG_GFLAGS_TEST_CACHE_KEY STREQUAL __cache_key))
	set(CMAKE_INCLUDE_SYSTEM_FLAG_CXX "-I")
    set(__fname "${CMAKE_CURRENT_LIST_DIR}/cmake/checks/check_glog_gflags.cpp")
    try_compile(
        SFM_GLOG_GFLAGS_TEST "${CMAKE_BINARY_DIR}" "${__fname}"
	    CMAKE_FLAGS "-DINCLUDE_DIRECTORIES:STRING=${GLOG_INCLUDE_DIRS};${GFLAGS_INCLUDE_DIRS}"
        LINK_LIBRARIES ${GLOG_LIBRARIES} ${GFLAGS_LIBRARIES}
        OUTPUT_VARIABLE __output
    )
    if(NOT SFM_GLOG_GFLAGS_TEST)
      file(APPEND ${CMAKE_BINARY_DIR}${CMAKE_FILES_DIRECTORY}/CMakeError.log
          "Failed compilation check: ${__fname}\n"
          "${__output}\n\n"
      )
    endif()
    set(SFM_GLOG_GFLAGS_TEST "${SFM_GLOG_GFLAGS_TEST}" CACHE INTERNAL "")
    set(SFM_GLOG_GFLAGS_TEST_CACHE_KEY "${__cache_key}" CACHE INTERNAL "")
    message(STATUS "Checking SFM glog/gflags deps... ${SFM_GLOG_GFLAGS_TEST}")
  endif()
修改 /usr/share/cmake/Modules/Compiler/GNU.cmake,注释掉 “ set(CMAKE_INCLUDE_SYSTEM_FLAG_${lang} "-isystem ") ” ,成功。
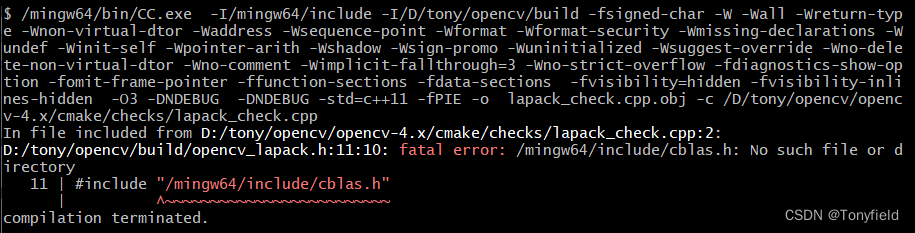
6. lapack 组件检测失败
(安装 mingw-w64-x86_64-cmake 而不是 cmake,以下是坚持使用 cmake的解决方法,我是杠精。)
Run Build Command(s): /usr/bin/cmake.exe -E env VERBOSE=1 /usr/bin/make.exe -f Makefile cmTC_dfa1f/fast
/usr/bin/make -f CMakeFiles/cmTC_dfa1f.dir/build.make CMakeFiles/cmTC_dfa1f.dir/build
make[1]: Entering directory '/D/word/opencv/build/CMakeFiles/CMakeTmp'
Building CXX object CMakeFiles/cmTC_dfa1f.dir/lapack_check.cpp.obj
/mingw64/bin/CC.exe -I/mingw64/include -I/D/tony/opencv/build -fsigned-char -W -Wall -Wreturn-type -Wnon-virtual-dtor -Waddress -Wsequence-point -Wformat -Wformat-security -Wmissing-declarations -Wundef -Winit-self -Wpointer-arith -Wshadow -Wsign-promo -Wuninitialized -Wsuggest-override -Wno-delete-non-virtual-dtor -Wno-comment -Wimplicit-fallthrough=3 -Wno-strict-overflow -fdiagnostics-show-option -fomit-frame-pointer -ffunction-sections -fdata-sections -fvisibility=hidden -fvisibility-inlines-hidden -O3 -DNDEBUG -DNDEBUG -std=c++11 -fPIE -o CMakeFiles/cmTC_dfa1f.dir/lapack_check.cpp.obj -c /D/work/opencv/opencv-4.x/cmake/checks/lapack_check.cpp
In file included from D:/rd/opencv/opencv-4.x/cmake/checks/lapack_check.cpp:2:
D:/work/opencv/build/opencv_lapack.h:11:10: fatal error: /mingw64/include/cblas.h: No such file or directory
11 | #include "/mingw64/include/cblas.h"
| ^~~~~~~~~~~~~~~~~~~~~~~~~~
compilation terminated.
make[1]: *** [CMakeFiles/cmTC_dfa1f.dir/build.make:78: CMakeFiles/cmTC_dfa1f.dir/lapack_check.cpp.obj] Error 1
make[1]: Leaving directory '/D/rd/opencv/build/CMakeFiles/CMakeTmp'
make: *** [Makefile:127: cmTC_dfa1f/fast] Error 2
直接命令行执行编译指令可以复现这个错误。
问题来源:
此天坑是由于 mingw的unix形式路径(/mingw64/include)都应该转化成windows形式使用(C:/msys2/ming64/include),一般 mingw会帮你自动完成,但是 gcc( g++、cc) 不是为 mingw 维护的,所以gcc可不会转换这个绝对路径。于是死球。
参考:gcc/g++ cannot include file with absolute path · Issue #6711 · msys2/MINGW-packages · GitHub
如果山不向你而来,你就应该向山撞去,
修改 opencv-4.x/cmake/OpenCVFindLAPACK.cmake
和 opencv-4.x/cmake/OpenCVFindLAPACK-DBG.cmake。
删除 _find_header_file_in_dirs() 调用中的第三个参数 ${LAPACK_INCLUDE_DIR},这个参数会产生一个绝对路径,这个参数值正是 /mingw64/include
macro(_find_header_file_in_dirs VAR NAME)
  unset(${VAR})
  unset(${VAR} CACHE)
  if(" ${ARGN}" STREQUAL " ")
    check_include_file("${NAME}" HAVE_${VAR})
    if(HAVE_${VAR})
      set(${VAR} "${NAME}") # fallback
    else()
      set(${VAR} "")
    endif()
  else()
    find_path(${VAR} "${NAME}" ${ARGN} NO_DEFAULT_PATH)
    if(${VAR})
      set(${VAR} "${${VAR}}/${NAME}")
      unset(${VAR} CACHE)
    else()
      unset(${VAR} CACHE)
      set(${VAR} "")
    endif()
  endif()
endmacro()

macro(ocv_lapack_check)
  string(REGEX REPLACE "[^a-zA-Z0-9_]" "_" _lapack_impl "${LAPACK_IMPL}")
  message(STATUS "LAPACK(${LAPACK_IMPL}): LAPACK_LIBRARIES: ${LAPACK_LIBRARIES}")
  ## _find_header_file_in_dirs(OPENCV_CBLAS_H_PATH_${_lapack_impl} "${LAPACK_CBLAS_H}" "${LAPACK_INCLUDE_DIR}")
  _find_header_file_in_dirs(OPENCV_CBLAS_H_PATH_${_lapack_impl} "${LAPACK_CBLAS_H}" )
  ## _find_header_file_in_dirs(OPENCV_LAPACKE_H_PATH_${_lapack_impl} "${LAPACK_LAPACKE_H}" "${LAPACK_INCLUDE_DIR}")
  _find_header_file_in_dirs(OPENCV_LAPACKE_H_PATH_${_lapack_impl} "${LAPACK_LAPACKE_H}")
之后,链接 lapack_check.obj 报错无数
D:/msys64/mingw64/lib/libopenblas.a(sgemm_direct_performant_BULLDOZER.c.obj):(.text+0x41): undefined reference to `omp_get_max_threads'
手动执行编译指令调试
echo " lapack_check.cpp  -->  lapack_check.obj  "

/mingw64/bin/CC.exe  -I/mingw64/include -I/D/tony/opencv/build -fsigned-char -W -Wall -Wreturn-type -Wnon-virtual-dtor -Waddress -Wsequence-point -Wformat -Wformat-security -Wmissing-declarations -Wundef -Winit-self -Wpointer-arith -Wshadow -Wsign-promo -Wuninitialized -Wsuggest-override -Wno-delete-non-virtual-dtor -Wno-comment -Wimplicit-fallthrough=3 -Wno-strict-overflow -fdiagnostics-show-option -fomit-frame-pointer -ffunction-sections -fdata-sections  -fvisibility=hidden -fvisibility-inlines-hidden  -O3 -DNDEBUG  -DNDEBUG -std=c++11 -fPIE \
-o lapack_check.cpp.obj \
-c opencv-4.x/cmake/checks/lapack_check.cpp

echo " lapack_check.obj  -->  lapack_check.out  "

/mingw64/bin/CC.exe    -fsigned-char -W -Wall -Wreturn-type -Wnon-virtual-dtor -Waddress -Wsequence-point -Wformat -Wformat-security -Wmissing-declarations -Wundef -Winit-self -Wpointer-arith -Wshadow -Wsign-promo -Wuninitialized -Wsuggest-override -Wno-delete-non-virtual-dtor -Wno-comment -Wimplicit-fallthrough=3 -Wno-strict-overflow -fdiagnostics-show-option -fomit-frame-pointer -ffunction-sections -fdata-sections  -fvisibility=hidden -fvisibility-inlines-hidden  -O3 -DNDEBUG  -DNDEBUG   -Wl,--gc-sections \
lapack_check.cpp.obj \
-o lapack_check.out  \
/mingw64/lib/libopenblas.a
发现还需要追加静态库
- /mingw64/lib/libgomp.a
- /mingw64/lib/gcc/x86_64-w64-mingw32/13.2.0/libgfortran.a
- /mingw64/lib/libquadmath.a
手动编译成功
/mingw64/bin/CC.exe    -fsigned-char -W -Wall -Wreturn-type -Wnon-virtual-dtor -Waddress -Wsequence-point -Wformat -Wformat-security -Wmissing-declarations -Wundef -Winit-self -Wpointer-arith -Wshadow -Wsign-promo -Wuninitialized -Wsuggest-override -Wno-delete-non-virtual-dtor -Wno-comment -Wimplicit-fallthrough=3 -Wno-strict-overflow -fdiagnostics-show-option -fomit-frame-pointer -ffunction-sections -fdata-sections  -fvisibility=hidden -fvisibility-inlines-hidden  -O3 -DNDEBUG  -DNDEBUG   -Wl,--gc-sections \
lapack_check.cpp.obj \
-o lapack_check.out \
/mingw64/lib/libopenblas.a \
/mingw64/lib/libgomp.a \
/mingw64/lib/gcc/x86_64-w64-mingw32/13.2.0/libgfortran.a \
/mingw64/lib/libquadmath.a
,修改 opencv-4.x/cmake/OpenCVFindLAPACK.cmake
和 opencv-4.x/cmake/OpenCVFindLAPACK-DBG.cmake 如下:
-  set(LAPACK_LIBRARIES    ${OpenBLAS_LIB}
+  set(LAPACK_LIBRARIES    ${OpenBLAS_LIB}
+           /mingw64/lib/gcc/x86_64-w64-mingw32/13.2.0/libgfortran.a
+           /mingw64/lib/libquadmath.a
+           /mingw64/lib/libgomp.a
+   )
因为没有检查 libgomp等库是否存在,不算是一个完整的补丁,但效果不减。
(哎,干怎么多都不如安装正确的cmake版本,我真傻。)
7. 工作目录名的坑
工作目录名不要用 opencv2,否则编译 opencv-4.x/modules/gapi/misc/python/python_bridge.hpp
会报错。
祝好运。


 619
619


 被折叠的 条评论
为什么被折叠?
被折叠的 条评论
为什么被折叠?
 到【灌水乐园】发言


