


1. 安装jdk
https://blog.csdn.net/torpidcat/article/details/90549551
2. nginx
https://blog.csdn.net/torpidcat/article/details/97934302
3. mysql
https://blog.csdn.net/torpidcat/article/details/110265490
4. redis
https://blog.csdn.net/torpidcat/article/details/123021796
===================================
首次导入,需要先执行 npm install
#进入到前端模块目录下
cd ruoyi-ui
# 安装
npm install
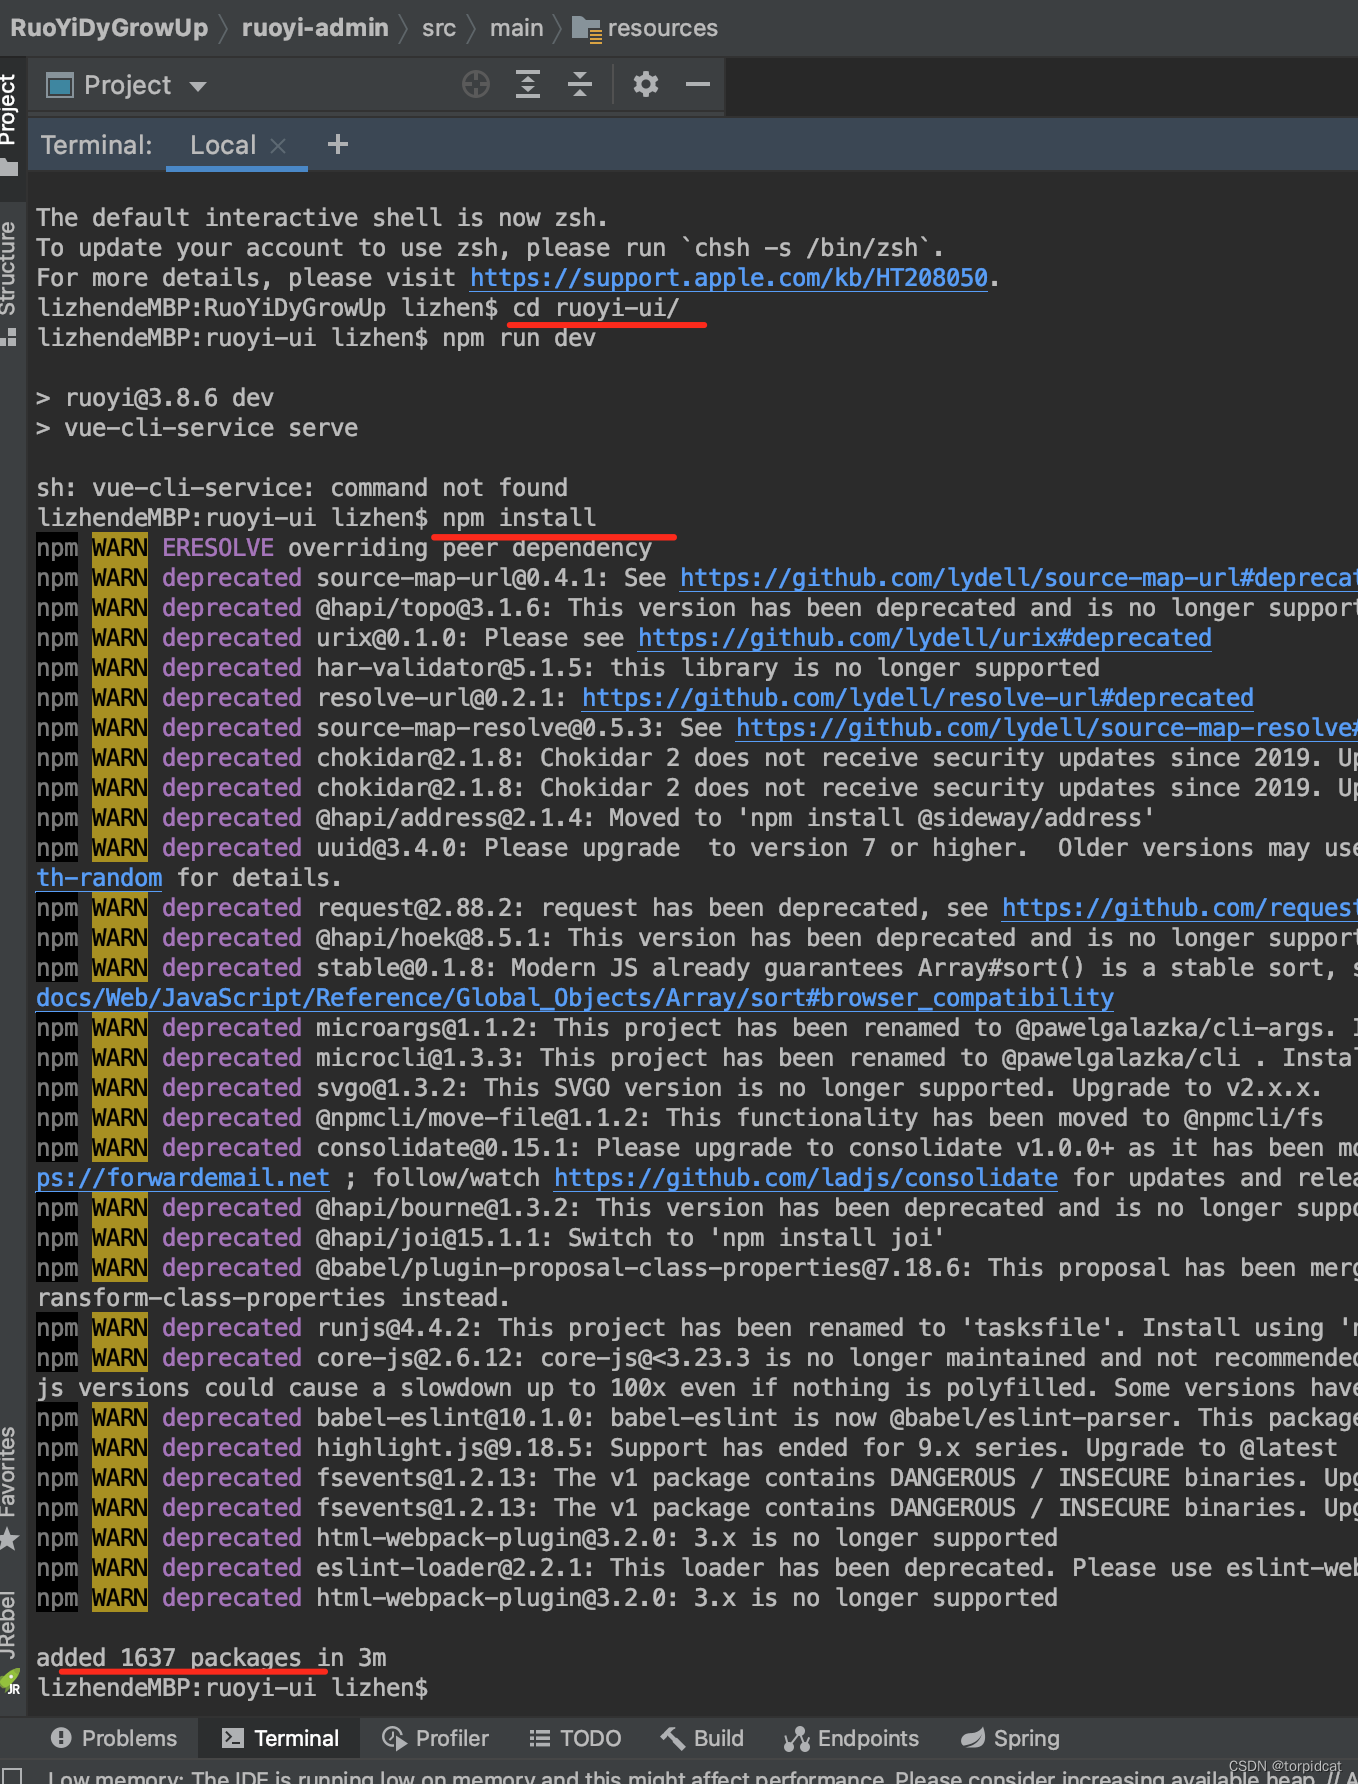
启动后端项目
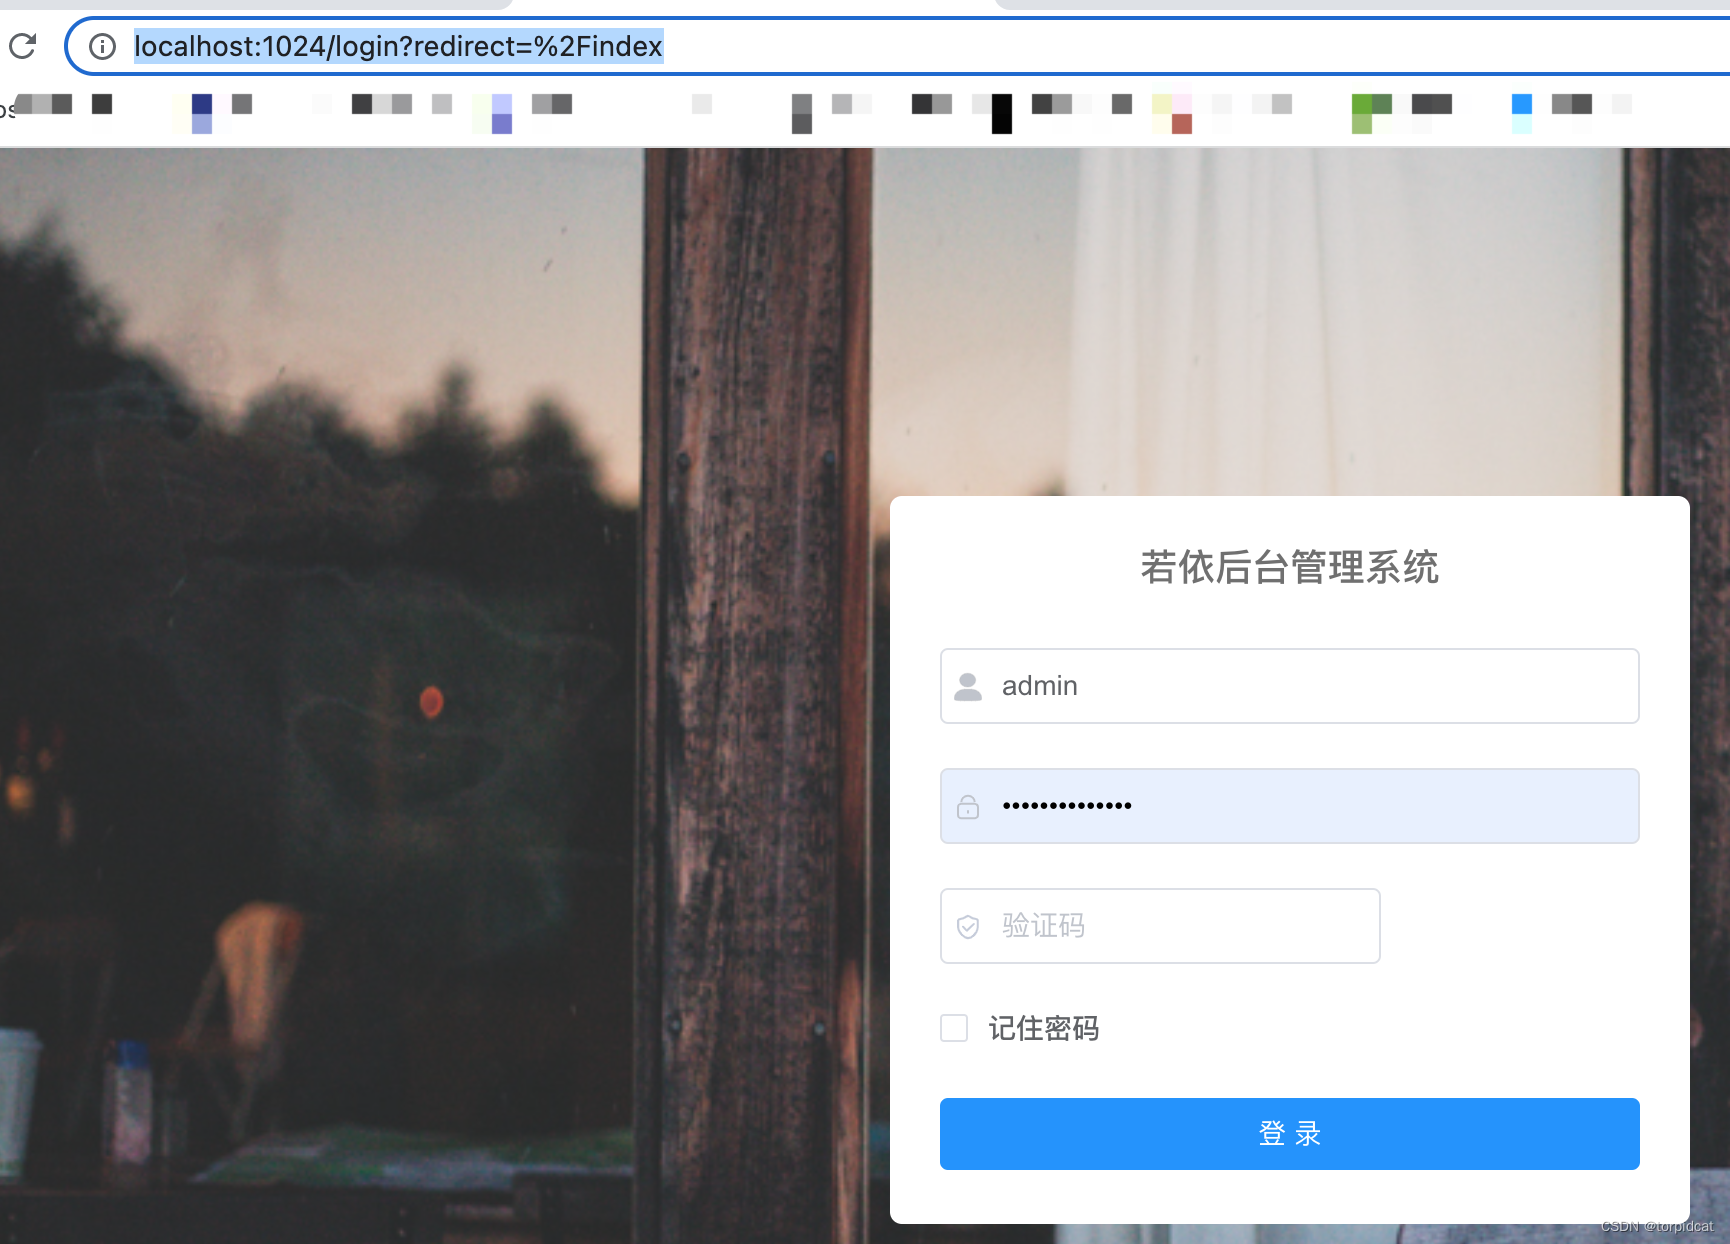
运行前端项目:运行成功后,会浏览器自动加载到前端首页(或者 浏览器访问打印的两个地址)
# 本地运行
npm run dev

部署打包:
#打包生成dist目录
cd ruoyi-ui
npm run build:prod
运行后 ruoyi-ui 目录下会创建一个dist目录,将dist目录压缩上传到服务器
服务器运行dist:
服务器安装nginx,nginx.conf 配置中server下新增location 指向到 dist目录,如下
#user  nobody;
worker_processes  1;
#error_log  logs/error.log;
#error_log  logs/error.log  notice;
#error_log  logs/error.log  info;
#pid        logs/nginx.pid;
events {
    worker_connections  1024;
}
http {
    include       mime.types;
    default_type  application/octet-stream;
    #log_format  main  '$remote_addr - $remote_user [$time_local] "$request" '
    #                  '$status $body_bytes_sent "$http_referer" '
    #                  '"$http_user_agent" "$http_x_forwarded_for"';
    #access_log  logs/access.log  main;
    sendfile        on;
    #tcp_nopush     on;
    #keepalive_timeout  0;
    keepalive_timeout  65;
    #gzip  on;
    server {
        # 原80端口改为使用81
        listen       81;
        server_name  localhost;
        #charset koi8-r;
        #access_log  logs/host.access.log  main;
        location / {
            root   html;
            index  index.html index.htm;
        }
        # ==========================================
        #微服务后台 前端VUE http://test.com/ 域名根目录访问项目
        location /{
            add_header Access-Control-Allow-Origin '*' always; # 解决跨域访问问题
            alias   /home/ruoyi/dist;#项目前端文件所在目录
            try_files $uri $uri/ /index.html;#自动寻找路径 找不到则默认访问index.html
            index  index.html index.htm;
        }

        #微服务后台  前端VUE http://test.com/admin/ 域名下项目目录访问项目
        #location /admin {
        #    add_header Access-Control-Allow-Origin '*' always; # 解决跨域访问问题
        #    alias   /home/ruoyi/dist;#项目前端文件所在目录
        #    try_files $uri $uri/ /index.html;#自动寻找路径 找不到则默认访问index.html
        #    index  index.html index.htm;
        #}
        #微服务 通过前端访问接口
        location /prod-api/ {
            proxy_set_header Host $http_host;
            proxy_set_header X-Real-IP $remote_addr;
            proxy_set_header REMOTE-HOST $remote_addr;
            proxy_set_header X-Forwarded-For $proxy_add_x_forwarded_for;
            proxy_pass http://localhost:8080/;
        }
        #微服务后台 后端接口
        location /api/ {
            proxy_set_header Host $http_host;
            proxy_set_header X-Real-IP $remote_addr;
            proxy_set_header REMOTE-HOST $remote_addr;
            proxy_set_header X-Forwarded-For $proxy_add_x_forwarded_for;
            proxy_pass http://localhost:8080/;
        }
        # ==========================================
        #error_page  404              /404.html;
        # redirect server error pages to the static page /50x.html
        #
        error_page   500 502 503 504  /50x.html;
        location = /50x.html {
            root   html;
        }
        # proxy the PHP scripts to Apache listening on 127.0.0.1:80
        #
        #location ~ \.php$ {
        #    proxy_pass   http://127.0.0.1;
        #}
        # pass the PHP scripts to FastCGI server listening on 127.0.0.1:9000
        #
        #location ~ \.php$ {
        #    root           html;
        #    fastcgi_pass   127.0.0.1:9000;
        #    fastcgi_index  index.php;
        #    fastcgi_param  SCRIPT_FILENAME  /scripts$fastcgi_script_name;
        #    include        fastcgi_params;
        #}
        # deny access to .htaccess files, if Apache's document root
        # concurs with nginx's one
        #
        #location ~ /\.ht {
        #    deny  all;
        #}
    }
    # another virtual host using mix of IP-, name-, and port-based configuration
    #
    #server {
    #    listen       8000;
    #    listen       somename:8080;
    #    server_name  somename  alias  another.alias;
    #    location / {
    #        root   html;
    #        index  index.html index.htm;
    #    }
    #}
    # HTTPS server
    #
    #server {
    #    listen       443 ssl;
    #    server_name  localhost;
    #    ssl_certificate      cert.pem;
    #    ssl_certificate_key  cert.key;
    #    ssl_session_cache    shared:SSL:1m;
    #    ssl_session_timeout  5m;
    #    ssl_ciphers  HIGH:!aNULL:!MD5;
    #    ssl_prefer_server_ciphers  on;
    #    location / {
    #        root   html;
    #        index  index.html index.htm;
    #    }
    #}
}
===================
编辑 application.yml
#修改线上、本地文件上传目录
profile: /home/ruoyi/uploadPath
服务器创建文件上传目录
#根据application.yml 文件 profile 参数值,创建对应目录
cd /home
mkdir ruoyi
cd /home/ruoyi
mkdir uploadPath
src/views/login.vue default的loginForm参数 username、password初始密码账号清空

重置系统原账号及密码
-- 数据库执行命令 重置两个用户的user_name
update sys_user set user_name = 'testadmin' where user_id = 1;
update sys_user set user_name = 'test' where user_id = 2;
admin 超管账号个人中心修改自己的密码、系统管理 - 用户管理 修改非超管用户的密码:

左侧菜单:隐藏停用非必要的菜单

左侧菜单:系统管理 - 参数设置 更改参数值,设置 登录页的注册入口开启和关闭、登录页验证码的开启和关闭

===================
安装jdk java
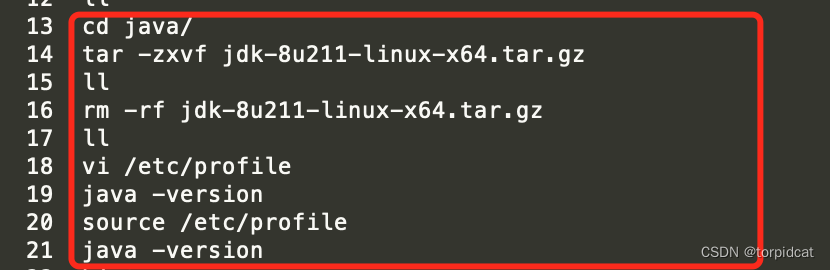
#进入opt目录
cd /opt
#创建java目录
mkdir java
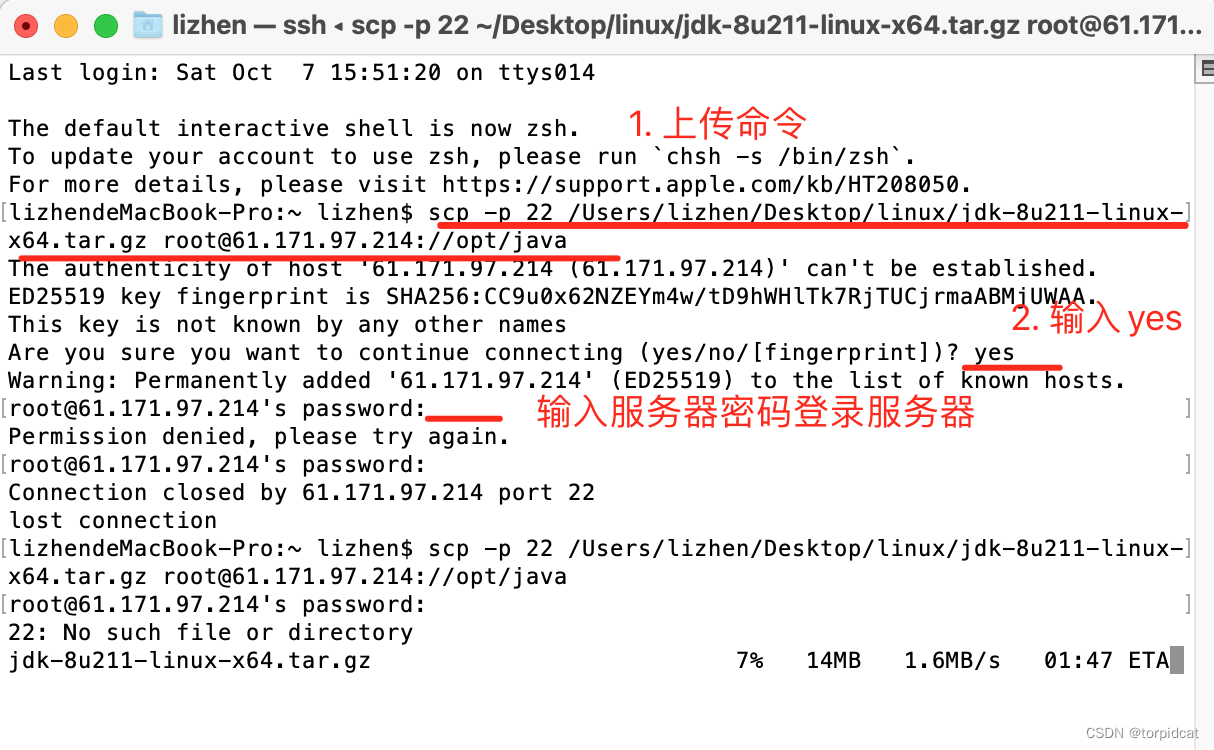
一、 上传jdk文件到服务器/opt/java目录下
1. mac 终端命令方式上传本地文件到服务器指定目录下
参考 https://blog.csdn.net/torpidcat/article/details/106520954
scp -p 22 /Users/lizhen/Desktop/linux/jdk-8u211-linux-x64.tar.gz root@61.171.97.214://opt/java
输入服务器密码
2. mac 系统 ShellCraft 的SFTP


二、解压 安装jdk
参考 https://blog.csdn.net/torpidcat/article/details/90549551
依次执行命令:
三. 安装nginx
https://blog.csdn.net/torpidcat/article/details/97934302
云主机安全组新增80端口的访问
四. mysql
https://blog.csdn.net/torpidcat/article/details/110265490
五. redis


 1729
1729


 被折叠的 条评论
为什么被折叠?
被折叠的 条评论
为什么被折叠?
 到【灌水乐园】发言


