


一、微信开发者工具当前系统代理不是安全代理,是否信任,点击信任以后点击登录二维码显示无法连接网络。
1.下载安装charles
2.打开charles
3.重新打开微信开发者工具
二、微信小程序包过大无法发布解决方法
1.分包
分包方式见官方介绍跳转官网
2.删除过大的插件或者库换成压缩包或者使用其他小的插件替换方式
3.图片压缩+分包
图片压缩可以在网上随便找个压缩网站或者压缩器压缩,然后把static里面的图片分散到各个分包里面,注意图片分包后只可以在当前分包中使用,并且在ios系统下需要require引入。
4.components中的组件分包
注意组件分包中的组件之可以在当前分包中使用,跨包无法使用.
5.easycom打包后会自动剔除没有使用的组件,对组件库的使用尤为友好
easycom使用方式见官网
6.代码压缩,uniapp运行-运行到微信小程序-勾选运行时是否压缩代码,有效减少vendor.js的代码
三、图片加水印
			// base64topath.js
			const FILE_BASE_NAME = 'tmp_base64src'; //⾃定义⽂件名
			function base64src(base64data, cb) {
			  const [, format, bodyData] = /data:image\/(\w+);base64,(.*)/.exec(base64data) || [];
			  if (!format) {
			    return (new Error('ERROR_BASE64SRC_PARSE'));
			  }
			  const filePath = `${wx.env.USER_DATA_PATH}/${FILE_BASE_NAME}.${format}`;
			  const buffer = wx.base64ToArrayBuffer(bodyData);
			  // console.log(filePath)
			  let fms = wx.getFileSystemManager()
			  fms.writeFile({
			    filePath,
			    data: buffer,
			    encoding: 'binary',
			    success() {
					// console.log(filePath)
			      cb(filePath);
			    },
			    fail() {
			      return (new Error('error'))
				  }
				})
			}
			export default base64src
			// 添加水印
			addWatermark(tempFilePath) {
				let self = this;
				return new Promise(async (resolve, reject) => {
					// 获取图片信息
					wx.getImageInfo({
						src: tempFilePath,
						success: async (res) => {
						const canvas = uni.createOffscreenCanvas({type: '2d', width: res.width, height: res.height})
						canvas._id = 'myCanvas';
						let context = canvas.getContext('2d')
						const image = canvas.createImage()
						  // 等待图片加载
						  await new Promise(resolve => {
							image.onload = resolve
							image.src = tempFilePath // 要加载的图片 url
						  })
						context.drawImage(image, 0, 0, res.width, res.height);

						// 设置文字字号及字体
						context.font = '28px sans-serif'
						// 设置画笔颜色
						context.fillStyle = 'rgba(0,0,0,0.2)';
						// 绘制矩形
						context.fillRect(0, 0, res.width, res.height)
						// 设置画笔颜色
						context.fillStyle = '#ffffff';
						context.textBaseline = 'top';
						context.shadowOffsetX=-2;//用来设定阴影在 X轴的延伸距
						context.shadowOffsetX=-2;//用来设定阴影在 Y轴的延伸距
						context.shadowBlur = 2;//设定阴影的模糊程度 默认0
						context.shadowColor = "rgba(0, 0, 0, 0.8)";
						// 填入文字
						let name = this.userInfo.name + '(' + this.userInfo.userName + ')';
						context.fillText(name, 20, 30);
						context.fillText(this.address, 20, 70);
						let date = moment(new Date()).format("YYYY-MM-DD HH:mm:ss")
						context.fillText(date, 20,110);
						// 将base64转为本地路径
						base64Img(context.canvas.toDataURL(), res => {
							resolve(res) // res为转换后的地址可以上传到后台服务
						})
					}
					})
				})
			},
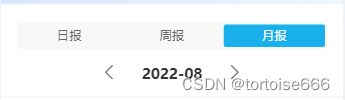
四、自定义时间切换组件
呈现效果
// timeselect.vue
<template>
	<view class="time_box">
		<!-- 周 -->
		<view v-if="dateType === '1'">
			<u-icon name="arrow-left" @click="weekPre" ></u-icon>
			<view class="time">
				<uni-dateformat :date="days[0]" format="yyyy-MM-dd"></uni-dateformat>~
				<uni-dateformat :date="days[6]" format="yyyy-MM-dd"></uni-dateformat>
			</view>
			<u-icon name="arrow-right" @click="weekNext"></u-icon>
		</view>

		<!-- 月 -->
		<view v-if="dateType === '2'">
			<u-icon name="arrow-left" @click="pickPre(currentYear, currentMonth)" ></u-icon>
			<view class="time">
				<uni-dateformat :date="month" format="yyyy-MM"></uni-dateformat>
			</view>
			<u-icon name="arrow-right" @click="pickNext(currentYear, currentMonth)"></u-icon>
		</view>


		<!-- 天 -->
		<view v-if="dateType === '0'">
			<u-icon name="arrow-left" @click="getNextDate(getDay, -1)" ></u-icon>
			<view class="time">
				<uni-dateformat :date="getDay" format="yyyy-MM-dd"></uni-dateformat>
			</view>
			<u-icon name="arrow-right" @click="getNextDate(getDay, 1)"></u-icon>
		</view>


	</view>
</template>

<script>
	export default {
		name: 'TimeSelsct',
		props: {
			dateType: {
				type: String,
				default: 'day'
			}
		},
		data() {
			return {
				currentYear: 1970, // 年份
				currentMonth: 1, // 月份
				currentDay: 1, // 日期
				currentWeek: 1, // 星期
				days: [],
				month: '',
				getDay: ''
			}
		},
		watch: {
			dateType(val) {
				if(val === '1') {
					this.$emit('getTime', this.days);
				}
				if(val === '2') {
					this.$emit('getTime', this.month)
				}
				if(val === '0') {
					this.$emit('getTime', this.getDay)
				}
			}
		},
		created() {
			this.initData(null)
		},
		methods: {

			formatDate(year, month, day) {
				const y = year
				let m = month
				if (m < 10) m = `0${m}`
				let d = day
				if (d < 10) d = `0${d}`
				return `${y}-${m}-${d}`
			},
			initData(cur) {
				let date = ''
				if (cur) {
					date = new Date(cur)
				} else {
					date = new Date()
				}
				this.currentDay = date.getDate() // 今日日期 几号
				this.currentYear = date.getFullYear() // 当前年份
				this.currentMonth = date.getMonth() + 1 // 当前月份
				this.currentWeek = date.getDay() // 1...6,0  // 星期几
				if (this.currentWeek === 0) {
					this.currentWeek = 7
				}

				const str = this.formatDate(this.currentYear, this.currentMonth, this.currentDay) // 今日日期 年-月-日
				this.month = str;
				this.getDay = str;
				this.days.length = 0
				// 今天是周日,放在第一行第7个位置,前面6个 这里默认显示一周,如果需要显示一个月,则第二个循环为 i<= 35- this.currentWeek
				/* eslint-disabled */
				for (let i = this.currentWeek - 1; i >= 0; i -= 1) {
					const d = new Date(str)
					d.setDate(d.getDate() - i)
					this.days.push(d)
				}
				for (let i = 1; i <= 7 - this.currentWeek; i += 1) {
					const d = new Date(str)
					d.setDate(d.getDate() + i)
					this.days.push(d)
				}
				if(this.dateType === '1') {
					this.$emit('getTime', this.days);
				} else {
					this.$emit('getTime', this.month)
				}
			},
			// 上个星期
			weekPre() {
				const d = this.days[0] // 如果当期日期是7号或者小于7号
				d.setDate(d.getDate() - 7)
				this.initData(d)
			},

			// 下个星期
			weekNext() {
				const d = this.days[6] // 如果当期日期是7号或者小于7号
				d.setDate(d.getDate() + 7)
				this.initData(d)
			},

			// 上一個月  传入当前年份和月份
			pickPre(year, month) {
				// this.month = (new Date()).getMonth() + 1;
				const d = new Date(this.formatDate(year, month, 1))
				d.setDate(0)
				this.initData(this.formatDate(d.getFullYear(), d.getMonth() + 1, 1))
			},


			// 下一個月  传入当前年份和月份
			pickNext(year, month) {
				// this.month = (new Date()).getMonth() + 1;
				const d = new Date(this.formatDate(year, month, 1))
				d.setDate(35)
				this.initData(this.formatDate(d.getFullYear(), d.getMonth() + 1, 1))
			},

			getNextDate(date,day) {
			  var dd = new Date(date);
			  dd.setDate(dd.getDate() + day);
			  var y = dd.getFullYear();
			  var m = dd.getMonth() + 1 < 10 ? "0" + (dd.getMonth() + 1) : dd.getMonth() + 1;
			  var d = dd.getDate() < 10 ? "0" + dd.getDate() : dd.getDate();
			  this.getDay = y + "-" + m + "-" + d;
			  // return y + "-" + m + "-" + d;
			  this.$emit('getTime', this.getDay)
			},

			// 当前选择日期
			pick(date) {
				alert(this.formatDate(date.getFullYear(), date.getMonth() + 1, date.getDate()))
			},

		}
	}
</script>

<style lang="scss">
.time_box {
	&>view {
		height: 100rpx;
		display: flex;
		align-items: center;
		justify-content: center;
		.time {
			font-size: 32rpx;
			font-family: PingFang SC;
			font-weight: bold;
			line-height: 45rpx;
			color: #333333;
			margin:0 50rpx;
		}
	}


}
</style>

// 使用page.vue
<template>
	<view>
		<view class="switch_nav b_border">
				<view class="subsection">
					<view @click="changeDateType(item.value)" :class="['item_subsection', (query.report_type === item.value ? 'chekced' : '')]" v-for="(item, index) in list">
						<text>{{item.label}}</text>
					</view>
				</view>
				<TimeSelsct @getTime="changetime" :dateType="query.report_type"/>
		</view>
	</view>
</template>

<script>
	import TimeSelsct from '@/components/timeselect.vue';
	export default {
		components: {
				TimeSelsct,
		},
		data() {
			return {
				list: [{
						label: '日报',
						value: '0'
					},
					{
						label: '周报',
						value: '1'
					},
					{
						label: '月报',
						value: '2'
				}],
				query: {
					report_type: '0',
				}
			}
		},
		methods: {
			changeDateType(val) {
				this.query.report_type = val;
			},
			changetime(time) {
				if(this.query.report_type === '0') {
					this.query.time = time;
				}
				if(this.query.report_type === '1') {
					this.query.time = moment(time[0]).format("YYYY-MM-DD") + ',' + moment(time[time.length-1]).format("YYYY-MM-DD")
				}
				if(this.query.report_type === '2') {
					this.query.time = moment(time).format("YYYY-MM");
				}
			},
		}
	}
</script>
<style lang="scss" scoped>
			.switch_nav {
				padding: 39rpx 35rpx 0;
				.subsection {
					height: 58rpx;
					background: #F8F8F8;
					border-radius: 10rpx;
					padding: 5rpx 6rpx;
					box-sizing: border-box;
					display: flex;
					align-items: center;
					justify-content: space-between;
					font-size: 26rpx;
					color: #666666;
				}
				.switch_time {
					height: 116rpx;
				}
				.item_subsection {
					height: 48rpx;
					width: 33%;
					display: flex;
					align-items: center;
					justify-content: center;
				}
				.chekced {

					border-radius: 5rpx;
					background-color: #19B0EB;
					color: #fff;
				}
		}
</style>


 582
582


 被折叠的 条评论
为什么被折叠?
被折叠的 条评论
为什么被折叠?
 到【灌水乐园】发言


