


1.6.2.Pytorch的基础数据类型
1.6.2.1.Torch定义了的七种CPU tensor类型和八种GPU tensor类型
1.6.2.2.基础数据类型
1.6.2.3.Pytorch数据类型
1.6.2.4.判断数据类型
1.6.2.5.CPU或GPU张量之间的转换
1.6.2.6.数据类型转换
1.6.2.7.常用向量
1.6.2.7.1. 1维向量
1.6.2.7.2. 2维向量
1.6.2.7.3. 3维向量
1.6.2.7.4. 4维向量
1.6.2.8.Tensor张量
1.6.2.9.Variable(变量)
1.6.2.Pytorch的基础数据类型
转自:https://www.cnblogs.com/taosiyu/p/11574412.html
转自:https://blog.csdn.net/weicao1990/article/details/93177626
1.6.2.1.Torch定义了的七种CPU tensor类型和八种GPU tensor类型

| Data type | CPU tensor | GPU tensor |
|---|---|---|
| 32-bit floating point | torch.FloatTensor | torch.cuda.FloatTensor |
| 64-bit floating point | torch.DoubleTensor | torch.cuda.DoubleTensor |
| 16-bit floating point | N/A | torch.cuda.HalfTensor |
| 8-bit integer (unsigned) | torch.ByteTensor | torch.cuda.ByteTensor |
| 8-bit integer (signed) | torch.CharTensor | torch.cuda.CharTensor |
| 16-bit integer (signed) | torch.ShortTensor | torch.cuda.ShortTensor |
| 32-bit integer (signed) | torch.IntTensor | torch.cuda.IntTensor |
| 64-bit integer (signed) | torch.LongTensor | torch.cuda.LongTensor |
torch.Tensor是默认的tensor类型(torch.FloatTensor)的简称。
1.6.2.2.基础数据类型
torch.Tensor是一种包含单一数据类型元素的多维矩阵。
1.6.2.3.Pytorch数据类型
同python相比,pytorch没有string类型
由于pytorch是面向计算的,对于字符这种通常通过编码下手
怎样用数字的形式去表示语言(字符串):NLP–>one-hot 或 Embedding (Word2vec,glove)
1.6.2.4.判断数据类型
1.打印数据类型:a.type()
2.打印的是基本的数据类型,没有提供额外的信息:type(a)
3.合法性检验:isinstance(a, torch.FloatTensor)
# -*- coding: UTF-8 -*-

import torch

# 两维,每个数字是由随机的正态分布来初始化的,均值是0,方差是1
a = torch.randn(2,3)
print(a)

# 方法一: 打印数据类型
print(a.type())
"""
输出结果:torch.FloatTensor
"""

# 方法二:打印数据类型,此种方式较少
print(type(a))
"""
输出结果:<class 'torch.Tensor'>
"""

# 方法三:合法性检验
print(isinstance(a, torch.FloatTensor))
"""
输出结果:True
"""
同一个tensor部署在cpu和gpu时的数据类型是不一样的
print(isinstance(a, torch.cuda.FloatTensor))
"""
False
"""

a = a.cuda()
print(isinstance(a, torch.cuda.FloatTensor))
"""
True
"""
标量Dimension 0/rank 0
print(torch.tensor(1.3))
"""
tensor(1.3000)
"""
loss就是一个标量
查看标量的维度
print(len(a.shape))
print(a.dim())
print(a.size())
输出结果:
2
2
torch.Size([2, 3])
a = torch.tensor(2.2)
print(a.shape)
"""
torch.Size([])
"""

print(len(a.shape))
"""
0
"""

print(a.size())
"""
torch.Size([])
"""

print(a.dim())
"""
0
"""
1.6.2.5.CPU或GPU张量之间的转换
1)CPU张量---->GPU张量, 使用Tensor.cuda()
2)GPU张量---->CPU张量,使用Tensor.cpu()
我们可以通过torch.cuda.is_available()函数来判断当前的环境是否支持GPU,如果支持,则返回True。所以,为保险起见,在项目代码中一般采取”先判断,后使用”的策略来保证代码的正常运行,其基本结构如下:
import torch
# 定义一个3行2列的全为0的矩阵
tmp = torch.randn((3, 2))
# 如果支持GPU,则定义为GPU类型
if torch.cuda.is_available():
    inputs = tmp.cuda()
# 否则,定义为一般的Tensor类型
else:
    inputs = tmp
1.6.2.6.数据类型转换
Tensor类型的变量进行类型转换一般有两种方法:
1)Tensor类型的变量直接调用long(), int(), double(),float(),byte()等函数就能将Tensor进行类型转换
2)在Tensor成员函数type()中直接传入要转换的数据类型。
当你不知道要转换为什么类型时,但需要求a1,a2两个张量的乘积,可以使用a1.type_as(a2)将a1转换为a2同类型。
示例代码:
import torch

a = torch.randn(2, 3)
print(a.type())
"""
输出解雇:torch.FloatTensor
"""

# 转换为IntTensor类型
b = a.int()

# 转换为LongTensor类型
c = a.type(torch.LongTensor)

print(b.type())
print(c.type())
"""
torch.IntTensor
torch.LongTensor
"""

# 将a转换为与b相同的类型
a.type_as(b)
print(a.type())
输出结果:
torch.FloatTensor
torch.IntTensor
torch.LongTensor
torch.FloatTensor
1.6.2.7.常用向量
1.6.2.7.1. 1维向量
1.torch.tensor([ 数据 ])
2.torch.FloatTensor(维度)
3.从numpy导入torch.from_numpy(data)
# -*- coding: UTF-8 -*-

import torch

'''
torch.tensor里面直接是数据
'''
print(torch.tensor([1.1]))
"""
tensor([1.1000])
"""

print(torch.tensor([1.1, 2.2]))
"""
tensor([1.1000, 2.2000])
"""

'''
torch.FloatTensor后面是维度
'''
print(torch.FloatTensor(1))
"""
tensor([0.])
"""

print(torch.FloatTensor(2))
"""
tensor([nan, 0.])
"""

import numpy as np
data = np.ones(2)
print(data)
"""
[1. 1.]
"""

print(torch.from_numpy(data))
"""
tensor([1., 1.], dtype=torch.float64)
"""
dim为1的向量有Bias
Linear Input线性层的输入
从0.4版本增加了 标量的表示,以前是[0.3]来表示标量,但这样语义上不太清晰。
1维的形状如何得到
.size
.shape
几个概念:
dim: 指的是size/shape的长度
size/shape: 指的是具体的形状
tensor: 指的是具体的数字
1.6.2.7.2. 2维向量
print("-----------------------------")
a = torch.randn(2,3)
print(a)
"""
输出结果:
tensor([[ 0.2193, -0.1624,  0.4880],
        [-0.3409, -0.0398, -0.1105]])
"""

print(a.shape)
"""
输出结果:torch.Size([2, 3])
"""

print(torch.Size([2,3]))
"""
输出结果:torch.Size([2, 3])
"""

print(a.size(0))
"""
输出结果:2
"""

print(a.size(1))
"""
输出结果:3
"""

print(a.shape[0])
"""
输出结果:2
"""

print(a.shape[1])
"""
输出结果:3
"""
常用于带有batch的Linear Input,例如[4, 784]4张784像素的图片。
1.6.2.7.3. 3维向量
形状:list(a.shape)
""" 使用随机的均匀分布 """
a = torch.rand(2, 2, 3)
print(a)
"""
输出结果:
tensor([[[0.5046, 0.1054, 0.7530],
         [0.9148, 0.1051, 0.1836]],
        [[0.1779, 0.4121, 0.9902],
         [0.0481, 0.3350, 0.3327]]])
"""

print(torch.Size([2, 2, 3]))
"""
输出结果 :torch.Size([2, 2, 3])
"""

""" 取第一个维度的第零号元素 [2, 3] """
print(a[0])
"""
输出结果:
tensor([[0.9671, 0.1238, 0.3057],
        [0.4024, 0.6567, 0.2158]])
"""

print(list(a.shape))
"""
输出结果:[2, 2, 3]
"""
场景:NLP文字处理
RNN Input Batch 例如 W,F[10, 100] 一个句子由10个单词构成,且每个单词由100维向量表示
W,S,F[10, 20, 100] 20个句子,每个句子由10个单词构成,且每个单词由100维向量表示
1.6.2.7.4. 4维向量
a = torch.rand(2,3,28,28)
print(a)
"""
输出结果:
tensor([[[[0.6231, 0.9154, 0.4204,  ..., 0.0579, 0.7664, 0.1785],
          [0.5089, 0.1688, 0.5066,  ..., 0.7042, 0.3496, 0.2878],
          [0.5088, 0.1218, 0.3959,  ..., 0.4361, 0.9444, 0.6922],
          ...,
          [0.2054, 0.3955, 0.5815,  ..., 0.1219, 0.6120, 0.5344],
          [0.3551, 0.6580, 0.2147,  ..., 0.3808, 0.0347, 0.7809],
          [0.0387, 0.9360, 0.9346,  ..., 0.2126, 0.4393, 0.3635]],
         [[0.0313, 0.3401, 0.5391,  ..., 0.7429, 0.9550, 0.8835],
          [0.8867, 0.8343, 0.6650,  ..., 0.2323, 0.7288, 0.6169],
          [0.0173, 0.2837, 0.0981,  ..., 0.7919, 0.1199, 0.4715],
          ...,
          [0.0065, 0.3136, 0.9442,  ..., 0.1014, 0.8131, 0.7077],
          [0.5674, 0.2298, 0.5876,  ..., 0.7588, 0.1455, 0.2006],
          [0.4947, 0.2612, 0.1119,  ..., 0.4409, 0.2100, 0.3606]],
         [[0.1816, 0.7162, 0.2843,  ..., 0.8659, 0.3539, 0.2105],
          [0.8740, 0.5211, 0.3080,  ..., 0.0186, 0.4834, 0.0604],
          [0.9522, 0.3371, 0.8377,  ..., 0.5938, 0.9316, 0.1068],
          ...,
          [0.5029, 0.0768, 0.0863,  ..., 0.4159, 0.8410, 0.0544],
          [0.5278, 0.4207, 0.8858,  ..., 0.1476, 0.3367, 0.4330],
          [0.4850, 0.6219, 0.9982,  ..., 0.0865, 0.5947, 0.5363]]],
        [[[0.0486, 0.4088, 0.2504,  ..., 0.0241, 0.5249, 0.4271],
          [0.8367, 0.0239, 0.7782,  ..., 0.8551, 0.8880, 0.4842],
          [0.5616, 0.8432, 0.6639,  ..., 0.9463, 0.5521, 0.9405],
          ...,
          [0.4830, 0.7709, 0.1868,  ..., 0.1166, 0.8649, 0.1682],
          [0.3598, 0.1117, 0.3153,  ..., 0.8129, 0.3032, 0.8810],
          [0.1691, 0.6173, 0.2354,  ..., 0.6724, 0.2057, 0.1257]],
         [[0.9701, 0.7867, 0.8495,  ..., 0.9854, 0.5879, 0.5311],
          [0.4379, 0.1123, 0.3955,  ..., 0.0373, 0.5489, 0.4325],
          [0.9141, 0.7619, 0.8913,  ..., 0.4997, 0.1641, 0.8735],
          ...,
          [0.4606, 0.6815, 0.3352,  ..., 0.1140, 0.0527, 0.0910],
          [0.7619, 0.5278, 0.0261,  ..., 0.2849, 0.0243, 0.5102],
          [0.1668, 0.0183, 0.7467,  ..., 0.3145, 0.5078, 0.1142]],
         [[0.6364, 0.2723, 0.5636,  ..., 0.6798, 0.7578, 0.0792],
          [0.8919, 0.5802, 0.8790,  ..., 0.9758, 0.6733, 0.9612],
          [0.8146, 0.0809, 0.4698,  ..., 0.4719, 0.4094, 0.6803],
          ...,
          [0.6182, 0.0760, 0.1162,  ..., 0.5734, 0.1516, 0.3907],
          [0.8162, 0.0702, 0.4725,  ..., 0.6663, 0.3173, 0.2642],
          [0.8898, 0.4762, 0.0644,  ..., 0.4956, 0.7831, 0.0645]]]])
"""

print(a.shape)
"""
输出结果:torch.Size([2, 3, 28, 28])
"""

print(a.numel())
"""
输出结果:4704
"""

print(a.dim())
"""
输出结果:4
"""
场景:CNN
[b, c, h, w] b: 几张照片 c: 通道 w:宽度 h:高度
PS: 在我们学习的过程中,一定要结合着物理意义去学习,就比如说我创建一个 [4,3,28,28] 的向量,这个向量有什么含义?当我们把向量进行matmul(矩阵相乘) 后,又有什么含义?不仅仅是为学习工具而去学习,而要时刻明白我这样做能达到什么样的效果。
1.6.2.8.Tensor张量
转自:https://blog.csdn.net/out_of_memory_error/article/details/81258809
Pytorch里面处理的最基本的操作对象就是Tensor(张量),它表示的其实就是一个多维矩阵,并有矩阵相关的运算操作。在使用上和numpy是对应的,它和numpy唯一的不同就是,pytorch可以在GPU上运行,而numpy不可以。所以,我们也可以使用Tensor来代替numpy的使用。当然,二者也可以相互转换。
Tensor的基本数据类型有五种:
32位浮点型:torch.FloatTensor。Pyorch.Tensor()默认的就是这种类型。
64位整型:torch.LongTensor。
32位整型:torch.IntTensor
16位整型:torch.ShortTensor
64位整型:torch.DoubleTensor
那么如何定义Tensor张量呢?其实定义的方式和numpy一样,直接传入相应的矩阵即可。下面就定义了一个三行两列的矩阵:
import torch

a = torch.Tensor([[1, 2],[3, 4], [5, 6]])
print(a)
"""
tensor([[1., 2.],
        [3., 4.],
        [5., 6.]])
"""
不过在项目之中,更多的做法是以特殊值或者随机值初始化一个矩阵,就像下面这样:
import torch

# 定义一个3行2列的全为0的矩阵
b = torch.zeros((3,2))

# 定义一个3行2列的随机值矩阵
c = torch.randn((3,2))

# 定义一个3行2列全为1的矩阵
d = torch.ones((3, 2))

print(b)
"""
tensor([[0., 0.],
        [0., 0.],
        [0., 0.]])
"""

print(c)
"""
tensor([[-0.4510, -0.3819],
        [ 2.3129,  1.8697],
        [-1.8247, -0.7346]])
"""

print(d)
"""
tensor([[1., 1.],
        [1., 1.],
        [1., 1.]])
"""
Tensor和numpy.ndarray之间还可以相互转换,其方式如下:
Numpy转化为Tensor: torch.from_numpy (numpy矩阵)
Tensor转化为numpy: Tensor矩阵.numpy()
范例如下:
import torch
import numpy as np

# 定义一个3行2列的全为0的矩阵
b = torch.randn((3, 2))

# tensor转化为numpy
numpy_b = b.numpy()
print(numpy_b)
"""
[[-1.2194347   0.3875851 ]
 [ 1.580722   -0.32657546]
 [-1.4154747   0.26230884]]
"""

# numpy转化为tensor
numpy_e = np.array([[1, 2], [3, 4], [5, 6]])
torch_e = torch.from_numpy(numpy_e)

print(numpy_e)
"""
[[1 2]
 [3 4]
 [5 6]]
"""

print(torch_e)
"""
tensor([[1, 2],
        [3, 4],
        [5, 6]], dtype=torch.int32)
"""
之前说过,numpy与Tensor最大的区别就是在对GPU的支持上。Tensor只需要调用cuda()函数就可以将其转化为能在GPU上运行的类型。
我们可以通过torch.cuda.is_available()函数来判断当前的环境是否支持GPU,如果支持,则返回True。所以,为保险起见,在项目代码中一般采取”先判断,后使用”的策略来保证代码的正常运行,其基本结构如下:
import torch

# 定义一个3行2列的全为0的矩阵
tmp = torch.randn((3, 2))

# 如果支持GPU,则定义为GPU类型
if torch.cuda.is_available():
    inputs = tmp.cuda()

# 否则,定义为一般的Tensor类型
else:
    inputs = tmp;
1.6.2.9.Variable(变量)
Pytorch里面的Variable类型数据功能更加强大,相当于是在Tensor外层套了一个壳子,这个壳子赋予了前向传播,反向传播,自动求导等功能,在计算图的构建中起的很重要的作用。Variable的结构图如下:
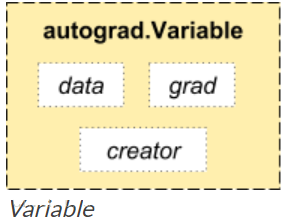
其中最重要的两个属性是:data和grad。data表示该变量保存的实际数据,通过该属性可以访问到它所保存的原始张量类型,而关于该variable (变量)的梯度会被累计到.grad上去。
在使用Variable的时候需要从torch.autograd中导入。下面通过一个例子来看一下它自动求导的过程:
import torch
from torch.autograd import Variable

# 定义三个Variable变量
x = Variable(torch.Tensor([1, 2, 3]), requires_grad=True)
w = Variable(torch.Tensor([2, 3, 4]), requires_grad=True)
b = Variable(torch.Tensor([3, 4, 5]), requires_grad=True)

# 构建计算图,公式为:y=w * x^2 + b
y = w * x * x + b

# 自动求导,计算梯度
y.backward(torch.Tensor([1, 1, 1]))

print(x.grad)
print(w.grad)
print(b.grad)
输出结果:
tensor([ 4., 12., 24.])
tensor([1., 4., 9.])
tensor([1., 1., 1.])
上述代码的计算图为y = w * x^2 + b。对x, w, b分别求偏导为:x.grad = 2wx,w.grad=x^2,b.grad=1。代值检验可得计算结果是正确的。


 2902
2902


 被折叠的 条评论
为什么被折叠?
被折叠的 条评论
为什么被折叠?
 到【灌水乐园】发言


