


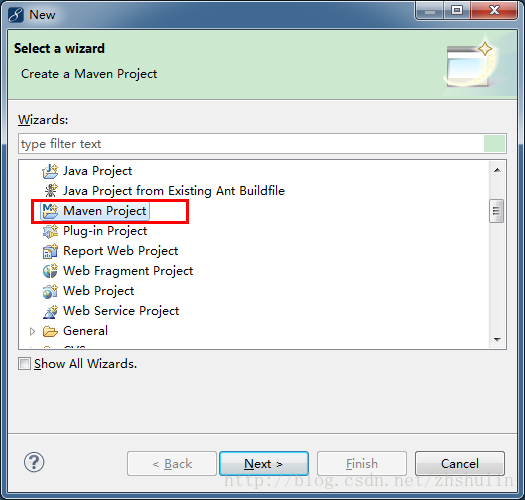
首先新建一个maven项目,如图:
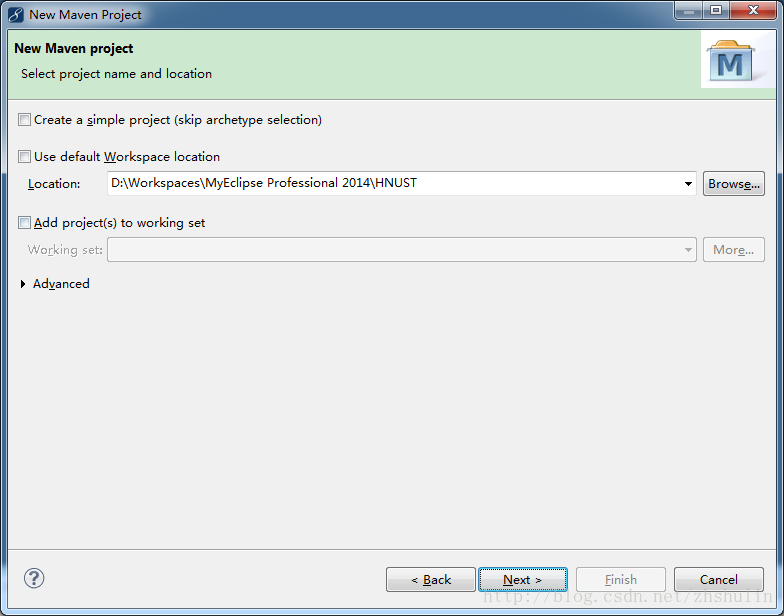
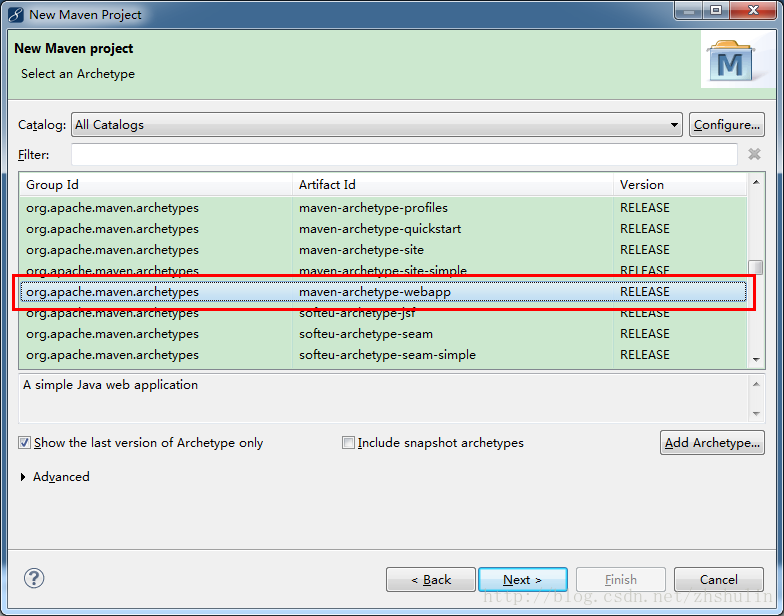
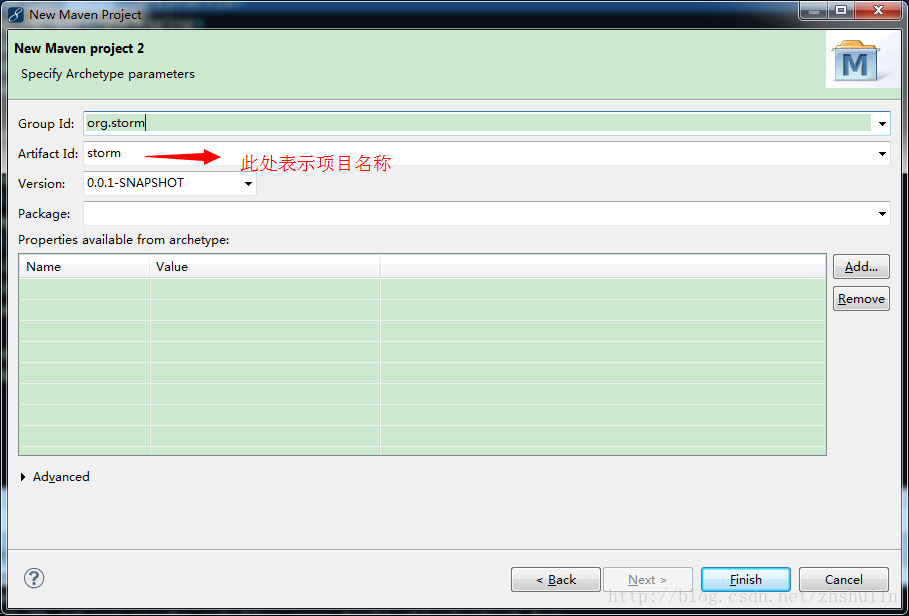
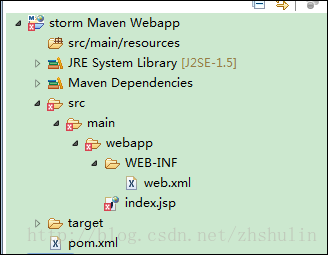
2、按照以上步骤就可以创建一个maven项目,可以看到最下图的目录结构,但是这样的目录结构是不对的,需要做一些修改。
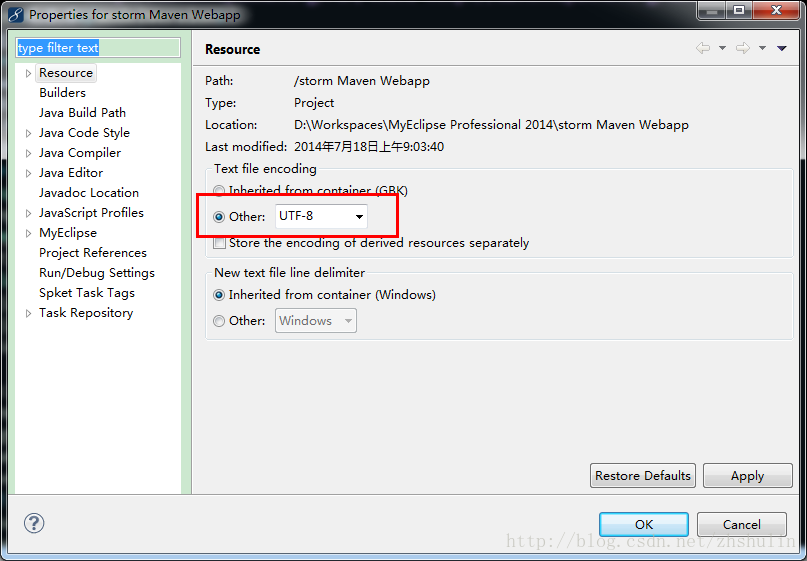
首先为了避免乱码,我们应该将项目编码换成UTF-8,以后项目编码都采用UTF-8,加个字符编码过滤器,乱码就不再“乱”了(不表示没有,但是比较容易解决)。
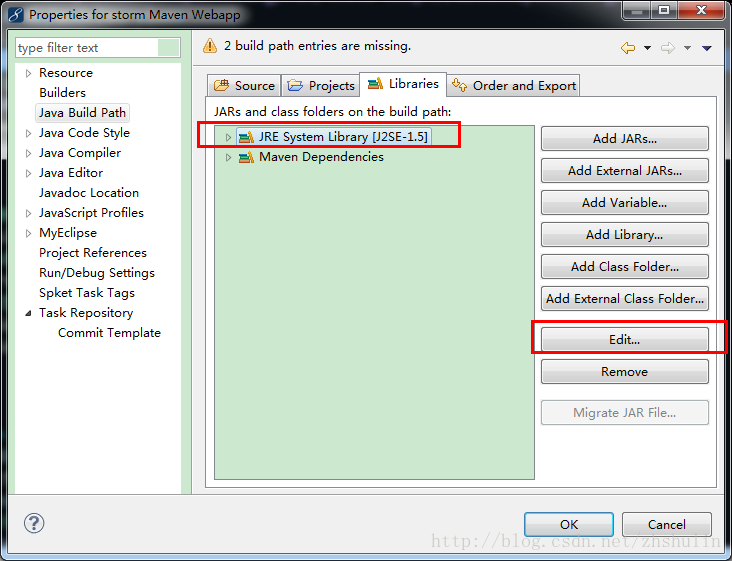
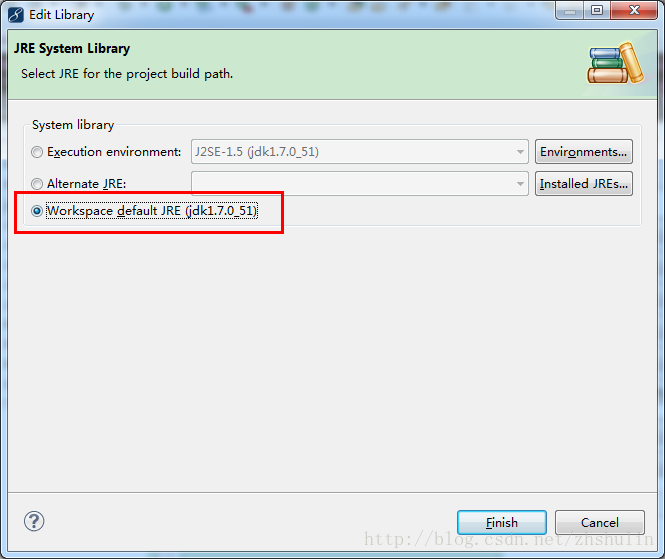
再次,按照以下图解来进行操作(设置JRE为默认的),这样就会出现完整的、正确的目录结构,至于什么原因,我不是很清楚,应该是个BUG:
最后,还有个index.jsp报错,我们需要引入Java EE的jar包即可。在pom.xml中引入:
- <!-- 导入java ee jar 包 -->
- <dependency>
- <groupId>javax</groupId>
- <artifactId>javaee-api</artifactId>
- <version>7.0</version>
- </dependency>
至此,完整的目录结构以及正确的项目搞定了。接下来再进行一些配置,毕竟是web项目,需要jstl等等,配置如下:
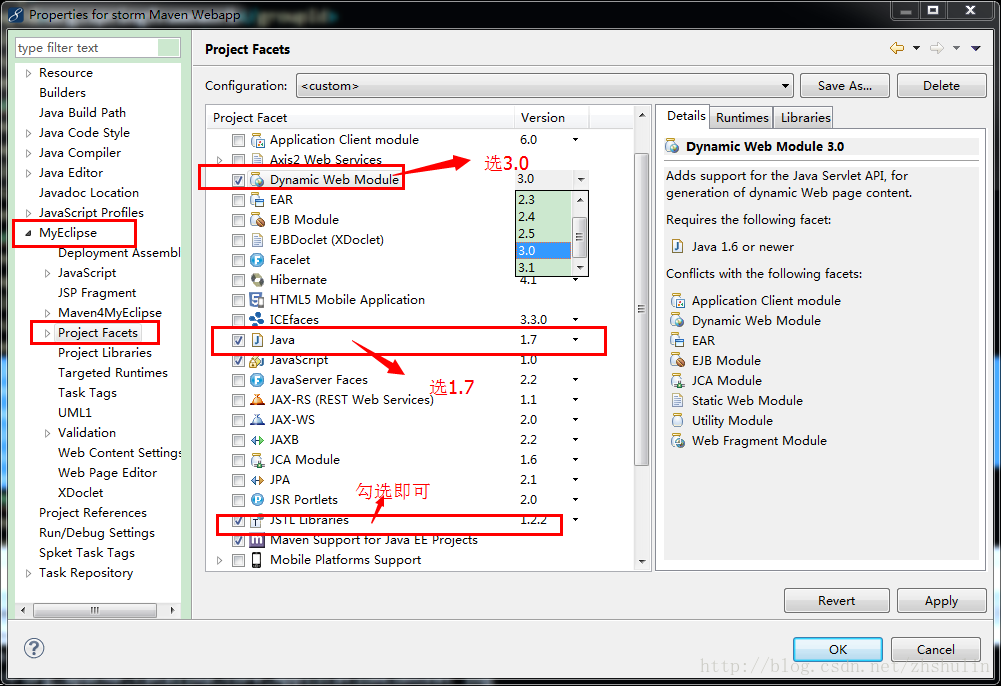
如果在选择改为3.0时候报错,修改不了 可以到项目工作空间下 workspace/项目名称/.settings /
打开org.eclipse.wst.common.project.facet.core.xml 修改为你需要的版本
参考:http://mvnrepository.com/,
Maven引入需要的JAR包
这是完整pom文件 如需要别的包自行加入
<?xml version="1.0" encoding="UTF-8"?>
<beans xmlns="http://www.springframework.org/schema/beans"
xmlns:xsi="http://www.w3.org/2001/XMLSchema-instance" xmlns:context="http://www.springframework.org/schema/context"
xmlns:aop="http://www.springframework.org/schema/aop" xmlns:tx="http://www.springframework.org/schema/tx"
xsi:schemaLocation="http://www.springframework.org/schema/beans
http://www.springframework.org/schema/beans/spring-beans-4.3.xsd
http://www.springframework.org/schema/context
http://www.springframework.org/schema/context/spring-context-4.3.xsd
http://www.springframework.org/schema/aop
http://www.springframework.org/schema/aop/spring-aop-4.3.xsd
http://www.springframework.org/schema/tx
http://www.springframework.org/schema/tx/spring-tx-4.3.xsd">
<!-- 加载配置属性文件 -->
<context:property-placeholder ignore-unresolvable="true" location="classpath:common.properties"/>
<!-- 扫描controller(controller层注入) -->
<context:component-scan base-package="com.tongxin.controller"/>
<!-- REST中根据URL后缀自动判定Content-Type及相应的View -->
<bean id="contentNegotiationManager" class="org.springframework.web.accept.ContentNegotiationManagerFactoryBean">
<property name="mediaTypes">
<map>
<entry key="xml" value="application/xml"/>
<entry key="json" value="application/json"/>
</map>
</property>
<property name="ignoreAcceptHeader" value="true"/>
<property name="favorPathExtension" value="true"/>
</bean>
<bean class="org.springframework.web.servlet.view.InternalResourceViewResolver">
<!-- 配置jsp路径的前缀 -->
<property name="prefix" value="/"/>
<!-- 配置jsp路径的后缀 -->
<property name="suffix" value=".jsp"/>
</bean>
<!-- 用于将对象转换为json -->
<bean id="stringConverter" class="org.springframework.http.converter.StringHttpMessageConverter">
<property name="supportedMediaTypes">
<list>
<value>text/plain;charset=UTF-8</value>
</list>
</property>
</bean>
<bean class="org.springframework.web.servlet.mvc.method.annotation.RequestMappingHandlerMapping"/>
<bean class="org.springframework.web.servlet.mvc.method.annotation.RequestMappingHandlerAdapter">
<property name="messageConverters">
<list>
<bean class="org.springframework.http.converter.json.MappingJackson2HttpMessageConverter" />
</list>
</property>
</bean>
</beans>
web.xm配置
<?xml version="1.0" encoding="UTF-8"?>
<!DOCTYPE web-app PUBLIC
"-//Sun Microsystems, Inc.//DTD Web Application 2.3//EN"
"http://java.sun.com/dtd/web-app_2_3.dtd" >
<web-app>
<display-name>Archetype Created Web Application</display-name>
<!-- 在Spring框架中是如何解决从页面传来的字符串的编码问题的呢?
下面我们来看看Spring框架给我们提供过滤器CharacterEncodingFilter
这个过滤器就是针对于每次浏览器请求进行过滤的,然后再其之上添加了父类没有的功能即处理字符编码。
其中encoding用来设置编码格式,forceEncoding用来设置是否理会 request.getCharacterEncoding()方法,设置为true则强制覆盖之前的编码格式。-->
<filter>
<filter-name>characterEncodingFilter</filter-name>
<filter-class>org.springframework.web.filter.CharacterEncodingFilter</filter-class>
<init-param>
<param-name>encoding</param-name>
<param-value>UTF-8</param-value>
</init-param>
<init-param>
<param-name>forceEncoding</param-name>
<param-value>true</param-value>
</init-param>
</filter>
<filter-mapping>
<filter-name>characterEncodingFilter</filter-name>
<url-pattern>/*</url-pattern>
</filter-mapping>
<!-- 项目中使用Spring 时,applicationContext.xml配置文件中并没有BeanFactory,要想在业务层中的class 文件中直接引用Spring容器管理的bean可通过以下方式-->
<!--1、在web.xml配置监听器ContextLoaderListener-->
<!--ContextLoaderListener的作用就是启动Web容器时,自动装配ApplicationContext的配置信息。因为它实现了ServletContextListener这个接口,在web.xml配置这个监听器,启动容器时,就会默认执行它实现的方法。
在ContextLoaderListener中关联了ContextLoader这个类,所以整个加载配置过程由ContextLoader来完成。
它的API说明
第一段说明ContextLoader可以由 ContextLoaderListener和ContextLoaderServlet生成。
如果查看ContextLoaderServlet的API,可以看到它也关联了ContextLoader这个类而且它实现了HttpServlet这个接口
第二段,ContextLoader创建的是 XmlWebApplicationContext这样一个类,它实现的接口是WebApplicationContext->ConfigurableWebApplicationContext->ApplicationContext->
BeanFactory这样一来spring中的所有bean都由这个类来创建
IUploaddatafileManager uploadmanager = (IUploaddatafileManager) ContextLoaderListener.getCurrentWebApplicationContext().getBean("uploadManager");
-->
<listener>
<listener-class>org.springframework.web.context.ContextLoaderListener</listener-class>
</listener>
<!--2、部署applicationContext的xml文件-->
<!--如果在web.xml中不写任何参数配置信息,默认的路径是"/WEB-INF/applicationContext.xml,
在WEB-INF目录下创建的xml文件的名称必须是applicationContext.xml。
如果是要自定义文件名可以在web.xml里加入contextConfigLocation这个context参数:
在<param-value> </param-value>里指定相应的xml文件名,如果有多个xml文件,可以写在一起并以“,”号分隔。
也可以这样applicationContext-*.xml采用通配符,比如这那个目录下有applicationContext-ibatis-base.xml,
applicationContext-action.xml,applicationContext-ibatis-dao.xml等文件,都会一同被载入。
在ContextLoaderListener中关联了ContextLoader这个类,所以整个加载配置过程由ContextLoader来完成。-->
<context-param>
<param-name>contextConfigLocation</param-name>
<param-value>classpath:applicationContext-common.xml</param-value>
</context-param>
<context-param>
<param-name>log4jConfigLocation</param-name>
<param-value>/WEB-INF/classes/log4j.properties</param-value>
</context-param>
<servlet>
<servlet-name>DispatcherServlet</servlet-name><!--在DispatcherServlet的初始化过程中,框架会在web应用的 WEB-INF文件夹下寻找名为[servlet-name]-servlet.xml 的配置文件,生成文件中定义的bean。-->
<servlet-class>org.springframework.web.servlet.DispatcherServlet</servlet-class>
<!--指明了配置文件的文件名,不使用默认配置文件名,而使用dispatcher-servlet.xml配置文件。-->
<init-param>
<param-name>contextConfigLocation</param-name>
<!--其中<param-value>**.xml</param-value> 这里可以使用多种写法-->
<!--1、不写,使用默认值:/WEB-INF/<servlet-name>-servlet.xml-->
<!--2、<param-value>/WEB-INF/classes/dispatcher-servlet.xml</param-value>-->
<!--3、<param-value>classpath*:dispatcher-servlet.xml</param-value>-->
<!--4、多个值用逗号分隔-->
<param-value>classpath:springmvc-servlet.xml</param-value>
</init-param>
<load-on-startup>1</load-on-startup><!--是启动顺序,让这个Servlet随Servletp容器一起启动。-->
</servlet>
<servlet-mapping>
<!--这个Servlet的名字是dispatcher,可以有多个DispatcherServlet,是通过名字来区分的。每一个DispatcherServlet有自己的WebApplicationContext上下文对象。同时保存的ServletContext中和Request对象中.-->
<!--ApplicationContext是Spring的核心,Context我们通常解释为上下文环境,我想用“容器”来表述它更容易理解一些,ApplicationContext则是“应用的容器”了:P,Spring把Bean放在这个容器中,在需要的时候,用getBean方法取出-->
<servlet-name>DispatcherServlet</servlet-name>
<!--Servlet拦截匹配规则可以自已定义,当映射为@RequestMapping("/user/add")时,为例,拦截哪种URL合适?-->
<!--1、拦截*.do、*.htm, 例如:/user/add.do,这是最传统的方式,最简单也最实用。不会导致静态文件(jpg,js,css)被拦截。-->
<!--2、拦截/,例如:/user/add,可以实现现在很流行的REST风格。很多互联网类型的应用很喜欢这种风格的URL。弊端:会导致静态文件(jpg,js,css)被拦截后不能正常显示。 -->
<url-pattern>/*</url-pattern> <!--会拦截URL中带“/”的请求。-->
</servlet-mapping>
<!-- Spring 刷新Introspector防止内存泄露 -->
<listener>
<listener-class>
org.springframework.web.util.IntrospectorCleanupListener
</listener-class>
</listener>
<welcome-file-list>
<welcome-file>index.jsp</welcome-file>
</welcome-file-list>
</web-app>
applicationContext-common.xml配置
<?xml version="1.0" encoding="UTF-8"?>
<beans xmlns="http://www.springframework.org/schema/beans"
xmlns:xsi="http://www.w3.org/2001/XMLSchema-instance" xmlns:context="http://www.springframework.org/schema/context"
xmlns:aop="http://www.springframework.org/schema/aop" xmlns:tx="http://www.springframework.org/schema/tx"
xmlns:p="http://www.springframework.org/schema/p"
xsi:schemaLocation="http://www.springframework.org/schema/beans
http://www.springframework.org/schema/beans/spring-beans-4.3.xsd
http://www.springframework.org/schema/context
http://www.springframework.org/schema/context/spring-context-4.3.xsd
http://www.springframework.org/schema/aop
http://www.springframework.org/schema/aop/spring-aop-4.3.xsd
http://www.springframework.org/schema/tx
http://www.springframework.org/schema/tx/spring-tx-4.3.xsd">
<!-- 读取配置信息-->
<!-- 自动扫描包 ,将带有注解的类 纳入spring容器管理 -->
<context:component-scan base-package="com.tongxin.controller">
<context:exclude-filter type="annotation" expression="org.springframework.stereotype.Controller"/>
</context:component-scan>
<!-- 引入配置文件 -->
<bean id="propertyConfigurer" class="org.springframework.beans.factory.config.PropertyPlaceholderConfigurer">
<property name="locations">
<list>
<value>classpath:jdbc.properties</value>
<value>classpath:common.properties</value>
</list>
</property>
</bean>
<!-- dataSource 配置 -->
<bean id="dataSource" class="org.apache.commons.dbcp.BasicDataSource">
<!-- 基本属性 url、user、password -->
<property name="url" value="${jdbc.url}"/>
<property name="username" value="${jdbc.username}"/>
<property name="password" value="${jdbc.password}"/>
<!-- 配置监控统计拦截的filters -->
<!-- <property name="filters" value="stat"/> -->
</bean>
<!-- mybatis文件配置,扫描所有mapper文件 -->
<bean id="sqlSessionFactory" class="org.mybatis.spring.SqlSessionFactoryBean">
<property name="dataSource" ref="dataSource"/>
<property name="configLocation" value="classpath:mybatis-config.xml"/>
</bean>
<!-- spring与mybatis整合配置,扫描所有dao -->
<bean class="org.mybatis.spring.mapper.MapperScannerConfigurer"
p:basePackage="com.tongxin.dao"
p:sqlSessionFactoryBeanName="sqlSessionFactory"/>
<!-- 对dataSource 数据源进行事务管理 -->
<bean id="transactionManager" class="org.springframework.jdbc.datasource.DataSourceTransactionManager"
p:dataSource-ref="dataSource"/>
<!-- 事务管理 通知 -->
<tx:advice id="txAdvice" transaction-manager="transactionManager">
<tx:attributes>
<!-- 对insert,update,delete 开头的方法进行事务管理,只要有异常就回滚 -->
<tx:method name="insert*" propagation="REQUIRED" rollback-for="java.lang.Throwable"/>
<tx:method name="update*" propagation="REQUIRED" rollback-for="java.lang.Throwable"/>
<tx:method name="delete*" propagation="REQUIRED" rollback-for="java.lang.Throwable"/>
<tx:method name="del*" propagation="REQUIRED" rollback-for="java.lang.Throwable"/>
<tx:method name="create*" propagation="REQUIRED" rollback-for="java.lang.Throwable"/>
<tx:method name="save*" propagation="REQUIRED" rollback-for="java.lang.Throwable"/>
<tx:method name="add*" propagation="REQUIRED" rollback-for="java.lang.Throwable"/>
<tx:method name="edit*" propagation="REQUIRED" rollback-for="java.lang.Throwable"/>
<!-- select,count开头的方法,开启只读,提高数据库访问性能 -->
<tx:method name="find*" read-only="true"/>
<tx:method name="select*" read-only="true"/>
<tx:method name="count*" read-only="true"/>
<!-- 对其他方法 使用默认的事务管理 -->
<tx:method name="*"/>
</tx:attributes>
</tx:advice>
<!-- 事务 aop 配置 -->
<aop:config>
<aop:pointcut id="serviceMethods" expression="execution(* com.tongxin.service..*(..))"/>
<aop:advisor advice-ref="txAdvice" pointcut-ref="serviceMethods"/>
</aop:config>
<!-- 配置使Spring采用CGLIB代理 -->
<aop:aspectj-autoproxy proxy-target-class="true"/>
<!-- 启用对事务注解的支持 -->
<tx:annotation-driven transaction-manager="transactionManager"/>
</beans>
springmvc-servlet.xml配置
<?xml version="1.0" encoding="UTF-8"?>
<beans xmlns="http://www.springframework.org/schema/beans"
xmlns:xsi="http://www.w3.org/2001/XMLSchema-instance" xmlns:context="http://www.springframework.org/schema/context"
xmlns:aop="http://www.springframework.org/schema/aop" xmlns:tx="http://www.springframework.org/schema/tx"
xsi:schemaLocation="http://www.springframework.org/schema/beans
http://www.springframework.org/schema/beans/spring-beans-4.3.xsd
http://www.springframework.org/schema/context
http://www.springframework.org/schema/context/spring-context-4.3.xsd
http://www.springframework.org/schema/aop
http://www.springframework.org/schema/aop/spring-aop-4.3.xsd
http://www.springframework.org/schema/tx
http://www.springframework.org/schema/tx/spring-tx-4.3.xsd">
<!-- 加载配置属性文件 -->
<context:property-placeholder ignore-unresolvable="true" location="classpath:common.properties"/>
<!-- 扫描controller(controller层注入) -->
<context:component-scan base-package="com.tongxin.controller"/>
<!-- REST中根据URL后缀自动判定Content-Type及相应的View -->
<bean id="contentNegotiationManager" class="org.springframework.web.accept.ContentNegotiationManagerFactoryBean">
<property name="mediaTypes">
<map>
<entry key="xml" value="application/xml"/>
<entry key="json" value="application/json"/>
</map>
</property>
<property name="ignoreAcceptHeader" value="true"/>
<property name="favorPathExtension" value="true"/>
</bean>
<bean class="org.springframework.web.servlet.view.InternalResourceViewResolver">
<!-- 配置jsp路径的前缀 -->
<property name="prefix" value="/"/>
<!-- 配置jsp路径的后缀 -->
<property name="suffix" value=".jsp"/>
</bean>
<!-- 用于将对象转换为json -->
<bean id="stringConverter" class="org.springframework.http.converter.StringHttpMessageConverter">
<property name="supportedMediaTypes">
<list>
<value>text/plain;charset=UTF-8</value>
</list>
</property>
</bean>
<bean class="org.springframework.web.servlet.mvc.method.annotation.RequestMappingHandlerMapping"/>
<bean class="org.springframework.web.servlet.mvc.method.annotation.RequestMappingHandlerAdapter">
<property name="messageConverters">
<list>
<bean class="org.springframework.http.converter.json.MappingJackson2HttpMessageConverter" />
</list>
</property>
</bean>
</beans>
mybatis-config.xml配置
<?xml version="1.0" encoding="UTF-8"?>
<!DOCTYPE configuration PUBLIC "-//mybatis.org//DTD Config 3.0//EN" "http://mybatis.org/dtd/mybatis-3-config.dtd">
<configuration>
<!-- 全局参数 -->
<settings>
<!-- 使全局的映射器启用或禁用缓存。 -->
<setting name="cacheEnabled" value="true"/>
<!-- 全局启用或禁用延迟加载。当禁用时,所有关联对象都会即时加载。 -->
<setting name="lazyLoadingEnabled" value="true"/>
<!-- 当启用时,有延迟加载属性的对象在被调用时将会完全加载任意属性。否则,每种属性将会按需要加载。 -->
<setting name="aggressiveLazyLoading" value="true"/>
<!-- 设置但JDBC类型为空时,某些驱动程序 要指定值,default:OTHER,插入空值时不需要指定类型 -->
<setting name="jdbcTypeForNull" value="NULL"/>
</settings>
<!--<!– 类型别名 –>-->
<!--<typeAliases>-->
<!--<typeAlias alias="Page" type="com.thinkgem.jeesite.common.persistence.Page" /><!–分页 –>-->
<!--</typeAliases>-->
<!-- -->
<!--<!– 插件配置 –>-->
<!--<plugins>-->
<!--<plugin interceptor="com.thinkgem.jeesite.common.persistence.interceptor.PaginationInterceptor" />-->
<!--</plugins>-->
</configuration>
jdbc.properties配置
jdbc.driver=com.mysql.jdbc.Driver
jdbc.url=jdbc\:mysql\://127.0.0.1\:3306/test?useUnicode\=true&characterEncoding\=UTF-8&autoReconnect\=true&useSSL\=false
jdbc.username=root
jdbc.password=1234
log4j.properties配置
#
# Log4J Settings for log4j 1.2.x (via jakarta-commons-logging)
#
# The five logging levels used by Log are (in order):
#
# 1. DEBUG (the least serious)
# 2. INFO
# 3. WARN
# 4. ERROR
# 5. FATAL (the most serious)
# Set root logger level to WARN and append to stdout
log4j.rootLogger=debug, stdout
log4j.appender.stdout=org.apache.log4j.ConsoleAppender
log4j.appender.stdout.layout=org.apache.log4j.PatternLayout
# Pattern to output the caller's file name and line number.
log4j.appender.stdout.layout.ConversionPattern=%d %5p (%c:%L) - %m%n
# Print only messages of level ERROR or above in the package noModule.
#log4j.logger.noModule=FATAL
# OpenSymphony Stuff
log4j.logger.com.opensymphony=error
log4j.logger.org.apache.struts2=error
# Spring Stuff
log4j.logger.org.springframework=debug
# debug Ibatis SQL statements
log4j.logger.com.ibatis=debug
log4j.logger.com.ibatis.common.jdbc.SimpleDataSource=debug
log4j.logger.com.ibatis.common.jdbc.ScriptRunner=debug
log4j.logger.com.ibatis.sqlmap.engine.impl.SqlMapClientDelegate=debug
log4j.logger.java.sql.Connection=debug
log4j.logger.java.sql.Statement=debug
log4j.logger.java.sql.PreparedStatement=debug


 7921
7921

 被折叠的 条评论
为什么被折叠?
被折叠的 条评论
为什么被折叠?
 到【灌水乐园】发言


