


最近业余研究一下linux内核,正好看到网易公开课里有讲的,就直接去找了一个作业学习一下。本文基于linux-3.18.6内核,简单分析init进程的创建,调试中采用了公开课的根文件系统映像https://github.com/mengning/menu.git 。初涉linux内核,不对地方多多指正。
环境搭建
先编译内核
make ARCH=i386 menuconfig
选择kernel hacking—>
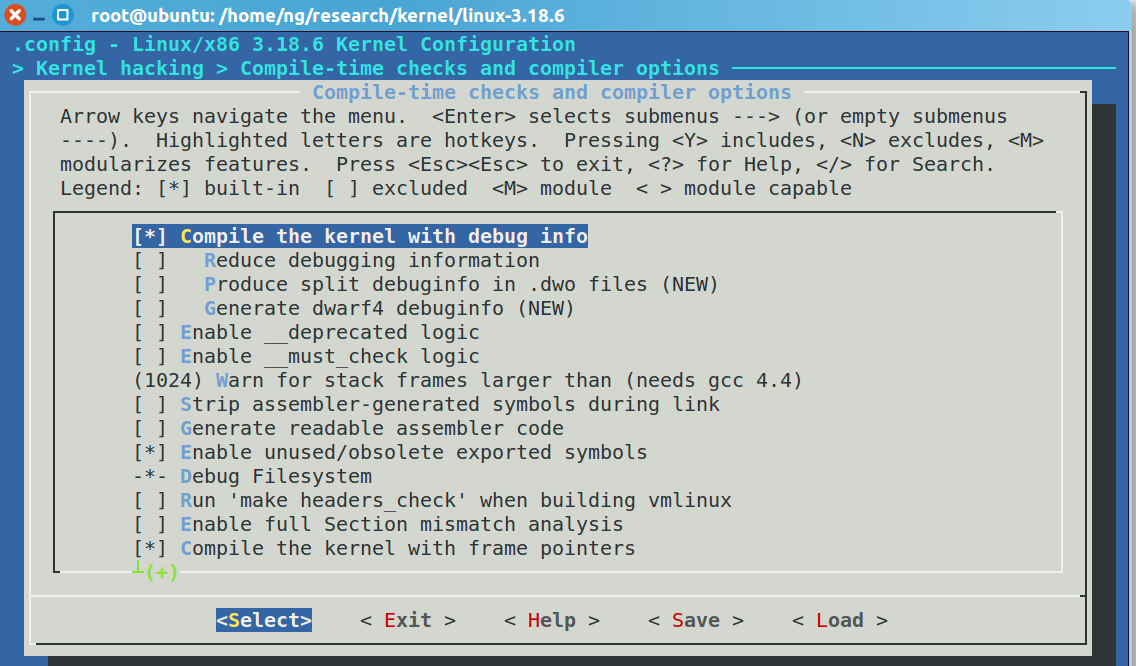
compile the kernel with debug info
make ARCH=i386这里我编译32位内核,所以设置了ARCH=i386。因为主机64位系统,默认出来的是64位内核,gdb连接qemu的时候会出一个错误,查了一些资料,据说要改gdb源码,就直接32位了。加入debug info信息,见下图。
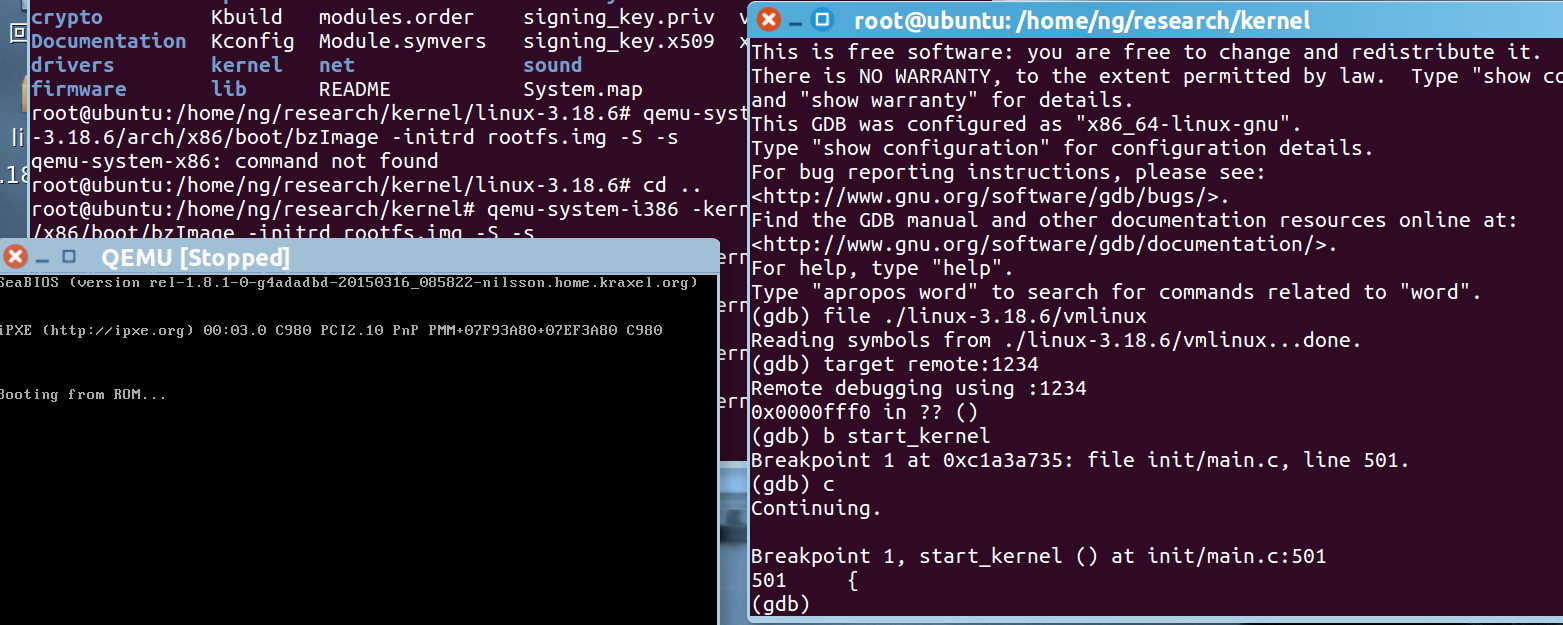
编译好之后,用qemu加载该内核,并将刚才提到的menu编译打包后作为根文件系统。这里也可以用qemu的映像,下载地址
http://wiki.qemu.org/download/linux-0.2.img.bz2
qemu-system-x86 -kernel linux-3.18.6/arch/x86/boot/bzImage -initrd rootfs.img -S -s在另一个终端里,启动gdb后,命令如下
file ./linux-3.18.6/vmlinux
target remote:1234
下断点
c
然后就会直接断下来,我这里断在了start_kernel上,如下图。
这样环境搭建完成,可以调试了。
分析
start_kernel函数调用了一系列初始化函数,最后会调用一个rest_init函数
static noinline void __init_refok rest_init(void)
 394{
 395        int pid;
 396
 397        rcu_scheduler_starting();
 398        /*
 399         * We need to spawn init first so that it obtains pid 1, however
 400         * the init task will end up wanting to create kthreads, which, if
 401         * we schedule it before we create kthreadd, will OOPS.
 402         */
 403        kernel_thread(kernel_init, NULL, CLONE_FS);
 404        numa_default_policy();
 405        pid = kernel_thread(kthreadd, NULL, CLONE_FS | CLONE_FILES);
 406        rcu_read_lock();
 407        kthreadd_task = find_task_by_pid_ns(pid, &init_pid_ns);
 408        rcu_read_unlock();
 409        complete(&kthreadd_done);
 410
 411        /*
 412         * The boot idle thread must execute schedule()
 413         * at least once to get things moving:
 414         */
 415        init_idle_bootup_task(current);
 416        schedule_preempt_disabled();
 417        /* Call into cpu_idle with preempt disabled */
 418        cpu_startup_entry(CPUHP_ONLINE);
 419}
调用了一个kernel_thread函数,创建一个新线程,执行kernel_init函数
static int __ref kernel_init(void *unused)
931{
932 int ret;
933
934 kernel_init_freeable();
935 /* need to finish all async __init code before freeing the memory */
936 async_synchronize_full();
937 free_initmem();
938 mark_rodata_ro();
939 system_state = SYSTEM_RUNNING;
940 numa_default_policy();
941
942 flush_delayed_fput();
943
944 if (ramdisk_execute_command) {
945 ret = run_init_process(ramdisk_execute_command);
946 if (!ret)
947 return 0;
948 pr_err("Failed to execute %s (error %d)\n",
949 ramdisk_execute_command, ret);
950 }
951
952 /*
953 * We try each of these until one succeeds.
954 *
955 * The Bourne shell can be used instead of init if we are
956 * trying to recover a really broken machine.
957 */
958 if (execute_command) {
959 ret = run_init_process(execute_command);
960 if (!ret)
961 return 0;
962 pr_err("Failed to execute %s (error %d). Attempting defaults...\n",
963 execute_command, ret);
964 }
965 if (!try_to_run_init_process("/sbin/init") ||
966 !try_to_run_init_process("/etc/init") ||
967 !try_to_run_init_process("/bin/init") ||
968 !try_to_run_init_process("/bin/sh"))
969 return 0;
970
971 panic("No working init found. Try passing init= option to kernel. "
972 "See Linux Documentation/init.txt for guidance.");
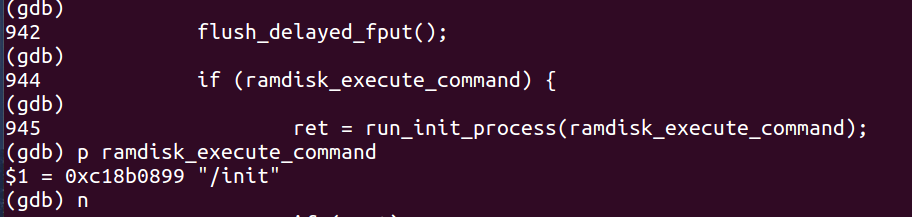
973}这里会调用一个关键的函数run_init_process ,该函数启动用户态进程init,即linux系统中pid=1的进程。具体run_init_process函数的分析,后面再加入。
在我调试的环境里,rootfs里没有/sbin/init之类的文件,但是在调试的时候,发现ramdisk_execute_command保存着根目录下的init路径,如下图所示
当没有指定init路径时,就会在965至967行的代码所示的几个位置寻找init。当着三个位置都无法找到时,按照一篇文章的说法,会试图建立一个交互的shell(/bin/sh)来代替,希望root用户可以修复这种错误并重新启动机器。
最后回到rest_init函数中,进入cpu_startup_entry函数,进入cpu_idle_loop函数中。init_task最终成为idle进程。还有一个是关于init_task的初始化,后续还需要研究一下。
总结整个过程,init_task进程由内核静态分配,然后初始化,之后创建并启动init用户态进程,最后init_task进入idle_loop。
总结
总体分析的比较粗糙,很多细节没有深入追究,后面需要慢慢补充上来。


 619
619

 被折叠的 条评论
为什么被折叠?
被折叠的 条评论
为什么被折叠?
 到【灌水乐园】发言


