遇到一个沙雕的产品(还是另外一个部门的领导),三天能写完的前端写了一个月,刚开始的需求能用就行,不需要ui,自己看着设计就行,到后来各种需求各种有,项目经理沟通n次,多次反悔,受到了前端、后台、项目经理、UI的diss,最后让UI做了个效果图,争取今天中午跟沙雕说拜拜。
项目主要技术是vue2+element-ui,后台是python+mongodb,再次总结一下vue2+element-ui的使用方法,让新人少踩些坑(当然我也是菜鸟)。
一、vue2+element-ui基本使用
1. 搭建环境
- 安装nodejs
- 安装cnpm和配置阿里镜像(这一步可以跳过,只是为了加快下载速度)
- 全局安装vue-cli,即cnpm i vue-cli -g
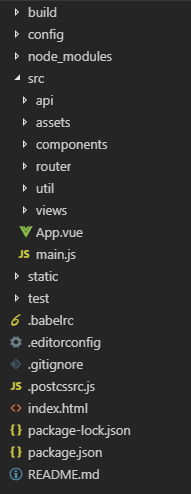
- 用vue-cli 创建一个项目,即vue init webpack demo(demo是我项目文件夹),期间选择需要的依赖,我只用了vue-router,创建完之后大概长这样。

2. 安装element-ui
2.1 进入项目文件夹,cnpm i element-ui -S 等待安装完成
2.2 找到项目文件夹下main.js ,增加三行代码,如下:
// The Vue build version to load with the `import` command
// (runtime-only or standalone) has been set in webpack.base.conf with an alias.
import Vue from 'vue'
import App from './App'
import router from './router'

// 这三行是增加的
import ElementUI from 'element-ui'
import 'element-ui/lib/theme-chalk/index.css'
Vue.use(ElementUI)

Vue.config.productionTip = false

/* eslint-disable no-new */
new Vue({
  el: '#app',
  router,
  components: { App },
  template: '<App/>'
})
2.3 具体element-ui咋用看文档吧,文档说的很详细:https://element.eleme.cn/#/zh-CN/component/button
二、vue2 路由和传值实现
1. 路由注册
每个路由都要进行注册,在项目文件夹下src/router/index.js里边进行注册,哪个vue叫啥名字,这个vue对应的url是多少。
另外:@表示src文件夹
2.路由跳转和传值
2.1 常规跳转,这个path就是注册时对应的path
this.$router.push({
   path: "/index"
});
2.2 带参数,并把参数放到URL后边,类似于get方式
this.$router.push({
    path: '/editCardetail',
    query: {
	    id: 10
    }
})
2.3 带参数,不把参数放URL后边,类似于POST方式,这里的name就是注册时的name
this.$router.push({
    name: "MatchDetail",
    params: {
      info: info
    }
});
三、vue2 如何发送http请求
注意: 不要用vue-resource,用axios!!
官方文档:http://www.axios-js.com/zh-cn/docs/
1. 安装axios
cnpm install --save axios
2. 封装一下(看个人喜好)
request.js 仅提供思路和框架,不提供代码本身
import axios from "axios"
import {
  baseURL
} from "./../assets/js/POJO"

// 创建axios实例
const service = axios.create({
  baseURL: baseURL, // api 的 base_url
  timeout: 1200000 // 请求超时时间
})

service.interceptors.request.use(
  config => {
    config.headers['Authorization'] = "JWT " + sessionStorage.getItem("token")
    config.headers['Content-Type'] = 'application/json'
    return config
  },
  error => {
    console.log(error) // for debug
    Promise.reject(error)
  }
)

export default service
3. 在具体的业务封装一下请求
import request from "./request"

 function getCompaniesByUsername(username) {
  return request({
    url: "/sign-up/companys",
    method: "get",
    params: {
      flt_username_equals: username
    }
  })
}

 function addCompany(data) {
  return request({
    url: "/sign-up/companys",
    method: "post",
    data: data
  })
}

 function updateCompany(data) {
  return request({
    url: "/sign-up/companys",
    method: "put",
    data: data
  })
}

 function removeCompany(id) {
  return request({
    url: "/sign-up/companys",
    method: "delete",
    params: {
      id: id
    }
  })
}

function getCompanyByUserAndCompanyName(username, deviceName) {
  return request({
    url: "/sign-up/companys",
    method: "get",
    params: {
      flt_username_equals: username,
      flt_name_equals: deviceName
    }
  })
}

const companyService = {};
companyService.addCompany = addCompany;
companyService.getCompaniesByUsername = getCompaniesByUsername;
companyService.updateCompany = updateCompany;
companyService.removeCompany = removeCompany;
companyService.getCompanyByUserAndCompanyName = getCompanyByUserAndCompanyName;
export default companyService
4. 应用
仅粘贴部分代码
 add() {
      let that = this;
      let companyIsValid = that.company.isValid();
      if (companyIsValid) {
        // 要提交到后台的数据,只有四项基本信息
        let company = that.company;
        // 上传到后台
        let data = {
          name: company.name,
          shortName: company.shortName,
          address: company.address,
          introduction: company.introduction
        };
        companyService
          .addCompany(data)
          .then(function(res) {
            if (res.data.code == 201) {
              that.$parent.$alert("添加成功", "提示");
              that.$parent.getAllCompanies();
              that.reset();
            } else {
              this.$alert("添加失败", "提示");
            }
          })
          .catch(function(error) {
            console.log(error);
          });
      } else {
        this.$alert("请补全所有必填信息后提交", "提示");
        return;
      }
    }
四、怎么写组件
看一个效果图


 这种能复用的东西就适合做成组件,比如这个弹出框,增加和修改都是同样的参数,只是提交的方法不一样。下面简单介绍一下组件怎么写。
1. 先写组件(就是要复用的那块结构)
compform.vue,值得注意的是,组件自己的东西写到data里边,一些控制信息写道props里边,回显的时候让父组件给子组件传值(传值方法很多,这里介绍我用的那种方法)
<template>
  <div>
    <el-dialog :title="isAdd ? '新增公司' : '编辑公司'" :visible.sync="dialog">
      <el-form ref="company" :model="company" :rules="company_rules" label-width="100px">
        <el-form-item label="公司名称" prop="name">
          <el-input size="small" v-model="company.name" :disabled="disabledName" placeholder="请输入公司名称"></el-input>
        </el-form-item>
        <el-form-item label="公司简称" prop="shortName">
          <el-input size="small" v-model="company.shortName" placeholder="请输入公司简称"></el-input>
        </el-form-item>
        <el-form-item label="公司地址" prop="address">
          <el-input size="small" v-model="company.address" placeholder="请输入公司地址"></el-input>
        </el-form-item>
        <el-form-item label="公司介绍" prop="introduction">
          <el-input rows="4" type="textarea" v-model="company.introduction" placeholder="请输入公司介绍"></el-input>
        </el-form-item>
      </el-form>
      <div slot="footer" class="dialog-footer">
        <el-button class="update-btn" type="primary" @click="doSubmit">提交</el-button>
        <el-button class="update-btn" @click="cancel">取消</el-button>
      </div>
    </el-dialog>
  </div>
</template>
<script>
import deviceService from "./../../api/device";
import teamService from "./../../api/team";
import companyService from "./../../api/company";
import {
  Device,
  Photo,
  Team,
  Company,
  Competitor,
  baseURL,
  PassiveRadarDev,
  OptoelecDev,
  TDOADev,
  RadarDev
} from "./../../assets/js/POJO";
import util from "./../../util/util";
export default {
  props: {
    isAdd: {
      type: Boolean,
      required: true
    }
  },
  data() {
    return {
      disabledName:true,
      company: new Company(),
      company_rules: {
        name: [{ required: true, message: "请输入公司名称", trigger: "blur" }],
        shortName: [
          { required: true, message: "请输入公司简称", trigger: "blur" }
        ],
        address: [
          { required: true, message: "请输入公司地址", trigger: "blur" }
        ],
        introduction: [
          { required: true, message: "请输入公司介绍", trigger: "blur" }
        ]
      },
      dialog: false
    };
  },
  methods: {
    cancel() {
      this.reset();
    },
    reset() {
      this.dialog = false;
      this.$refs.company.clearValidate();
      this.company = new Company();
    },
    doSubmit() {
      if (this.isAdd) {
        this.add();
      } else {
        this.update();
      }
    },
    add() {
      let that = this;
      let companyIsValid = that.company.isValid();
      if (companyIsValid) {
        // 要提交到后台的数据,只有四项基本信息
        let company = that.company;
        // 上传到后台
        let data = {
          name: company.name,
          shortName: company.shortName,
          address: company.address,
          introduction: company.introduction
        };
        companyService
          .addCompany(data)
          .then(function(res) {
            if (res.data.code == 201) {
// 获取父组件指针,执行父组件方法
              that.$parent.$alert("添加成功", "提示");
              that.$parent.getAllCompanies();
              that.reset();
            } else {
              this.$alert("添加失败", "提示");
            }
          })
          .catch(function(error) {
            console.log(error);
          });
      } else {
        this.$alert("请补全所有必填信息后提交", "提示");
        return;
      }
    },
    update() {
      let that = this;
      companyService.updateCompany(that.company).then(res => {
        that.$parent.$alert("修改成功", "提示");
        that.$parent.getAllCompanies();
        that.reset();
      });
    }
  }
};
</script>
2. 写父组件,并引用子组件(刚才写的有复用功能的组件)
<template>
  <div>
    <Header></Header>
    <div class="content-box">
      <!-- 参赛人员信息 -->
      <div class="content">
        <Title title="公司信息汇总">
          <el-button type="primary" @click="toAdd">添加</el-button>
        </Title>
        <el-table
          :data="companies"
          :header-cell-style="getRowClass"
          stripe
          border
          style="width: 100%"
        >
          <el-table-column prop="name" label="公司名称"></el-table-column>
          <el-table-column prop="shortName" label="公司简称"></el-table-column>
          <el-table-column prop="address" label="公司地址"></el-table-column>
          <el-table-column prop="introduction" label="公司介绍"></el-table-column>
          <el-table-column fixed="right" label="操作">
            <template slot-scope="scope">
              <el-button
                icon="el-icon-edit"
                circle
                @click.native.prevent="toUpdate(scope.row)"
                type="primary"
                size="small"
              ></el-button>
              <el-button
                icon="el-icon-delete"
                circle
                @click.native.prevent="removeCompany(scope.$index)"
                type="primary"
                size="small"
              ></el-button>
            </template>
          </el-table-column>
        </el-table>
      </div>
    </div>
    <compForm ref="compform" :is-add="isAdd"></compForm>
  </div>
</template>
<style scoped>
</style>
<script>
import Title from "@/components/Title";
import Header from "@/components/Header";
import "element-ui/lib/theme-chalk/index.css";
import "./../assets/css/index.css";
import axios from "axios";
import { fail } from "assert";
import { Company, baseURL } from "./../assets/js/POJO";
import compForm from "./module/compform";

export default {
  data() {
    return {
      isAdd: true,
      companySet: new Set(),
      URL: baseURL,
      companies: [],
      // 要添加的公司对象
      company: new Company()
    };
  },
  mounted() {
    this.getAllInfos();
    this.getAllCompanies();
  },
  methods: {
    toAdd() {
      this.isAdd = true;
    // 这里获取到了子组件,要传值可以直接通过这个指针
      const _this = this.$refs.compform;
      _this.company = new Company();
      _this.dialog = true;
      _this.disabledName = false;
    },
    toUpdate(row) {
      this.isAdd = false;
// 这里获取到了子组件,要传值可以直接通过这个指针
      const _this = this.$refs.compform;
      _this.dialog = true;
      _this.company = row;
       _this.disabledName = true;
    },
    getAllInfos() {

    },
    // 设置表头背景色
    getRowClass({ row, column, rowIndex, columnIndex }) {
      if (rowIndex === 0) {
        return "background: rgba(213,213,213,0.24)";
      }
    },
    // 删除公司
    removeCompany(index) {

    }
  },
  components: {
    Header,
    Title,
    compForm
  }
};
</script>
父组件向子组件通信核心代码:const _this = this.refs.xxx
子组件向父组件通信核心代码:this.$parent.xxx
五、一些其它的坑
- 一些表单验证、label、必填选填等等的东西,el-form组件里有现成的。
- 可多选的表格回显的时候,要用Object类型判断!
- 表格右侧操作按钮,可以通过scope.row获取当前行的对象!详细看文档。
- el-input可以自定义模板,可以做成百度搜索输入栏那样的。
- menu组件要实现根据router跳转,要在menu属性添加default-active="$route.path",在menu-item的index属性输入router的path。
- 父子组件通信的时候尽量避免修改同一个props中的变量,会有警告,很长。
- table中el-table-column指定formatter属性可以格式化,这个可以处理时间、布尔值、数组等等
- table中添加<el-table-column type="selection" width="55"></el-table-column>可以实现多选功能
- 可以实现多选功能的table多选框回显的时候,回显函数要写到this.$nextTick(()=>{})里边


 594
594


 被折叠的 条评论
为什么被折叠?


